Leather belts are a classic, stylish accessory that can add charm to any outfit. However, with regular use, belts may suffer from scuffs, scratches, and even cracks. Luckily, repairing them with glue is a simple and affordable solution. But what kind of glue should you use? There are various types of glues available in the market, each with its own strength and weakness. In this guide, we will discuss the best types of glue for leather belts and factors to consider when selecting one. Additionally, we’ll provide step-by-step instructions on how to repair your leather belts effectively. So, roll up your sleeves, grab your glue, and let’s get started!
Types of Glue for Leather Belts
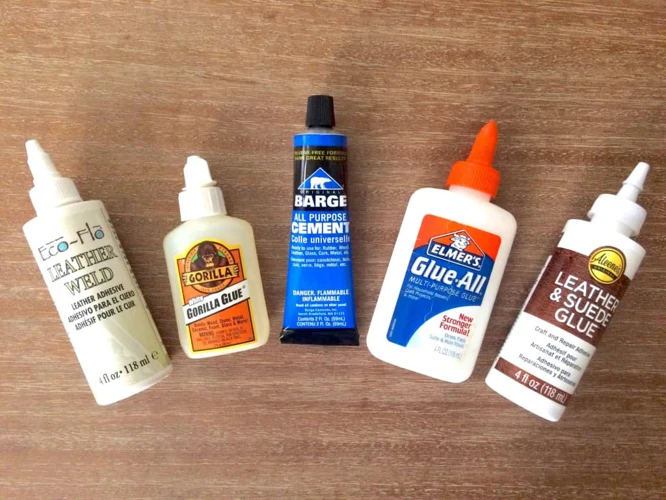
If your leather belt has sustained damage or if a part of it has come loose, you’ll need to apply an adhesive to fix it. Various types of glue can be used for repairing leather belts – but which one is the right one for your particular case? In this section, we’ll discuss some of the most common and effective glues that you can use on your leather belt. Using the appropriate glue is essential to ensure that your belt stays firmly together and looks as good as new.
1. Super Glue
Super glue, also known as cyanoacrylate glue, is one of the most common types of glue used for leather belts. It is a fast-drying adhesive that creates a strong bond between leather surfaces. Super glue comes in different viscosities, which makes it ideal for filling gaps or cracks in your leather belt.
Here is a table comparing the advantages and disadvantages of using super glue for leather belt repair:
| Advantages | Disadvantages |
|---|---|
| Fast-drying, creates a strong bond | Not flexible; can crack if the belt is bent or twisted |
| Fills gaps and cracks in the leather | Can be difficult to remove if excess glue gets on the leather |
| Works well on small leather patches or pieces | Not recommended for large areas of damage |
When using super glue, it is important to apply only a small amount to avoid excess glue on the leather. Additionally, super glue is not flexible, so it may crack if the belt is bent or twisted. If you are repairing a large area of damage, it may be better to use a different type of glue that can bond to larger surfaces.
If you do accidentally get excess super glue on the leather, you can try removing it with acetone or nail polish remover. However, this may also remove the color from the leather, so be careful when applying these products.
Pro tip: If you need to glue a small accessory to your leather belt, like a buckle or bead, you can use a toothpick to apply the super glue precisely to the spot where you need it.
If you want to learn how to glue leather shoes, check out our article on how to glue shoes.
2. Contact Cement
Contact cement is a popular choice for bonding leather belts due to its strong, permanent hold. This type of adhesive works by applying a layer of glue to both surfaces to be bonded, allowing it to partially dry, and then pressing them together. Contact cement is great for surfaces that may expand or contract due to temperature changes, and it remains flexible, making it a top choice for leather belts.
One of the most significant advantages of using contact cement for leather belts is its strength. When two surfaces bonded with contact cement come into contact, they form an incredibly strong and permanent bond. Plus, contact cement dries quickly, usually in 15-20 minutes, depending on the temperature and humidity level.
Another significant advantage of using contact cement for leather belts is its ability to provide a waterproof seal, which is particularly useful for belts since they are often exposed to moisture, sweat, and other elements. Additionally, contact cement can handle heavy usage and is resistant to solvents, heat, and chemicals. This glue is also available in both solvent-based and water-based formulas.
When applying contact cement, it is essential to work in a well-ventilated area and to wear gloves to avoid getting the glue on your hands. Use a brush or applicator to apply a thin layer of glue to both surfaces to be bonded. Be sure to let the glue partially dry to a “tacky” consistency before joining the surfaces together. Once the surfaces touch each other, they can not be repositioned.
Here are the pros and cons of using contact cement for leather belts:
| Pros | Cons |
|---|---|
| Provides a strong, permanent bond | Difficult to reposition surfaces once joined together |
| Dries quickly | Can emit strong fumes, requiring proper ventilation |
| Remains flexible and can handle heavy usage | May require gloves and protective eyewear when applying |
| Waterproof and resistant to solvents, heat, and chemicals |
Whether you need to repair a broken belt or modify one you already have, contact cement is an excellent choice for a leather bonding adhesive. For more information on how to glue leather, check out our article on how to glue leather.
3. Epoxy
Epoxy is another type of adhesive that is suitable for repairing leather belts. It is a two-part adhesive that consists of an epoxy resin and a hardener. When mixed together, it creates a strong and durable bond that can withstand heavy loads, making it ideal for leather belts that need a strong adhesive.
Advantages of Epoxy:
- Epoxy creates a very strong and durable bond that can withstand heavy loads.
- It can be used on a variety of surfaces such as metal, wood, and plastic as well as leather.
- Epoxy dries clear, making it ideal for leather belts that don’t have a uniform color.
- It is waterproof and heat resistant, which means it can withstand exposure to water and heat without losing its hold or becoming brittle.
Disadvantages of Epoxy:
- It takes longer to dry than other types of adhesives, with an average drying time of 24 hours.
- Epoxy can be messy to work with, and it requires careful mixing of the two components to achieve the best results.
If you decide to use epoxy to repair your leather belt, make sure you prepare the surface properly before applying the adhesive. Clean the area thoroughly with rubbing alcohol or a leather cleaner, and ensure that it is completely dry before applying the epoxy. Mix the two components in equal parts and apply the mixture to the damaged area of the belt. Clamp the belt in place to ensure a strong bond, and leave it to dry for at least 24 hours.
Internal Link: For more information on how to use glue to repair shoes, visit how to glue converse shoes.
4. Leather Glue
Leather glue is a specialized adhesive that is designed to bond leather materials, making it an ideal choice for repairing leather belts. This type of glue has a strong and flexible hold that allows it to work well on leather, one of the toughest materials to adhere to. There are different types of leather glue available on the market; some are water-based, while others are solvent-based.
One of the top advantages of using leather glue is its excellent bonding properties, which can create a bond that is stronger than the leather itself. It dries clear and is perfect for concealed repairs. Leather glue is also designed to remain flexible and won’t crack or break over time, so it’s perfect for use on belts that need to withstand constant motion and pressure.
When using leather glue, it’s essential to select the right type of glue. Some glues are only suitable for certain types of leather, so it’s important to read the manufacturer’s instructions carefully before beginning the repair. It’s recommended to use a high-quality leather glue that is designed specifically for belts, ensuring that it will provide a strong and long-lasting hold.
Leather glue is easy to apply. One of the easiest methods is using a small brush to apply the glue to the area that needs repair. After application, the glue should be left to dry for several hours before continuing to the next step.
Using leather glue is an excellent option for repairing leather belts. It’s strong, durable, and flexible, making it ideal for use on belts that see regular wear and tear. When selecting a leather glue, be sure to choose a high-quality product designed specifically for belts to ensure the best results.
5. Fabric Glue
When you think of fabric glue, you might not immediately think of it as an option for leather belts. However, there are certain types of fabric glue that can work well for this task. Fabric glue can be a good choice for small repairs or for people who have concerns about working with strong-smelling adhesives.
Pros: Fabric glue is easy to work with, dries clear, and doesn’t have a strong odor. It can also be a good option if you need to glue different types of materials together.
Cons: In terms of strength, fabric glue is not as durable as some of the other options on this list. It may not hold up as well over time, especially if the belt is subject to a lot of wear and tear.
| Brand | Strength | Flexibility | Drying Time | Color | Waterproof |
|---|---|---|---|---|---|
| Aleene’s Original Tacky Glue | Medium | Flexible | 24 hours | Dries clear | No |
| Gorilla Super Glue Fabric | Strong | Flexible | 10-45 seconds | Dries white | No |
| Unique Stitch Fabric Glue | Medium | Flexible | 24 hours | Dries clear | No |
It’s also worth noting that not all fabric glues are created equal. Some are stronger than others and may be more suitable for use on leather. The table above lists a few examples of fabric glues that you might consider using on your leather belt.
If you decide to use fabric glue to repair your belt, you’ll want to follow the same general steps as with the other types of glue. Be sure to clean the area well, apply the glue, clamp the belt, and let it dry thoroughly.
While fabric glue may not be the strongest option for leather belt repairs, it can be a good choice for small, less-critical repairs or for those who prefer an easier-to-work-with adhesive. If you’re not sure which glue to use, experimenting with a few different types can help you determine which one works best for your specific needs.
Internal link: If you want to learn more about shoe glue, check out our article on what shoe glue is made of.
Factors to Consider When Choosing Glue
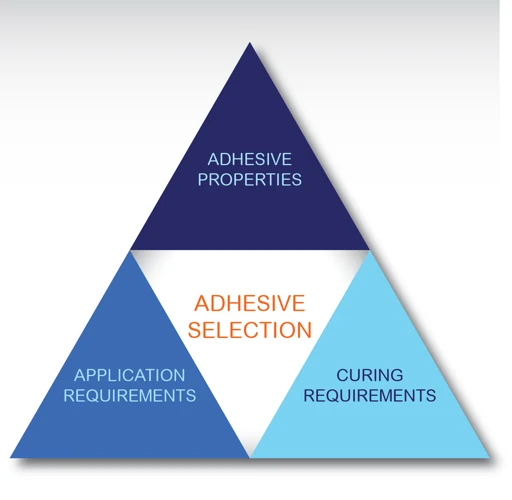
When it comes to repairing a leather belt, choosing the right glue is essential. But with so many types of glue for leather belts on the market, it can be overwhelming to choose the best one for your needs. In this section, we’ll explore the factors to consider when selecting a glue for your leather belt repair project. Understanding these factors will help you make an informed decision and achieve the best result with your repair. So, let’s dive in and take a closer look at what you need to consider.
1. Strength
When it comes to repairing a leather belt, strength is one of the most important factors to consider when choosing a glue. It determines how well the glue will hold the leather together, especially if you plan on wearing the belt frequently. Here are some of the strongest glues for repairing leather belts:
- Super Glue: Also known as cyanoacrylate glue, it is a type of fast-drying adhesive that creates a strong bond on leather. It is best used for small tears or holes on the belt, but be careful not to use too much as it can cause the leather to become hard and brittle.
- Contact Cement: This is a popular choice for belt repair as it creates an incredibly strong bond. It is waterproof and heat resistant, making it ideal for use on leather belts that may be exposed to harsh environmental conditions.
- Epoxy: Epoxy is a two-part adhesive that creates a very strong bond between the leather surfaces. It can take a bit longer to dry, but once it does, the bond is very strong and durable.
- Leather Glue: This is a special type of adhesive that is specifically designed for use on leather. It creates a flexible bond that can withstand the wear and tear of a belt, making it an ideal choice for long-term repairs.
- Fabric Glue: While not as strong as the other types of glue mentioned here, fabric glue is still a good choice for small repairs on leather belts that are not exposed to harsh environmental conditions. It is easy to use and dries clear, making it a good option for belts with lighter colors.
When choosing a glue for your leather belt, it’s important to consider the strength of the adhesive to ensure that it will hold up over time. A strong bond will prevent the need for constant reapplication of glue and will help keep your belt looking like new for longer. To learn more about how to glue other items, such as a Beats headband or Crocs, check out our other guides on gluing a Beats headband and gluing Crocs.
2. Flexibility
One important factor to consider when choosing the best glue for your leather belt is flexibility. Since leather is a flexible material, you need to choose a glue that can withstand the rigors of daily wear and tear. Not all glues are suitable for use on leather belts and some may crack or become brittle over time.
To ensure that your leather belt stays in good condition, it is important to choose a flexible glue that can withstand the bending, stretching, and twisting motions that the belt will go through when in use. A good glue that provides flexibility to leather without breaking down is contact cement.
Here’s a quick comparison of the flexibility of the top five glues for leather belts:
| Glue Type | Flexibility |
|---|---|
| Super Glue | Poor – Becomes brittle over time |
| Contact Cement | Excellent – Provides a flexible bond |
| Epoxy | Fair – Can be brittle and likely to crack |
| Leather Glue | Good – Flexible bond, but not as strong as contact cement |
| Fabric Glue | Poor – Can be too flexible and break down over time |
As shown in the table, contact cement is the best glue for leather belts in terms of flexibility. It provides a strong and flexible bond that can withstand constant movement and stretching.
It is important to note that when using contact cement, you should follow the manufacturer’s instructions carefully as this type of glue can be difficult to work with. A thin layer of glue should be applied to both surfaces, and allowed to dry for a few minutes before pressing them together. Once the surfaces are joined, you should use a clamp or heavy object to apply pressure evenly across the bond until fully cured.
Remember, choosing the right glue for your leather belt repair is crucial to ensure that the repair is long-lasting and durable. For more information on choosing the right glue, check out our article on What Glue is Best for Leather?.
3. Drying Time
Drying time is an essential factor to consider when choosing glue for your leather belt. Different types of glue have varying drying times, and the time it takes for the glue to dry is an important criterion to think about before settling on a particular type of glue.
If you’re working on a project that requires quick adhesion, super glue is an excellent option. It has a fast drying time, often within seconds, making it ideal for urgent repairs. However, it’s crucial to note that super glue may not be the best for belts since they can weaken the leather. Using super glue is not advisable if you’re working on a high-stress area of your belt.
Contact cement is another option that offers a relatively fast drying time. It typically dries within 10-15 minutes, but it may take up to 24 hours to dry completely. It’s an excellent choice for repairing seams and edges and can be applied to one or both surfaces. Contact cement creates a strong bond between two surfaces, making it suitable for a wide range of applications.
Epoxy is a slow-setting glue that’s perfect for heavy-duty applications since it dries to a hard, durable finish. It has the longest drying time of all the glue types, with some taking up to 24 hours to dry completely. It’s an excellent choice if you need a strong bond since it’s resistant to water, heat, and chemicals.
Leather glue has a longer drying time than super glue or contact cement, typically taking about 4-6 hours to dry completely. However, it’s an excellent option if you’re a beginner since it’s easy to use and can be removed with water if you make any mistakes.
Fabric glue is another option that has a relatively short drying time of about 24 hours. It creates a soft, flexible bond that can withstand washing, making it ideal for use on leather belts. However, it’s essential to note that fabric glue may not be as strong as other types of glue, but it’s an excellent option if you’re looking for something to fix minor issues.
In conclusion, drying time is a critical factor to consider when selecting the best glue for your leather belt. Each glue type has its advantages and disadvantages, and selecting the best for your project depends on several factors. Remember to consider your project’s needs, such as strength, flexibility, drying time, color, and waterproofing.
4. Color
When it comes to the color of the glue, it’s an important factor to consider, especially if your leather belt has a specific color or you want to maintain its original appearance. Some glues dry clear, while others have a yellowish or brownish tint that can affect the belt’s color. For instance, if you have a light-colored belt, you may want to avoid using yellowish glue that can darken the surface.
Here are some options for different glue colors:
- Clear glue: This is an excellent choice if you’re concerned about discoloration. It dries transparent, making it almost invisible, and won’t alter the color of the leather.
- Black glue: This type of glue is ideal for black leather belts because it blends in perfectly, hiding any marks or imperfections.
- Brown glue: Brown-colored glue is suitable if you want to maintain a natural look on your leather belt. It can blend in with the tanned leather and hide any visible seams.
It’s essential to select the right color of glue to avoid discoloration or affecting the leather’s appearance. In some cases, the color of the glue can also affect the durability of the belt, so it’s worth considering when making a choice.
To determine the appropriate color, you can also test the glue on a small, inconspicuous area of the belt to see how it reacts before applying it to the main surface. This step can help you avoid any mistakes and ensure that the glue complements the leather color.
Pro tip: If you accidentally get glue on areas of your leather belt that you don’t want to attach, you can remove it by applying acetone. However, you should be cautious and test it on an inconspicuous spot first to avoid any damage to the belt’s surface.
For more information about how long shoe glue takes to dry, check out our article on how long shoe glue takes to dry.
5. Waterproofing
When choosing the best glue for your leather belt, it is important to consider whether or not the glue is waterproof. If you live in a rainy or humid climate, or you plan on wearing your belt during activities that may expose it to water, then you want to make sure that your glue can withstand exposure to moisture.
Here are some waterproof glues to consider:
- Marine glue: As the name suggests, this type of glue is commonly used for marine applications and can withstand exposure to water and salt. It is a very strong adhesive that dries clear and is ideal for outdoor gear such as belts, bags, and shoes.
- Clear silicone glue: This glue is also waterproof and dries clear. It is great for repairing small tears and punctures in your leather belt and is suitable for use on both natural and synthetic leather.
- Neoprene glue: This type of glue is a rubber-based adhesive that is commonly used for bonding items that are exposed to water, oil, and chemicals. It creates a strong bond that remains flexible and is perfect for fixing leather belts that are frequently exposed to water or other liquids.
It’s important to note that while waterproof glue is a great choice for repairing your leather belt, it may be more difficult to remove or adjust in case further alterations are needed. Always consider the type of repair or alteration that needs to be made before deciding on a waterproof glue for your leather belt.
If you want to know more about how to melt shoe glue to repair your leather sneakers and make them look new again, take a look at our article on How to Melt Shoe Glue. However, glue isn’t just for repairing shoes, check out our article on Why Glue Pennies to Shoes.
Steps to Repair Your Leather Belt
So, your favorite leather belt is starting to show some signs of wear and tear? Don’t worry, repairing it is easier than you might think. With the right glue and a few simple steps, you can have it looking as good as new in no time. In this section, we will guide you through the process of repairing your leather belt step by step. Just follow these instructions, and your belt will be ready to wear again before you know it.
1. Clean the Belt
Before starting the repair process, it’s important to clean the surface of the leather belt to remove any dirt, dust, or oils. This ensures that the glue will properly adhere to the leather for a strong and lasting hold.
Here are the steps to clean your leather belt:
- Use a soft cloth or brush to gently wipe away any dirt or dust particles from the surface of the belt.
- If the belt is particularly dirty, you can use a damp cloth with warm water to gently clean the belt. Avoid using excessive water, as it can damage the leather.
- Dry the belt completely with a clean, absorbent cloth.
- If there are any stains or marks on the belt, you can try using a leather cleaner or conditioner to remove them. Apply the cleaner or conditioner to a soft cloth and rub it onto the affected area. Then wipe away any excess cleaner or conditioner with a clean cloth.
By cleaning your leather belt properly before applying any glue, you can ensure that the glue will properly adhere to the leather for a strong and long-lasting hold.
2. Apply Glue to the Belt
Before applying the glue to your leather belt, it is important to choose the right type of glue based on the factors we discussed earlier. Once you have selected the appropriate glue, follow these steps to apply it to the belt:
Step 1: Apply the glue in thin coats to the area that needs to be repaired. Be careful not to apply too much glue, as it can cause the leather to warp or weaken.
Step 2: Use a small brush or cotton swab to evenly distribute the glue across the surface of the leather. Make sure to get into any crevices or tight areas that may need glue.
Step 3: Apply pressure to the glued area by using a clamp or heavy weight. This will help to ensure a strong bond between the leather and the glue.
Step 4: If necessary, repeat the process until the belt is fully repaired. Be sure to let the glue dry completely before wearing or using the belt.
It is important to keep in mind that applying glue to leather can be tricky, and mistakes can be costly. Be patient and take your time to ensure that the glue is applied properly. Additionally, it is always a good idea to test the glue on a small, inconspicuous area of the belt before repairing the entire piece. This will allow you to ensure that the glue is compatible with the leather and does not cause any damage.
Table: Do’s and Don’ts of Applying Glue to Leather Belts
| Do | Don’t |
|---|---|
| Apply glue in thin, even coats | Apply too much glue |
| Use a small brush or cotton swab to distribute the glue | Apply glue with your fingers |
| Apply pressure to the glued area with a clamp or heavy weight | Leave the glued area to dry without applying pressure |
| Let the glue dry completely before using or wearing the belt | Use the belt before the glue has fully dried |
| Test the glue on a small area of the belt before repairing the whole piece | Assume that all glues work well on leather without testing first |
By following these do’s and don’ts, you will improve the likelihood of your belt being well-repaired and long-lasting.
3. Clamp the Belt
After applying glue to your leather belt, it’s important to clamp the two sides together to ensure a strong and long-lasting bond. Here are the steps to clamping your belt:
- Get the Right Tools: Before clamping, you’ll need a few tools, including clothespins, a C-clamp, or a vise. Make sure the clamping tool you choose is appropriate for the size of your belt.
- Align the Edges: The two ends of your belt should be perfectly aligned before clamping. This will ensure that the belt doesn’t warp or twist during the drying process.
- Apply Pressure: Use your chosen clamping tool to apply even pressure to the belt. You want enough pressure to bond the leather but not so much that it causes damage or distortion.
- Leave the Belt to Dry: After clamping, leave your belt to dry for the recommended time according to the glue instructions. This may take anywhere from a few hours to overnight depending on the type of glue and the humidity levels in your area.
Using the right clamping technique is vital for a successful leather belt repair. Improper clamping may lead to inferior bonds and weaker spots that can break easily. By following the above steps, you should be able to create a tight, sturdy seal that will last for years to come.
4. Let it Dry
After clamping the belt ends together, it’s important to let the glue dry completely before wearing it. This usually takes around 24 hours but can vary depending on the type of glue you used. Check the label of the glue you used for specific drying times.
To ensure the best results, it’s recommended to not touch or move the belt while it’s drying. Place it in a dry and well-ventilated area away from direct sunlight or heat sources which could damage or warp the leather.
Table:
| Type of Glue | Recommended Drying Time |
|---|---|
| Super Glue | 10-30 seconds |
| Contact Cement | 15-20 minutes |
| Epoxy | 24 hours |
| Leather Glue | 30-60 minutes |
| Fabric Glue | 24 hours |
While some types of glue may dry faster than others, it’s important to give it enough time to fully cure to ensure a strong and long-lasting hold. Rushing the drying process could result in the belt coming apart again, which will cause frustration and require the repair process to be repeated. Patience is key when waiting for the glue to dry.
Conclusion
It’s important to choose the right type of glue for your leather belt repairs to ensure a long-lasting and durable result. Super glue, contact cement, epoxy, leather glue, and fabric glue are all suitable options depending on your specific needs and preferences.
You should consider a few factors when choosing your glue, including strength, flexibility, drying time, color, and waterproofing. Depending on the type of belt you have and the extent of the damage, you may need to prioritize some of these factors over others.
Once you’ve selected the appropriate glue, you can follow a few simple steps to repair your leather belt. It’s important to clean the belt thoroughly beforehand and to clamp it securely while the glue dries.
By taking these precautions and following the recommended steps, you can easily and effectively repair your leather belt at home, no matter what type of damage it has sustained. Whether you need to fix a small tear or a larger rip, the right glue and a little bit of patience can go a long way in restoring your belt to its former glory.
In summary, a high-quality glue can be invaluable when it comes to fixing your leather belt. By ensuring that you know what to look for in a glue and how to properly apply it, you can save yourself time, money, and frustration in the long run. So why not give it a try and see the results for yourself?
Frequently Asked Questions
1. Can I use regular glue on my leather belt?
No, regular glue may not be strong enough to hold the leather belt together for a long period of time.
2. How do I remove old glue from my leather belt?
You can remove old glue from your leather belt by using a razor blade or sandpaper. Be careful not to damage the leather.
3. Is super glue a good option for leather belts?
Yes, super glue is a good option for leather belts as it provides a strong and quick bond.
4. Can contact cement be removed from leather?
No, contact cement cannot be removed from leather. It is a permanent adhesive once applied.
5. Can I use epoxy for repairing my leather belt?
Yes, epoxy can be used for repairing a leather belt as it provides a strong and durable bond. However, it may not be flexible enough for belts that need to be bent often.
6. What is leather glue made of?
Leather glue is typically made of strong adhesive materials such as natural rubber or synthetic latex.
7. Can fabric glue be used on leather belts?
Yes, fabric glue can be used on leather belts but it may not provide a strong enough bond for heavy-duty belts.
8. Can glue repair a belt buckle?
No, glue cannot repair a belt buckle. A damaged belt buckle will need to be replaced.
9. How long does it take for glue to dry on a leather belt?
The drying time for glue on a leather belt can vary, but it typically takes anywhere from a few hours to a full day to completely dry.
10. Can I wear my leather belt right after repairing it?
No, you should wait for the glue to fully dry before wearing your leather belt again to ensure a strong and durable bond.