Have you ever found yourself in a predicament where your favorite pair of Birkenstocks were in dire need of repair? Perhaps the toe strap has come loose or the sole is starting to peel away. Don’t worry, you’re not alone! Birkenstocks are a popular and beloved brand of shoes that can withstand a lot of wear and tear, but they do require a little love and care from time to time. In this step-by-step guide, we’ll show you how to glue your Birkenstocks back together so you can get back to your favorite summer activities. So, roll up your sleeves and let’s get started!
What You’ll Need

Gather Your Materials: What You’ll Need for Gluing Your Birkenstocks
To successfully glue your Birkenstocks, you’ll need a few essential materials that will help you repair them effectively. These include both Birkenstock repair materials and Birkenstock cleaning materials. Getting the right materials is important to ensure that your repairs last a long time and don’t cause any further damage to your sandals. Before you begin, make sure you have everything you need. If you want to learn more about shoe glue and its types, you can read our article What is Shoe Goo Glue?.
Birkenstock Repair Materials
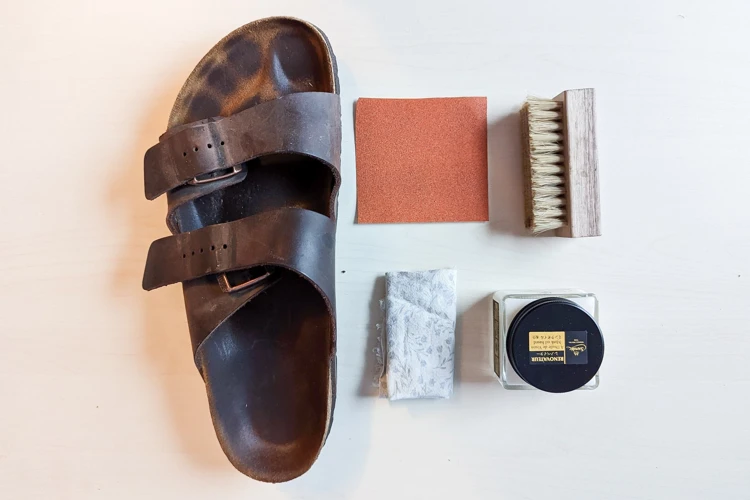
When it comes to repairing your Birkenstock sandals, having the right materials on-hand is crucial for ensuring a successful fix. These materials include:
- Shoe glue: This is the main ingredient you will need to adhere your Birkenstock’s straps and soles back together. Make sure you choose a high-quality glue that is specifically designed for shoe repair. If you’re not sure which type of glue to use, check out our guide on what shoe glue is made of.
- Clamps or clothespins: You’ll need something to hold the straps or soles in place while the glue dries. Clamps or clothespins work well for this purpose.
- Sandpaper: Before you apply the glue, you’ll need to rough up the surface of the Birkenstock straps or soles so that the glue can better stick to them. Use a coarse sandpaper to lightly scuff the surface.
- Rubbing alcohol: Clean the surface of your Birkenstocks with rubbing alcohol before applying glue. This will remove any oils or debris that could prevent the glue from adhering to the material.
If you do not have any shoe glue on hand, you may be able to make your own shoe glue using household items, such as vinegar and gelatin. However, it’s best to use a pre-made glue that is specifically designed for shoe repair to ensure a lasting and strong bond.
Birkenstock Cleaning Materials
To properly clean your Birkenstocks before gluing them, there are a few materials you’ll need to gather. Here are the materials you’ll need to clean the surface of your Birkenstocks:
- Mild Soap – Use a gentle soap that won’t damage the materials of your Birkenstocks.
- Water – You’ll need water to rinse off the soap from your Birkenstocks.
- Soft-bristled Brush – Use a brush with soft bristles to avoid damaging the surface of the Birkenstocks.
- Towel – You’ll need a towel to dry your Birkenstocks after cleaning them.
It’s important to use a gentle soap when cleaning your Birkenstocks to avoid stripping away any oils or other protective treatments that may be present on the surface. To start the cleaning process, mix a small amount of mild soap with water and use the soft-bristled brush to gently scrub the surface of your Birkenstocks. Rinse the soap away with water and dry the Birkenstocks completely using a towel.
Once your Birkenstocks are clean and dry, you’ll be ready to move on to the next step of the gluing process.
Clean Your Birkenstocks
After wearing your Birkenstocks for a while, it’s natural for them to accumulate dirt and grime, which can get in the way of a successful repair job. Proper cleaning is essential to ensure the longevity of your repaired Birkenstocks. By following these simple cleaning steps, you’ll be on your way to successfully restoring your favorite summer shoes. Start by gathering the necessary materials and following along with the steps below. And if you have a leather belt that needs repairing, check out our guide on How to Glue a Belt Back Together.
Remove Dirt and Grime
Before you can begin gluing your Birkenstocks back together, it’s important to make sure the surface is free of any dirt or grime. Cleaning your Birks properly will help to ensure that the glue adheres to the surface properly. Here’s how to do it step-by-step:
| Materials: | Instructions: |
|---|---|
| Dish soap | Fill a bowl with warm water and add a few drops of dish soap. |
| Soft-bristled brush | Dip the brush into the soapy water and gently scrub your Birkenstocks, paying special attention to any areas that are particularly dirty or stained. |
| Paper towels | Use paper towels to wipe away any excess soap and water. |
| Warm water | Rinse your Birkenstocks thoroughly with warm water to remove all traces of soap. |
| Towel | Pat your Birkenstocks dry with a soft towel. |
Once your Birkenstocks are clean and dry, you’re ready to move on to the next step of the gluing process. If you need more information on how to glue leather in general, check out our detailed guide on how to glue leather.
Use Rubbing Alcohol
After removing the dirt and grime from your Birkenstocks, the next step is to use rubbing alcohol. Rubbing alcohol is an excellent cleaning agent that will help remove any remaining dirt and oils from the surface. It is essential to clean the surface thoroughly to achieve maximum adhesion.
To use rubbing alcohol, you will need a clean cloth or sponge and rubbing alcohol. Pour some rubbing alcohol on the cloth or sponge and gently rub the surface of the Birkenstocks. Use a circular motion to clean the surface and ensure that you cover every part of the shoe. Rubbing alcohol is quite effective in removing stubborn stains, so be sure to use it if you have any on your shoes.
Note: Rubbing alcohol should be used sparingly. Avoid using too much on the shoe as it can damage the material. Use just enough to dampen the cloth or sponge.
After cleaning the Birkenstocks with rubbing alcohol, it is essential to dry them thoroughly. You can use a dry cloth or leave them out in the sun to dry. Ensure that they are completely dry before proceeding to the next step.
Using rubbing alcohol can also help create a better surface for adhesion. When applying glue, it is ideal to work with a surface that is free of oils and dirt. Using rubbing alcohol will help remove any oils or dirt that might interfere with the bonding process.
Pro Tip: If you have any trouble with your Birkenstocks such as detached rubber soles, leather belts, or car trim, be sure to check out our other guides on gluing rubber to leather, gluing sneaker soles, gluing trim back on the car, and what glue to use on a leather belt for an effective repair.
Prep the Surface
Before applying the glue, it is important to properly prepare the surface of your Birkenstocks. This will ensure that the glue adheres to the material and creates a strong bond. Properly prepping the surface can also help to extend the life of your Birkenstocks. When it comes to repairing shoes or sandals, surface preparation is key. In this section, we will cover the steps you need to take to prep the surface of your Birkenstocks before applying the glue. So, grab the materials you will need and let’s get started.
Use Sandpaper to Scuff the Surface
Once you have cleaned your Birkenstocks with rubbing alcohol, the next step is to use sandpaper to scuff up the surface where you will be applying the glue. This is an important step, as it will help the glue adhere better and ensure a stronger hold.
To scuff the surface, you will need to use sandpaper with a medium grit, around 120 to 150. It’s important to not use sandpaper that is too rough, as this can damage the material. Take the sandpaper and gently rub over the area where the glue will be applied. Use a circular motion, applying light pressure. The goal is to rough up the surface and create a slightly textured surface for the glue to adhere to.
Pro tip: To avoid getting sanding debris on the rest of your shoe, it’s a good idea to cover the rest of the shoe with tape or a plastic bag while you work.
Once you have scuffed up the surface with sandpaper, clean the area again with rubbing alcohol to remove any sanding debris and make sure the area is clean and dry before applying glue.
And there you have it – your Birkenstocks are now prepped and ready for glue! For more information on gluing different types of materials, check out these helpful guides:
– How to Glue Rubber to Leather
– How to Glue Beats Headband
– How to Glue Sneaker Soles
– What Glue to Use on Leather Belt
– How to Glue Trim Back on Car
Clean Again with Rubbing Alcohol
Once you have removed any dirt and grime from your Birkenstocks, it’s important to ensure that the surface is completely clean before moving on to the next step. To do this, you will need to use rubbing alcohol.
Here are the steps to follow when cleaning your Birkenstocks with rubbing alcohol:
- Prepare the rubbing alcohol: You will need a small amount of rubbing alcohol to clean your Birkenstocks. Pour a small amount into a bowl or container and set it aside.
- Dip a cloth into the rubbing alcohol: Take a clean cloth and dip it into the rubbing alcohol. Squeeze any excess liquid from the cloth so that it is damp but not soaking wet.
- Wipe down the surface of the Birkenstocks: Use the damp cloth to wipe down the surface of your Birkenstocks, paying special attention to the areas where you will be applying glue. This will help to remove any remaining dirt or oils that could prevent the glue from sticking properly.
- Dry the Birkenstocks: Once you have wiped down the entire surface of your Birkenstocks with rubbing alcohol, allow them to air dry completely before moving on to the next step.
It’s important to make sure that your Birkenstocks are completely dry before applying glue, as any moisture could prevent the glue from bonding properly. Taking the time to properly clean and prepare your Birkenstocks will ensure that your repair job is successful and your shoes look like new again.
Apply the Glue
Now it’s time to begin the actual gluing process. Applying glue may seem like a simple step, but it’s important to do it correctly in order to ensure a strong and long-lasting bond. By following these steps carefully, you can confidently apply the glue and get your Birkenstocks back in shape. So, let’s grab our materials and get started!
Apply a Small Amount of Glue
Once you have prepped the surface, it’s time to apply the glue to your Birkenstocks. When applying glue, it’s crucial to use a small amount to avoid any mess or overflow. Too much glue can also weaken the bond between the surfaces and lead to premature separation. Here’s a breakdown of what you’ll need to apply a small amount of glue:
| Item | Description |
| Glue | Select a glue that is specifically designed for shoe repair. Look for options such as Shoe Goo or E6000. |
| Applicator Brush | You can use a toothpick or a small paintbrush to apply a small amount of glue. However, it’s important to note that the brush should only be used for glue application and not reused for anything else. |
| Clean Rag or Paper Towel | Have a clean rag or paper towel handy to wipe away any excess glue that may seep out once you align the straps together. |
Now that you have your materials prepared, it’s time to get started. Using your applicator brush, apply a small amount of glue to the area where the Birkenstock straps will connect. Spread the glue evenly to ensure proper adhesion.
Once the glue is applied, carefully align the straps together. Use your hands to press down firmly and evenly on both sides, making sure the straps are completely connected. Be cautious not to move the straps out of alignment once they’ve been laid down on the glue-covered surface.
If any excess glue seeps out from the connection point, use a clean rag or paper towel to wipe it away. It’s essential to have a clean and smooth surface once the glue dries to ensure that it’s not visible and that it won’t rub off when you wear your Birkenstocks.
Applying a small amount of glue correctly is the key to a successful repair job on your Birkenstocks. Make sure to use the appropriate materials and follow the instructions carefully, and your favorite pair of sandals will be as good as new.
Align the Straps
After applying a small amount of glue, the next step is to properly align the straps on your Birkenstocks. This is important to ensure a secure and comfortable fit. Here is a step-by-step guide to aligning the straps:
- Start with the big toe strap: This is the strap that runs perpendicular to your foot and connects to the toe piece. Make sure it lines up with the toe piece and is centered on the sole.
- Move on to the instep strap: This strap runs parallel to your foot and connects to the side of the sole. Gently adjust the strap to ensure it sits flat against your foot and is centered on the sole.
- Align the heel strap: This strap connects to the back of the sole and should be centered on your heel. Check that it is sitting flat against your foot and lined up with the other straps.
- Double-check alignment: Once all of the straps are in place, take a step back and double-check that everything is properly aligned and sitting flat against your foot.
It’s important to take your time during this step to ensure proper alignment. Rushing could result in discomfort or even further damage to your Birkenstocks. Once you’re satisfied with the strap placement, move on to the next step of clamping the pieces together.
Clamp the Pieces Together
After applying the glue and aligning the straps, it’s time to clamp the pieces together. This ensures that there is enough pressure for the glue to properly bond the two surfaces together. Here’s how to do it:
- Get your clamps ready: Choose the appropriate size clamps for the area you are working on. It’s important to have enough clamps to apply steady pressure along the whole length of the strap.
- Place the clamps: Position the clamps around the straps, making sure that they are evenly spaced and that there is enough pressure to hold the straps together.
- Tighten the clamps: Begin tightening the clamps, making sure that you do not over tighten them as this may cause the glue to seep out and leave a mess.
- Check for alignment: Double-check that the straps are properly aligned before the glue completely dries. Adjust the straps if necessary.
- Let the glue dry: Allow the glue to dry according to the manufacturer’s instructions. Do not be tempted to remove the clamps before the glue is fully cured; this may cause the straps to shift out of place and ruin your repair.
By following these steps, you’ll be able to successfully glue your Birkenstocks and have them looking and feeling like new again.
Let the Glue Dry
Once you have applied the glue and aligned the straps, it is important to let the glue dry fully before using your Birkenstocks again. This will ensure a strong and secure bond between the straps and the sole of the shoe.
Timing: Allow the glue to dry for at least 24 hours, as this will ensure that it has fully cured and set. While it can be tempting to check on the glue frequently during this time, it is best to leave the shoes untouched and undisturbed to give the glue ample time to dry.
Temperature: It is important to note that temperature can play a role in how long the glue takes to dry. Ideally, the temperature should be between 60- and 80-degrees Fahrenheit while the glue is drying. Cooler temperatures can slow down the drying process and may affect the strength of the bond.
Avoid Disturbing the Shoes: Avoid wearing your Birkenstocks or handling them too much while the glue is drying. Moving the shoes around too much or stretching the straps can weaken the bond and compromise the repair.
Once the glue has fully dried, check the straps for any sign of looseness or weakness. If everything feels tight and secure, your Birkenstocks are ready to wear again!
Finishing Touches
As you near the end of your Birkenstock repair journey, there are a few finishing touches that can make all the difference. These small but important steps will not only enhance the appearance of your sandals, but also ensure that the glue job is secure and long-lasting. So, grab your supplies and let’s get started on the final steps of your Birkenstock repair project.
Trim off Excess Glue
Once your glue has fully dried, it’s time to trim off any excess that may have squeezed out during the clamping process. Using a sharp pair of scissors or a craft knife, carefully trim away the excess glue until it’s flush with the surface of your sandals. Be sure to exercise caution when trimming to avoid accidentally cutting into the leather straps or cork sole.
Pro Tip: If you’re having trouble getting rid of the excess glue, try using a fine-grit sandpaper to lightly sand it away. This will not only remove any excess glue, but it will also scuff up the surface of the glue, making it easier to conceal in the next step.
After trimming your Birkenstocks, take a close look at the area where you glued them. If there are any rough or uneven spots, use a piece of fine-grit sandpaper to gently smooth them out. This will ensure that your sandals look as good as new once you’re finished with your repair.
Note: Be careful not to overdo it with the sandpaper. You don’t want to sand away too much material and weaken the structure of your shoes. Just use the sandpaper to smooth out any rough spots you may have missed during the trimming process.
Trimming off excess glue is an important step in ensuring that your Birkenstocks look as good as new. Be patient, exercise caution, and you’ll be left with a pair of sandals that are ready to take on your next adventure.
Use a Marker to Conceal the Glue
Once the glue has dried, you may notice some excess glue that has spilled over. Don’t worry, this is a common occurrence when gluing Birkenstocks, but it is important to address it for aesthetic reasons.
To conceal the excess glue, use a marker that matches the color of your Birkenstocks. Make sure the marker is waterproof and permanent, as you don’t want it to smudge or come off in the rain.
With the marker, carefully color over the excess glue until it blends in with the rest of the Birkenstock. Use small, light strokes to avoid coloring over the rest of the shoe.
It is important to note that while this step may seem minor, it can make a significant difference in the overall appearance of your repaired Birkenstocks. Taking the time to conceal the glue will ensure that your shoes look as good as new and are ready to be worn again.
In addition to using a marker, you can also use leather dye or shoe polish to cover the excess glue. However, these methods may require more skill and experience, so using a marker may be the best option for beginner DIYers.
So, take your time and be patient when concealing the glue. It may take some trial and error to get it just right, but the end result will be well worth the effort.
Conclusion
After following these simple steps, your Birkenstocks should be as good as new! Remember to always clean your Birkenstocks before attempting any repairs, as the glue will not adhere to a dirty surface. When applying the glue, be sure to use a small amount and align the straps carefully before clamping them together. Allow the glue to dry completely before wearing your Birkenstocks again.
If you happen to have any excess glue, don’t panic! Simply trim it off with scissors and use a marker to conceal any remaining traces of glue.
By taking the time to repair your Birkenstocks instead of replacing them, you’re not only saving money but also doing your part for the environment. So next time you notice your Birkenstocks need a little extra support, follow this step-by-step guide and get back to walking on cloud nine in no time.
Frequently Asked Questions
Can I use any glue to repair my Birkenstocks?
No, it’s recommended to use a glue that is specifically designed for shoe repair, such as Barge All-Purpose Cement.
How long does it take for the glue to dry?
This can vary depending on the type of glue used, but typically it takes around 24 hours for the glue to fully dry and cure.
Can I repair Birkenstock soles with glue?
While it’s possible to repair Birkenstock soles with glue, it’s not recommended as it may not provide a long-lasting fix. It’s best to replace the sole if it’s severely damaged.
Can I still wear my Birkenstocks while the glue is drying?
No, it’s best to let the glue fully dry and cure before wearing your Birkenstocks to ensure the repair is strong and long-lasting.
How often should I clean my Birkenstocks?
It’s recommended to clean your Birkenstocks every two to four weeks depending on how often you wear them and how dirty they get.
Can I use soap and water to clean my Birkenstocks?
Yes, you can use mild soap and water to clean your Birkenstocks. Just be sure to fully rinse off the soap and allow them to dry completely before storing them.
What should I do if the straps on my Birkenstocks break?
You can purchase replacement straps online or from a Birkenstock retailer. It’s also possible to repair the straps with glue if the damage is minor.
How can I prevent my Birkenstocks from getting damaged?
Store them in a dry place when not in use and avoid exposing them to extreme heat or cold. Also, regularly clean and condition the leather to keep it soft and supple.
Can I use sandpaper to scuff the surface of my Birkenstocks?
Yes, but be sure to use a fine-grit sandpaper and avoid applying too much pressure to prevent damage to the leather.
Should I use gloves when applying glue?
It’s recommended to use gloves to protect your skin from the harsh chemicals in the glue.