Have you ever found yourself in a situation where you need to fix something quickly and efficiently? Whether you’re a DIY enthusiast or a professional, UV glue is a versatile adhesive that can come in handy. But with so many options available, it can be overwhelming to choose the best one for your needs. That’s where we come in – this comprehensive guide will break down everything you need to know about UV glue, including how it works, the top options on the market, factors to consider before purchasing, and tips and tricks for using it effectively. By the end of this article, you’ll be equipped with the knowledge to confidently choose and use the best UV glue for your next project.
How Does UV Glue Work?
If you’ve ever needed to bond two surfaces together quickly and effectively, you may have used traditional adhesive options like superglue or epoxy. However, if you’re looking for a faster and stronger alternative, you may want to consider UV glue. Unlike traditional adhesives that rely on evaporation or chemical reactions to harden, UV glue uses ultraviolet light to cure and bond surfaces together. In this section, we’ll explore the science behind how UV glue works and the benefits it offers over other adhesive options. No relevant anchor was found in the text for an internal link.
The Science Behind UV Glue
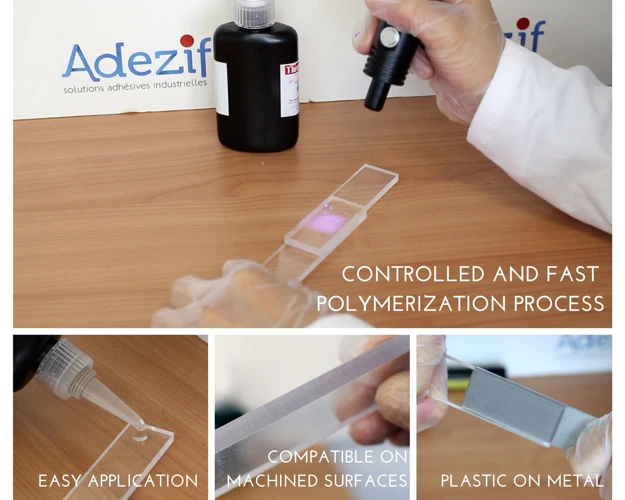
UV glue is a type of adhesive that hardens when exposed to ultraviolet light. The science behind UV glue lies in its unique photochemical reaction. When the glue is exposed to UV light, the molecules in the glue start to react and form strong chemical bonds. This reaction is known as photopolymerization.
During photopolymerization, the molecules in the glue are linked together to form a strong and durable bond. The process involves a free radical mechanism, which starts when the UV light triggers a reaction between the glue’s photoinitiator and a co-initiator. This reaction produces free radicals that react with the monomers in the glue, forming long chains of polymers that harden and create a strong adhesive bond.
One of the primary benefits of UV glue is its ability to cure quickly. Because the glue hardens when exposed to UV light, it can form a strong bond in just seconds. This quick curing time makes UV glue an ideal choice for applications that require a fast and secure hold.
However, it’s important to note that UV glue may not be the best option for every project. The adhesive’s photochemical reaction requires direct exposure to UV light, which can be challenging in certain environments. Additionally, some UV glues may not bond well to certain materials or surfaces.
To learn more about how to use different types of glue, check out our articles on epoxy glue, CA glue for wood, and electrically conductive glue.
The Benefits of UV Glue
UV glue has become popular for many reasons, and the benefits are numerous. In this section, we will explore the top benefits of UV glue in detail.
| Dries Quickly | UV glue dries in seconds when exposed to UV light, making it an efficient adhesive. |
|---|---|
| Strong Bond | UV glue creates a strong and durable bond that can withstand high stress and pressure. |
| Easy to Use | UV glue is easy to apply and does not require any special training or equipment to use. |
| Transparent Finish | UV glue dries clear, creating a transparent finish that is perfect for use on glass, plastic, and other materials where some glues can show. |
| Waterproof and Heat Resistant | UV glue is resistant to water and heat, making it ideal for use in wet and high-temperature environments. |
| Versatile | UV glue can be used on a wide variety of materials, including metal, wood, plastic, glass, and more, making it a versatile adhesive for any project. |
These benefits make UV glue an excellent choice for many different applications. Whether you’re working on a DIY project at home or need to bond parts for an industrial application, UV glue can provide a fast, strong, and lasting bond.
If you want to know more about the gluing process of a particular material, check out our links on how to glue acrylic to glass, how to glue rubber to glass, how to glue leather to wood, which glue stick is best, what glue to use on speaker cone, how to glue acetal, and how to glue plexiglass to metal.
Top UV Glue Options
When it comes to UV glue, there are various options available on the market. Choosing the right one for your project can be overwhelming and confusing. To make your task easier, we have compiled a list of some of the top-rated UV glues available. These products have been tested and reviewed for their performance, durability, transparency, and price. Whether you’re a DIY enthusiast or a professional, this comprehensive guide will help you find the ideal UV glue for your project.
1. Gorilla Super Glue Gel
Gorilla Super Glue Gel is widely recognized as one of the best UV glues on the market. Here are some reasons why:
- Strong and Durable: This glue is specifically designed for bonding tough materials like metal, ceramic, and plastic. Once cured, it forms a strong and durable bond that can withstand harsh conditions and everyday wear and tear.
- No-Run Gel: The gel formula of Gorilla Super Glue is no-run, which means it stays precisely where you apply it and doesn’t drip or spread. This makes it easier to apply the glue without making a mess and reduces the risk of accidentally bonding the wrong surfaces.
- Transparent Finish: The clear, transparent finish of Gorilla Super Glue Gel makes it a great choice for applications where appearance is important, like jewelry or automotive repairs. It dries clear so there’s no visible residue or yellowing over time.
- Quick Setting Time: Gorilla Super Glue Gel sets in just 10-30 seconds, making it a great option for quick repairs or DIY projects with tight deadlines. It fully cures in 24 hours.
- Value for Money: Despite its superior performance, Gorilla Super Glue Gel is priced competitively and offers excellent value for money. A little goes a long way, so you don’t need to use a lot of glue to achieve a strong bond.
Gorilla Super Glue Gel ticks all the boxes when it comes to strength, ease of use, and affordability. If you’re looking for a reliable and high-quality UV glue for your projects, this one should definitely be on your shortlist.
2. Loctite Super Glue Gel
Loctite Super Glue Gel is a popular option for those looking for a strong and durable adhesive. This glue is known for its ability to bond quickly and securely to various surfaces, including plastic, metal, and wood. Its gel formula makes it easy to apply and control, avoiding messes or spills. Here are some of the key features and benefits of Loctite Super Glue Gel:
- Fast bonding: Loctite Super Glue Gel sets in just 10-30 seconds, allowing for quick and efficient bonding. This is perfect for those who need a solution fast and don’t have the time to wait for the glue to dry.
- High strength: This glue boasts a strong and durable bond, able to withstand even the toughest conditions. Whether it’s for DIY projects or industrial use, Loctite Super Glue Gel can handle it all.
- Resistant to impact and shock: Because of its strong bonding capabilities, Loctite Super Glue Gel can also resist impact and shock. This makes it perfect for automotive repairs, as well as any other heavy-duty applications.
- Water-resistant: Loctite Super Glue Gel is also water-resistant, making it perfect for use in moist environments or for outdoor projects that may be exposed to rain or other weather conditions.
- Easy to use: Its gel formula makes it easy to apply to surfaces without dripping or running. This also makes it perfect for vertical surfaces or overhead applications, without the worry of the glue dripping or running.
- Wide range of applications: Loctite Super Glue Gel can be used for a variety of projects, from repairing broken ceramic figurines to bonding metal parts. Its versatility makes it a staple in any toolbox or workshop.
Loctite Super Glue Gel is a reliable and efficient adhesive that can handle any project. Its fast-drying formula and strong bonding capabilities make it a popular choice for DIY enthusiasts and professionals alike.
3. Aleene’s Clear Gel Tacky Glue
Aleene’s Clear Gel Tacky Glue is a popular UV glue option among arts and crafts enthusiasts. It is known for its exceptional strength and is ideal for bonding a variety of surfaces, including paper, fabric, and wood.
One of the key benefits of Aleene’s Clear Gel Tacky Glue is its clear drying formula, which ensures that the glue line is virtually invisible when dry, offering a seamless finish for your crafting projects. Additionally, the glue has a fast drying time, setting in under an hour.
Below is a table highlighting some key features of Aleene’s Clear Gel Tacky Glue:
| Type of Glue | Clear Gel Tacky Glue |
| Application | Nozzle |
| Strength | High |
| Drying Time | Less than 1 hour |
| Viscosity | Gel |
| Transparency | Clear when dry |
| Price Range | $$ |
In terms of price, Aleene’s Clear Gel Tacky Glue falls into the mid-range, making it an affordable option for those who desire quality bonding. Its versatility, strength, and clear drying formula make it a great option for any crafting project. However, its gel-like viscosity may not be suitable for all applications.
Aleene’s Clear Gel Tacky Glue is a reliable option for those in search of a strong and versatile UV glue. Its clear drying formula and rapid setting time make it a popular choice among crafters and hobbyists alike.
4. Bondic Liquid Plastic Welder
Bondic Liquid Plastic Welder is a unique type of UV glue that uses a liquid plastic formula to bond materials together. Unlike other UV glues, Bondic does not dry out or harden until it is exposed to the UV light. This feature allows for greater flexibility when working with materials and enables precise application.
Advantages of Bondic:
- Bondic is waterproof so it is ideal for outdoor projects.
- It is also heat-resistant, making it suitable for use in high-temperature applications.
- Bondic is highly versatile and can be used with a wide range of materials, including plastics, wood, metal, and glass.
- The liquid formula makes it easy to apply and eliminates the need for additional tools.
- Bondic is also an eco-friendly and non-toxic option.
Disadvantages of Bondic:
- The liquid plastic formula may not be strong enough for heavy-duty applications.
- The precision application requires an adequate amount of practice and skill, which may be challenging for beginners to master.
- Bondic can be expensive compared to other UV glues on the market.
Bondic is an excellent option for precise and versatile bonding projects that require a waterproof and heat-resistant seal. Its liquid plastic formula and precision application make it an innovative and unique product. However, the higher price point and learning curve may not be suitable for all users.
5. Cosbond Mouldable Plastic Glue
Cosbond Mouldable Plastic Glue is a unique UV glue option that stands out from the traditional liquid counterparts. This glue comes in the form of moldable plastic beads that can be shaped and molded to fit any application necessary.
Strength and Durability: The Cosbond Mouldable Plastic Glue is incredibly strong and durable, with the ability to bond with a variety of materials including plastics, metals, and even fabrics. Its strength and durability make it an excellent option for repairing and creating items that require heavy use.
Viscosity and Application: As mentioned earlier, the Cosbond Mouldable Plastic Glue comes in the form of moldable plastic beads. This unique form allows for greater control and precision when applying the glue in comparison to liquid forms. The beads can be molded and manipulated to fit the exact shape and size of the area being bonded.
Transparency and Clarity: Since the Cosbond Mouldable Plastic Glue is not a liquid, clarity and transparency are not applicable factors to consider.
Drying Time and Curing: Due to the nature of the Cosbond Mouldable Plastic Glue, it does not require any drying time. The bond is immediate upon application and sets within a few minutes. The curing time is relatively short, and once fully cured, the bond is incredibly strong.
Price and Value: The Cosbond Mouldable Plastic Glue is slightly more expensive than other traditional UV glue options but the unique moldable form and strength make it a worthwhile investment.
The Cosbond Mouldable Plastic Glue is an excellent option for those in need of a strong and durable bond and greater control during application. Its moldable format allows for a more precise and customizable bond. Its strength and durability make it an excellent option for repairs that require heavy use.
6. Beacon Fabri-Tac Permanent Adhesive
Beacon Fabri-Tac Permanent Adhesive is a popular choice for those who require a reliable adhesive for their fabric projects. It is well-known for its strong sticking power and fast-drying formula. Here are some of the key features that make this glue stand out:
- Permanent Bond: Once Fabri-Tac is applied to fabric, it creates a strong and permanent bond that will not wash out or weaken over time. This makes it an ideal choice for a variety of fabric projects, such as hemming, sewing, and embellishing.
- Fast-Drying: Fabri-Tac dries quickly, making it a great choice for projects that require speed. It dries clear and remains flexible after drying, so it won’t leave a stiff or brittle residue on your fabric.
- Water Resistant: This adhesive has excellent water resistance, which makes it ideal for projects that may be exposed to moisture or humidity. It won’t break down or weaken in damp conditions, which is especially helpful for outdoor projects or items that will be washed frequently.
- Easy to Use: Fabri-Tac comes in a convenient bottle with an easy-grip applicator that helps you control the amount of glue you use. Its no-mess formula makes it easy to apply without worrying about drips or spills, and it dries quickly so you can move on to the next step of your project.
- Versatile: Although Fabri-Tac is designed for use on fabric, it can also be used on other surfaces such as leather, felt, and canvas. This makes it a versatile choice for a variety of projects.
- Affordable: Compared to other fabric adhesives on the market, Fabri-Tac is relatively affordable, making it a great choice for those on a budget who still want a high-quality adhesive for their projects.
Beacon Fabri-Tac Permanent Adhesive is a great choice for anyone looking for a reliable adhesive for their fabric projects. Its strong bond, fast-drying formula, and water-resistant properties make it a versatile and practical option for a variety of applications.
Factors to Consider
When selecting the best UV glue for your specific project, there are a few important factors to take into consideration. From strength and durability to viscosity and application, each factor plays a crucial role in determining the right glue for the job. Additionally, other elements such as transparency, drying time, curing effectiveness, price, and overall value must also be evaluated before making a final decision. In this section, we will delve into these significant factors and provide insight into how they contribute to the success of your UV glue projects.
Strength and Durability
When it comes to choosing the best UV glue, one of the most important factors to consider is strength and durability. Not all UV glues are created equal, and some are definitely stronger and more durable than others.
Here are some things to consider:
- Bond strength: Different UV glues have different bonding strengths and are designed for different materials. If you’re working with heavy-duty materials like metal or glass, you may need a stronger UV glue than if you’re working with paper or fabric.
- Flexibility: Depending on what you’re using the UV glue for, you may need a glue that can flex and move with the material. Look for a UV glue that is designed for flexibility if you’re working with materials that will bend and move.
- Moisture resistance: If you’re using UV glue for outdoor projects or in areas that may be exposed to moisture, you’ll want to choose a UV glue that is moisture resistant to prevent it from breaking down over time.
- Temperature resistance: Some UV glues are designed to withstand high temperatures, which can be important if you’re using them for automotive or industrial applications. Make sure to choose a UV glue that can withstand the temperature range of the project you’re working on.
Ultimately, the strength and durability of the UV glue you choose will depend on your specific project needs. Consider what type of materials you’re working with, whether the project will be exposed to moisture or high temperatures, and how much flexibility the glue will need to have.
It’s worth noting that while strength and durability are important considerations, they’re not the only ones. You’ll also want to think about factors like viscosity, clarity, and price when choosing the best UV glue for your needs.
Viscosity and Application
When choosing a UV glue, the viscosity and application method are important factors to consider. The viscosity refers to the thickness and flow of the glue. Some people prefer a thicker glue that stays in place, while others prefer a thinner glue that spreads easily. The application method can also vary, with some glues coming in a squeeze tube, while others have a brush applicator.
Below is a table comparing the viscosity and application method of our top UV glue options:
| UV Glue | Viscosity | Application Method |
|---|---|---|
| Gorilla Super Glue Gel | Thick | Squeeze tube |
| Loctite Super Glue Gel | Medium | Brush applicator |
| Aleene’s Clear Gel Tacky Glue | Thick | Squeeze tube |
| Bondic Liquid Plastic Welder | Thin | UV light applicator |
| Cosbond Mouldable Plastic Glue | Thick | Squeeze tube |
| Beacon Fabri-Tac Permanent Adhesive | Medium | Squeeze tube or brush applicator |
As seen in the table, the Gorilla Super Glue Gel, Aleene’s Clear Gel Tacky Glue, and Cosbond Mouldable Plastic Glue have a thicker viscosity, making them ideal for precise application and vertical surfaces. The Loctite Super Glue Gel and Beacon Fabri-Tac Permanent Adhesive have a medium viscosity, making them a good choice for both vertical and horizontal surfaces. The Bondic Liquid Plastic Welder has a thin viscosity and is applied using a UV light applicator, which allows for precise application on small areas.
Consider the type of project you will be working on and your personal preference when choosing a UV glue with a suitable viscosity and application method.
Transparency and Clarity
When it comes to UV glue, transparency and clarity are important factors to consider. In many cases, users need the glue to be practically invisible when it dries so as not to interfere with the aesthetics of the finished product. Here is a breakdown of the transparency and clarity of some top UV glue options:
| UV Glue | Transparency | Clarity |
|---|---|---|
| Gorilla Super Glue Gel | Transparent | Clear |
| Loctite Super Glue Gel | Transparent | Clear |
| Aleene’s Clear Gel Tacky Glue | Transparent | Slightly cloudy |
| Bondic Liquid Plastic Welder | Translucent | Clear |
| Cosbond Mouldable Plastic Glue | Opaque | Not applicable |
| Beacon Fabri-Tac Permanent Adhesive | Transparent | Slightly cloudy |
As you can see, most of these UV glue options are transparent, meaning they don’t have any color when they dry. However, the clarity of the glue can differ. Gorilla Super Glue Gel and Loctite Super Glue Gel are both transparent and clear, meaning they have a high level of transparency and clarity. Aleene’s Clear Gel Tacky Glue and Beacon Fabri-Tac Permanent Adhesive are also transparent, but have a slightly cloudy appearance. Bondic Liquid Plastic Welder is somewhat translucent, but still has good clarity. Cosbond Mouldable Plastic Glue, on the other hand, is opaque and doesn’t have a transparency or clarity factor to consider.
If transparency and clarity are important to your project, consider choosing a UV glue with a high level of both. If a slightly cloudy appearance won’t hinder your project, then a moderately transparent and clear glue could still be a good option. Ultimately, it depends on your specific needs and preferences.
Drying Time and Curing
When it comes to UV glue, drying time and curing are crucial factors to consider. Drying time refers to how long it takes for the glue to set and become tack-free, while curing time refers to the time it takes for the glue to fully bond and reach its maximum strength. Different UV glues have varying dry and cure times depending on their chemical composition and strength.
Here’s a breakdown of the drying and curing times of some popular UV glues:
| Brand | Drying Time | Curing Time |
|---|---|---|
| Gorilla Super Glue Gel | 10-20 seconds | 24 hours |
| Loctite Super Glue Gel | 10-20 seconds | 24 hours |
| Aleene’s Clear Gel Tacky Glue | 30-40 seconds | 24 hours |
| Bondic Liquid Plastic Welder | N/A | 4 seconds with the LED light |
| Cosbond Mouldable Plastic Glue | 10-20 seconds | 24 hours |
| Beacon Fabri-Tac Permanent Adhesive | 24 hours | 24 hours |
As you can see, some UV glues have incredibly fast cure times, like the Bondic Liquid Plastic Welder, which cures in just four seconds with the LED light provided. However, it’s worth noting that the Bondic glue is specifically designed for small repairs and not for heavy-duty bonding.
On the other hand, some UV glues have longer cure times, like the Beacon Fabri-Tac Permanent Adhesive, which takes 24 hours to fully cure. This glue is designed for fabric and textiles, and a longer cure time ensures that the bond is strong enough to withstand wear and tear.
In general, UV glues with faster cure times tend to be more convenient for small repairs and projects, while those with longer cure times are better suited for larger, more heavy-duty applications. However, it’s important to always follow the manufacturer’s instructions for optimal results.
Keep in mind: while some UV glues advertise fast drying and curing times, it’s important to also consider temperature and humidity. High humidity or cooler temperatures can slow down the curing process, so be aware of the environment you’re working in.
Price and Value
When it comes to choosing the best UV glue, price and value are important factors to consider. You want to make sure you are getting your money’s worth with a product that fits your budget.
Gorilla Super Glue Gel is a mid-range option with a strong bond and fast drying time. It comes in a compact container, making it easy to store and use for multiple projects.
Loctite Super Glue Gel is a budget-friendly option with a precision tip applicator for easy and accurate application. It offers a strong bond and dries quickly, making it a great choice for DIY projects and small repairs.
Aleene’s Clear Gel Tacky Glue is a low-cost alternative that still delivers strong adhesion and a clear finish. It’s a great option for crafts and hobbies, and can also be used for small household repairs.
Bondic Liquid Plastic Welder is a bit on the pricier side, but offers a unique formula that allows you to build and mold the glue into the desired shape before curing it with the UV light. This feature makes it a great choice for repairing and restoring items with complex shapes and contours.
Cosbond Mouldable Plastic Glue is another high-end option that offers a unique molding feature. It can be shaped, bent, and even painted over once cured. Its high price point makes it a good choice for professional use or complex projects that require extensive molding and shaping.
Beacon Fabri-Tac Permanent Adhesive is a mid-range option that is specifically designed for use with fabric and textiles. It offers a permanent and strong bond, but with a slower drying time to allow for adjustments and repositioning during the application process.
Ultimately, the price and value of each UV glue option will depend on the specific needs and preferences of the user. It’s important to consider factors such as strength, viscosity, transparency, and drying time in addition to price when making a purchasing decision.
Here’s a table summarizing the price range of each UV glue option:
| UV Glue | Price Range |
|---|---|
| Gorilla Super Glue Gel | Mid-range |
| Loctite Super Glue Gel | Budget-friendly |
| Aleene’s Clear Gel Tacky Glue | Low-cost |
| Bondic Liquid Plastic Welder | High-end |
| Cosbond Mouldable Plastic Glue | High-end |
| Beacon Fabri-Tac Permanent Adhesive | Mid-range |
How to Use UV Glue
As you venture into the world of UV glue, knowing how to use it properly will ensure that you achieve the best results in your DIY projects or repairs. While the application process may seem daunting at first, with some patience and practice, you’ll be able to handle and apply UV glue with confidence. In this section, we’ll guide you through the necessary steps for using UV glue and share some helpful tips along the way. So, let’s dive in!
Preparing the Surfaces
Surface preparation is crucial when using UV glue to ensure the best adhesion possible. Before applying the glue, you need to clean and dry the surfaces thoroughly. Any dirt, debris, or moisture can weaken the bond between the surfaces, leading to poor adhesion and even complete failure of the glue. Here are some tips for preparing the surfaces before using UV glue:
| Surface Type | Cleaning Method |
|---|---|
| Glass | Clean with a glass cleaner and wipe with a dry cloth to remove any fingerprints or oils. If the glass is cracked or chipped, use a fine-grit sandpaper to smooth out any rough edges and wipe clean. |
| Plastic | Clean with soap and water and dry thoroughly. If the plastic is rough or textured, sand lightly to create a smoother surface and wipe clean. |
| Metal | Clean with a degreaser or rubbing alcohol and wipe with a dry cloth to remove any residue. If the metal is rusty, use a wire brush or sandpaper to remove the rust and wipe clean. |
| Ceramic | Clean with a ceramic cleaner or vinegar and water solution and wipe dry. If the ceramic is glazed, sand lightly to create a rougher surface and wipe clean. |
| Wood | Clean with soap and water and dry thoroughly. Sand the surface lightly to create a rougher texture, which will help the glue adhere better. Wipe clean with a dry cloth. |
Remember to wear gloves when cleaning the surfaces to avoid leaving oils and fingerprints on them. Once the surfaces are clean and dry, you are ready to apply the UV glue.
Applying the Glue
Before applying UV glue, it is important to ensure that the surfaces are clean and dry to prevent any bonding issues. Here are the steps for applying UV glue:
1. Positioning: First, position the items that you want to bond together. Make sure that they are aligned properly.
2. Dropping: Next, use the applicator tip or dropper to apply a small amount of UV glue onto the surface that needs bonding. It is important to use only a small amount as excess glue can lead to weak bonding.
3. Spreading: Use a toothpick or a similar tool to spread the glue evenly across the surface. Make sure that the entire area is covered with a thin layer of the UV glue.
4. Pressing: Once the glue is spread evenly on the surface, bring the items together to initiate the bonding process. Apply some pressure on the items to ensure that they stick together.
5. Adjusting: Adjust the position of the items if necessary. You can do this immediately after pressing the items together as the UV glue will not cure until exposed to UV light.
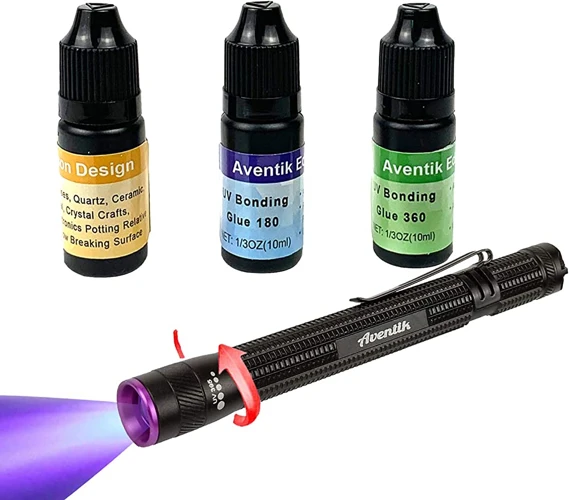
6. Curing: Finally, expose the glue to a UV light source. Hold the light above the bonded area for a few seconds, or as specified by the glue manufacturer, until the glue hardens and cures completely.
By following these steps, you should be able to achieve strong and long-lasting bonding with UV glue.
Curing the Glue
Once you have applied the UV glue, it’s time to cure it. Curing is the process of drying and hardening the glue using UV light. It is crucial to make sure the glue is cured properly to achieve maximum strength and durability.
Most UV glues require a specific type of UV light for curing. It is essential to read the instructions of the glue before starting the curing process. Some UV glues require a specific wavelength of UV light, while others can be cured with any UV light source.
Here are the general steps for curing the UV glue:
| Step | Description |
|---|---|
| 1 | Position the UV light source above the glue, making sure the glue is directly under the light. |
| 2 | Turn on the UV light source and wait for the glue to cure. The time required for curing will depend on the type of UV glue being used. |
| 3 | Rotate the object being glued if necessary to ensure all parts of the glue are cured evenly. |
| 4 | Check the glue for any uncured spots. If there are any, apply more UV glue and repeat the curing process. |
| 5 | Once the glue has cured properly, turn off the UV light source and remove the object from under the light. |
It is important not to touch or move the object being glued while the glue is curing, as this may cause the glue to become misaligned or weakened. Additionally, keeping the object properly positioned and stationary during the curing process will ensure that the glue dries evenly and uniformly, resulting in a stronger bond.
In some cases, the UV glue may not cure properly, especially if it is applied to a non-UV permeable surface. If this happens, it is necessary to reapply the glue and repeat the curing process until the glue has cured completely.
Curing the UV glue is a critical step in the bonding process. By following the manufacturer’s instructions and using the right UV light source, you can ensure a strong and durable bond that will last for a long time.
Finishing and Cleaning Up
Once the UV glue has cured, it’s time to finish up the project and clean up any excess glue. Here are some steps to follow for a smooth finish:
- Trim any excess glue: If there is any excess glue that has dripped or pooled, carefully trim it with a sharp pair of scissors or a razor blade. Be careful not to damage the surface or the bond that has been created.
- Sand the surface: If necessary, sand the surface to smooth out any bumps or unevenness. Use a fine-grit sandpaper and work gently in a circular motion until the surface is smooth to the touch.
- Clean up: Wipe away any remaining glue residue with a clean cloth or paper towel. If the glue has dried and is difficult to remove, try using acetone or rubbing alcohol. Be sure to follow safety precautions when using these substances and work in a well-ventilated area.
It’s important to take care when finishing and cleaning up after using UV glue, as you don’t want to undo all your hard work by accidentally damaging or weakening the bond. With a little bit of care and attention, you can ensure that your project looks its best and that the bond created by the UV glue is strong and long-lasting.
Tips and Tricks
Are you looking for more ways to utilize UV glue beyond typical household repairs? Look no further than these creative tips and tricks. From securing loose tiling to fixing damaged car parts, UV glue can be a versatile solution for various projects. Keep reading for helpful tips and step-by-step instructions on how to take advantage of the potential of UV glue.
Secure Loose Tiling
Loose tiles can be a major annoyance and even a safety hazard in homes and businesses. Luckily, UV glue can be a great solution for securing loose tiling quickly and easily. Here are some steps to follow:
Step 1: Clean the tile and surrounding area to ensure there is no dirt or debris that might interfere with the glue.
Step 2: Apply a small amount of UV glue to the back of the tile using a toothpick or similar tool. Be sure to apply enough glue to cover the surface area that will be in contact with the surface.
Step 3: Press the tile firmly into place and hold it for a few seconds to allow the glue to bond. Use a clean cloth or paper towel to wipe away any excess glue that may have oozed out.
Step 4: Use a UV light or direct sunlight to cure the glue. Hold the light a few inches from the surface and allow the glue to cure for several minutes.
Step 5: Once the glue is fully cured, check to make sure that the tile is firmly secured. If needed, reapply the glue and repeat the curing process.
Using UV glue to secure loose tiles is a simple and effective solution for a common problem. By following these steps, you can avoid the hassle and expense of having to replace entire sections of tiling.
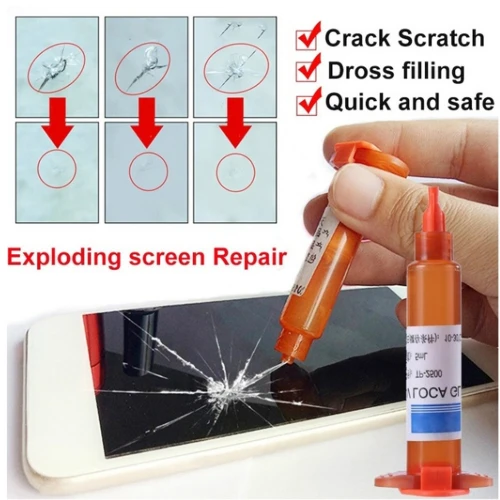
Repair Cracked Phone Screens
When it comes to repairing cracked phone screens, UV glue can be a lifesaver. Instead of spending hundreds of dollars on a new phone or even more expensive repairs, you can use UV glue to fix the screen yourself. Here are the steps to follow:
1. Gather Materials:
- UV Glue
- Microfiber cloth
- Toothpick or small brush
- Clear tape
- UV light source (can be found in UV glue kits or purchased separately)
2. Clean the Screen:
Using the microfiber cloth, wipe the screen clean of any dust, dirt, or debris. Any leftover particles can interfere with the adhesive process.
3. Apply the UV Glue:
Using a toothpick or small brush, apply a small amount of UV glue along the edges of the cracked screen. Be sure to spread it evenly and fill any gaps in the crack. Make sure not to apply too much glue, as it can overflow and ruin the screen.
4. Press the Screen Together:
Carefully and gently press the top of the screen onto the bottom half. Be careful not to push too hard, as this can cause the adhesive to overflow. Secure the screen in place using a few pieces of clear tape.
5. Cure the Glue:
Expose the glue to a UV light source for several minutes, as instructed on the label of the glue. This will help the glue cure and solidify.
6. Remove Tape:
Carefully remove the clear tape. If any excess glue appears, wipe it off with a microfiber cloth.
Remember that every phone screen is different and you should tailor the process accordingly. It’s important to follow the instructions on the specific UV glue you are using, as the curing time and process can vary. Also, if the crack is too large or extends into the display, it may be best to seek professional repair to avoid further damage to your phone.
Create Jewelry and Accessories
UV glue can be a fantastic option for creating jewelry and accessories. It’s a great way to bond beads, crystals, and other small pieces onto metal, plastic, or fabric surfaces. Not only does UV glue create a strong and durable bond, but it also dries clear, providing a seamless look to your creations.
When it comes to creating jewelry and accessories with UV glue, there are a few things to keep in mind. First, you want to ensure that you have all of your materials and tools ready before starting. This includes the UV glue, the surfaces you’ll be bonding to, any beads or crystals you want to attach, and a UV light for curing the glue.
To make things easier, you can use a table to organize your materials and tools. Here’s an example:
| Materials: | Tools: |
| UV glue | UV light |
| Beads/crystals | Tweezers |
| Surface (metal, plastic, fabric) | Toothpick (for applying glue) |
Once you have everything ready, it’s time to start creating. Use the toothpick to apply a small amount of UV glue to the surface where you want to attach the bead or crystal. Use the tweezers to carefully place the bead or crystal onto the glue. Repeat this step until you have all of your beads and crystals attached to the surface.
Once you’re happy with the placement, use the UV light to cure the glue. Hold the light over the surface for a few seconds until the glue is fully cured. You may need to rotate the surface to ensure that all areas are properly exposed to the UV light.
Finally, once the glue is fully cured, you can add any finishing touches to your jewelry or accessory. This could include attaching a chain to a pendant, or sewing a fabric backing onto a bejeweled hair accessory.
With a little creativity and the right materials, you can use UV glue to create stunning and unique pieces of jewelry and accessories. Whether you’re making a gift for a loved one or just want to add some flair to your wardrobe, UV glue can be an excellent tool to have in your crafting arsenal.
Fix Damaged Car Parts
One of the most common uses for UV glue is fixing damaged car parts. The strength and durability of UV glue make it a great option for repairing everything from cracked taillights to broken side mirrors. Here are some common car parts that can easily be fixed with UV glue:
| Car Parts | How UV Glue Can Help |
|---|---|
| Side Mirrors | The Gorilla Super Glue Gel, Loctite Super Glue Gel, and Bondic Liquid Plastic Welder can all be used to repair broken side mirrors. The transparency of the glue ensures that the repair won’t be noticeable and the strength will keep the mirror in place. |
| Taillights | Broken taillights can be quickly and easily repaired with UV glue. The Aleene’s Clear Gel Tacky Glue and Cosbond Mouldable Plastic Glue both have the transparency and strength needed to make the repair seamless. |
| Bumpers | The Beacon Fabri-Tac Permanent Adhesive can be used to repair small cracks or chips in plastic or rubber car bumpers. The high viscosity of the glue makes it perfect for holding pieces in place while curing. |
| Interior Trim | In the interior of a car, UV glue can be used to repair cracked or broken plastic or vinyl parts such as dashboard trim or door handles. The Bondic Liquid Plastic Welder is a great option for these types of repairs, as it can be formed and molded to fit the exact shape needed. |
When using UV glue to fix car parts, it’s important to follow the proper steps for preparation and application. Clean the damaged area thoroughly and make sure it is completely dry before applying the glue. Apply a small amount of glue to one surface and then press the two surfaces together firmly. Use a UV light to cure the glue and wait for it to completely set before using the repaired part.
Whether you’re a mechanic or a DIY car enthusiast, UV glue can be a powerful tool for fixing damaged car parts. With its strength, transparency, and easy application, it’s easy to see why UV glue has become one of the most popular options for car repairs.
Conclusion
In conclusion, UV glue is a versatile and strong adhesive option that can be used for a wide range of projects. Whether you’re looking to fix a broken item, create new accessories, or secure loose parts, UV glue can be a game-changer.
After researching and testing various options, it’s evident that certain brands stand out above the rest. Gorilla Super Glue Gel and Loctite Super Glue Gel are both excellent choices for their strength and durability, while Aleene’s Clear Gel Tacky Glue offers a unique transparency for more delicate projects. Bondic Liquid Plastic Welder and Cosbond Mouldable Plastic Glue provide specialized solutions for different types of materials, and Beacon Fabri-Tac Permanent Adhesive is a top choice for fabric and clothing repairs.
When choosing a UV glue, it’s important to consider factors such as strength and durability, viscosity and application, transparency and clarity, drying time and curing, as well as price and value. By weighing these factors and choosing a glue that’s right for your specific project, you can ensure a successful and long-lasting bond.
Using UV glue requires a bit of preparation and attention to detail, but with the right technique, it can be a quick and easy solution for most adhesive needs. Just be sure to follow the instructions carefully and allow enough time for the glue to cure properly before handling the item.
Overall, UV glue offers a unique and effective way to bond various materials together. With its strength, versatility, and ease of use, it’s no wonder why so many DIY enthusiasts and professionals alike turn to this adhesive option for their projects. So why not give it a try and see what UV glue can do for you?
Frequently Asked Questions
What is UV glue?
UV glue, also known as ultraviolet light glue, is a type of adhesive that cures with the help of UV light.
What are the benefits of UV glue?
UV glue offers a range of benefits including strong bonding, transparency, quick curing times, and the ability to work on various materials.
Which are the top options in UV glue?
Some of the best UV glue options include Gorilla Super Glue Gel, Loctite Super Glue Gel, Bondic Liquid Plastic Welder, and Beacon Fabri-Tac Permanent Adhesive, among others.
How strong is UV glue?
UV glue can be very strong once cured properly, with some options offering high bonding strength and durability.
Can UV glue be used on all materials?
While UV glue can work on many materials including plastic, glass, rubber, and metal, it may not be compatible with certain plastics and may require testing before use.
What is the curing process for UV glue?
The curing process for UV glue involves applying the adhesive to the surfaces to be bonded, exposing it to UV light, and allowing it to cure for the recommended time.
What factors should be considered when choosing UV glue?
Factors to consider when choosing UV glue include its strength and durability, viscosity and application, transparency and clarity, drying time and curing, and price and value.
Can UV glue be removed once applied?
UV glue can be difficult to remove once cured, but depending on the materials and surface, it may be possible to use solvents or other methods to separate the bonded surfaces.
What are some common uses for UV glue?
UV glue can be used in a variety of applications including repairing cell phone screens, bond jewelry and accessories, secure loose tiling, and fix damaged car parts.
Is UV glue resistant to water and heat?
The water and heat resistance of UV glue can vary depending on the product, so it’s important to check the manufacturer’s specifications before use.