When it comes to enjoying music or watching a movie, the best sound quality is always an important factor. However, over time, the cones of speakers may wear out and cause distortion or disruptions in the sound. Repairing the speaker cone may seem like a daunting task, but with the right glue and technique, it can be done effectively. But which glue should you use? In this comprehensive guide, we’ll take a look at the different types of glue suitable and unsuitable for speaker cone repair, how to choose the right one for your speaker cone, and a step-by-step guide on how to properly use glue on a speaker cone. Let’s get started and restore the crisp sound quality of your speakers.
What is a Speaker Cone?
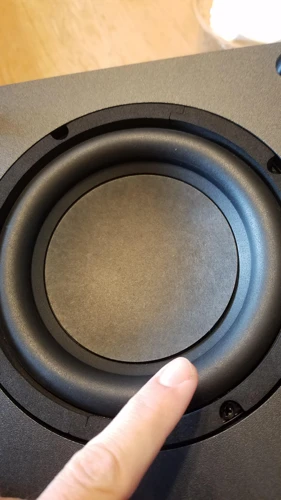
The speaker cone is a crucial component of any speaker system, responsible for producing sound that we hear. But what exactly is a speaker cone? For those who are not familiar with speaker technology, a speaker cone is the circular piece of material that vibrates back and forth to create sound waves. Most cones are made from materials such as paper, plastic, or metal. However, some high-end cones may be made from more exotic materials such as kevlar or carbon fiber. To learn more about the materials used for speaker cones, check out our comprehensive guide on gluing polymer clay.
Materials Used for Speaker Cones
Speaker cones are an integral part of speakers that helps to produce high-quality sound. These cones are made up of various materials, including paper, synthetic films, rubber, and metal. Each material has its own unique characteristics that affect the sound quality produced by a speaker.
Paper cones are the most commonly used speaker cones because they are lightweight and affordable. They are made using special paper that has been treated to resist moisture and provide durability. Synthetic films, on the other hand, are more expensive but are known for their ability to produce clearer sound due to their uniform thickness.
Rubber cones are often used for subwoofers because of their ability to handle high power levels. They are flexible and can withstand a lot of vibration, making them ideal for use in applications that require a lot of power.
Metal cones are mostly used in high-end speakers because they can produce very high-quality sound with exceptional clarity and detail. They are usually made from aluminum, titanium, or magnesium and are much more expensive than other types of cones.
It is important to consider the type of material your speaker cone is made from before choosing the appropriate glue to use. For instance, some glue types may not work well on rubber cones while others may not work well on metal cones.
While choosing the right glue is important, it is just as important to know how to apply it properly to avoid damaging the speaker cone. In the next section, we will discuss some of the suitable and unsuitable types of glue for speaker cone repair.
Types of Glue Suitable for Speaker Cone Repair
When it comes to repairing a speaker cone, using the right type of glue is crucial. Not all glues are suitable for this delicate job, as some may damage the cone or fail to provide a strong and long-lasting bond. Fortunately, there are several types of glue that work well for speaker cone repair. Below, we’ll explore some of them in detail and provide tips on how to choose the right one for your specific needs. But first, let’s take a closer look at what a speaker cone is and what materials are commonly used to make it.
Epoxy Glue
Epoxy glue is a two-part adhesive that is known for its high strength and waterproof properties. It is a popular choice for fixing speaker cones because of its ability to bond to various materials and its durability. When using epoxy glue for speaker cone repair, it is important to choose a formula that is designed to work with the materials in your speaker cone.
Here are some advantages and disadvantages of using epoxy glue for speaker cone repair:
Advantages:
- Epoxy glue provides a strong and permanent bond
- It can bond to a variety of materials, including the paper, plastic, and metal used in speaker cones
- It dries clear, making it ideal for use on cones with decorative patterns or designs
- Epoxy glue can withstand vibration and extreme temperatures, making it a good choice for speaker cone repair
Disadvantages:
- Epoxy glue can take longer to dry than other types of glue
- It typically requires mixing before use, which can be messy
- Epoxy glue may not be suitable for larger speaker cone repairs because it may not spread as easily as other types of glue
If you decide to use epoxy glue for your speaker cone repair, it is important to follow the manufacturer’s instructions carefully. Make sure the surfaces are clean and dry before applying the adhesive. Next, mix the two parts of the epoxy glue together according to the instructions.
Apply the glue to the damaged area of the speaker cone, taking care not to use too much. Then, hold the cone gently in place while the glue sets. This may take several hours or even overnight, depending on the drying time indicated on the adhesive’s packaging.
While using epoxy glue for speaker cone repair can provide a strong and lasting bond, it is important to note that this adhesive can be difficult to remove once it dries. It is also recommended to wear protective gloves and work in a well-ventilated area to avoid inhaling fumes.
Epoxy glue is a good option for speaker cone repair, especially if you need a strong and waterproof bond. If you want to learn more about creating strong glue for plastic or other materials, check out our article on How to Make Strong Glue for Plastic.
Polyurethane Glue
Polyurethane glue, also known as Gorilla glue, is a popular choice for speaker cone repair due to its strong and durable bond. This type of glue works well for repairing both paper and foam speaker cones. One of the key benefits of polyurethane glue is that it expands as it dries, which helps to fill any gaps and create a strong bond.
| Pros | Cons |
|---|---|
| Strong and durable bond that can withstand vibration and stress | Expands as it dries, which can create a messy application if too much is used |
| Can be sanded and painted over once it has dried | Can be difficult to remove if excess glue gets on surrounding areas |
| Water-resistant and can withstand high humidity | Dries quickly, which can be challenging for larger repairs |
When using polyurethane glue for speaker cone repair, it’s important to keep in mind that a little goes a long way. It’s best to apply a small amount to the damaged area and then press the cone in place, rather than applying too much glue and making a mess. It’s also recommended to wear gloves and protect your work area from any potential drips or spills.
If you need to remove polyurethane glue from your hands or work area, acetone or rubbing alcohol can be effective. However, be sure to use caution when working with these chemicals and follow all safety precautions.
Polyurethane glue is a great option for repairing your speaker cone and ensuring that it lasts for many more years to come. If you’re unsure about which type of glue to use for your specific repair, be sure to consult with a professional or do some research beforehand.
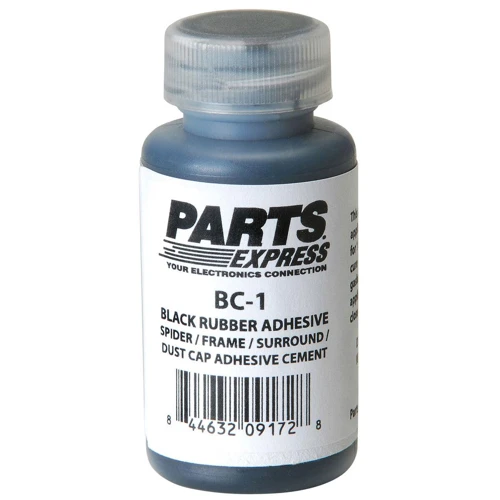
Silicone Adhesive
Silicone adhesive is another type of glue that can be used for repairing speaker cones. It is a versatile adhesive that can bond multiple materials together, including paper, plastic, and metal. One of the main advantages of silicone adhesive is its flexibility, which allows the speaker cone to move and vibrate without breaking the glue bond.
Here is a table comparing the pros and cons of using silicone adhesive:
| Pros | Cons |
|---|---|
| Flexible bond | Not as strong as other types of glue |
| Dries clear | Longer drying time |
| Resistant to water, heat, and chemicals | Can be messy to apply |
Silicone adhesive is particularly useful for repairing tears or cracks in the speaker cone. To use it, follow the same steps as with other types of glue, but be sure to apply it thinly and evenly to avoid any excess glue seeping out and causing a mess.
One important thing to keep in mind: silicone adhesive may not be compatible with all materials, so be sure to test it on a small area before applying it to the entire cone. If you’re unsure whether silicone adhesive is the right choice for your repair job, consult a professional or do further research to make sure you’re making the best decision.
If you need more information on how to apply glue to specific materials, check out our articles on how to glue plastic to glass or how to glue acrylic to glass.
CA Glue
CA glue, also known as cyanoacrylate adhesive, is a type of fast-drying glue that is perfect for repairing small tears or punctures to speaker cones. It has a very low viscosity, which means that it is thin and easily flows into the affected area. This makes it ideal for fixing small holes or cracks that are difficult to reach with other types of glue.
One of the main advantages of CA glue is that it dries very quickly, usually within a few minutes. This means that you can make the repair and have your speaker up and running again in no time. However, it is important to note that CA glue tends to be brittle when dry, which means that it is not well-suited for repairing large tears or holes in the cone.
To use CA glue for speaker cone repair, follow these steps:
- Step 1: Clean the damaged area of the speaker cone. Make sure to remove any dust or debris from the surface.
- Step 2: Apply a small amount of CA glue to the affected area. Use a toothpick or other small pointed tool to apply the glue precisely.
- Step 3: Hold the cone in place until the glue dries completely, which should take no more than a few minutes.
Note: CA glue is a very strong adhesive and can bond skin to skin or skin to other materials quickly. You should avoid getting it on your skin. If you do happen to get CA glue on your skin, use acetone to remove it.
CA glue is ideal for small speaker cone repairs due to its thin consistency and quick drying time. However, it is not suitable for large tears or holes. Remember to use it carefully, avoid applying too much, and protect your hands and work area to avoid accidents.
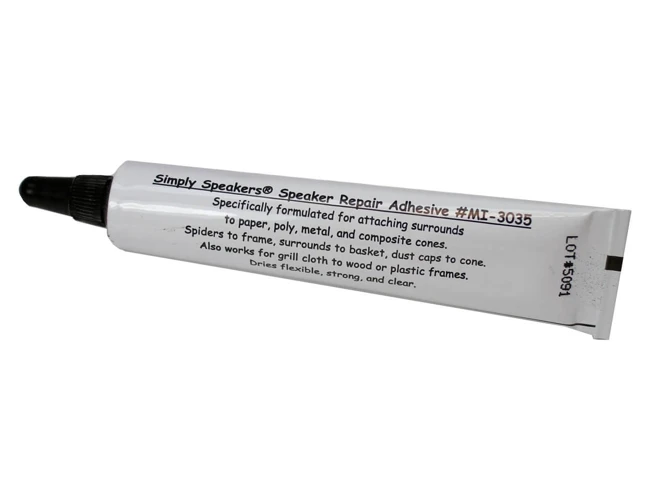
Clear Adhesive
Clear adhesive is a popular option for repairing speaker cones, and for good reason. This type of glue is made with a clear formula that dries transparent, making it perfect for use on cones that have any visible damage.
Here are some of the benefits of using clear adhesive for your speaker cone repair:
- It dries clear, making it ideal for use on delicate cones that have visible damage.
- It has a high resistance to water and high temperatures, providing a long-lasting hold that is perfect for speakers that get hot during use.
- It is easy to apply, thanks to its precision applicator that ensures the glue goes just where it’s needed.
- It sets quickly and can be sanded or painted over after drying, allowing for additional repairs or embellishments if needed.
However, it is important to note that while clear adhesive can be a great option for speaker cone repair, it may not be the best for all types of cones or damage. It is crucial to consider the material and strength of your speaker cone before choosing which type of glue to use.
For example, if your speaker cone is made of a fragile material, such as glass or porcelain, clear adhesive may not be strong enough to hold the cone together. In this case, a more heavy-duty glue like epoxy or polyurethane would be a better option. On the other hand, if your speaker cone is made of a durable material like metal or plastic, clear adhesive may be all you need to repair any minor damage.
In addition to considering the material of your cone, it is also important to think about the type of damage that needs to be repaired. If your speaker cone has a large tear or hole, clear adhesive may not be strong enough to hold the cone together and prevent further damage. In this case, a patch or replacement may be necessary.
Clear adhesive can be a great option for repairing speaker cones with minor visible damage. It dries clear, is easy to apply, and has a high resistance to water and high temperatures. However, it is important to consider the material and type of damage to your speaker cone before choosing which glue to use. If you’re not sure which glue is best for your repair, consult with a professional or do some additional research to find the right solution.
Types of Glue Unsuitable for Speaker Cone Repair
When it comes to repairing speaker cones, not all glues are created equal. In fact, using unsuitable types of glue can actually do more harm than good. While some adhesives may seem like a quick fix, they can cause permanent damage to your speaker and ultimately lead to costly replacements. It’s important to understand which types of glue to avoid when repairing your speaker cone to ensure that you don’t end up causing more problems. So, before you reach for that bottle of hot glue or rubber cement, read on to learn about the types of adhesives that should never be used to repair your speaker cone.
Hot Glue
Hot glue is a popular choice for do-it-yourself projects, but it is not a good option for repairing speaker cones. Hot glue has a low bond strength and may not adhere properly to the material of the cone. Additionally, hot glue can become brittle over time, causing the repair to fail. Thus, it’s not a suitable type of glue for fixing speaker cones.
Below is a table outlining the advantages and disadvantages of using hot glue for repairing speaker cones:
| Advantages | Disadvantages |
|---|---|
| Easy to apply | Low bond strength |
| Dries quickly | May not adhere properly to cone material |
| Can be removed easily if necessary | Becomes brittle over time |
It is highly recommended to avoid hot glue when repairing speaker cones. Instead, opt for one of the suitable types of glue mentioned earlier in this article, such as epoxy glue, polyurethane glue, silicone adhesive, CA glue, or clear adhesive. These glues provide a higher bond strength, excellent adhesion to various types of cone materials, and are long-lasting. So, for speaker cone repair, hot glue should always be avoided.
Rubber Cement
Rubber cement is a popular adhesive that is widely used for crafts and artwork. However, it is not suitable for repairing speaker cones. Rubber cement is a type of glue that contains natural rubber as its primary adhesive component, which makes it flexible and easy to work with. It is also known for its repositionable quality, which makes it ideal for temporary bonding applications. However, when it comes to repairing a speaker cone, rubber cement is not strong enough to hold the damaged part together, and it may cause further damage to the cone.
One of the main problems with using rubber cement on a speaker cone is that it is not durable. Rubber cement tends to dry out and become brittle over time, which can cause the repaired area to crack and break apart. This can lead to a poor sound quality and even permanent damage to the speaker. Rubber cement may not adhere well to some materials, which can result in a weak bond.
Another issue with rubber cement is that it is not waterproof. This means that if the speaker gets wet, the cement may dissolve and lose its adhesive properties, causing the cone to become loose or detached. If you are looking to repair your speaker cone, you should avoid using rubber cement.
Instead of rubber cement, you can use other types of glue that are more suitable for speaker cone repair, such as epoxy glue, polyurethane glue, silicone adhesive, CA glue, or clear adhesive. These types of glue are strong, durable, and waterproof, which makes them ideal for repairing speaker cones.
Choosing the right type of glue for your speaker cone depends on several factors, such as the material of the cone, the bond strength, and the drying time. By considering these factors and following the appropriate steps for using glue on a speaker cone, you can successfully repair your speaker and restore its sound quality.
Regular Super Glue
Regular super glue is not suitable for repairing speaker cones. It is a type of cyanoacrylate glue, which means it dries quickly and forms a strong bond. However, it is not flexible enough for use on speaker cones, which need to be able to vibrate and flex as sound waves pass through them. Using regular super glue can cause the cone to become stiff and affect the quality of sound produced. Additionally, it does not hold up well against exposure to heat and moisture.
It is important to avoid using regular super glue when attempting to repair a speaker cone.
If you require assistance with gluing other materials, such as marble or copper to wood, you can refer to our other articles on how to glue marble or how to glue copper to wood. However, when it comes to repairing speaker cones, it is best to choose from the appropriate types of glue listed in this article.
How to Choose the Right Glue for Your Speaker Cone
When repairing a speaker cone, choosing the right glue is crucial for a successful outcome. With so many glue options available, it can be perplexing to determine which one is suitable for your speaker cone. However, considering a few key factors can help you make an informed decision. In this section, we will guide you through the process of selecting the appropriate glue for your speaker cone. This way, you can repair your speaker cone with confidence. But before we dive into that, let’s take a quick look at the materials that you may encounter in your speaker cone.
Consider the Material of Your Speaker Cone
When choosing the right glue for your speaker cone repair, it’s important to consider the material of your speaker cone. Some materials, such as paper or cloth, may not be compatible with certain types of glue. Using the wrong glue could damage your speaker cone, or cause the repair to fail altogether.
Here are some common materials used for speaker cones and the corresponding glues that are suitable for them:
- Paper cones: Epoxy glue, polyurethane glue, or silicone adhesive are suitable for paper cones. However, it’s important to note that paper cones are delicate and can tear easily, so be gentle when applying the glue.
- Cloth cones: Clear adhesive or polyurethane glue are suitable for treating cloth cones. Cloth cones are flexible, so it’s important to use a glue that can move with the cone without cracking or breaking the bond.
- Plastic cones: CA glue or epoxy glue is suitable for plastic cones. However, it’s essential to check that the glue doesn’t react with the plastic.
- Metal cones: Polyurethane glue or silicone adhesive are suitable for metal cones. It’s important to use a glue that can withstand high vibrations as metal cones have a high vibration range.
It’s important to note that not all types of glue will work on all speaker cone materials. Before starting your repair, research the material your speaker cone is made from and which glue would be the best fit. You can test the glue on a small area of the cone before using it on the entire speaker cone to ensure that it won’t cause any damage. By doing so, you can save yourself from causing more damage to your speaker cone.
If you are unsure of the material, reach out to the manufacturer or take professional advice to the save the speaker cone from perishing.
Check the Bond Strength
When choosing the right glue for your speaker cone repair, checking the bond strength is crucial. You want a glue that will create a strong, lasting bond that can withstand the vibrations of the speaker without breaking apart.
Bond strength refers to the force required to break the bond between two surfaces. It is measured in pounds per square inch (PSI) or newtons per square millimeter (N/mm²). In general, the higher the bond strength, the stronger the bond.
Different types of glue have varying bond strengths, as shown in the table below.
| Glue Type | Bond Strength (PSI) |
|---|---|
| Epoxy Glue | 1,800 – 3,000 |
| Polyurethane Glue | 1,000 |
| Silicone Adhesive | 350 – 400 |
| CA Glue | 3,500 |
| Clear Adhesive | 2,000 – 2,500 |
As you can see, CA glue has the highest bond strength, followed by epoxy glue and clear adhesive. Polyurethane glue and silicone adhesive have lower bond strengths but can still be effective for speaker cone repair depending on the extent of the damage.
It’s worth noting that bond strength can vary depending on factors such as the materials being bonded, the amount of glue applied, and the curing time. It’s important to follow the manufacturer’s instructions for your chosen glue to ensure the strongest possible bond.
When choosing a glue for speaker cone repair, it’s important to consider the bond strength in addition to other factors such as the drying time and the type of material being bonded.
Think About the Drying Time
When considering which glue to use for your speaker cone repair, think about the drying time of the adhesive. The drying time can be influenced by several factors such as the type of glue, temperature, humidity, and the size of the damaged area. Some types of glue dry faster than others, while some may take a longer time to set completely.
In order to help you make an informed decision, we have compiled a table with the average drying time of the glues discussed in this article:
| Type of Glue | Average Drying Time |
|---|---|
| Epoxy Glue | 24-48 hours |
| Polyurethane Glue | 4-24 hours |
| Silicone Adhesive | 24-48 hours |
| CA Glue | 10-30 seconds |
| Clear Adhesive | 1-2 hours |
As you can see, some glues such as CA glue have a very short drying time, while others like epoxy glue take several hours to dry. Depending on your preference and the urgency of the repair, you should choose a glue whose drying time suits your needs.
It is important to note that some glues may take longer to fully cure, which means that even though the surface may be dry after a few hours, the adhesive may not have reached its maximum strength. Fully cured glue is essential for a long-lasting repair, so be sure to follow the manufacturer’s instructions regarding cure time.
In addition, temperature and humidity can also affect the drying time of the glue. Generally, warmer temperatures and low humidity will result in faster drying times, while cooler temperatures and high humidity will result in slower drying times. You can control the temperature and humidity in your work area to some extent, which can help speed up or slow down the drying time as needed.
Keep in mind that the size of the damaged area can also affect the drying time. A larger damaged area will require more glue, which can take longer to dry.
By taking into account the drying time of the glue, you can ensure that your repair is successful. Remember to be patient and give the glue enough time to fully cure before testing it out.
Step-by-Step Guide: How to Use Glue on Speaker Cone
You have the perfect type of glue for your speaker cone repair, and now it’s time to take action. But how exactly do you use it? Don’t worry; we’ve got you covered with a step-by-step guide on how to apply glue to your speaker cone. Whether you’re using epoxy glue, polyurethane glue, silicone adhesive, CA glue, or clear adhesive, the process is similar. By following these simple steps, you can ensure a successful speaker cone repair that will restore your audio experience to its fullest potential. So, put on your work gloves, grab your glue, and let’s get started!
Step 1: Prepare the Surface
Step 1: Before applying any glue to the speaker cone, it is essential to prepare the surface properly. The preparation stage involves cleaning the damaged area and making it free from any dirt, dust, or grime that may affect the bonding process. If the cone is torn or punctured, cut off any excess or protruding material using a pair of sharp scissors.
| Materials Required | Instructions |
|---|---|
| Cotton swabs or soft cloth | Dip the cotton swabs or cloth in a mild solvent or rubbing alcohol to clean the damaged area gently. Be careful not to rub too hard, as this can cause further damage. |
| Sandpaper or a nail file | Gently sand the area around the damaged part of the speaker cone to create some surface friction that assists the glue to bond correctly. Do not over-sand the speaker cone as this can affect the sound quality. |
| Masking tape | Cover any areas of the speaker cone that do not require gluing using masking tape. The tape ensures that no excess glue drips onto other parts of the speaker cone, which can be hard to remove and affect the sound quality of the device. |
It is important to note that the type of surface preparation may vary depending on the type of glue used. For instance, some adhesives may require rougher surfaces than others, so be sure to read the manufacturer’s instructions carefully. By preparing the speaker cone surface correctly, the bonding process is more secure, and the glue can dry correctly, providing an effective speaker cone repair.
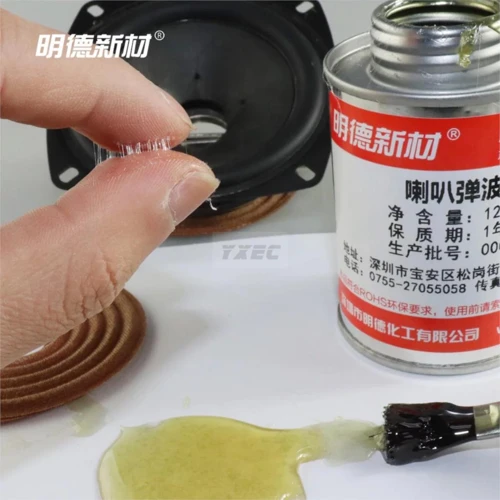
Step 2: Apply Glue to the Damaged Area
After preparing the surface of the speaker cone, the next step is to apply the glue to the damaged area. Before applying the glue, make sure to select the appropriate type of glue for your specific speaker cone, as discussed previously. Once you’ve chosen the right glue, follow these steps:
- Step 1: Squeeze a small amount of glue onto a clean and disposable surface, such as a piece of cardboard or plastic.
- Step 2: Use a toothpick or small brush to apply the glue to the damaged area. Be careful not to use too much glue as this can affect the sound quality of your speaker. If you’re using a thin glue, like epoxy glue, you can mix it with a hardener on the cardboard or plastic surface to achieve a more viscous consistency that’s easier to apply.
- Step 3: Spread the glue evenly and thinly across the cracked or split area of the cone. Use a gentle touch to avoid further damaging the speaker cone.
- Step 4: Make sure to cover the entire damaged area with glue, even if it’s a small crack. This will help to ensure a strong bond between the cone and the glue.
It’s important to remember that different glues have different drying times. Make sure to read the instructions on the label before applying the glue, so you’ll know how long to wait for it to dry. Applying too much pressure or handling the speaker cone roughly while the glue is drying can damage the cone or affect the repair. So, be patient and gentle during this process.
In the next step, we’ll talk about how to hold the cone in place while the glue is drying.
Step 3: Hold the Cone in Place
After applying the glue to the damaged area of the speaker cone, the next step is to hold it in place until the glue dries completely. This is a crucial step because if the cone moves before the glue sets, the repair will not hold properly.
Step 3: To hold the speaker cone in place, use masking tape or painter’s tape to create a brace or dam that will keep it from moving. You can also use a clamp if one is available, but be careful not to apply too much pressure to the cone as this may cause further damage.
Tape Method: Cut a strip of tape and place it over the top of the cone, pressing it down onto the adhesive. Then create a dam by wrapping the tape around the cone – the aim is to create a shallow ‘well’ around the damaged area. Fill the well with glue, spreading it evenly with a toothpick. Once you are satisfied with the amount of glue, cut a small piece of tape and seal the well by taping over it. Then, apply longer strips of tape over the cone, creating a star-like pattern, until you are sure that the cone is secure.
Clamp Method: If you’ve decided to use a clamp, ensure that it’s positioned properly at the centre of the cone or as close to it as possible. Apply pressure to the clamp slowly and then release it slowly so that the cone doesn’t move or become damaged.
Now that the cone is secure, allow the glue to dry completely according to the manufacturer’s recommended drying time. Avoid touching the repaired area until the glue has completely set. You can remove the tape or clamp once the glue is dry.
In case you need a visual guide, check out our article on “How to Glue a Crown Back On” or “How to Glue Glass“, which offer similar techniques for holding objects in place while the glue dries.
Step 4: Let the Glue Dry Completely
After applying the glue to the damaged area of the speaker cone, the next step is to let it dry completely. This is a crucial step as it ensures that the glue forms a strong bond with the cone material and the repair lasts for a long time. The drying time of the glue depends on the type of glue used and environmental conditions, such as temperature and humidity.
Epoxy Glue: Epoxy glue usually takes around 24 hours to dry completely. However, some brands offer a fast-drying option that can dry in as little as five minutes. It is recommended to leave the repaired speaker cone untouched for at least 24 hours to ensure that the bond has fully set.
Polyurethane Glue: Polyurethane glue can take anywhere from 1-24 hours to dry completely. However, it is recommended to leave the repair for at least 24 hours to make sure that the bond is strong.
Silicone Adhesive: Silicone adhesive typically takes 24-48 hours to dry completely. It is best to wait a full 48 hours before handling the repaired speaker cone to ensure that the bond is fully set.
CA Glue: CA glue dries very quickly, usually within a few minutes. However, it is recommended to let the repair sit for 24 hours before using to prevent any chance of the bond breaking.
Clear Adhesive: Clear adhesive dries in about 10-45 minutes, depending on the brand and environmental conditions. It is recommended to leave the repaired speaker cone untouched for at least 24 hours to ensure that the bond is fully set.
It is important to resist the temptation to move or manipulate the repaired cone before it has fully dried. Any disturbance can compromise the bond strength and lead to the need for a second repair. It is also important to avoid environmental conditions that can affect the drying process, such as high humidity or extreme temperatures.
Once the glue has dried completely, the repaired speaker cone should be ready to use. However, it is recommended to check for any additional damage to the speaker before testing it out.
Tips for Successful Speaker Cone Repair
Ensuring a successful repair for your speaker cone requires more than just choosing the right type of glue. There are various best practices and precautions you can follow throughout the process to help guarantee a successful outcome. In this section, we will uncover some essential tips and techniques you should keep in mind while repairing your speaker cone to ensure a lasting and efficient fix. By following these tips, you will not only achieve a successful repair outcome, but you will also protect your hands and work area from damage.
Apply the Right Amount of Glue
When it comes to speaker cone repair, it is important to apply the right amount of glue to ensure a strong and reliable bond. Applying too much glue could cause the cone to warp or create a messy and uneven finish. On the other hand, applying too little glue could result in a weak bond that may not hold up over time.
To ensure that you apply the right amount of glue, it is best to use a small tool such as a toothpick or a plastic spatula to apply the glue. This will allow you to apply the glue precisely and in small amounts.
Table: Tips for Applying the Right Amount of Glue to Your Speaker Cone
| Tips | Description |
|---|---|
| Use a small tool | Use a toothpick or a plastic spatula to apply glue in small amounts and prevent messiness |
| Apply only to the damaged area | Avoid applying glue to areas that are not damaged to prevent warping and uneven finish |
| Spread the glue evenly | Use the small tool to spread the glue evenly over the damaged area of the cone |
| Follow product instructions | Refer to the instructions on the glue product for the recommended amount of glue to apply |
Applying the right amount of glue can be tricky, but by following these tips, you can ensure that your speaker cone will be properly repaired and sound as good as new. Remember to use a small tool to apply the glue, apply only to the damaged area, and spread the glue evenly for the best results. Additionally, following the product instructions will give you a clear idea of how much glue to use for your specific repair project.
Be Patient with the Drying Time
One of the most important aspects of repairing a speaker cone with glue is being patient with the drying time. It’s crucial to wait until the glue is completely dry before using the speaker again. Rushing the process can result in a weaker bond or even undoing the repair altogether.
To ensure you’re properly patient with the drying time, consider the following tips:
- Refer to the manufacturer’s instructions: Different types of glue have different drying times. Always read and follow the manufacturer’s recommended drying time for your glue.
- Avoid checking the glue too frequently: Continuously touching and moving the speaker cone can interfere with the adhesive process and delay the drying time. Instead, put the speaker cone in a safe place where it won’t be disturbed and let it dry undisturbed for the recommended amount of time.
- Let the glue dry in a warm, dry area: Humidity and temperature can affect the drying time of glue. For the best results, dry the speaker cone in a well-ventilated, dry area with a temperature around 70°F (21°C).
- Consider using a drying aid: If you’re in a hurry and need the glue to dry faster, a drying aid can help speed up the process. However, be careful with using these products as they can also affect the strength of the bond.
Remember, patience is key when it comes to the drying time of speaker cone glue repairs. Rushing the process can result in a weaker bond or even undoing the repair altogether. Take the time to properly follow the manufacturer’s instructions and make sure the glue is completely dry before using the speaker again.
Avoid Excessive Pressure on the Cone
When using glue to repair a damaged speaker cone, it is important to avoid excessive pressure on the cone. Applying too much pressure may deform the cone shape and affect the sound quality of the speaker. Here are some tips to avoid putting too much pressure on the cone:
- Use a gentle touch: When applying glue to the cone, use a light and gentle touch. This will help prevent any accidental dents or deformations in the cone shape.
- Avoid using clamps: While it may be tempting to use clamps to hold the cone in place while the glue dries, this can also lead to excessive pressure and damage to the cone. Instead, try using your fingers to gently hold the cone in place.
- Allow glue to dry naturally: Instead of trying to speed up the drying process with the use of a heat source or fan, allow the glue to dry naturally. This will give the glue sufficient time to set and prevent you from accidentally touching the cone and applying too much pressure while it is still soft.
- Don’t over-tighten screws: If you are using screws to hold the cone in place, be careful not to over-tighten them. This can place too much pressure on the cone and cause damage. Use just enough force to hold the cone in place, then stop tightening.
By following these tips, you can ensure that you do not apply excessive pressure to your speaker cone when using glue for repairs. This will help to preserve the shape and sound quality of the speaker, and ensure that your repairs are successful.
Protect Your Hands and Work Area
When using glue on a speaker cone, it’s important to take precautions to protect your hands and work area. Here are some tips to keep in mind:
Wear Gloves – When handling glue, it’s a good idea to wear gloves to protect your skin. Some types of glue can cause irritation or allergic reactions, so it’s better to be safe than sorry. Disposable latex or nitrile gloves are a good choice for this task, as they provide a barrier between your skin and the glue.
Work in a Well-Ventilated Area – Some types of glue can produce fumes that can be harmful if inhaled. To avoid this, make sure you work in a well-ventilated area. If you’re working indoors, consider opening a window or turning on a fan to circulate the air.
Use a Drop Cloth – Glue can be messy, and you don’t want it to get on your work surface. To protect your table or countertop, use a drop cloth or a sheet of newspaper. This will also make clean-up easier once you’re done.
Keep Glue Away from Children and Pets – Many types of glue can be harmful if ingested, so it’s important to keep them out of reach of children and pets. Store your glue and any tools you use to apply it in a secure location, such as a locked cabinet or high shelf.
By taking these steps, you can ensure that your work area stays clean and safe while you’re repairing your speaker cone.
Conclusion
In conclusion, repairing a speaker cone with glue can be a simple and cost-effective solution, but it is important to choose the right type of glue for the job. Using unsuitable glue can damage the cone and compromise the sound quality of the speaker. Therefore, it is important to consider the material of the speaker cone, the bond strength, and the drying time when selecting glue for the repair job.
Following a step-by-step process can also ensure a successful repair job. Preparing the surface, applying the right amount of glue, holding the cone in place without applying excessive pressure, and allowing enough time for the glue to dry are some of the key steps for successful speaker cone repair.
Overall, repairing your speaker cone is possible with the right product and technique. By following the tips discussed in this guide, you can successfully repair your speaker cone and restore your sound quality without spending a lot of money on professional repair services. Don’t hesitate to experiment with different types of glue to find the one that works best for your particular speaker cone material and repair needs.
Frequently Asked Questions
What should I use to clean the speaker cone before applying glue?
You can clean the speaker cone using a soft brush, dry cloth, or compressed air. Make sure to remove any loose particles or dust before applying glue.
Can I use hot glue to repair a speaker cone?
No, hot glue is not suitable for repairing speaker cones as it can melt or deform the cone material and its bond may not be strong enough.
Will using the wrong glue damage the speaker cone?
Yes, using the wrong glue can damage the speaker cone, especially if it does not dry properly, creates a weak bond or reacts negatively with the cone material.
How long does it take for the glue to dry completely?
The drying time depends on the type of glue used, but most glues require at least 24-48 hours to dry completely. Follow the instructions on the glue package for the recommended drying time.
What is the best glue for repairing a tear in a paper speaker cone?
Epoxy glue is the best option for repairing tears in a paper speaker cone because it creates strong bonds and dries clear. However, polyurethane glue can also be used as it creates a flexible bond that can withstand vibration.
Can I still use my speaker while the glue is drying?
No, it’s best to avoid using your speaker while the glue is drying as it can affect the bond strength and lead to further damage or distortion of the speaker’s sound.
What is the difference between CA glue and clear adhesive?
CA glue is a type of adhesive that dries quickly and creates a strong bond. Clear adhesive, on the other hand, is a transparent glue that dries clear and has a longer drying time. Both can be used for speaker cone repair, but CA glue is better for quick fixes and clear adhesive for larger repairs.
Why is rubber cement unsuitable for speaker cone repair?
Rubber cement has a weak bond strength and can become brittle over time, leading to further damage to the speaker cone. It can also cause the cone to sag or deform due to its weight and elasticity.
What is the best way to protect my hands and work area when using glue?
Wearing gloves and working in a well-ventilated area can help protect your hands and work area while using glue. You can also use a drop cloth or newspaper to avoid damaging surfaces or making a mess.
Can I repair a hole in a speaker cone using glue?
It depends on the size and location of the hole. If it’s small and near the edge of the cone, it can be repaired with glue. However, larger or central holes may require professional repair or replacement of the entire cone.