Have you ever found yourself in the middle of a woodworking project, struggling to find the right adhesive to bond two pieces of wood together? Look no further than CA glue. But what exactly is CA glue and how do you use it? This guide will provide a comprehensive overview of CA glue for woodworkers, from its various types and applications to tips for achieving the strongest bond possible. Whether you’re a newbie or a pro, this guide has everything you need to know to get started with CA glue and take your woodworking projects to the next level. So, pull up a chair, get ready to learn, and let’s dive in!
What is CA Glue?
Understanding what CA glue for wood is and how it works can be perplexing, but it is an essential part of any woodworker’s toolkit. Also known as cyanoacrylate adhesive, CA glue is a fast-curing, high-strength adhesive that bonds wood and a variety of other materials together. This type of glue has been around since the 1940s, but it has only become widely used in woodworking in recent years due to its many benefits. To learn more about the various types of CA glue for wood and how to use them effectively, keep reading. And if you need information on how to glue stone to stone or plastic to car parts, check out the relevant links above for more tips and tricks.
How Does it Work?
CA glue, also known as cyanoacrylate adhesive, is a fast-drying, strong bonding agent used for a wide range of materials, including wood. When used on wood, CA glue penetrates the fibers of the wood and creates a bond that is usually stronger than the wood itself. But how does it work?
CA glue is a type of reactive adhesive, meaning it requires moisture to cure. When exposed to water vapor, CA glue reacts and forms a strong bond by cross-linking with the hydroxyl ions found in the moisture. This reaction occurs rapidly and produces a strong bond that can hold up to various stresses and strains.
The curing time of CA glue depends on several factors, including the humidity and temperature of the environment, the type of wood being bonded, and the viscosity of the glue. Thin CA glue typically cures in a matter of seconds, while thicker formulas may require several minutes or more to fully cure.
CA glue can be used to join pieces of wood together, fill small cracks and gaps, and reinforce weak areas. It is also useful for finishing wood projects, as it can be sanded, painted, and stained once dry.
However, it is important to note that CA glue is not suitable for all types of wood and may not work well on oily or wet surfaces. It is also not recommended for load-bearing applications or high-temperature environments.
In the next section of this article, we will discuss the different types of CA glue available for wood and their specific uses. If you’re interested in learning more about how to glue metal to concrete, check out our guide on how to glue metal to concrete.
Why Use CA Glue for Wood?
Using CA glue for wood is an excellent choice because it is incredibly strong and dries incredibly quickly. It can bond wood to different materials as well as to another piece of wood itself. The glue line is almost clear, so it creates fewer visible marks than other adhesives, such as traditional wood glue. CA glue for wood is ideal for projects where quick bonding is necessary, and it is also great for fixing small cracks and gaps in wood.
Many woodworkers also prefer using CA glue because it is not affected by moisture or humidity. That is why it can be utilized for outdoor woodworking projects as well as indoor ones without any issues. Due to its high strength, it can be used to shape and sculpt wood as it cures, adding more versatility to its applications.
Another advantage of using CA glue for wood is that it can be used on both porous and non-porous surfaces, making it easy to use on a variety of wooden projects such as furniture, musical instruments, and other decorative items around the house. Additionally, it has a long shelf life compared to traditional wood glue and does not require any additional mixing or preparation.
However, it is important to note that this glue’s fast-drying time does not leave much room for error in application. It is best to use a steady hand and make sure that the surfaces to be bonded are correctly aligned before the glue is applied. Using CA glue for wood is a great way to ensure a strong, long-lasting bond for your woodworking projects with minimal effort.
If you want to learn more about glues and adhesives for different materials, check out our article on What is B7000 glue?.
Types of CA Glue for Wood
When it comes to bonding wood, cyanoacrylate adhesive, or CA glue, is a popular choice due to its fast-drying and strong-holding properties. However, not all CA glue products are the same, and it’s important to choose the right type of glue for your particular woodworking project. There are several types of CA glue for wood available in the market, and each has its own unique characteristics and uses. Let’s take a look at some of the most popular types of CA glue for wood, their properties, and applications. But before we dive in, if you’re wondering about which glue is the strongest overall, check out our article on the strongest glue for all kinds of projects.
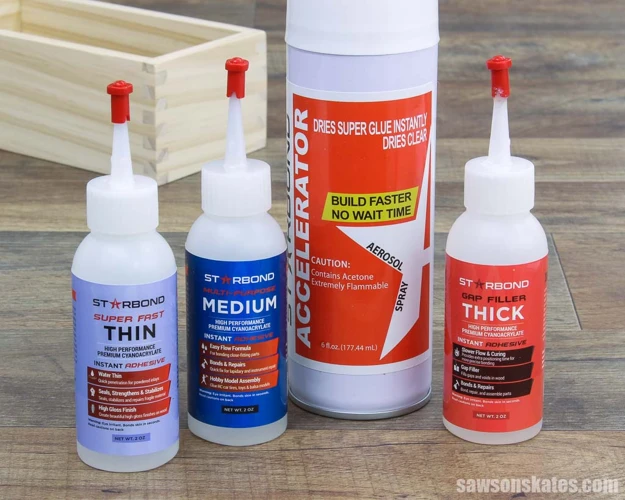
Thin CA Glue
Thin CA glue is also known as super glue, and it is a type of adhesive that is commonly used for woodworking. It has a very low viscosity, which means that it is very thin and can penetrate even the tiniest cracks and gaps in the wood. It sets very quickly, making it an ideal choice for bonding parts that need to be held together tightly and accurately.
One of the main advantages of thin CA glue is that it dries clear, making it perfect for projects that require an invisible bond. It is also great for bonding porous materials like wood, as it seeps into the pores and creates a very strong bond.
However, thin CA glue does have some drawbacks. It can be quite brittle when dry, which means that it is not suitable for applications where there will be a lot of stress on the bond. It is also not waterproof, so it should not be used for outdoor projects or any project that will be exposed to moisture.
When using thin CA glue, it is important to be very careful. The thin consistency means that it can easily run and drip, so it is important to apply it sparingly. It is also important to work quickly, as it sets very fast. It is recommended that you wear gloves when using thin CA glue, as it can bond skin together very quickly.
Tip: If you are using thin CA glue for a larger project, it can be helpful to use an accelerator to speed up the drying process. This will help to ensure that all parts are bonded properly before the glue has a chance to dry.
Thin CA glue is a great choice for woodworking projects that require a strong and invisible bond. Just be sure to use it carefully and make sure it is the right choice for your specific project.
Medium CA Glue
Medium CA glue is the most versatile type of cyanoacrylate adhesive available for woodworking projects. It has a medium viscosity and sets in about 20 to 30 seconds. This type of glue is perfect for bonding wood joints that require a strong hold and quick setting time. Medium CA glue can be used for gap-filling applications but should not be used for bonding parts with large gaps.
Advantages of Medium CA Glue:
- Medium viscosity allows for easy application and spreading without running or dripping
- Sets quickly, making it a great choice for bonding small and medium-sized wood parts
- Provides a strong and durable bond
- Can be sanded and painted over once cured
- Less brittle than Thin CA glue, making it less likely to crack under stress
Medium CA glue is suitable for a wide range of woodworking projects, from furniture repair to wooden toys and crafts. It can also be used for bonding non-porous materials such as metal and plastic in combination with a primer.
When using Medium CA glue, it’s important to follow standard safety precautions such as wearing gloves and eye protection. It’s also recommended to use in a well-ventilated area and to avoid inhaling the fumes.
Tip: If you need to bond materials with large gaps or require more working time, consider using Thick CA glue instead.
Medium CA glue is a versatile and reliable adhesive that’s perfect for bonding wood joints in woodworking projects. By following proper safety protocols and the appropriate application techniques, you can achieve a strong and durable bond that will withstand the test of time.
Thick CA Glue
Thick CA Glue: Thick CA glue is the perfect choice for filling gaps and cracks on wood surfaces. Its thick consistency allows it to be spread easily on the surface with a brush or an applicator tip. Additionally, it has a slower setting time, allowing for adjustments to be made even after it has been applied.
Below is a comparison table of different types of CA glue for wood, including thick CA glue:
| Type of CA Glue | Thickness | Setting Time | Best Use |
|---|---|---|---|
| Thin CA Glue | Watery | Almost Instant | On well-fitted surfaces |
| Medium CA Glue | Viscous | 10-20 seconds | On slightly unfitted surfaces |
| Thick CA Glue | Very Viscous | 20-30 seconds | For filling gaps and cracks |
| Colored CA Glue | Viscous | 10-20 seconds | For matching wooden surfaces |
| Rubber-Toughened CA Glue | Viscous | 20-30 seconds | For bonding dissimilar materials |
| Flexible CA Glue | Viscous | 20-30 seconds | For surfaces that require flexibility after bonding |
| Black CA Glue | Viscous | 10-20 seconds | For dark wooden surfaces |
| Odorless CA Glue | Watery | Almost Instant | For those who are sensitive to fumes |
When using thick CA glue, it is important to remember that excessive application can lead to longer bonding times. It is recommended to add the glue in small amounts and let it settle before adding more. Additionally, it is best to clamp the surfaces together until the glue has fully cured.
If you’re interested in learning how to glue stone to stone, check out our helpful guide for step-by-step instructions.
Colored CA Glue
When it comes to woodworking, sometimes a little touch of color is needed to make a project stand out. Colored CA glue is perfect for this purpose. It’s designed to be used just like regular CA glue, but it comes in a range of colors to add a unique touch to your project. Red, yellow, green, blue, and black are just a few of the color options available.
One thing to keep in mind when using colored CA glue is that it can alter the appearance of the wood and the overall finish of the project. Before using colored CA glue, it’s a good idea to test it on a scrap piece of wood. This way, you can see how the glue will look once it dries and decide if it’s the look you’re going for.
Below are some tips for using colored CA glue in your woodworking projects:
– Start with a small amount of glue – Colored CA glue can be difficult to remove once it’s dry, so start with a small amount and add more as needed.
– Be patient – Colored CA glue can take longer to dry than regular CA glue. Be patient and give it time to set before handling the project.
– Use sparingly – Colored CA glue can be thick and gloopy, so use it sparingly to avoid drips and spills.
– Don’t mix colors – Mixing different colors of CA glue together can result in a muddy and unattractive finish. Stick to one color per project.
– Match the color to the project – Choose a colored CA glue that complements the wood and overall finish of the project.
Colored CA glue is a fun and creative way to add a unique touch to your woodworking projects. Just remember to test it on a scrap piece of wood before using it on your project and use it sparingly to avoid any mistakes. If you’re unsure about using colored CA glue, stick with clear or regular CA glue instead.
Rubber-Toughened CA Glue
Rubber-toughened CA glue is a variation of the standard cyanoacrylate adhesive that incorporates small rubber particles into the formula. This allows for increased shock resistance and flexibility, making it a good choice for bonding materials that undergo stress or frequent movement. The rubber-toughened formula provides a more durable bond compared to regular CA glue, especially for projects that involve woodturning or objects that need to withstand vibration.
Here are some additional benefits of using rubber-toughened CA glue:
- Versatility: This type of glue can be used to bond a variety of materials, including metal, plastic, and wood.
- Shorter curing time: Rubber-toughened CA glue typically sets faster than other adhesives, allowing for quicker project completion.
- Flexibility: The added rubber particles allow the glue to flex and absorb shock, making it more resistant to cracking or breaking due to sudden impacts or movement.
However, it’s worth noting that rubber-toughened CA glue may not be the best choice for all projects. For example, it may not be an ideal adhesive for materials that require a rigid bond, or for projects that will be exposed to extreme temperatures or water. In such cases, a different type of glue like epoxy or polyurethane may be a better option.
Whether you’re using rubber-toughened CA glue or another adhesive, it’s important to follow proper safety precautions and choose the right adhesive for your project. For more information on selecting the right glue for specific materials or objects, check out our articles on how to glue plastic car parts, or what glue is waterproof.
Flexible CA Glue
Flexible CA glue is a versatile adhesive that can be used for a variety of purposes. It is particularly useful for bonding materials that are subject to movement or vibration. This is because flexible CA glue has a slight degree of elasticity, which allows it to absorb shocks and stresses without breaking the bond.
There are several types of flexible CA glue available on the market. Here are some of the most common ones:
| Product | Features | Recommended for |
|---|---|---|
| Loctite Super Glue Flexible | • Resistant to impact, shock, and vibration • Flexible bond • Clear color |
• Metal to rubber • Plastic to leather • Rubber to plastic • Leather to metal |
| Gorilla Super Glue Gel | • Flexible • No-run formula • Impact-resistant |
• Metal to plastic • Rubber to rubber • Leather to metal • Plastic to plastic |
| Bob Smith Industries Insta-Flex+ | • Thin, flexible formula • Resistant to shock, vibration, and impact • Clear color • Can be used as a gap-filling adhesive |
• Metal to rubber • Plastic to metal • Rubber to plastic • Ceramic to metal |
Loctite Super Glue Flexible is perfect for bonding metal to rubber, plastic to leather, rubber to plastic, and leather to metal. It is resistant to impact, shock, and vibration, and forms a clear, flexible bond.
Gorilla Super Glue Gel is another flexible CA glue that is ideal for bonding metal to plastic, rubber to rubber, leather to metal, and plastic to plastic. Its no-run formula makes it easy to apply, and it cures to a flexible, impact-resistant bond.
Finally, Bob Smith Industries Insta-Flex+ is a thin, flexible CA glue that is ideal for bonding metal to rubber, plastic to metal, rubber to plastic, and ceramic to metal. It is resistant to shock, vibration, and impact, and can also be used as a gap-filling adhesive.
No matter which type of flexible CA glue you choose, be sure to follow the manufacturer’s instructions for best results. It’s also important to remember to use the glue in a well-ventilated area, and to wear gloves and eye protection if recommended by the manufacturer.
If you’re looking for more information on specific adhesive applications, check out our guide on how to glue metal to plastic, how to glue plexiglass to plexiglass, how to glue stone to stone, what glue is waterproof, how to glue sand to wood, and how to glue a countertop.
Black CA Glue
Black CA glue is a special type of cyanoacrylate adhesive that is often used in woodworking projects where the glue joints need to be hidden. It is a popular choice for projects that involve exotic woods or darker colored woods, as it blends in with the grain and color of the wood.
One benefit of using black CA glue is that it can be sanded and polished to create an invisible joint without the need for wood filler. This makes it a great choice for projects where a smooth, seamless finish is desired.
Here are some key points to keep in mind when using black CA glue for your woodworking projects:
Pros:
- Blends in with the color and grain of darker woods
- Can be sanded and polished to create an invisible joint
- Dries quickly
- Creates a strong bond on wood, metal, plastic, and other porous materials
- Waterproof once cured
Cons:
- The dark color may not be suitable for lighter colored woods
- Stains easily and can be difficult to clean up if spilled
- The fast-drying formula may not allow for adjustments or repositioning of parts once the glue is applied
- May have a strong odor, so be sure to work in a well-ventilated area
When using black CA glue, it is important to follow proper safety precautions. Wear gloves and eye protection, and work in a well-ventilated area. It is also important to choose the right viscosity of glue for your project. Thin CA glue is suitable for small joints and tight-fitting parts, while thick CA glue is better for larger gaps and rough surfaces.
Tip: If you are using black CA glue on a wood surface that has been stained or finished, test the glue in an inconspicuous area first to make sure it does not react with the existing finish.
Internal Link: If you need to glue plastic car parts together, check out our guide on how to glue plastic car parts.
Odorless CA Glue
For those who are sensitive to strong odors or want to avoid the harsh smell of traditional cyanoacrylate adhesives, odorless CA glue is the perfect solution. This type of glue is specially formulated to minimize fumes and unpleasant odors that are common with traditional CA glue. Here’s a table that outlines the key features of odorless CA glue:
| Features | Benefits |
|---|---|
| No Fumes | Minimizes the risk of respiratory irritation or allergic reactions. |
| No Odor | Eliminates unpleasant smells typically associated with traditional CA glue. |
| Fast Drying | Sets and hardens quickly, reducing the time needed for clamping or other bonding methods and speeding up the overall process. |
| Clear Finish | Creates a transparent bond with no visible residue or discoloration of the wood surface. This is particularly useful for projects where appearance is important. |
If you’re working in a small, enclosed space like a workshop or a studio, or if you’re concerned about protecting your own health and safety, then using odorless CA glue is a smart choice. However, it’s worth noting that this particular formulation may have slightly different bonding properties or set times than other types of CA glue, so be sure to consult the label or manufacturer’s instructions before use. Odorless CA glue is an excellent option for woodworkers who want to achieve a strong, reliable bond without the fumes and odors associated with traditional adhesives.
Viscosity and Setting Time for CA Glue
When using CA glue for wood, it is important to consider the viscosity and setting time of the adhesive. The viscosity of the glue refers to its thickness or consistency, while the setting time refers to the amount of time it takes for the glue to dry and create a bond. Both of these factors can affect the success of your project and the quality of the bond.
Viscosity:
There are different viscosities of CA glue available, including thin, medium, and thick. Thin CA glue has a low viscosity and is very runny, making it ideal for filling gaps and bonding small, delicate parts. Medium CA glue has a slightly higher viscosity and is well-suited for bonding larger surfaces. Thick CA glue has a very high viscosity and is ideal for use on surfaces that require extra bonding strength or when filling larger gaps.
Setting Time:
The setting time of CA glue can vary based on the type and brand of glue you are using. In general, thin CA glue sets very quickly, often in just a few seconds. Medium CA glue can take a little longer, usually setting within 30 seconds to a minute. Thick CA glue can take several minutes to set fully, depending on the thickness of the glue and the conditions in which it is applied.
It’s important to note that the setting time of CA glue can be affected by several factors, including the humidity and temperature of the environment, the porosity of the wood, and the clamping pressure applied. In general, a warmer and more humid environment will cause the glue to set faster, while a cooler and drier environment will result in slower setting times.
Tips for using CA glue viscosity and setting time:
– Choose the appropriate viscosity of glue for the job at hand
– Always test the glue and its setting time on a scrap piece of wood before applying it to your project
– Be mindful of the environmental conditions and adjust your technique accordingly
– Apply the glue sparingly to prevent excess glue from seeping through porous wood
– Use clamps or other pressure techniques to ensure a strong bond while the glue sets
By taking viscosity and setting time into consideration when choosing and applying CA glue for wood, you can ensure a strong and successful bond for your woodworking project.
Tips for Using CA Glue on Wood
When it comes to woodworking, choosing the right glue can make all the difference in your final product. CA glue, also known as cyanoacrylate adhesive, is a popular choice among woodworkers for its strength and versatility. However, using CA glue requires a certain level of skill and precision to ensure the best results. In this section, we’ll provide some helpful tips and tricks for using CA glue on wood to ensure a successful and long-lasting bond. From surface preparation to choosing the right type of CA glue for your project, these tips will help you achieve professional-level results in your woodworking endeavors.
Surface Preparation
For a successful bond with CA glue on wood, proper surface preparation is essential. Below are some steps to follow for prepping the surface:
| Step | Details |
|---|---|
| Clean the Surface | Ensure the bonding area is clean and free of dust, grease, oil, or any other contaminant. Use a clean cloth or cotton swab dipped in alcohol or acetone to remove any residue. Avoid touching the surface with bare hands, as that can transfer oils and dirt. |
| Sand the Surface | Lightly sand the area to be bonded with fine-grit sandpaper. This creates more surface area for the glue to adhere to and removes any gloss or finish that can inhibit bonding. Be sure to wipe off any resulting sawdust with a clean cloth. |
| Moisten the Surface | Spraying the surface with a light mist of distilled water can help activate the glue and accelerate the curing process as it reacts to moisture. |
| Score the Surface | For non-porous surfaces like plastics or metal, score the surface with a razor blade or sandpaper to create a rough texture that will better adhere to CA glue. |
It is important to note that the above surface preparation steps are general guidelines. Depending on the specific type and quality of the wood, as well as other factors like humidity and temperature, the application technique may vary. It is always best to follow the product instructions and experiment with a small piece before starting a larger project. Proper surface preparation can provide a strong and long-lasting bond with CA glue on wood.
Application Techniques
When it comes to applying CA glue to wood, it’s important to use proper techniques to ensure a strong and lasting bond. Here are some key application techniques to keep in mind:
Use Small Amounts: Because CA glue sets quickly, it’s best to use small amounts at a time to avoid wasting the product or accidentally gluing something in the wrong place. A little bit goes a long way!
Apply to Clean, Dry Surfaces: The surface of the wood should be clean and free of any dust, debris, or oils before applying CA glue. Use a clean cloth or paper towel to wipe it down and let it dry completely before application.
Use a Spreadable Tool: Many woodworkers prefer to use a spreadable tool, such as a toothpick or a microbrush, to apply CA glue to wood. This helps to control the amount applied and ensures full coverage.
Apply Pressure: Once the CA glue has been applied, apply pressure to the wood pieces to create a strong bond. Clamping is often recommended, especially for larger projects.
Allow Time to Cure: Depending on the type of CA glue used, it will take different amounts of time to cure. Generally, thin CA glue sets within seconds, while thicker varieties can take up to several minutes. Be sure to allow enough time for the glue to fully cure before handling the wood.
It’s worth noting that different types of wood may react differently to CA glue, so it’s important to test a small area before committing to a larger project. This will help you to determine the best application techniques for your unique situation.
| Technique | Key Points |
|---|---|
| Use Small Amounts | – Avoid waste – Control application – Prevent accidental misplacement |
| Apply to Clean, Dry Surfaces | – Remove dust, debris, and oils – Use clean cloth or paper towel – Allow to dry before application |
| Use a Spreadable Tool | – Control application – Ensure full coverage |
| Apply Pressure | – Create strong bond – Clamp for larger projects |
| Allow Time to Cure | – Different setting times for different types of CA glue – Wait until fully cured to handle wood |
By following these application techniques and taking proper precautions, you can achieve strong and lasting bonds with CA glue on wood projects.
Clamping and Bonding Time
When using CA glue on wood, clamping and bonding time are crucial factors that can affect the quality of the bond. Depending on the type of wood and the amount of glue used, the bonding time may vary. It is essential to consider the curing time and the clamping pressure required for each type of CA glue.
To help you better understand the bonding time required for each type of CA glue, we have summarized the information in the table below:
| CA Glue Type | Clamping Time | Bonding Time |
|---|---|---|
| Thin CA Glue | 10-15 seconds | 1-5 seconds |
| Medium CA Glue | 30-60 seconds | 5-10 seconds |
| Thick CA Glue | 60-90 seconds | 10-20 seconds |
| Colored CA Glue | 30-60 seconds | 5-10 seconds |
| Rubber-Toughened CA Glue | 60-90 seconds | 15-30 seconds |
| Flexible CA Glue | 60-90 seconds | 30-60 seconds |
| Black CA Glue | 30-60 seconds | 5-10 seconds |
| Odorless CA Glue | 60-90 seconds | 15-30 seconds |
Clamping time is the period in which the two surfaces to be bonded should be pressed together. It is essential to apply sufficient pressure to ensure a strong bond. The amount of pressure required depends on the surface area and the type of wood. The clamping time can range from 10 seconds for thin CA glue to 90 seconds for thick and rubber-toughened CA glue.
Bonding time, on the other hand, refers to the time the adhesive takes to cure and bond the two surfaces together. The bonding time for CA glue for wood is generally between 1-60 seconds, depending on the type of CA glue used and the amount applied.
It is important to keep the surfaces being bonded still and undisturbed during the bonding time. Any movement or disruption can negatively affect the bond’s quality, leading to weak spots, cracks, or gaps.
In summary, the clamping and bonding time required for using CA glue on wood depends on the type of CA glue used. Thin CA glue requires a shorter bonding time, while thick CA glue requires more clamping and bonding time. It is crucial to follow the manufacturer’s instructions when using CA glue to achieve a strong, durable bond.
Choosing the Right CA Glue
When it comes to choosing the right CA glue for your wood projects, there are several factors to consider. The table below highlights the important features of different types of cyanoacrylate adhesives for wood:
| Type of CA Glue | Viscosity | Setting Time | Color | Strength |
|---|---|---|---|---|
| Thin CA Glue | Thin | 1-5 seconds | Clear | Low strength |
| Medium CA Glue | Medium | 5-15 seconds | Clear or amber | Medium strength |
| Thick CA Glue | Thick | 15-30 seconds | Clear or white | High strength |
| Colored CA Glue | Medium to thick | 5-15 seconds | Various colors | Medium to high strength |
| Rubber-Toughened CA Glue | Medium to thick | 5-15 seconds | Clear | High strength and impact resistance |
| Flexible CA Glue | Medium | 30-60 seconds | Clear | Medium strength and flexibility |
| Black CA Glue | Medium | 5-15 seconds | Black | Medium strength |
| Odorless CA Glue | Thin to medium | 1-5 seconds | Clear | Low to medium strength |
Viscosity: Thin CA glue is ideal for small cracks and gaps, while thick CA glue is ideal for larger gaps and filling voids. Medium CA glue is a good all-purpose adhesive.
Setting Time: The setting time of CA glue can range from 1-60 seconds, depending on the viscosity and formulation. Consider the complexity of the project and how much time you need to make adjustments before the glue sets.
Color: Some CA glue comes in clear or transparent colors, while others are colored to blend with wood or other materials. Choose a color that matches or compliments your project.
Strength: Different types of CA glue offer varying levels of strength and impact resistance. Consider the weight and stresses your project will endure when choosing the right adhesive.
By considering these factors, you can choose the right CA glue for your woodworking project and ensure a strong, long-lasting bond.
Safety Precautions
When working with CA glue for wood, it is important to take certain precautions to ensure safety. Here are some safety measures you should take when handling cyanoacrylate adhesive:
| Safety Precaution | Explanation |
|---|---|
| Wear Gloves | CA glue can stick to the skin and cause discomfort or even injury. Wear gloves to protect your hands while working with it. |
| Use in a Well-Ventilated Area | CA glue releases fumes that can be harmful when inhaled. It is advisable to use it in a well-ventilated area to minimize exposure to the fumes. |
| Avoid Skin Contact | As mentioned earlier, CA glue can cause irritation or injury to the skin. Avoid skin contact with the glue by wearing gloves and other protective gear. |
| Protect Your Eyes | It is important to protect your eyes from CA glue splashes or fumes. Wear safety goggles or glasses while working with the glue to prevent any eye injuries. |
| Store Properly | CA glue should be stored in a cool, dry place away from children and pets. Ensure that the cap is tightly closed to prevent the glue from drying out and going to waste. |
By taking these necessary safety precautions, you can use CA glue for wood without risking harm to your health. It is important to follow these precautions to maximize the benefits of using CA glue while minimizing any potential risks.
Conclusion
After learning about CA glue for wood, you should now have a good understanding of what it is, how it works, and why it’s a great choice for woodworking projects. With its fast setting time, strong bonding properties, and versatility, CA glue is a valuable addition to any woodworker’s toolkit.
When using CA glue on wood, keep in mind the importance of proper surface preparation and choosing the right type of glue for your specific project. Take the time to experiment with different viscosities and setting times to find the perfect fit for your needs.
Remember to always follow safety precautions when working with CA glue, such as wearing gloves and eye protection and using the glue in a well-ventilated area. And always be sure to store your glue properly to extend its shelf life and prevent clogging.
In conclusion, CA glue is an indispensable tool for woodworking projects where fast, strong bonding is needed. With its various types and viscosities, there is a perfect glue for every project. Use it with care and attention to detail, and you will achieve professional-level results in no time.
Frequently Asked Questions
What makes CA glue different from other adhesives?
CA glue bonds quickly and strongly to most surfaces, including wood, metal, and plastic, making it an ideal adhesive for various applications.
Can CA glue be used for outdoor wood projects?
Yes, CA glue can be used for outdoor wood projects. However, it is recommended to use a waterproof or weather-resistant variant of CA glue for greater durability.
Can CA glue be sanded and painted over?
Yes, once the CA glue has fully cured, it can be sanded and painted over to match the surrounding surfaces.
What is the difference between thin and thick CA glue?
Thin CA glue is ideal for bonding small parts and filling hairline cracks, while thick CA glue is better for bonding larger surfaces and gap-filling applications.
How long does it take for CA glue to cure?
The curing time for CA glue depends on the viscosity, humidity, and temperature. Generally, thin CA glue takes a few seconds to set and 30 to 60 seconds to cure, while thick CA glue can take up to 24 hours to fully cure.
What is rubber-toughened CA glue?
Rubber-toughened CA glue is a variant of cyanoacrylate adhesive that contains rubber particles, making it more flexible and impact-resistant than regular CA glue.
Can CA glue be removed if applied incorrectly?
Yes, CA glue can be removed using acetone or other debonding agents. However, it is important to use caution and follow the manufacturer’s instructions to avoid damaging the surface or causing harm to yourself.
What are some safety precautions when using CA glue?
It is recommended to wear gloves, eye protection, and a respirator when using CA glue to avoid skin contact, eye irritation, and inhalation of fumes. It is also important to use CA glue in a well-ventilated area and store it out of reach of children and pets.
Can CA glue be used on oily or waxed surfaces?
No, CA glue does not adhere well to oily or waxed surfaces. It is important to clean and dry the surfaces before applying CA glue for optimal adhesion.
Is it necessary to clamp parts together when using CA glue?
While clamping is not always necessary, it can help ensure a tight and secure bond, especially for larger surfaces or gap-filling applications. It is recommended to apply pressure for at least 30 seconds to allow the CA glue to cure properly.