Have you ever found yourself needing to make a quick fix to a torn piece of clothing or wanting to add some embellishments to a fabric project? Using a glue gun on fabric can be a simple and effective solution. But with so many types of glue guns and glue sticks available, it can be overwhelming to know where to start. Don’t worry – we’ve got you covered with this ultimate guide on how to use a glue gun on fabric. From choosing the right glue gun and stick to preparing the fabric and step-by-step instructions, you’ll learn everything you need to know to use a glue gun on fabric like a pro. So, let’s dive in and discover the versatility, time-saving, and cost-effectiveness of using a glue gun on fabric.
Why Use a Glue Gun on Fabric?
Gluing fabric can be a daunting task, but using a glue gun can make it easier and more efficient. But why should you choose a glue gun over other types of adhesive? There are three main reasons why using a glue gun on fabric is advantageous: versatility, time-saving, and cost-effectiveness. With a glue gun, you can easily attach fabric to a variety of surfaces, save time with quick and easy application, and avoid spending money on expensive adhesives. But before you dive into gluing fabric with a glue gun, it’s important to choose the right type of glue gun and glue stick for the job at hand.
1. Versatility
When it comes to crafting and DIY projects, using a glue gun on fabric offers a high level of versatility. With the right glue gun and glue stick, you can use this handy tool to create a wide range of fabric projects, including clothing, accessories, and even home decor items.
Here are some of the ways that a glue gun can be used on fabric:
| Application | Description |
| Clothing repairs and alterations | If you have a piece of clothing that needs hemming or minor repairs, a glue gun can be a quick and easy way to get the job done without having to sew by hand or use a sewing machine. |
| Embellishments and decorations | Whether you want to add glitter, beads, or other embellishments to your fabric projects, a glue gun makes it easy to attach them securely without having to sew them in place. |
| Craft projects | Glue guns are versatile tools that can be used for a wide range of crafting projects that involve fabric, such as making sock puppets, creating home decor items, and more. |
| Costumes and cosplay | If you’re creating a costume or cosplay outfit, a glue gun can be a valuable tool for attaching fabric pieces together or adding embellishments and decorations. |
Using a glue gun on fabric allows for a great deal of flexibility and creativity, as well as being a time-saving and cost-effective option for many DIY projects. So whether you’re a seasoned crafter or just starting out, a glue gun can be a valuable addition to your crafting toolbox.
If you want to know more about the different types of glue guns and glue sticks that are suitable for fabric projects, check out our article on what are glue sticks.
2. Time-saving
Using a glue gun on fabric is a great time-saving alternative to traditional sewing methods. Instead of having to thread a needle and sew each seam by hand, you can apply a precise line of glue with the help of a glue gun. This method can be especially useful for quick, temporary fixes, or for projects that require a lot of repetitive sewing, like attaching sequins or beads.
Some common uses of a glue gun on fabric include hemming pants, attaching patches, and applique work. With the right glue gun and settings, the adhesive bond can last a long time and hold up against wear and tear.
It’s important to note, however, that a glue gun is not always a suitable replacement for sewing. If you’re working with heavy fabrics or creating garments meant to withstand wear and tear, you’ll want to sew seams for added durability.
The time and effort saved by using a glue gun makes it a great resource for many fabric projects.
3. Cost-effective
When it comes to crafting or doing DIY projects that involve fabric, using a glue gun can be a cost-effective option. Instead of spending money on expensive adhesives or sewing supplies, a glue gun and glue sticks can provide a sturdy hold for a fraction of the cost.
Table 1: Cost Comparison
| Adhesive Type | Cost |
|---|---|
| Glue Gun + Glue Sticks | $10 (gun) + $5 (glue sticks) = $15 |
| Fabric Glue | $5-$10 |
| Sewing Supplies (needles, thread, etc.) | $15-$20 |
In some cases, using a glue gun may even be more cost-effective than traditional sewing methods. For instance, creating a no-sew fabric project with a glue gun can save money by eliminating the cost of a sewing machine and related accessories.
However, it’s important to note that not all projects may be suitable for glue gun use. For instance, certain types of fabric such as leather or silk may require specialized adhesives. Before starting a project, it’s important to research the best adhesive for the specific fabrics involved in order to avoid any damage or issues with the final product.
Link: What Is White Latex Glue?
Choosing the Right Glue Gun and Glue Stick for Fabric
Finding the right glue gun and glue stick for your fabric project can be a daunting task. However, the type of glue gun and glue stick you choose can have a huge impact on the outcome of your project. It is important to take into account the temperature, wattage, glue stick size and material before making a decision. Whether you are working with delicate fabrics or heavy-duty materials, choosing the right glue gun and glue stick will ensure that your project is successful. In the next few sections, we will guide you through the factors to take into account when choosing the right glue gun and glue stick for your fabric project.
1. Temperature
When choosing a glue gun for fabric, temperature is an important factor to consider. Using the wrong temperature can damage the fabric and ruin your project. There are different types of glue guns in terms of temperature, so it’s essential to choose wisely.
Low Temperature: A low-temperature glue gun is suitable for delicate fabrics such as lace, ribbon, or thin fabrics like silk. They operate at around 250F (121C), which is generally considered safe for most fabrics. These glue guns take longer to melt glue sticks, but they are perfect for gluing delicate materials without causing any damage.
High Temperature: A high-temperature glue gun is suitable for more robust fabrics such as denim or canvas. These glue guns work at a temperature of 380F (193C) and are better in terms of bonding strength. They’re also perfect for making sure that the glue dries quickly and securely on such fabrics.
Dual Temperature: Dual temperature glue guns give you the best of both worlds. These guns have a switch that lets you choose between high and low temperatures, making them ideal for people who work with a wide range of fabrics. You can use low temperature for delicate fabrics and switch to high temperature when working with more robust ones.
When choosing a glue gun for fabric, you should choose one with a suitable temperature for your project’s fabric. Using the wrong temperature can cause damage or make the project feel or look wrong.
If you’re looking for more information on how to use a glue gun on fabric, check out our guide on how to glue fabric to wood letters.
2. Wattage
When it comes to choosing the right glue gun for fabric, wattage is another important factor to consider. The wattage of a glue gun determines how quickly it heats up and how much glue it can dispense at once. Generally, the higher the wattage, the faster the glue gun will heat up and the more glue it can melt at a time.
It’s important to note that a higher wattage glue gun may not always be better for fabric. If you plan on using the glue gun for delicate fabrics or detailed projects, a lower wattage glue gun may be a better choice. A low wattage glue gun will heat up more slowly and allow for more precision when applying the glue.
To help you determine which wattage glue gun is best for your needs, the table below outlines some common wattage ranges and their corresponding benefits and drawbacks.
| Wattage Range | Benefits | Drawbacks |
|---|---|---|
| 20-40W | Great for delicate fabrics and detailed projects | Heats up slowly, may not dispense enough glue for larger projects |
| 60-100W | Heats up quickly and can handle larger projects | May dispense too much glue at once, making precision difficult |
| Over 100W | Can easily handle large projects and thicker fabrics | May be too powerful for delicate fabrics and detailed projects |
It’s important to choose the right wattage glue gun for your project, so take some time to consider the type of fabric you’ll be working with and the level of precision you need. Don’t forget to also consider the size and material of the glue stick, as well as the temperature settings available on the glue gun.
If you’re still unsure which wattage glue gun is right for your project, do some additional research or consult with a crafting expert. And, make sure to check out our guide on How to Glue EVA Foam to Fabric for more tips and tricks.
3. Glue Stick Size and Material
When it comes to using a glue gun on fabric, the size and material of the glue stick you choose is just as important as the temperature and wattage of your glue gun. Using the wrong glue stick could result in your project falling apart – literally. So what should you look for when choosing a glue stick for fabric? Let’s take a look at the most important factors.
Firstly, glue stick size matters. Most glue guns take standard size glue sticks that are about 7/16 inch in diameter. However, for smaller projects or more intricate gluing, you may want to consider mini glue sticks, which are about half the size of standard sticks. Mini sticks are also great for those hard-to-reach areas. On the other hand, if you’re working on a larger project, you may want to opt for jumbo glue sticks, which are two to three times the size of standard sticks.
Secondly, the material of the glue stick is crucial. While most glue sticks are made of some type of adhesive polymer, they are not all created equal. You need to choose a glue stick that is specifically designed for fabric, as these glue sticks usually have a stronger hold and are able to withstand washing and drying. A good rule of thumb is to look for glue sticks that say “fabric” or “multi-temp” on the label.
Here’s a helpful table summarizing the key factors to consider when choosing a glue stick for fabric:
| Factor | What to Look For |
|---|---|
| Size | Standard, mini, or jumbo depending on your project needs |
| Material | Glue sticks specifically designed for fabric or labeled “multi-temp” |
By choosing the right glue stick size and material for your fabric project, you can ensure a strong and lasting bond. If you’re unsure which glue stick to use for a specific fabric, always do a test on a scrap piece of fabric before committing to your full project. And remember, while using a glue gun on fabric can be a game-changer for your DIY projects, it’s important to choose the right tools and materials for the job to ensure a successful outcome.
Pro Tip: Are you working with delicate fabrics like nylon or silk? Check out our article on how to glue nylon, how to glue ribbon to paper, and how to glue tissue paper on glass for more specific tips and tricks.
Preparing Fabric for Gluing
Preparing your fabric correctly before using a glue gun is essential to achieve the best results. By taking the time to prepare your fabric, you can ensure that the glue adheres well and does not damage the fabric. Before we dive into the step-by-step process of using a glue gun on fabric, let’s explore how to prepare your fabric and make sure it’s ready for gluing. This is especially important if you’re working with delicate or lightweight fabrics, such as silk or cotton. Not properly preparing your fabric can result in unwanted wrinkles, bumps and even discoloration. So, take the time to properly prep your fabric to achieve a smooth and professional finish.
1. Washing and Drying
Before using a glue gun on fabric, it’s important to properly prepare the fabric for the best results. This includes washing and drying the fabric to ensure that it’s clean and free from any dirt or debris. Here are some tips for washing and drying fabric before using a glue gun:
1. Choose the right detergent: When washing fabric, it’s important to choose a detergent that’s appropriate for the type of fabric you’re washing. For example, delicate fabrics may require a gentler detergent, while more durable fabrics can handle a stronger detergent.
2. Follow the care instructions: Always check the care instructions on the fabric label before washing it. Some fabrics may need to be washed in cold water or air-dried instead of being put in the dryer. Following the care instructions will help prevent any damage to the fabric.
3. Use a gentle cycle: When washing fabric, use a gentle cycle to prevent any damage to the fabric. This means that the washing machine will agitate the fabric less than a standard cycle, which can be too harsh for certain fabrics.
4. Avoid using fabric softener: Fabric softener can leave a residue on the fabric that can interfere with the adhesive properties of the glue. Instead, use a vinegar rinse to help soften the fabric without leaving any residue.
5. Air-dry the fabric: Instead of putting the fabric in the dryer, air-dry it to avoid any shrinking or stretching. Hang the fabric up or lay it flat to dry, depending on the type of fabric.
By following these tips, you can ensure that your fabric is properly prepared for gluing. With clean, dry fabric, your glue gun will be able to adhere to the fabric more effectively and produce better results.
For more tips on using a glue gun, check out our article on how to glue ribbon. If you’re looking for a glue-free craft project, learn how to make a sock puppet without hot glue in our step-by-step guide. Or, if you’re interested in collage, find out what glue to use for collage in our comprehensive guide.
2. Ironing
Preparing your fabric properly is essential for the glue gun to work effectively. Here are some tips for preparing your fabric before using a glue gun:
| Tip | Description |
|---|---|
| 1. Washing and Drying | Wash and dry your fabric before gluing. This will help to remove any dirt or residue and ensure the glue sticks properly. |
| 2. Ironing | Iron your fabric to remove any wrinkles or creases. This will create a smooth surface for the glue to adhere to. (Check out our article on how to make a sock puppet without hot glue to learn how to iron a sock puppet) |
Ironing is an important step in preparing your fabric for gluing. Not only does it remove any wrinkles or creases, but it also creates a smooth surface for the glue to adhere to. Make sure to use the appropriate heat setting for your fabric to avoid damaging it.
To iron your fabric, start by setting the iron to the correct heat setting. Generally, a low to medium heat setting is appropriate for most fabrics. Check the care label on your fabric to make sure you are using the correct heat setting.
Once the iron is heated, lay your fabric out on the ironing board. When ironing, start from the center of the fabric and work your way out to the edges. Be sure to move the iron in a smooth motion to avoid creating any new wrinkles.
After ironing your fabric, you are ready to use your glue gun. Be sure to follow the steps outlined in the next section to ensure that the glue adheres properly and that your project turns out just right.
Remember, proper preparation is key to using a glue gun on fabric successfully. So, take the time to prepare your fabric properly and you will be rewarded with a beautifully finished project.
Using a Glue Gun on Fabric: Step-by-Step Guide
It’s time to dive into the practical aspect of using a glue gun on fabric! Now that you’ve got your glue gun and fabric ready, let’s start the step-by-step guide on how to properly apply glue on fabric. With the right technique, you can easily attach fabric and even create intricate designs. Follow these simple steps and use your glue gun like a pro. But before we start, remember to check out our article on what glue to use for collage to choose the best glue stick for your fabric project.
1. Secure the Fabric
Before you start gluing fabric, it’s important to secure it in place to prevent it from shifting or wrinkling. Here are some steps you can take to secure the fabric:
| Pinning: | Using sewing pins to hold the fabric in place is a popular method. Make sure the pins are evenly spaced and do not interfere with the area where you plan to glue. |
| Tape: | If you don’t want to put holes in your fabric, you can use tape instead. However, make sure the tape is not too sticky, or it may leave residue on the fabric. |
| Clamps: | For larger pieces of fabric, using clamps can be a good option. Use small clamps to hold the fabric in place, but be careful not to clamp too tightly and create indentations on the fabric. |
Whatever method you choose, make sure the fabric is secure and flat before you start gluing. This will ensure that the glue is evenly applied and will create a strong bond.
2. Heat the Glue Gun
Before using a glue gun, it’s important to heat it up first. Heating the glue gun will allow the glue stick to melt and become adhesive, making it possible to apply it to the fabric. Follow these steps to heat up the glue gun:
- Plug in the Glue Gun: Plug the glue gun into an electrical outlet and make sure it’s on a flat and safe surface.
- Allow the Glue Gun to Heat Up: Depending on the glue gun you’re using, it can take anywhere from 5 to 15 minutes for it to heat up fully. Keep an eye on the glue gun’s indicator, which will tell you when it’s ready.
- Always Use Low Heat for Delicate Fabrics: If you’re working with a delicate fabric, make sure to set the glue gun to low heat to avoid damaging it.
- Use High Heat for Tough Fabrics: For tough and heavy-duty fabrics, set the glue gun to high heat to ensure the glue can bond properly.
- Place Glue Stick into the Glue Gun: Once the glue gun is heated up, carefully insert the glue stick into the back end of the glue gun. Push the glue stick until it touches the heating element and wait for it to melt.
It’s always important to follow the manufacturer’s instructions when heating up a glue gun. Some glue guns may require longer or shorter heating times, and not all glue sticks are the same. It’s also crucial to handle the glue gun with care, especially when it’s heated up, to avoid any accidental burns or injuries.
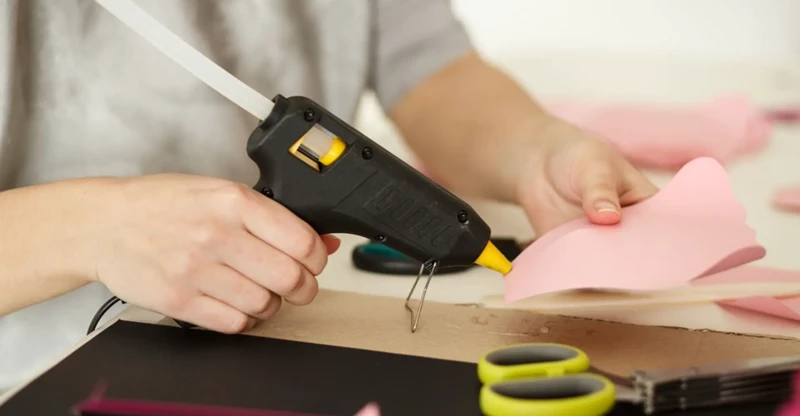
3. Apply Glue to the Fabric
When applying glue to the fabric, it is important to apply it evenly and sparingly. Here are the steps to follow:
- Start by squeezing the trigger of the glue gun to extrude a small amount of glue onto a scrap piece of fabric or paper to ensure the glue is flowing smoothly and to clean the nozzle of any dried glue from previous use.
- Position the glue gun over the fabric where you want to apply glue and gently squeeze the trigger to start the flow of glue. Avoid squeezing too hard to prevent excessive glue from coming out of the gun.
- Move the glue gun steadily along the line where you want to apply the glue, applying small dots or thin lines of glue depending on the shape of the object or fabric you are working with.
- Be sure not to apply too much glue, as it can seep through the fabric or create bumps in the fabric surface. As a general rule of thumb, apply glue around the edges of the fabric pieces and use small amounts in the center to minimize bumps and air pockets.
- Repeat the process until all of the fabric pieces have been glued together as needed.
It’s also important to work quickly when applying glue to avoid any premature drying. If you need more time to align the fabric, use fabric clips or pins to hold the pieces together while you continue to work.
Always keep in mind that using too much glue can ruin the aesthetics and texture of the fabric, resulting in a messy and amateurish look. On the other hand, using too little glue may not provide enough bonding, compromising the longevity of your project. So, take your time and practice applying glue with a steady hand until you find the perfect balance and achieve the desired results.
4. Press and Hold
Once you have applied the glue to the fabric using your glue gun, it’s important to firmly press and hold the two fabrics together for a few seconds to ensure a strong bond. This will prevent the fabric from coming apart over time.
To effectively press and hold the fabrics together, follow these tips:
| Step | Instructions |
|---|---|
| Step 1 | Align the Fabrics: Ensure that the fabrics are properly aligned before pressing them together. It’s important to make sure that the edges of both fabrics meet perfectly so that the glue can create a strong bond. |
| Step 2 | Apply Pressure: Press down firmly on the fabrics to ensure that the glue is being spread evenly between the two fabrics. You can use your hand or a flat object like a ruler or a book to apply pressure. |
| Step 3 | Hold Firmly: Hold the fabrics together for at least 20-30 seconds. The longer you hold the fabrics together, the stronger the bond will be. Avoid moving the fabrics around or adjusting them during this time, as this can disrupt the bond. |
It’s important not to rush this step and to make sure that you hold the fabrics together for a sufficient amount of time to allow the glue to fully dry and create a strong bond. Once you have held the fabrics together for the appropriate amount of time, you can move on to the next section of your project.
Tips and Tricks for Using a Glue Gun on Fabric
Are you excited to get started on your fabric crafting project with your trusty glue gun? Before you dive in, take a moment to read through these helpful tips and tricks for using a glue gun on fabric. These suggestions will not only improve the quality of your work but also make the process even more enjoyable. From choosing the right nozzle to cleaning up after your project is complete, these tips will help you become a glue gun pro in no time.
1. Use in a Well-Ventilated Area
When using a glue gun on fabric, it is important to use in a well-ventilated area. This is because the fumes that a glue gun emits can be harmful when inhaled for extended periods of time. It’s recommended to always work in a room with plenty of air flow or open windows. You could also use fans or air purifiers to enhance ventilation.
The fumes emitted by the glue gun come from the glue sticks used. The glue sticks are made up of various chemicals that heat up and melt when inserted into the glue gun’s heating chamber. These chemicals can produce a strong smell as they melt and mix together, creating potentially harmful fumes that shouldn’t be inhaled.
To further ensure your safety, consider using a respirator mask to avoid breathing in the fumes. A simple disposable mask will suffice, but you can also invest in a reusable, more efficient one if you plan on using a glue gun on fabric frequently.
In addition to the potential health risks, working in a well-ventilated area will also help to prevent overheating. If a glue gun is used excessively without proper ventilation, it may overheat and cause damage to both the glue gun and the fabric.
Always use a glue gun on fabric in a well-ventilated area to avoid potential exposure to harmful fumes. Consider using a respirator mask to take extra precautions against inhalation of fumes. Not only is this important for your own health, but it will also prevent overheating of the glue gun and fabric.
| Do: | Don’t: |
|---|---|
|
|
2. Use a Silicone Mat or Parchment Paper
When working with a glue gun on fabric, it’s important to protect your work surface as well as ensure that the glue doesn’t seep through the fabric layers. Using a silicone mat or parchment paper can be a quick and easy solution to this problem.
Silicone mats are heat-resistant and non-stick, which means that hot glue will not permanently adhere to them. They are also easy to clean, so any excess glue can easily be peeled off once it has cooled. Silicone mats come in various sizes and shapes, perfect for any project.
Parchment paper is another great option for protecting your work surface. It is also heat-resistant and non-stick, making it easy to remove excess glue. Parchment paper can also be easily purchased at any grocery store, making it a readily available option.
It’s important to note that both silicone mats and parchment paper can also help to prevent any glue from seeping through the layers of fabric. Simply place a piece of the mat or paper between the layers before gluing.
Here is a table detailing the pros and cons of each option:
| Pros | Cons | |
|---|---|---|
| Silicone mat | Heat-resistant and non-stick | May be more expensive than parchment paper |
| Parchment paper | Readily available at grocery stores | May tear easily if not handled carefully |
Using a silicone mat or parchment paper is a simple and cost-effective way to protect your work surface and prevent glue from seeping through fabric layers. It’s a small step that can make a big difference in the success of your project.
3. Use Low Heat for Delicate Fabrics
When working with delicate fabrics, it’s important to adjust your glue gun’s heat setting to prevent damage. Using low heat is essential for fabrics that are sensitive to high temperatures.
Before using your glue gun, be sure to check the user manual for instructions on adjusting the temperature setting. Some glue guns have a dual heat setting, while others may require the use of a lower wattage bulb.
To further protect delicate fabrics, consider using a specialty glue stick formulated for fabrics. These sticks often have a lower melting point, which can help prevent damage to the fabric.
Here’s a helpful table to reference when determining the appropriate temperature setting for your glue gun:
| Fabric Type | Temperature Setting |
|---|---|
| Silk | Low |
| Lace | Low |
| Satin | Low |
| Chiffon | Low |
| Organza | Low |
| Cotton | Medium-Low |
| Wool | Medium |
| Denim | High |
| Leather | High |
Using low heat for delicate fabrics not only prevents damage, but also helps to ensure a successful and long-lasting bond. Remember to always test a small area of the fabric before applying glue to the entire project to ensure that the temperature and glue stick are appropriate for the fabric.
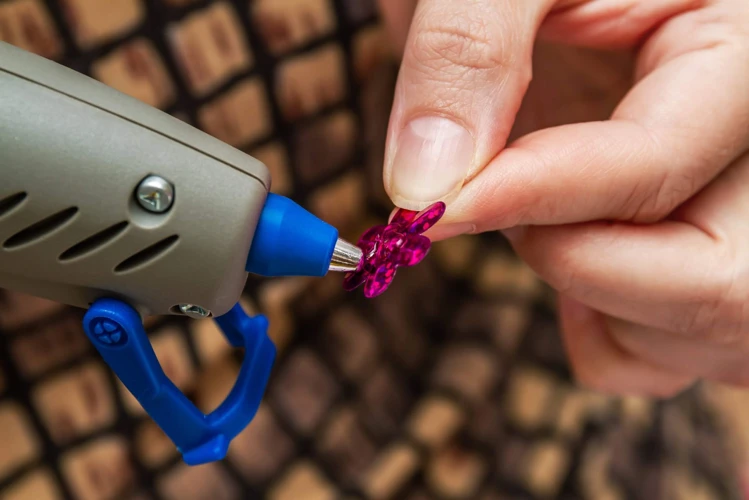
4. Use a Precision Tip Nozzle
When using a glue gun on fabric, it is important to consider the precision and accuracy of the glue application. A precision tip nozzle can be incredibly useful for this purpose. With a precision tip nozzle, you can apply the glue more precisely and avoid accidentally gluing unwanted areas of the fabric.
Here are some benefits of using a precision tip nozzle:
| Benefit | Explanation |
|---|---|
| Increased Precision | A precision tip nozzle allows you to apply glue with greater accuracy and precision. This can be particularly useful when working with intricate or delicate fabrics. |
| Less Waste | When using a precision tip nozzle, you can apply just the right amount of glue to the fabric, which reduces waste. This is especially important when working with expensive fabrics where every drop counts. |
| More Control | Using a precision tip nozzle gives you more control over the glue application. This is particularly useful when you need to apply glue to a certain area or create a specific pattern. |
Another advantage of using a precision tip nozzle is that it can help you avoid putting too much glue on the fabric, which can make it stiff or difficult to work with. By using a precision tip nozzle, you can apply just the right amount of glue, giving you a better result overall.
It is worth noting that different glue guns come with different nozzle sizes and shapes. Some glue guns come with interchangeable nozzles, allowing you to use different nozzle shapes and sizes depending on your specific needs. When purchasing a glue gun, it is important to consider the nozzle size and shape and how it will affect your glue application on fabric.
Using a precision tip nozzle when using a glue gun on fabric is a smart choice. It provides greater control, accuracy, and precision when applying glue, which can lead to a better overall result.
5. Avoid Gluing Seams
When using a glue gun on fabric, it’s important to be mindful of where you’re placing the glue. One area to avoid gluing is on seams. Gluing over seams can not only create an uneven and bulky appearance, but it can also weaken the structural integrity of the garment or project.
Why should you avoid gluing seams?
As mentioned, gluing seams can create a bulky appearance. This is especially true if you’re using a thicker glue stick or applying too much glue to the seam. The excess glue can seep through the fabric and create an unsightly mess. Additionally, when you apply pressure to the seam, the glue can spread and make it difficult to achieve a smooth finish.
In terms of structural integrity, gluing over seams can also create weak points in the garment or project. A seam is typically where two pieces of fabric are joined together, and the glue may not adhere properly to both pieces. This can result in the glue coming undone or the seam unraveling over time.
What can you do instead?
If you need to glue fabric together that has a seam, try to apply the glue on either side of the seam, so that the seam is still able to move and flex. Another option is to sew the seam first and then use the glue gun to reinforce or attach additional pieces to the fabric.
Here’s a helpful table summarizing the do’s and don’ts of gluing seams:
| DO: | DON’T: | |
|---|---|---|
| Placement | Apply glue on either side of the seam | Apply glue directly on the seam |
| Technique | Use a small amount of glue to avoid excess seepage | Use too much glue, causing it to spread and make it difficult to achieve a smooth finish |
| Structural Integrity | Sew the seam first, then use the glue gun to reinforce or attach additional pieces to the fabric | Depend solely on glue to keep the seams together |
As you can see from the table, gluing over seams is best avoided to ensure a clean and professional-looking finished product. By practicing good technique and being mindful of where you’re placing the glue, you can achieve great results with your glue gun on fabric projects.
After Using a Glue Gun on Fabric
Once you have completed your fabric bonding project using a glue gun, it’s important to take some steps to ensure that your project looks its best and your tools are maintained properly. With the right care, your project will look professional and have a long-lasting hold. In this important section, we will discuss what to do after using a glue gun on fabric, including cooling, trimming, and cleaning. So, let’s get started!
1. Allow to Cool and Dry
Once you have finished gluing your fabric, it is essential to allow it to cool and dry before moving or handling it. This step is crucial because if the glue is not dry, it can easily come apart, ruining all your hard work.
Here are some tips to ensure your fabric is dry before handling:
- Let the fabric sit undisturbed in a flat, level position for at least 30 minutes to allow the glue to cool and set.
- Avoid touching or moving the fabric during this time. Doing so can cause the glue to shift or smudge.
- For a stronger bond, let the fabric sit for up to two hours before handling it.
- In high humidity or colder temperatures, the drying time may be longer, so it’s essential to take this into account and wait for it to completely dry before handling it.
Why is allowing the fabric to cool and dry so important?
When you apply glue to fabric, it creates a bond by seeping into the fibers. As it cools, the glue solidifies and creates a tight hold that firmly secures the fabric together.
If you move or handle the fabric before it is completely dry, you risk breaking this bond, causing the glue to loosen or detach entirely. Additionally, any excess glue that is not dry can smudge or rub off onto other surfaces, creating unsightly marks that can be challenging to remove.
It is crucial to be patient during the drying process to ensure that your fabric is adequately secured, and the glue remains intact.
2. Trim Excess Glue
Once you have finished gluing your fabric, the next step is to trim any excess glue. This is an important step to ensure that your final product looks neat and professional. Excess glue can harden and create unsightly lumps and bumps on your fabric. Here are some steps to follow when trimming excess glue:
- Allow the glue to dry completely before trimming. This will ensure that you don’t accidentally smear glue on your fabric while trimming.
- Take a pair of sharp scissors and carefully trim the excess glue away. Be sure to do this in a well-lit area so you can see what you are doing.
- Use small, precise cuts to remove the excess glue. It’s better to take off a little at a time rather than cutting too much off at once.
- If the excess glue is in a hard-to-reach spot, use a pair of tweezers to carefully remove it.
Remember that it’s better to take your time and trim the excess glue carefully than rush through it and end up damaging your fabric. Once you have trimmed all the excess glue, take a step back and admire your handiwork! You should be proud of yourself for tackling a DIY fabric project with a glue gun.
Pro Tip: If you accidentally get glue on your fabric in an unwanted spot, don’t panic! Let the glue dry completely, then use a toothbrush to gently brush it away. If there is still some residue left, try using a solution of equal parts vinegar and water to remove it.
3. Clean Your Glue Gun
Keeping your glue gun clean is essential for its longevity and efficiency. Here are some tips for cleaning your glue gun:
- Unplug the Glue Gun: Before cleaning the glue gun, make sure it is unplugged and the glue has cooled down.
- Remove the Glue Stick: Take out any unused glue sticks from the gun. If there is excess glue inside the gun, use pliers to pull it out.
- Wipe the Nozzle: Use a damp cloth to clean the nozzle of the glue gun. This helps to remove any remaining glue residue and ensure that the nozzle is free from clogs.
- Clear the Feeding Mechanism: Inspect the feeding mechanism for any hardened glue and use a toothbrush or small brush to remove it.
- Check the Trigger: Make sure that the trigger of the glue gun is moving smoothly without any obstruction. If it is stuck, clean the trigger and mechanism.
- Store Properly: Store your glue gun in a dry and cool place and make sure it is kept away from children and pets.
By following these simple steps, you can maintain your glue gun in a good condition and ensure that it is ready to use for your next project. Regular cleaning also prevents any build-up of glue in your glue gun which can cause clogs and affect its performance.
Conclusion
In conclusion, using a glue gun on fabric can be an incredibly useful tool for DIY projects, repairs, and even professional work. It provides versatility, saves time, and is cost-effective. However, it’s essential to choose the right glue gun and glue stick for the fabric you’re working with. You’ll also need to prepare the fabric properly before gluing, ensuring it’s clean and wrinkle-free.
When using a glue gun, it’s important to follow the step-by-step guide carefully and take advantage of tips and tricks to ensure the best results. Always use your glue gun in a well-ventilated area and choose a low heat setting for delicate fabrics. A precision tip nozzle can also be useful for more intricate work.
After using a glue gun on fabric, allow the glue to cool and dry before trimming excess glue and cleaning your glue gun. With proper care, your glue gun can last for years and continue to be a useful tool in your DIY arsenal.
Overall, using a glue gun on fabric doesn’t have to be intimidating or complicated. By following these tips and tricks, you can ensure your projects are a success and enjoy the satisfaction of a job well done. So go ahead and get creative with your glue gun – the possibilities are endless!
Frequently Asked Questions
Can a glue gun be used on all types of fabric?
While glue guns can be used on many types of fabric, it is best to test a small area first to ensure that the glue does not damage the fabric.
Can glue from a glue gun be washed out of fabric?
Yes, glue from a glue gun can be washed out of fabric. However, it is important to use the correct temperature setting on the glue gun and the correct glue stick for the fabric.
What type of glue stick should be used on delicate fabrics?
A low temperature glue stick should be used on delicate fabrics. This will prevent the fabric from being damaged by the heat of the glue.
Can a glue gun be used for hemming pants?
Yes, a glue gun can be used for hemming pants. However, it is important to use a strong glue stick and to apply the glue evenly to avoid any puckering.
Can a glue gun be used for attaching decorations to fabric?
Yes, a glue gun can be used for attaching decorations to fabric. It is important to use a strong glue stick and to allow the glue to dry completely before wearing or washing the item.
How long does it take for glue from a glue gun to dry?
The drying time for glue from a glue gun will depend on the temperature of the glue gun and the thickness of the glue layer. Typically, it takes 30 seconds to 2 minutes for glue to dry.
Can glue from a glue gun be removed from fabric if a mistake is made?
If a mistake is made, glue from a glue gun can be removed from fabric with a warm, damp cloth. It is important to act quickly before the glue dries completely.
Do different types of glue sticks work better on different types of fabric?
Yes, different types of glue sticks work better on different types of fabric. For example, a high temperature glue stick is best for heavy fabrics like denim, while a low temperature glue stick is best for delicate fabrics like silk.
What is the best way to store a glue gun and glue sticks?
The best way to store a glue gun and glue sticks is in a dry, cool place away from direct sunlight. It is also important to keep the glue gun and glue sticks out of reach of children and pets.
Can a glue gun be used on other materials besides fabric?
Yes, a glue gun can be used on many other materials besides fabric, including wood, plastic, and metal. It is important to use the correct temperature and glue stick for the material.