Adding a touch of fabric to wood can transform a simple piece of decor into a unique and personalized statement. Whether it’s for a monogrammed centerpiece or a wall decoration, gluing fabric to wood is a creative way to enhance your living space. Understanding the right fabric to wood bonding techniques is essential for a successful project.
Understanding Fabric to Wood Bonding Techniques
When it comes to attaching fabric to wood, the bond between the two materials is crucial. A strong, lasting adhesive is necessary to withstand the texture of the fabric and the solidity of the wood. This blog post will guide you through the process of applying fabric to wood, ensuring a durable and attractive finish.
Materials Required for DIY Wood Letter Decor
Embarking on a DIY wood letter decor project requires some essential materials that will help you achieve a professional-looking result. These items are readily available at craft stores or online.
Choosing the Best Glue for Fabric to Wood
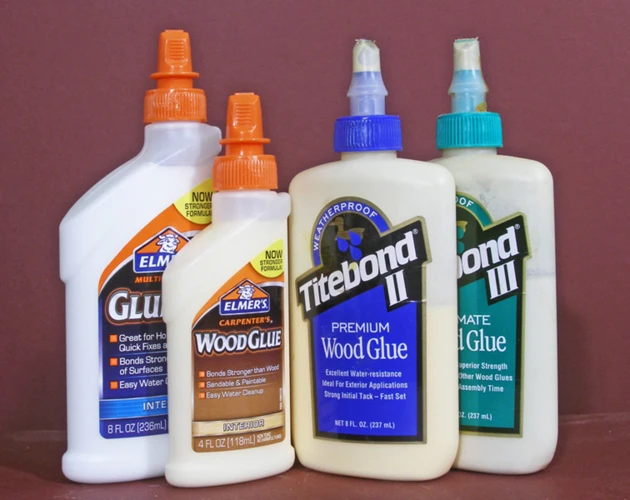
The best glue for fabric to wood is one that is flexible, strong, and easy to apply. Options such as PVA glue, spray adhesive, or mod podge work well for these types of projects. Each adhesive has its own set of properties, so selecting the right one will depend on the fabric’s weight and the wood’s finish.
Selection of Wood Letters and Fabrics
Choosing the right wood letters and fabrics is just as important as selecting the adhesive. Wood letters can be found in various sizes and thicknesses, while fabrics can range from lightweight cotton to heavier upholstery material. Consider the final placement of your decor when making your choice, as this will influence the durability required.
Step-by-Step Guide to Applying Fabric to Wood
With all the materials at hand, it’s time to delve into the craft of applying fabric to wood letters. Follow this step-by-step guide to ensure a smooth and successful application.
Preparing the Wood Letters for Application
Start by cleaning the wood letters with a dry cloth to remove any dust or debris. If the wood has a glossy finish, lightly sanding the surface can help the adhesive adhere better. Wipe away any sanding residue before proceeding to the next step.
Trace and Cut the Fabric to Fit the Wood Letters
Lay the fabric flat and place the wood letter on top. With a pencil or tailor’s chalk, trace around the letter, adding a small margin for error. Cut the fabric carefully along the lines you’ve drawn.
Applying Fabric to Wood Adhesive
Apply a thin, even layer of your chosen fabric to wood adhesive onto the wood letter. Be sure to cover the entire surface, extending to the edges without over-saturating the wood. If using a spray adhesive, follow the manufacturer’s instructions and apply in a well-ventilated area.
Attaching the Fabric to the Wood Letters
Carefully place the fabric onto the adhesive-coated wood letter. Press down gently, starting from the center and working towards the edges to avoid any air pockets or wrinkles.
Smoothing Out Bubbles and Wrinkles
Once the fabric is in place, use a flat tool, such as a brayer or a credit card, to smooth out any bubbles or wrinkles. This will also help to secure the bond between the fabric and the wood.
Decorative Techniques for Fabric and Wood Crafts
With the fabric now attached to the wood, you can explore various decorative techniques to further enhance your creation.
Craft Ideas with Wood Letters
- Paint the sides of the letters for a pop of color.
- Add glitter or metallic foil to the edges for a sparkling finish.
- Stencil designs onto the fabric for added detail.
Adding Embellishments and Final Touches
For that extra flair, consider adding embellishments such as ribbons, buttons, or beads. These final touches can tie in the theme of your room or reflect a personal interest.
Wood Letter Decoration Ideas
Wood letter decoration ideas are as varied as your imagination. These personalized pieces can serve as focal points in a variety of settings.
Inspirational Themes for Personalized Decor
Consider themes that resonate with you or the recipient of your craft. From nautical to floral, the motifs you choose can reflect personality and style.
Integrating Wood Letters into Home Decor
Integrate your fabric-covered wood letters into your home decor by mounting them on walls, placing them on shelves, or incorporating them into gallery walls. They can also make wonderful gifts for special occasions.
Troubleshooting: Common Issues When Gluing Fabric to Wood
Even with careful preparation, you might encounter some issues when gluing fabric to wood. Here’s how to address common problems.
Adhesive Not Sticking Properly
If the adhesive is not sticking, it may be due to a lack of surface preparation or using the wrong type of glue. Ensure the wood is clean and consider reapplying a different adhesive if necessary.
Fabric Fraying or Lifting from the Edges
Fabric fraying or lifting from the edges can be mitigated by applying a sealant or using a fabric glue that seals the edges as it dries. Trim any loose threads before applying the glue to prevent further fraying.
Conclusion: Your DIY Fabric-Covered Wood Letters
Completing your DIY fabric-covered wood letters project is a satisfying accomplishment. With the right materials and techniques, you can create beautiful and lasting decorations.
Displaying Your Crafted Wood Letters
Be proud of your handiwork and display your crafted letters prominently. They will undoubtedly add a personal touch to any space.
Maintenance Tips for Your Fabric-Covered Letters
To maintain your fabric-covered letters, keep them free of dust and avoid placing them in direct sunlight to prevent fading. If they become dirty, a light spot cleaning with a damp cloth should suffice.
FAQs on How to Attach Fabric to Wood
Have questions about how to attach fabric to wood? Stay tuned for a comprehensive FAQ section that will provide answers to common inquiries.
When it comes to crafting, knowing the right techniques to bind different materials together can make all the difference in your projects. If you’re interested in how to adhere fabric to wood letters for a unique and personalized touch, we’ve got you covered in our detailed guide. But why stop there? Expand your crafting skills by exploring our other tutorials on how to effectively glue paper to fabric, perfect for adding patterns or text to your textile projects. For those looking to attach paper in a more rigid form, check out our tips on how to glue paper to wood letters, which can help you create stunning decorative pieces. And for embellishing your fabric works with a bit of sparkle, our article on how to glue beads to fabric will provide you with all the steps you need to get started. Whether you’re a seasoned crafter or just beginning, mastering these adhesive techniques will take your projects to the next level!
Additional Craft Resources and Ideas
If you’re looking for further inspiration, there are numerous resources and ideas available for fabric and wood crafts. Check out craft blogs, Pinterest, and YouTube tutorials for more creative projects.