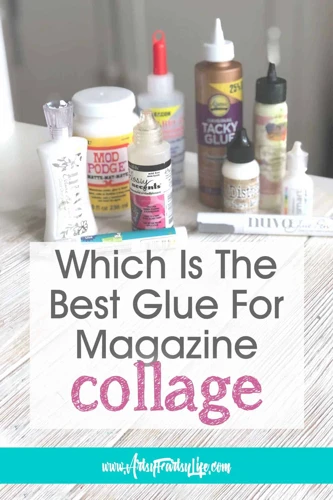
Have you ever found yourself staring at a pile of magazine clippings, patterned papers, and photographs, overwhelmed by the idea of turning them into a beautiful collage? With so many options for adhesives, it can be challenging to know which glue is best for your project. You don’t want to risk your hard work falling apart, nor do you want to end up with unsightly wrinkles or bubbles. That’s why we’ve put together this comprehensive guide on which glue to use for collage. We’ll cover everything from the different types of glue available to considerations when choosing the right one for your project. By the end of this guide, you’ll be equipped with the knowledge and confidence to tackle any collage project that comes your way. Let’s get started!
The Importance of Choosing the Right Glue
As a beginner in the world of collage making, choosing the right glue can be a daunting task. With so many types of glue available in the market, selecting the right one can be perplexing. However, the glue you choose plays a pivotal role in the final appearance and durability of your collage. By choosing the right glue, you can ensure that your collage stays in place, and there is no damage caused to it, giving you a long-lasting and beautiful piece of art to showcase. In this article, we’ll guide you through the importance of choosing the right glue and help you understand the different types of glues available for collage making. Additionally, we’ll provide you some tips for using glue in your collage. So, let’s dive in!
1.1 Ensuring Your Collage Stays in Place
When creating a collage, one of the main concerns is ensuring that all the pieces stay in place. Using a strong and durable glue is crucial for this. There are several types of glue that are suitable for collage making, each with their own strengths and weaknesses. Some examples of strong adhesives include PVA glue, Mod Podge, and spray adhesive. For more delicate materials such as suede or velvet, it may be necessary to use a specialized glue like the one mentioned here to prevent damage or discoloration.
Regardless of the type of glue you choose, it is important to ensure that it is applied evenly and in the right amount. Too much glue can cause clumps and bubbles, while too little may not hold the pieces securely. Additionally, the porosity of your materials can also affect how well the glue adheres. Porous materials like fabric may require multiple coats or a stronger glue like the one mentioned here.
Ultimately, choosing the right glue will not only keep your collage together, but also prevent long-term damage. For upholstery collage projects, a strong adhesive like the one mentioned here is important for holding heavy or bulky materials in place. For those working with fabric, knowing how strong is fabric glue is important for ensuring that the materials remain attached over time. By considering the materials you are using and the ultimate purpose of your collage, you can choose a glue that will keep your artwork secure for years to come.
1.2 Avoiding Damage to Your Collage
Avoiding Damage to Your Collage: When you’re working on a collage, it’s important to consider how to avoid damage to your materials during the gluing process. Some adhesives can cause wrinkling, warping, or even discoloration if they bleed through the paper or fabric. These issues can be especially problematic if you’re working with delicate or valuable items, such as old photographs or rare artwork.
To prevent damage, you’ll want to consider both the type of glue you use and the application method. For example, if you’re gluing paper to wood, you may want to use a gentle adhesive like Mod Podge that won’t warp or damage the paper. Or, if you’re working with fabrics, you may want to opt for a fabric glue that won’t dissolve or weaken the fibers.
One way to protect your collage is to use a barrier between the glue and the materials. This can be as simple as laying down a sheet of wax paper or plastic wrap before applying the adhesive. The barrier will prevent the glue from soaking through and damaging your materials. Be sure to remove the barrier material after the glue has dried to avoid leaving any residue behind.
Another tip for avoiding damage is to work in layers when possible. This means gluing down a few items at a time, allowing the glue to dry completely, and then adding more layers. By working in this way, you can ensure that each layer is firmly adhered without risking damage to the layers below.
Finally, if you’re using a strong adhesive like hot glue, be sure to keep the glue away from sensitive surfaces and use it sparingly. Hot glue can be effective at sticking items together quickly, but it can also melt or damage some materials, such as velvet or delicate fabrics. Consider using a fabric glue or other gentler adhesive for these types of materials, or explore alternative methods for attaching velvet to your collage.
| Tips for Avoiding Damage to Your Collage: |
|---|
| Choose a gentle adhesive for delicate materials |
| Use a barrier between the glue and your materials |
| Work in layers to avoid damage |
| Use strong adhesives sparingly and with caution |
By taking these precautions, you can help ensure that your collage stays in good condition for years to come.
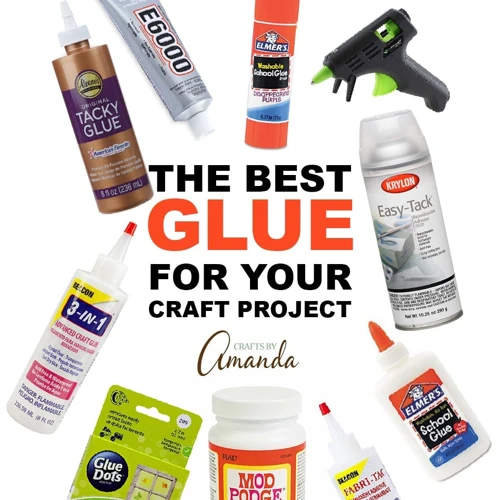
Types of Glue for Collage Making
When it comes to making collages, choosing the right type of glue is crucial to ensure that your artwork stays intact. There are various types of glue available in the market for collage making, each with its own unique properties and advantages. Let’s take a closer look at some of the commonly used glues for collage making and their specific use cases. Whether you’re working with paper, fabric, or other materials, this guide will help you choose the right glue for your project.
2.1 PVA Glue
PVA glue is one of the most popular types of glue used in collage making. PVA stands for polyvinyl acetate, which is a type of thermoplastic adhesive. It is water-soluble and dries clear, which makes it perfect for use in a wide variety of projects.
Advantages:
- PVA glue is very versatile and can be used on a wide range of materials including paper, cardboard, fabric, and even some plastics.
- It dries clear and flexible, making it ideal for use in collages where you don’t want the glue to be visible.
- It is easy to find in most craft stores and is very affordable.
- It has a long shelf life and can be stored for a long time without losing its adhesive properties.
Disadvantages:
- PVA glue can be too wet for thin paper, causing it to warp and buckle.
- It can take longer to dry than some other types of glue, which can be frustrating for impatient collage makers.
- It is not waterproof, which means it may not be the best choice for collages that will be exposed to moisture.
When using PVA glue in your collage, it’s important to apply it evenly to avoid any bubbles or wrinkles. You should also be careful when working with thin or delicate materials, as the wetness of the glue can cause them to tear or warp. Remember to let the glue dry completely before moving or hanging your collage.
If you’re interested in using PVA glue in a non-traditional way, you can also try making your own fabric paint with glue. This is a fun and affordable way to add some color to your collages and other creative projects. Check out our article on how to make fabric paint with glue for step-by-step instructions.
PVA glue is a versatile and affordable option for collage making. It has its pros and cons, so it’s important to consider your specific needs before choosing a glue. But if you’re looking for a reliable and easy-to-find option, PVA glue is definitely worth considering.
2.2 Mod Podge
Mod Podge is a popular choice among collage makers due to its versatility and convenience. It is a water-based sealer, glue, and finish that is perfect for use on a variety of surfaces, including paper, fabric, and wood. This glue is a great choice for those who want a glossy finish on their collages.
One of the benefits of Mod Podge is its easy application. It can be applied using a brush or foam applicator, and dries clear with a smooth finish. Mod Podge also offers a variety of finishes, including matte and glitter, allowing you to choose the perfect finish for your project.
However, it’s important to note that Mod Podge can sometimes cause wrinkles or bubbles in thin or delicate papers. To avoid this, use a thin layer of Mod Podge and apply it evenly to the surface. It’s also important to use Mod Podge sparingly, as too much glue can cause the paper to wrinkle or warp.
| Pros | Cons |
|---|---|
| Offers a variety of finishes | Can sometimes cause wrinkles or bubbles |
| Easy to apply with a brush or foam applicator | Can be messy if not applied evenly |
| Can be used on a variety of surfaces | May need several coats to ensure a strong hold |
Another possible downside of Mod Podge is that it can be relatively expensive compared to other glue options for collage making. However, it is widely available in craft stores and online retailers.
Mod Podge is a versatile and convenient option for those looking for a glossy finish on their collages. While it may have some drawbacks, with a little care and attention, it can be a valuable tool in your collage making kit. To avoid bubbling and wrinkle, follow the recommendation to use thin layers of Mod Podge and apply it evenly to the surface. You can buy Mod Podge and other glues at many online retailers, and if you want to learn how to use specific types of glue, such as when attaching ribbon (link) or pom poms to a shirt (link), check out some of the tutorials available online.
2.3 Spray Adhesive
Spray adhesive is another popular option for collage makers because it dries quickly and evenly. This type of glue is applied by spraying a fine mist of adhesive onto the surface, creating a thin, even layer. Not only does spray adhesive create a strong bond, but it also doesn’t create the same wrinkles or bubbles that other types of glue can sometimes cause.
The Benefits of Using Spray Adhesive for Collages
- Spray adhesive is quick and easy to apply.
- It creates an even layer of adhesive, which is especially important when working with large or irregularly shaped materials.
- The drying time is relatively fast compared to other types of glue, which makes it a great option if you’re short on time.
- It won’t wrinkle or bubble your paper or materials as other types of glue sometimes can.
If you’re working with photos or thinner paper, it’s important to note that some spray adhesives can bleed through the paper. Be sure to test a small area before applying the spray adhesive to the entire project.
How to Use Spray Adhesive in Your Collage
1. First, make sure to work in a well-ventilated area, as the fumes from spray adhesive can be strong.
2. Lay out your materials and determine where you want to apply the adhesive.
3. Shake the can of spray adhesive well and hold it about 6-8 inches away from the materials.
4. Apply a light, even coat of adhesive to the surface of your material. Be sure to cover the entire area you’d like to bond.
5. Carefully place the material onto your collage base and press down firmly to ensure a strong bond.
6. If needed, you can reposition the material for a short amount of time after it has been pressed down.
7. Allow sufficient time for the adhesive to dry thoroughly before moving or handling the collage.
If you’re looking for more detailed information on how to use glue for certain materials or techniques, check out our other guides on how to glue ribbon or how to glue pom poms to a shirt.
2.4 Double-Sided Tape
When it comes to double-sided tape, it is a popular choice for collage making because it does not create any mess. This type of tape is dry to the touch and easy to handle. Double-sided tape is essentially a layer of adhesive coated on both sides of a strip of material, commonly paper or plastic. Due to its thinness, it’s a great option for layering papers and achieving a smooth, flush finish.
However, it does have some drawbacks. For one, it can be expensive, especially if you need a large quantity. Additionally, double-sided tape may not be the best option for heavier objects or those with uneven surfaces. It is also not ideal for materials that are sensitive to pressure or heat, such as delicate papers and photos.
Using double-sided tape is relatively straightforward. Simply cut the tape to the desired length and apply it to the object or surface you want to adhere. Then, carefully press the other object or surface onto the tape, making sure it is aligned correctly. You can use a roller or your fingers to smooth out any wrinkles or bubbles.
Here is a table summarizing the pros and cons of using double-sided tape for collage making:
| Pros | Cons |
|---|---|
| Easy to handle and work with | Expensive compared to other options |
| Creates a clean, seamless finish | Not ideal for heavier or uneven objects |
| Does not create a mess or require drying time | May not be suitable for delicate materials |
Ultimately, whether or not double-sided tape is the right choice for your collage project depends on your specific needs and preferences. Consider the materials you are using, the weight and shape of the objects you want to adhere, and the overall look you are going for.
2.5 Glue Stick
Glue sticks are a great option for collage makers who need a quick and easy way to adhere paper or lightweight materials to their artwork. Here are some things to keep in mind when considering using a glue stick:
1. Stickiness: Glue sticks are known for their stickiness, making them an excellent option for paper and other lightweight materials. However, if you’re working with heavier materials or trying to adhere items to a non-porous surface, a glue stick may not be your best option.
2. Drying Time: One of the benefits of using a glue stick is that they typically dry quickly, allowing you to move on to the next layer of your collage with minimal wait time. However, keep in mind that some brands of glue sticks may take longer to dry than others.
3. Translucency: Glue sticks typically dry clear, making them a great option for collages where you don’t want the adhesive to be visible. However, if you’re working with thicker paper or materials with a darker color, you may see some discoloration after the glue dries.
4. Availability: Glue sticks are readily available at most craft stores and office supply stores, making them an easy option to pick up on the go.
When using a glue stick for your collage, keep in mind to apply it evenly and avoid using too much, as this can result in bubbling or wrinkling of your materials. Also, be sure to remove any excess glue before it dries to ensure a clean and polished finish.
Considerations When Choosing a Glue for Your Collage
When it comes to creating a collage, the right glue is essential for ensuring that your materials stick together properly. But with so many options available, it can be difficult to know which glue to choose. Before making a decision, there are several factors to consider. Here are some key points to keep in mind when choosing a glue for your collage project.
3.1 Porosity of Your Materials
When choosing a glue for collage making, the porosity of your materials plays a significant role. Porosity refers to the ability of the material to absorb water or other liquids. Materials such as paper, cardboard, and fabric have a higher porosity compared to materials such as plastic or glass.
Table: Porosity of Common Materials
| Material | Porosity Level |
|---|---|
| Cardstock paper | High |
| Construction paper | High |
| Textured paper | High |
| Magazine paper | Medium |
| Fabric | High |
| Plastic | Low |
| Glass | Low |
If you’re working with highly porous materials such as fabric or textured paper, a PVA glue or Mod Podge would be an ideal option. These types of glue have a high liquid content and will seep into the materials, creating a strong bond. On the other hand, if you’re working with materials that have low porosity such as plastic or glass, a spray adhesive or double-sided tape would be a better option. These types of glue have a high adhesive content and will stick to the surface without seeping in.
It’s important to consider the porosity of your materials when choosing a glue for your collage. Using the wrong type of glue can result in a weak bond or damage to your materials. By selecting the appropriate glue for the porosity level of your materials, you’ll ensure that your collage will stay intact for years to come.
3.2 Drying Time
When it comes to choosing a glue for your collage, considering the drying time is an important factor. The drying time varies depending on the type of glue you use and can greatly affect the outcome of your collage.
The following table outlines the average drying times for common types of glue:
| Glue Type | Average Drying Time |
|---|---|
| PVA glue | 20-30 minutes |
| Mod Podge | 15-20 minutes |
| Spray Adhesive | less than 5 minutes |
| Double-Sided Tape | instant |
| Glue Stick | less than 5 minutes |
As you can see, some types of glue dry faster than others. This can be an advantage if you’re working on a time-sensitive project but can also be a disadvantage if you need to make adjustments after the glue has already dried.
When considering drying time, it’s important to also think about the size and weight of the materials you’re using. For example, if you’re working with heavier materials, it may take longer for the glue to dry and hold them in place. In this case, a stronger adhesive may be necessary. On the other hand, if you’re using smaller, lightweight materials, a faster drying glue such as spray adhesive or a glue stick may be more suitable.
Ultimately, the drying time of your glue will depend on your personal preferences and the specific needs of your collage project. By considering the types of materials you’re using and the time frame in which you need to complete your project, you can make an informed decision on which glue to use.
3.3 Finish
When choosing a glue for your collage, it’s important to consider the finish you want to achieve. Some glues will dry matte while others may have a glossy finish. It’s all about personal preference and the overall aesthetic you want to create.
Matte Finish: Matte finishes are perfect for a more natural look. This finish is not reflective and is great for a rustic or vintage style collage. PVA glue and glue sticks often dry with a matte finish.
Glossy Finish: If you’re looking for a more polished and modern look, a glossy finish would be perfect for your collage. Mod Podge and spray adhesive are great options for achieving a glossy finish.
Semi-Gloss Finish: If you want the best of both worlds, a semi-gloss finish may be your preferred option. Double-sided tape is a great adhesive that will give you a semi-gloss finish.
Consider experimenting with different finishes to find what works best for your project. Keep in mind that the finish of your glue can affect the overall look of your collage.
To summarize, the finish of your glue should be considered as an important factor when deciding which glue to use for your collage. Refer to the table below for a quick overview of the finishes associated with different types of glue.
| Type of Glue | Finish |
|---|---|
| PVA Glue | Matte |
| Mod Podge | Glossy |
| Spray Adhesive | Glossy |
| Double-Sided Tape | Semi-Gloss |
| Glue Stick | Matte |
3.4 Price and Availability
When choosing a glue for your collage, one of the most important factors to consider is price and availability. While some types of glue are easily accessible and affordable, others may be harder to find or come with a higher price tag.
To help you compare prices and availability, we’ve created a table below:
| Glue Type | Price Range | Availability |
|---|---|---|
| PVA Glue: | $$ | Widely available at craft stores and online |
| Mod Podge: | $$$ | Available at craft stores and online |
| Spray Adhesive: | $$$ | Available at some craft stores and online |
| Double-Sided Tape: | $ | Widely available at craft stores and online |
| Glue Stick: | $ | Widely available at office supply stores and online |
As you can see from the table, PVA glue and double-sided tape are generally more affordable and widely available than Mod Podge and spray adhesive. While glue sticks are also affordable, they may not be the best choice for all types of collages, particularly if you’re working with heavier materials.
When considering availability, it’s important to keep in mind that some types of glue may be more popular in different regions or countries. For example, if you live in Europe, you may find that UHU glue stick is more readily available than other types of glue. On the other hand, if you’re in the United States, you may have an easier time finding Mod Podge at your local craft store.
Ultimately, it’s important to strike a balance between price, availability, and the other factors we’ve discussed in this guide when choosing a glue for your collage. By doing so, you’ll be able to create a beautiful and long-lasting collage without breaking the bank.
Tips for Using Glue in Your Collage
When it comes to making a collage, using glue to stick everything together is essential. However, it’s important to use the right technique to avoid making mistakes. Applying the glue evenly, avoiding bubbles and wrinkles, and removing excess glue are all important aspects of using glue in your collage. In this section, we’ll provide you with some tips to help you use glue like a pro and get the best results for your collage. So, let’s dive in and explore some useful glue tips.
4.1 Applying Glue Evenly
One of the most important aspects of using glue in your collage is applying it evenly. This can be challenging, especially if your collage materials have varying porosities or textures. But with the right technique and tools, you can ensure that your glue is spread smoothly and evenly over all of your materials.
Tools for Applying Glue Evenly
There are several tools you can use to help you apply glue evenly:
| Tool | Pros | Cons |
|---|---|---|
| Brush | Helps spread glue evenly over large areas | Can leave brush strokes or bristles in glue if not careful |
| Sponge | Minimizes brush strokes and can be used for both small and large areas | Can absorb too much glue if not wrung out properly |
| Applicator bottle | Allows for precise application of glue | May be difficult to clean and can be time consuming to fill |
Technique for Applying Glue Evenly
No matter what tool you choose, it’s important to use the right technique for applying glue evenly. Here are some steps you can follow:
- Apply a thin, even layer of glue to your materials. Too much glue can cause wrinkles or bubbles.
- Spread the glue evenly over the entire surface of your material using your chosen tool, making sure to cover the edges and corners.
- Avoid applying too much pressure, as this can cause the glue to seep out from between the layers of your materials.
- Wipe away any excess glue with a damp cloth or sponge.
- Allow your collage to dry completely before applying any additional layers of glue.
By following these steps and using the right tools, you can create a beautiful and professionally finished collage that will stand the test of time.
4.2 Avoiding Bubbles and Wrinkles
When making a collage, nothing is more frustrating than getting bubbles and wrinkles in your artwork. Fortunately, there are several tips you can follow to avoid these issues and create a smooth, professional-looking final product.
1. Start with a clean surface: Before applying any glue, make sure all the surfaces are clean and free of dust or debris. Use a clean cloth or brush to remove any unwanted particles.
2. Apply the glue in thin, even layers: Use a brush or sponge to apply the glue thinly and evenly to the surface. Avoid using too much glue, as it can lead to bubbles and wrinkles.
3. Work from the center outward: Start by applying glue to the center of the surface and working outward in small sections. This helps to prevent air pockets from forming.
4. Smooth out the paper: As you lay each piece of paper down, use a clean, dry cloth or roller to smooth it out and remove any air pockets. Work slowly and carefully to avoid creating new wrinkles or bubbles.
5. Let the glue dry naturally: Avoid using heat or fans to dry the glue, as this can cause bubbles to form. Instead, allow the glue to dry naturally in a cool, dry place.
6. Use a weight: If you notice any bubbles or wrinkles after the glue has dried, place a heavy weight on top of the surface for a few hours to help press out any imperfections.
By following these tips, you can avoid bubbles and wrinkles in your collage and create a polished, professional-looking artwork.
4.3 Removing Excess Glue
One of the most frustrating aspects of collage making is dealing with excess glue. No one wants to spend hours creating a beautiful collage, only to have it ruined by unsightly globs of glue. To avoid this, it’s important to know how to properly remove excess glue from your collage.
1. Wait for the Glue to Dry: Before attempting to remove excess glue, make sure it’s fully dry. If you try to remove wet glue, you’ll only spread it and make the problem worse. Depending on the type of glue you’re using, it may take anywhere from a few minutes to several hours to dry completely.
2. Use a Razor Blade: Once the glue is dry, you can use a razor blade to carefully scrape away the excess. This method works well if the glue is on a hard surface, such as a piece of cardboard. However, be cautious not to scratch or damage the surface while scraping.
3. Rub with a Sponge: If the glue is on a more delicate surface, such as paper or fabric, use a damp sponge to gently rub away the excess. Be careful not to rub too hard, as this could tear the surface.
4. Try a Solvent: If the glue is particularly stubborn, you may need to try a solvent. Acetone, rubbing alcohol, and vinegar are all effective solvents for removing excess glue. Apply the solvent to a cotton ball or cloth and gently dab at the glue until it starts to dissolve.
5. Use a Glue Eraser: Another option is to use a glue eraser, which is specifically designed to remove any kind of glue residue. Simply rub the eraser over the excess glue until it disappears.
By following these tips, you can easily remove any excess glue from your collage without damaging the materials or ruining your hard work.
Conclusion
In summary, choosing the right glue for your collage-making project is crucial for both aesthetic and practical reasons. It ensures that your artwork stays in place and is not damaged as a result of inappropriate materials. Additionally, using the right adhesive can improve the finish of your work and prevent any unsightly bubbles or wrinkles.
When considering which glue to use, it’s essential to take into account the porosity of your materials, the drying time of the adhesive, the desired finish, and the product’s price and availability. By thinking carefully about these factors, you can ensure that you make the best decision for your project.
To make the most of your chosen adhesive, it’s important to use it carefully and correctly. This means applying it evenly across your materials, avoiding any bubbles or wrinkles, and removing any excess glue. Following these tips can help you to produce a high-quality collage that you can be proud of.
Ultimately, the right glue will depend on your specific needs and preferences. Whether you opt for PVA glue, Mod Podge, spray adhesive, double-sided tape, or a glue stick, make sure to experiment and find the one that’s perfect for your project. With a little bit of trial and error, you can create stunning collages that showcase your creativity and imagination.
Frequently Asked Questions
Can I use regular glue for making a collage?
Yes, you can use regular glue for making a collage. However, it’s important to choose the right type of glue that is suitable for your materials and won’t cause damage over time.
What is PVA glue?
PVA glue, short for polyvinyl acetate glue, is a water-based adhesive that dries clear and is widely used for collage making. It’s affordable, easy to find, and suitable for both porous and non-porous materials.
Is Mod Podge a glue or a sealer?
Mod Podge is both a glue and a sealer. It’s a water-based, all-in-one adhesive, sealer, and finish that dries clear and can be used for a variety of crafting projects, including collages.
Can I use spray adhesive for making a collage?
Yes, you can use spray adhesive for making a collage. However, it’s important to use it in a well-ventilated area, as it can be harmful when inhaled. It’s also not recommended for use on delicate materials.
What is double-sided tape?
Double-sided tape is a thin, adhesive tape that is coated with adhesive on both sides. It’s easy to use, mess-free, and ideal for attaching lightweight materials to surfaces.
Can I use a glue stick for making a collage?
Yes, you can use a glue stick for making a collage. However, it may not be the best choice for attaching heavy or non-porous materials, as they may not stick as securely over time.
How do I choose the right glue for my collage?
When choosing the right glue for your collage, consider the porosity of your materials, the drying time of the glue, the desired finish, and the price and availability. It’s also helpful to test the glue on a small area before committing to the whole collage.
How can I apply glue evenly?
To apply glue evenly, use a brush or a roller and apply a thin, even layer to both surfaces you want to glue together. Avoid applying too much glue, as it can cause bubbles and wrinkles in your collage.
How can I avoid bubbles and wrinkles in my collage?
To avoid bubbles and wrinkles in your collage, make sure to apply the glue evenly and press down firmly on the materials to remove any air pockets. You can also use a brayer or a roller to smooth out any wrinkles once the glue has dried.
How can I remove excess glue from my collage?
To remove excess glue from your collage, use a damp cloth or a sponge to gently wipe away any excess. Avoid rubbing too hard or using abrasive materials, as this can damage the surface of your materials.