Have you ever found yourself struggling with a project that requires a strong adhesive? Whether you’re a DIY enthusiast or a professional crafter, a glue gun can be your best friend. Not only it is a time-saver, but it is also a versatile tool that can be used for a variety of projects. However, using a glue gun properly can be a challenge, especially for beginners. From choosing the right glue stick to applying the glue to your project, there are many factors to consider. In this guide, we’ll go over everything you need to know about how to use a glue gun properly: tips, tricks, and safety measures. So grab your glue gun and let’s get started!
Types of Glue Guns
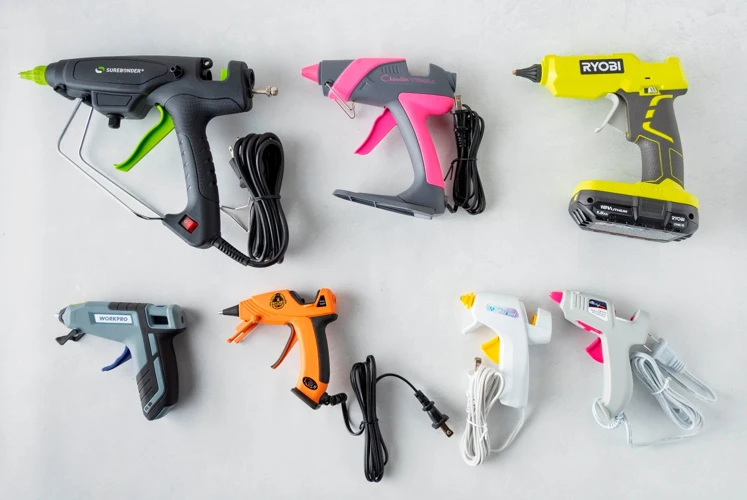
If you’re new to crafting or DIY projects, you might be overwhelmed with the number of glue gun options available on the market. Choosing the right type of glue gun is essential for your project’s success. There are primarily three types of glue guns: low-temperature, high-temperature, and dual-temperature. Each type has its unique advantages and limitations, which we’ll explore further in this section. Whether you’re looking to glue foam for a cosplay costume (check out our guide here) or fix a broken vase (we’ve got you covered too), understanding the differences between glue guns will help you achieve the best results.
Low-Temperature Glue Guns
Low-temperature glue guns are a great option for delicate materials that could be damaged by high heat. They operate at a lower temperature than high-temperature glue guns, making them a safer choice for children to use. These types of glue guns are typically used for bonding materials such as lace, ribbon, and foam sheets.
Advantages of Low-Temperature Glue Guns
Low-temperature glue guns have several advantages over high-temperature guns. They are particularly useful for materials that might melt or warp under high temperatures. These guns have a faster set time, so you won’t have to wait as long for the glue to dry. Also, low-temperature glue sticks tend to cost less than high-temperature sticks.
Disadvantages of Low-Temperature Glue Guns
One disadvantage of low-temperature glue guns is that they may not provide a strong enough bond for heavy-duty projects. Also, the glue may not hold up well under extreme heat or cold. Additionally, they may not work as well on non-porous surfaces, as the glue takes longer to dry on these materials.
Below is a comparison table outlining the key features of low-temperature glue guns.
| Feature | Low-Temperature Glue Guns | High-Temperature Glue Guns |
|---|---|---|
| Temperature Range | Approximately 250°F | Approximately 380°F |
| Glue Stick Compatibility | Only works with low-temperature glue sticks | Works with both high-temperature and low-temperature glue sticks |
| Application Time | Quick, due to the lower temperature | Slower, due to the higher temperature |
| Bond Strength | Not as strong as high-temperature glue guns | Provides a stronger bond than low-temperature guns |
| Best For | Delicate materials and children’s crafts | Heavy-duty projects and non-porous surfaces |
Conclusion
Low-temperature glue guns are a great option for anyone looking to glue delicate materials without the risk of damaging them with high heat. They provide a fast set time, are safe for children to use, and are generally less expensive than high-temperature glue guns. However, they may not be as suitable for heavy-duty projects or non-porous surfaces.
High-Temperature Glue Guns
High-temperature glue guns are ideal for bonding materials that require a strong and long-lasting hold. These glue guns operate at a higher temperature, usually between 380°F and 400°F, and melt the glue stick faster, making them efficient for large projects that require a lot of bonding. However, it is important to note that these glue guns should be used with caution to prevent burns or damage to your project.
Here is a comparison table of the features of high-temperature glue guns:
| Feature | High-Temperature Glue Guns |
|---|---|
| Temperature | 380°F – 400°F |
| Glue Stick Option | Standard-sized glue sticks |
| Application Speed | Fast, due to higher temperature |
| Strength | Strong and long-lasting hold |
| Ideal For | Large and heavy-duty projects, materials that require a strong hold like wood, metal, or plastic |
| Safety | Can cause burns if mishandled or used improperly. Always wear protective gloves and work in a well-ventilated area. |
Tip: Always keep a fire extinguisher on hand when working with a high-temperature glue gun, as the intense heat could potentially start a fire if it comes into contact with flammable materials.
Remember, it’s crucial to choose the right type of glue gun for your project to ensure that it bonds effectively. In the next section, we’ll discuss how to choose the right glue stick. For more information about how to melt hot glue sticks in the microwave for easy application, check out our article.
Dual-Temperature Glue Guns
Dual-temperature glue guns are a popular choice for those who want versatility in their adhesive tool. These glue guns have two temperature settings, allowing you to switch between a low and high temperature as needed. The low temperature setting is usually around 250 degrees Fahrenheit, while the high temperature setting can reach up to 380 degrees Fahrenheit.
The benefits of using a dual-temperature glue gun include:
- Ability to use on a variety of materials, including delicate ones
- Less risk of burning or melting certain materials
- Ability to bond materials that require higher temperatures
When working with a dual-temperature glue gun, it’s important to choose the right temperature for your project to ensure a secure bond. If you’re working with a delicate material such as lace or ribbon, the low temperature setting would be the best option to prevent damage. However, if you’re working with materials such as wood or metal, you may need the high temperature setting to get a strong bond.
How to switch between temperatures:
- Wait until the glue gun has completely heated up.
- Locate the temperature switch, usually located near the tip or on the handle of the glue gun.
- Slide the switch to the desired temperature setting.
What types of glue sticks are compatible with dual-temperature glue guns? Dual-temperature glue guns are compatible with both low-temperature and high-temperature glue sticks. However, it’s important to use the appropriate temperature glue stick to prevent clogs and ensure a strong bond. If you’re not sure which type of glue stick to use for your project, consult the manufacturer’s instructions or ask a professional for advice.
Dual-temperature glue guns are a versatile and useful tool for any crafter or DIY enthusiast. Make sure to choose the right temperature for your project and always follow safety precautions to prevent burns or injuries.
If you’re interested in learning more about unique ways to use a glue gun, check out our article on how to glue chocolate together.
Choosing the Right Glue Stick
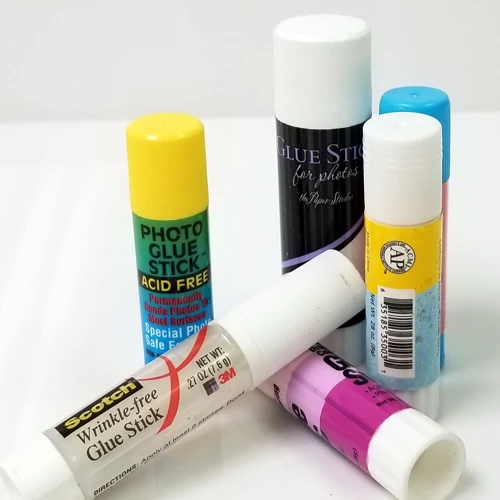
Choosing the right glue stick is essential to achieve a strong and lasting bond for your project. There are various types of glue sticks to choose from, depending on the type of glue gun you have and the materials you are working with.
First off, make sure to check the label of the glue stick to see if it is compatible with your glue gun. Not all glue sticks are created equal, and using the wrong type can cause damage to your glue gun or result in a poor bond.
If you have a low-temperature glue gun, choose glue sticks that are specifically designed for low-temperature use. These glue sticks melt at a lower temperature, which is safer for delicate materials such as foam, ribbon, and fabric. On the other hand, if you have a high-temperature glue gun, opt for glue sticks that are formulated for high-temperature use. These glue sticks melt at a higher temperature and can bond more durable materials such as wood, plastics, and metal.
If you have a dual-temperature glue gun, choose glue sticks that are labeled as dual-temperature, which means they can be used for both high and low temperature settings. This type of glue gun is versatile and allows you to switch between the two temperature settings depending on the materials you are working with.
Another consideration when choosing a glue stick is the size or diameter. Most glue guns take standard size glue sticks, but it’s important to check the diameter of your glue gun’s nozzle to ensure a proper fit. If the glue stick is too small, it may not dispense glue evenly, while a glue stick that is too large may clog the nozzle.
In addition to considering the type and size of the glue stick, you may also want to think about the glue’s adhesive properties. Some glue sticks are designed to bond quickly, while others take longer to set. There are also specialty glue sticks available that are formulated for specific uses, such as bonding fabric or foam.
Ultimately, the key to choosing the right glue stick is to read the label carefully and consider the materials you are working with, as well as the type of glue gun you have. By selecting the right glue stick for your project, you can ensure a strong and lasting bond.
If you’re having trouble with a clogged glue gun nozzle or need to learn how to load a glue gun, check out our other guides for helpful tips and tricks.
Preparing the Glue Gun
Preparing your glue gun before use is an essential step that will ensure your glue gun functions correctly and produces good results. Proper preparation will also increase the life span of your glue gun. In this section, we’ll guide you through the necessary steps to prepare your glue gun for use. Before diving into the preparation process, it’s important to know that there are different types of glue guns (low-temperature, high-temperature, and dual-temperature) and that each type has a slightly different preparation process. So, make sure to check which type of glue gun you have before following these steps. If you’re unsure which glue gun you have, check the manufacturer’s instructions. Let’s begin the preparation process!
Plugging in the Glue Gun
Before you start using the glue gun, it is essential to plug it in and heat it up to the appropriate temperature. To do this, you should follow the steps below:
- Check the Voltage: Before plugging in the glue gun, make sure that the voltage required by the glue gun matches the voltage of the outlet you are using. Mismatched voltage can result in a short circuit or an electrical fire.
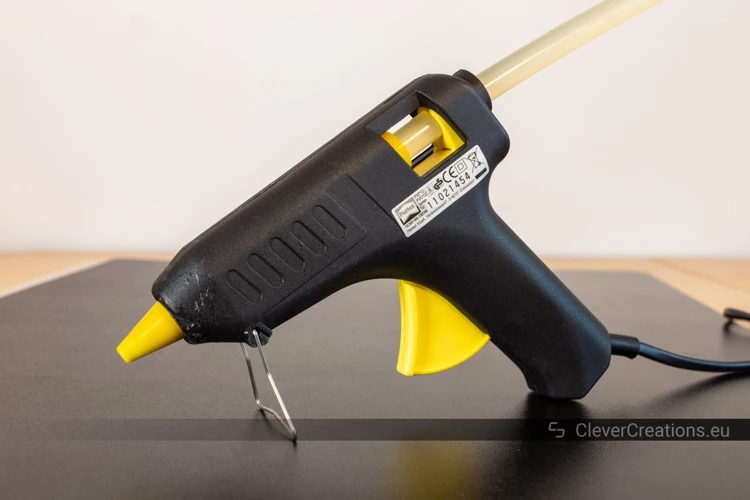
- Place the Glue Gun on a Stand: Insert the glue stick into the gun’s shaft, and then place the gun on a stand or a flat, heat-resistant surface. This will prevent the hot tip from coming into contact with any surfaces that could be damaged or cause a fire.
- Plug the Gun In: After the glue gun is placed on a stand, plug it into an electrical outlet. Make sure the cord is not frayed or damaged. If the cord is damaged, do not use the glue gun until it is repaired.
- Preheat the Gun: Once you have plugged in the glue gun, switch it on and allow it to preheat. The amount of time required for preheating depends on the type of glue gun and the manufacturer’s instructions provided. Generally, it takes around 5 minutes to warm up.
It’s important to note that the glue gun’s temperature can get relatively hot and dangerous. It is essential to keep the glue gun away from children or anything flammable. In case of any spillage, it’s essential to clean up immediately. As a beginner, use low-temperature glue guns that are comparatively less dangerous than high-temperature ones.
Plugging in the glue gun is a crucial step before using it for any project. Always check the voltage before plugging in the gun, place the gun on a stand, plug it in, and then allow it to preheat. Following these steps will help you use the glue gun safely and effectively.
Inserting the Glue Stick
Inserting the glue stick into your glue gun is an essential step before using it. Ensure that your glue gun is unplugged before inserting the glue stick. It is important to select the correct size of glue stick that fits your glue gun. Usually, glue sticks come in standard sizes of 7.2mm, 11mm, and 15mm.
Step 1: Choose the right size of the glue stick that is compatible with your glue gun. Check the manufacturer’s instructions to find out which size is appropriate.
| Glue Gun Size | Glue Stick Size |
| Mini Glue Gun | 7.2mm |
| Regular Glue Gun | 11mm or 15mm |
| Industrial Glue Gun | 15mm |
Step 2: Next, remove the cap from the back of your glue gun. This is usually the area where the glue stick is inserted.
Step 3: Check the glue stick to see whether it has bumps or deformities. If there are any, trim them off or throw the glue stick away. A deformed glue stick can cause blockages and damage to your glue gun.
Step 4: Insert the glue stick into the back of the glue gun. Make sure that the glue stick fits snugly in the glue gun. Push the stick in until it reaches the glue gun’s heating element.
Step 5: Turn on your glue gun and allow the glue to heat up. This typically takes about 3-5 minutes, but it can vary depending on the glue gun model.
Remember to plug your glue gun into a socket that is compatible with the voltage rating of your glue gun. Once the glue gun is heated, you are ready to use it for your project. If you need to change the glue stick during your project, unplug the glue gun first before following the steps above.
Pro Tip: Wondering what is inside a hot glue stick? Hot glue sticks are typically made up of thermoplastic polymer material that melts and flows when heated. They come in a variety of colors and can be used for different projects, such as creating snowflakes or fake blood. Check out some fun hot glue gun projects at /how-to-make-hot-glue-snowflakes/.
Heating the Glue Gun
Before starting any project with your glue gun, it’s important to properly heat it up to its intended temperature. The process for heating your glue gun will vary based on the type of glue gun you have. Refer to the instruction manual that came with your glue gun for specific heating instructions.
| Type of Glue Gun | Heating Process |
|---|---|
| Low-Temperature Glue Gun | Plug in the glue gun and turn it on. Allow the glue gun to heat up for approximately 5 minutes. |
| High-Temperature Glue Gun | Plug in the glue gun and turn it on. Allow the glue gun to heat up for approximately 10-15 minutes. |
| Dual-Temperature Glue Gun | Refer to the instruction manual to determine the intended temperature for your project. Set the glue gun to the corresponding temperature setting and allow it to heat up accordingly. |
It’s important to note that during the heating process, the glue gun will become very hot. It’s important to handle it carefully and avoid touching the heated metal tip of the gun. Once the glue gun has sufficiently heated up, it’s ready to use with your selected glue stick.
Pro tip: If you find that your glue gun is taking too long to heat up, try using a higher temperature glue stick or using a glue gun with a higher wattage. For more tips on working with glue, check out our article on how to dry tacky glue faster. If you’re curious about the ingredients in your hot glue sticks, check out our article on what is in hot glue sticks. And if you’re feeling crafty, learn how to make fake blood with glue in our article on how to make fake blood with glue.
Using the Glue Gun
As you get ready to use your glue gun, there may be some uncertainty around how to use it properly. However, with proper technique and a bit of practice, you’ll be able to apply glue to your projects with ease. In this section, we’ll cover the essential steps involved in using your glue gun, including applying glue to your project, cleaning up excess glue, and changing glue sticks. Let’s dive in and master the art of using a glue gun!
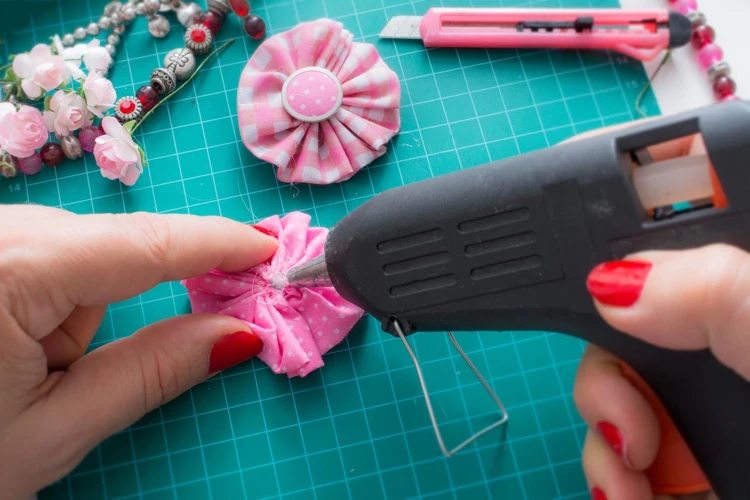
Applying Glue to Your Project
When it comes to applying glue to your project with a glue gun, there are a few important tips to keep in mind. First, make sure you have the right type of glue stick for your project. It’s also important to have a steady hand and apply the glue evenly to ensure a strong bond.
One technique for applying glue is to hold the gun at a 45-degree angle and apply the glue in a steady and even stream. When using a high-temperature glue gun, be careful not to apply too much pressure, as this can cause the glue to drip or string.
Another tip is to work in small sections at a time, applying the glue and attaching the materials before moving on to the next section. This will help ensure that the glue doesn’t dry before you have a chance to attach the materials.
Table: Tips for Applying Glue to Your Project
| Tip | Description |
|---|---|
| Choose the right glue stick | Make sure you have the appropriate type of glue stick for your project |
| Apply glue evenly | Hold the gun at a 45-degree angle and apply the glue in a steady and even stream |
| Work in small sections | Apply the glue and attach materials in small sections to prevent the glue from drying too quickly |
| Be careful with high-temperature glue guns | Avoid applying too much pressure to prevent dripping or stringing |
By following these tips and working carefully, you can ensure a successful project with a strong bond created by your glue gun.
Cleaning Up Excess Glue
When using a glue gun, it’s common to have excess glue that drips or oozes out of the nozzle. This excess glue can be a hassle to deal with, but it’s important to clean it up to avoid any unwanted sticking or messes. Here are some tips on how to clean up excess glue:
- Don’t touch the glue while it’s still hot. The glue can burn your skin and cause serious injury. Wait until the glue has cooled and hardened before attempting to clean it up.
- Use a scraper or knife to remove hardened glue. If the glue has hardened, you can use a plastic scraper or a knife to gently scrape it off. Be careful not to scratch or damage the surface underneath the glue.
- Use acetone or rubbing alcohol to remove glue residue. If there is still glue residue left behind, you can use acetone or rubbing alcohol to dissolve it. Apply the acetone or rubbing alcohol to a cotton ball or cloth and gently rub the residue until it comes off.
- Use hot soapy water for tougher glue stains. If the glue stain is particularly stubborn, you can try using hot soapy water to loosen it. Soak a cloth in hot, soapy water and place it on the stain for a few minutes. Then, use a scraper or knife to remove the glue.
- Wipe away excess glue immediately with a wet cloth. If you notice excess glue while it’s still wet, wipe it away immediately with a damp cloth. This will prevent it from hardening and be easier to clean up.
By following these tips, you can easily clean up excess glue from your project and workspace. Remember to always be careful when handling the glue gun and use proper safety precautions.
Changing Glue Sticks
When you run out of glue, you will need to change the glue stick in your glue gun. Here are the steps to follow when changing glue sticks:
- Unplug the glue gun: Before you change the glue stick, make sure the glue gun is unplugged and cool to the touch to avoid any potential burns.
- Remove the current glue stick: The easiest way to remove the glue stick is to gently pull it out with your fingers. If it does not come out easily, you can try heating up the glue gun again for a minute or two to soften the glue before pulling it out.
- Prepare the new glue stick: Get a new glue stick that matches your glue gun’s size and let it warm up for a few minutes before inserting it into the glue gun.
- Insert the new glue stick: Gently slide the new glue stick into the glue gun’s feeder, making sure the end of the stick is securely in place. Be careful not to touch the hot nozzle or any dripping glue.
- Begin using the new glue stick: Once the glue gun has warmed up and the new glue stick is inserted, you can start using your glue gun again to continue your project.
Make sure to properly dispose of the used glue stick and any packaging that came with the new one. Remember, safety is key when handling a glue gun and its sticks. Always wear gloves and have a fire extinguisher nearby in case of emergencies.
Safety Tips
When working with any kind of tool or equipment, it’s important to prioritize safety measures. The same can be said when using a glue gun. Glue guns can become incredibly hot and produce melted glue that can cause serious burns or injuries if not handled properly. In this section, we’ll go over some essential safety tips to follow while using a glue gun to ensure you can work on your projects without any accidents or injuries. So, let’s dive in and discover how to use these tools safely and efficiently.
Protecting Your Skin
When using a glue gun, it is important to protect your skin from potential burns or injuries. Here are some tips to keep in mind:
| Tip | Description |
|---|---|
| Wear Gloves | Invest in a pair of heat-resistant gloves to prevent direct contact with the hot glue. This is especially important if you are working on a project that requires holding small pieces or intricate details. |
| Use a Barrier | If you don’t have gloves, you can use a barrier such as a piece of cardboard or a silicone mat to protect your skin. This will also prevent any glue messes from sticking to your work surface. |
| Be Mindful of Drips | Glue drips can happen and if one falls on your skin it’s important to remove it immediately to prevent a burn. Be sure to have a bowl of cold water nearby to quickly dip your skin into. |
| Keep a Safe Distance | When using the glue gun, maintain a safe distance from your skin. This is especially important when working with high-temperature glue guns, which can reach temperatures of up to 400 degrees. |
By following these tips, you can ensure that your skin is safe from any potential accidents while using a glue gun. It’s always better to be safe than sorry, so take the necessary precautions to protect yourself and your skin.
Maintaining a Safe Workspace
Keeping your workspace safe is crucial when working with a glue gun. Here are some tips for maintaining a safe workspace:
- Clear the area: Before using your glue gun, make sure to clear your workspace of any clutter or obstructions. This will help prevent any accidents or spills.
- Protect your surface: Use a protective surface, such as a silicone mat or a piece of cardboard, to avoid damage to your workspace.
- Keep the glue gun upright: Always store the glue gun in an upright position when not in use. This not only prevents any glue from spilling out but also helps in keeping pets or children away from it.
- Avoid distractions: When working with a glue gun, it is important to stay focused and avoid any distractions. Taking a break from your work each time you are interrupted for some reason can reduce the risk of an accident.
- Wear protective gear: It is important to wear protective gear, such as gloves and safety glasses, when working with a glue gun to keep your hands and eyes safe from any potential damage.
- Do not touch the hot glue: Never touch the glue coming out of the glue gun, as it can cause severe burns to your skin.
- Store the glue gun properly: After using your glue gun, let it cool off and store it in a safe place out of reach of children or pets. Do not leave it lying around loose as it will increase the chances of an accident.
By following these simple guidelines, you can keep your workspace safe and avoid any accidents that may occur when working with a glue gun. Remember that safety should always be your top priority when using any kind of tools or equipment.
Common Mistakes to Avoid
Despite the ease of use of a glue gun, there are still some common mistakes that people make while using it. To help you avoid making these mistakes, we have compiled a list of the most common ones below.
Not Using the Right Type of Glue Stick: One of the most common mistakes people make is using the wrong type of glue stick for their project. Make sure that you are using the correct type of glue stick for your project, whether it is a low-temperature, high-temperature, or dual-temperature glue stick. Using the wrong type of glue stick can lead to poor adhesion, which means that your project will not stick together properly.
Applying Too Much Glue: Another common mistake is applying too much glue. While it can be tempting to use a lot of glue to ensure that your project sticks together, it can actually have the opposite effect. Too much glue can cause the glue to seep through the material and create a mess. Too much glue can take longer to dry, which can delay your project.
Not Allowing the Glue Gun to Heat Up Properly: A common mistake people make is not allowing enough time for the glue gun to heat up properly. This can cause the glue to be too thick or not sticky enough, which can lead to a weak bond. Make sure that you allow your glue gun to heat up completely before using it.
Not Cleaning the Glue Gun: Another common mistake is not cleaning the glue gun properly after use. This can cause the glue gun to clog, which can make it difficult to use the next time you need it. Make sure that you clean your glue gun after every use to prevent any build-up of glue residue.
Touching the Tip of the Glue Gun: One of the most dangerous mistakes people make is touching the tip of the glue gun. The tip of the glue gun can get extremely hot and can cause serious burns if it comes into contact with your skin. Always be careful when using a glue gun and avoid touching the tip at all times.
By avoiding these common mistakes, you can ensure that your projects are successful and that you get the most out of your glue gun. Always be mindful of the type of glue stick you are using, how much glue you are applying, and whether or not the glue gun is heated up properly. By doing so, you can avoid making these common mistakes and enjoy using your glue gun to its fullest potential.
Advanced Techniques
Now that you’ve mastered the basics of using a glue gun, it’s time to take your skills to the next level with some advanced techniques. These methods will require a bit more skill and patience, but they’ll allow you to tackle more complex projects and create truly stunning results. In this section, we’ll explore some of the more challenging aspects of glue gun use, such as working with difficult materials, adding embellishments, and creating a permanent bond. With the right tools and techniques, you’ll be able to take your DIY projects to new heights. Let’s dive in and discover what’s possible!
Working with Difficult Materials
When it comes to using a glue gun, it’s important to know that not all materials are created equal. Some materials can be trickier to work with than others, requiring a bit more finesse and technique to ensure a strong bond. Here are a few tips for working with difficult materials:
| Material | Tip |
|---|---|
| Foam | Use a low-temperature glue gun and apply the glue in a thin, even layer to avoid melting the foam. |
| Glass | Use a high-temperature glue gun and apply the glue in small dots rather than a continuous line. This will help prevent the glue from drying too quickly and ensure a strong bond. |
| Leather | Before gluing, clean the leather with rubbing alcohol to remove any oils and dirt that could interfere with the bond. Use a high-temperature glue gun and apply the glue in small dots, being careful not to apply too much. |
| Metal | Use a high-temperature glue gun, and sand the surface of the metal to create a rough texture that the glue can adhere to. Apply the glue in small dots rather than a continuous line. |
| Plastic | Use a high-temperature glue gun and apply the glue in small dots rather than a continuous line. Avoid applying too much glue, as it can melt the plastic and weaken the bond. |
| Wood | Use a high-temperature glue gun and apply the glue in a thin, even layer to ensure a strong bond. Clamp the pieces together until the glue dries to create an even stronger bond. |
Remember, practice makes perfect when it comes to using a glue gun. Don’t be afraid to experiment with different techniques and materials to find what works best for you. By following these tips for working with difficult materials, you’ll be well on your way to creating strong and long-lasting bonds.
Adding Embellishments
When it comes to adding embellishments to your projects, a glue gun can be an invaluable tool. Here are some tips and techniques to make sure your embellishments stay securely attached:
- Choose the Right Glue: When attaching embellishments, it’s important to choose a strong, durable glue. Consider using a high-temperature glue gun and a heavy-duty glue stick for the best results.
- Apply Glue in Small Sections: Instead of applying glue to the entire surface of the embellishment, try applying it in small sections for greater control.
- Wait for the Glue to Cool: Before attaching the embellishment, wait for the glue to cool slightly so it’s not too hot and won’t melt the material.
- Use a Toothpick: To apply glue to small or intricate embellishments, dip a toothpick into the hot glue and use the toothpick to place the glue where it’s needed.
- Experiment with Placement: Play around with the placement of your embellishments before committing to a final position. Once the glue dries, it will be difficult to reposition the embellishment.
Remember, practice makes perfect! Don’t be afraid to experiment with different types of embellishments and techniques until you find what works best for you. With a little practice and patience, you’ll be able to add beautiful and unique embellishments to all of your projects.
Creating a Permanent Bond
When it comes to creating a permanent bond with your glue gun, there are a few things to keep in mind. Here are some tips to help you achieve a strong and long-lasting bond:
1. Choose the Right Glue Stick
Choosing the right glue stick is essential for achieving a permanent bond. Look for a glue stick specifically designed for your project. If you are bonding wood, for example, choose a glue stick that is formulated for wood. This will ensure that the bond is as strong as possible.
2. Clean and Dry the Surfaces
Before applying the glue, make sure the surfaces you are bonding are clean and dry. Any dirt, dust, or moisture can weaken the bond. Use a clean, dry cloth to wipe down the surfaces and make sure they are free of debris.
3. Apply the Glue Correctly
To create a permanent bond, you’ll want to apply the glue liberally. Make sure there is enough glue to fill in any gaps or spaces between the surfaces. Apply the glue in a zig-zag pattern to ensure full coverage. Press the surfaces together firmly while the glue is still hot and pliable.
4. Allow Time for the Glue to Dry
Once the surfaces are bonded, allow the glue to dry completely. Depending on the type of glue you are using, this could take anywhere from a few minutes to a few hours. Follow the manufacturer’s recommended drying time.
5. Test the Bond
After the glue has dried, test the bond by applying pressure to the bonded surfaces. If there is any movement or separation, the bond is not strong enough. If this happens, you may need to reapply the glue and let it dry again.
By following these tips, you can create a strong, permanent bond with your glue gun. Remember to choose the right glue stick for your project, clean and dry the surfaces, apply the glue correctly, allow time for the glue to dry, and test the bond to ensure it is strong enough for your needs.
Conclusion
In conclusion, using a glue gun properly can be a game changer for all your DIY projects. It’s a simple, yet effective tool that can make a big difference in the quality and durability of your creations. By choosing the right type of glue gun and stick for your project, preparing the tool properly, and following safety guidelines, you can achieve great results.
Remember to protect your skin, maintain a safe workspace, and avoid common mistakes such as using too much glue or applying it in the wrong area. Additionally, exploring advanced techniques such as working with difficult materials, adding embellishments, and creating a permanent bond can elevate your craftsmanship to the next level.
Whether you’re a seasoned crafter or a beginner, a glue gun is a must-have tool in your arsenal. With a little practice and attention to detail, you can achieve amazing results and bring your creative ideas to life. So, grab your glue gun and let your imagination run wild!
Frequently Asked Questions
What are the differences between low-temperature, high-temperature, and dual-temperature glue guns?
Low-temperature glue guns are ideal for delicate materials, such as lace and foam, whereas high-temperature glue guns are better suited for heavy-duty materials, such as wood and metal. Dual-temperature glue guns offer the best of both worlds, allowing you to switch between low and high temperatures depending on your project’s needs.
How do I choose the right glue stick for my project?
The type of glue stick you choose depends on the materials you’re using. For delicate materials, such as fabric or foam, choose a low-temperature glue stick. For heavier materials, such as wood or metal, choose a high-temperature glue stick.
How do I plug in my glue gun correctly?
Make sure the glue gun is turned off and unplugged before you attempt to plug it in. Then, insert the glue gun’s plug into an outlet that’s close to your workspace.
How do I insert a glue stick into my glue gun?
First, make sure your glue gun is unplugged and the opening is at the top. Then, insert the glue stick into the opening, pushing it past the glue gun’s trigger. Finally, plug in the glue gun and wait for it to heat up.
How long does it take for a glue gun to heat up?
It usually takes a glue gun between 3-5 minutes to heat up. The exact time will depend on the type of glue gun you have, so check your instruction manual for more information.
How do I apply glue to my project?
You should apply glue in a continuous flow, moving the glue gun in a smooth, steady motion. Be sure to press the materials together immediately after applying the glue.
How do I clean up excess glue?
Excess glue can be removed with a damp cloth or paper towel. Be sure to clean glue from the glue gun’s nozzle as well, so it doesn’t clog and affect the glue’s flow.
How do I change glue sticks?
Simply unplug the glue gun and wait for it to cool down. Remove the old glue stick, and insert the new one. Then, plug in the glue gun and wait for it to heat up again.
How do I protect my skin when using a glue gun?
Wear gloves to protect your hands and arms from hot glue. Keep burn cream handy just in case you do get burned
What are some advanced techniques for using a glue gun?
Advanced techniques for using a glue gun include working with difficult materials such as plastics, adding embellishments like glitter and beads, and creating a permanent bond with materials that are traditionally difficult to glue, such as ceramic and glass.