Picture this: you’re in the middle of a crafting project and your glue gun suddenly stops working. What do you do? Well, if you have some glue sticks on hand, you can easily melt them down in the microwave to continue your project. But wait, is that even possible? Can you really melt glue sticks in the microwave? The answer is yes, and in this beginner’s guide, we will walk you through all the steps you need to successfully melt hot glue sticks in the microwave. So, grab your materials and let’s get started!
What You Need
Before you can start melting hot glue sticks in the microwave, it’s essential to have the right materials on hand. Here is a list of what you need to get started:
Glue Sticks: Of course, you’ll need glue sticks to melt, and you can pick them up at your local craft store or online. If you’re unsure which type of glue stick to use, check out “What Glue to Use for Popsicle Sticks,” which describes the best type of glue for any craft project.
Microwave-Safe Container: Choose a container that can withstand heat from the microwave. Materials such as glass or microwave-safe plastic are ideal.
Microwave: Clearly, you need a microwave to heat the glue sticks.
Now that you know what you need let’s dive into the steps for melting hot glue sticks in the microwave using these items.
Glue Sticks
When it comes to melting hot glue sticks in the microwave, choosing the right kind of glue sticks is important. Not all glue sticks are created equal, and using the wrong type can result in a failed project.
Make sure you have hot glue sticks that are labeled as microwave-safe. Not all glue sticks are meant to be melted in the microwave, and some may release harmful fumes if exposed to high heat. Using microwave-safe glue sticks will ensure a safe and successful melting process.
In addition to checking for microwave safety, the size and shape of the glue sticks also matter. It is recommended to use small-sized glue sticks as they melt quicker and more evenly than larger ones.
For best results, break your glue sticks into smaller pieces before melting them in the microwave. This will help them melt more evenly and quickly.
Here are some popular types of hot glue sticks that you might find in your local craft store:
| Glue stick type | Features | Recommended use |
|---|---|---|
| Clear glue sticks | Transparent when dry, strong bonding | For crafts that require a clear adhesive such as glass or plastic projects |
| Colored glue sticks | Available in a range of colors, adds a decorative touch | For crafts that require a decorative adhesive such as scrapbooking or party decorations |
| Glitter glue sticks | Contains shimmering particles, gives a glittery effect | For crafts that require a glittery adhesive such as handmade cards or ornaments |
| High-temperature glue sticks | Stronger and more durable than standard glue sticks | For heavy-duty projects such as woodworking or metalworking |
Now that you know what kind of glue sticks to use, let’s move on to the other materials you will need to melt them in the microwave. If you want to learn how to make your melted glue look like honey, check out this article.
Microwave-Safe Container
When it comes to melting hot glue sticks in the microwave, using the right container is crucial. Not all containers are safe to use in the microwave, and using the wrong one could cause the container to melt or even catch fire. It’s important to select a microwave-safe container to avoid any accidents.
What Makes a Container Microwave-Safe?
A microwave-safe container is made of materials that are not affected by microwave radiation. The container should be able to withstand high temperatures without melting or releasing any harmful chemicals. You can identify a microwave-safe container by looking for a symbol that indicates that the container is safe to use in the microwave.
The following table shows different materials and whether they are safe to use in the microwave or not.
| Material | Microwave Safe |
|---|---|
| Glass | Yes |
| Plastic | Yes, if marked as microwave-safe |
| Ceramic | Yes |
| Paper | Yes, if specified for microwave use |
| Foam | No |
| Metal | No |
It’s important to note that even if a container is marked as microwave-safe, it may not be safe to use for extended periods or at high temperatures. It’s always better to use a container specifically designed for microwave use to avoid any risks.
When melting hot glue sticks in the microwave, it’s best to use a container that is not too deep and allows you to easily stir the glue without spilling it. A shallow glass or ceramic dish is a good option. Avoid using plastic containers that are thin or flimsy, as they may warp or melt. As an alternative, you can also use a silicone mold or cupcake liners to melt small amounts of hot glue sticks.
Choosing the right container is just one step in the process of melting hot glue sticks in the microwave. Let’s move on to the other essential items you will need.
Microwave
When it comes to melting glue sticks in a microwave, the appliance you use plays a big role. Microwaves with higher wattage will melt the glue faster, so keep that in mind when timing your heating intervals. It’s best to use a microwave with a wattage of at least 800 for the best results. Make sure the microwave is clean and free from any food debris or foreign objects before use. It’s important to maintain and clean your microwave in order to keep it functioning properly.
It’s also important to note that not all microwaves are created equal. Some have a rotating turntable while others don’t. When heating the glue, it’s best to use a microwave-safe container that fits the turntable for even heating. Additionally, microwaves can create hot spots, which can burn the glue or cause it to heat unevenly. To prevent this, it’s important to stir the glue at least once during the heating process.
Before melting your glue, refer to your microwave’s manual for any specific instructions or safety precautions. Following the manufacturer’s instructions can help prevent damage to your microwave or injury to yourself.
It’s also important to remember that microwaving glue sticks can produce fumes that may be harmful to your health, so it’s important to use caution and avoid inhaling the fumes. Consider opening a window or using a fan to ventilate the area, and wear a protective mask or use a respirator to avoid breathing the fumes.
Now that you know more about microwaving glue sticks, let’s move on to the steps you need to follow to melt hot glue successfully. If you want to learn more about hot glue, check out our article on how hot a glue gun can get or how to smooth hot glue.
Steps to Follow
Now that you have all the necessary materials, it’s time to start melting those glue sticks in the microwave! Follow these simple steps to achieve the perfect consistency for your project. Remember to take all necessary safety precautions to avoid burns and damage to your microwave. Once you have melted your glue, you can use it for a variety of projects, such as painting hot glue, gluing pencils together, gluing up a box, making a cell phone case, or gluing foam core. Let’s get started!
Step 1: Break the Glue Sticks into Small Pieces
Before melting hot glue sticks in the microwave, you will need to break the sticks into small pieces. This will ensure that the glue melts evenly and prevents any chunks of glue from getting stuck together.
To break the glue sticks into smaller pieces, follow these steps:
| Step 1a: | Unwrap the hot glue sticks and remove any paper or plastic covering. |
| Step 1b: | Use a pair of scissors to cut the sticks into smaller sections, about 1 inch in length. |
| Step 1c: | Break the sections into even smaller pieces, about the size of a pea. |
It’s essential to break the hot glue sticks into small pieces instead of just placing the entire stick in the microwave. Otherwise, you risk overheating the glue, causing it to bubble and splatter, making a mess and potentially damaging your microwave.
Always use caution when handling hot glue and scissors. Keep an eye out for any sharp or jagged pieces while you break the glue sticks. Be sure to clean up any excess glue or debris from your workspace afterward to avoid any potential accidents.
Step 2: Place the Glue Pieces into the Container
To begin the process of melting the glue sticks in the microwave, the next step is to place the glue pieces into the container. This step is crucial for achieving the desired consistency of the melted glue. Here are the details:
| Step 2 | Place the Glue Pieces into the Container |
| 1. Choose a microwave-safe container that is large enough to hold the glue pieces and deep enough to prevent the glue from overflowing. | |
| 2. Place the broken glue pieces into the container. Ensure that the container is not too full as the glue will expand when heated. | |
| 3. If you are using different colors of glue sticks, you can mix them in the container to create a new color. However, avoid mixing different brands as they may have different compositions and melting points. | |
| 4. When you have added the glue pieces to the container, give it a gentle tap to settle the pieces to the bottom of the container. This will help to ensure that all the glue pieces melt evenly. |
It is important to use a microwave-safe container to avoid any mishaps. Choose a container that is deep enough to hold the glue pieces without overflowing. It is also important to ensure that the container is not too full as the glue will expand when heated. If you are looking to create a new color, you can mix different colored glue sticks. However, avoid mixing different brands of glue sticks as they may have different compositions and melting points. Lastly, tapping the container gently on a flat surface will ensure that all the glue pieces settle evenly, promoting even melting.
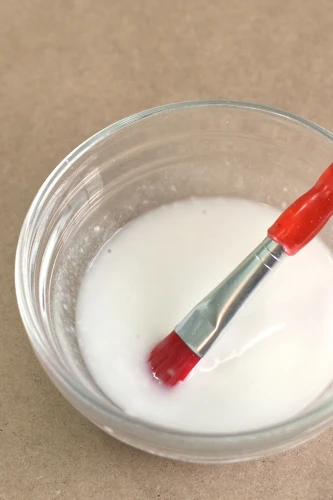
Step 3: Microwave the Glue Pieces
Now it’s time to microwave the glue pieces. This step is crucial, so be sure to follow the instructions carefully to ensure the glue melts evenly and without any issues.
Step 3: Place the container of glue pieces in the microwave. Set the microwave for 30-second intervals on high power. As the glue melts, it can bubble and expand, so it’s essential to keep an eye on it.
Tip: Don’t leave the glue unattended while it’s microwaving, as it can quickly overheat and become hazardous.
After the first 30 seconds, stop the microwave and remove the container. Use a spoon or stick to stir the glue pieces to help them melt evenly.
Tip: If the glue hasn’t melted enough after the first 30 seconds, place it back in the microwave for another 30 seconds. Repeat until the glue melts completely.
Continue microwaving and stirring the glue in 30-second intervals until it’s entirely melted. The amount of time it takes will depend on the amount of glue and the power of your microwave.
Caution: Be careful not to overheat the glue, as it can become dangerously hot and burn your skin. Always use oven mitts or a heat-safe glove to handle the container if it becomes too hot during the microwaving process.
Once the glue is completely melted, you’re ready to move on to the next step. The glue should be at a smooth, consistent texture, ready for use in your project.
Step 4: Check Consistency and Stir
After microwaving the glue pieces, it is important to check the consistency and stir the mixture to ensure that it is evenly melted. To do this, follow the steps below:
| Step | Action |
|---|---|
| 1 | Remove the container from the microwave using oven mitts to avoid burns. |
| 2 | Check the consistency of the glue by using a stir stick or toothpick to stir the mixture. If the glue appears too thick or lumpy, it needs more melting – put it back in the microwave. |
| 3 | If the glue appears to be too thin, add more glue pieces to the container and return it to the microwave to continue melting. |
| 4 | Stir the glue mixture thoroughly until it reaches a smooth and even consistency. Be sure to scrape the sides and bottom of the container to incorporate any unmelted glue pieces. |
It is important to achieve the correct consistency for the melted glue before using it for any project. Too thick, and the glue may not adhere properly, while too thin can cause it to run or drip. Checking the consistency and stirring the mixture are crucial steps in ensuring optimal glue performance.
Tips and Safety Precautions
As with any DIY project, it’s important to take the necessary safety precautions when melting hot glue sticks in the microwave. Not only can hot glue be dangerous if mishandled, but microwaving the glue can also be a fire hazard if not done correctly. To help ensure a safe and successful outcome, here are some useful tips and safety precautions to be aware of before getting started.
Use Oven Mitts
When melting hot glue sticks in the microwave, one of the most important things to remember is to use oven mitts. The container may become very hot during the melting process and can cause serious burns if touched with bare hands. It’s important to use a pair of thick, heat-resistant oven mitts that can provide proper protection.
Here are some tips to keep in mind when using oven mitts:
- Choose the right mitts: Not all oven mitts are created equal. When choosing mitts, look for ones that are specifically designed for high-heat applications. They should be made from a heat-resistant material, such as silicone or Kevlar, and be able to withstand temperatures of at least 500°F.
- Handle the container with care: Even with oven mitts, it’s important to handle the container with care. The melted glue may still be very hot, so hold the container with both hands and avoid accidental spills.
- Don’t rush: It’s important to take your time when using oven mitts. Rushing through the process can increase the risk of accidents and burns. Slowly and carefully move the container out of the microwave and onto a heat-resistant surface.
- Inspect the mitts: Before each use, inspect the mitts for any signs of wear and tear. Make sure there are no holes or tears that could compromise their effectiveness. If you notice any damage, replace the mitts immediately.
Using oven mitts is a crucial step when melting hot glue sticks in the microwave. Always choose heat-resistant mitts, handle the container with care, and take your time to avoid accidents and burns. By following these tips and taking the necessary precautions, you can safely melt hot glue sticks in the microwave with ease.
Don’t Overheat
When melting hot glue sticks in the microwave, it’s important to be cautious and not overheat the container. Overheating can cause the glue to bubble and boil, resulting in a runny consistency that won’t stick properly. To avoid this problem, follow these tips:
- Heat in short increments: Instead of setting the microwave for a long period of time, heat the glue in short 10-15 second increments. This will help ensure that the glue doesn’t overheat.
- Check consistency frequently: After each heating increment, take the container out of the microwave and check the consistency of the glue. If it’s not completely melted yet, stir it and heat it again in short increments. Repeat until the glue is completely melted and has a smooth consistency.
- Avoid overheating: It’s better to underheat the glue than to overheat it. If you’re unsure how long to heat the glue for, start with short increments and work your way up until the glue is melted. If you’re still not sure, it’s better to stop heating and let the glue cool down before reheating it in short increments.
By following these tips, you can ensure that your hot glue sticks are melted to just the right consistency for your project, without overheating the glue and causing it to become runny and difficult to work with.
Avoid Metal Containers
When melting glue sticks in the microwave, it is important to use the right container. It is best to avoid metal containers when melting hot glue sticks in the microwave. When metal is heated in the microwave, it can create a spark which can cause a fire or damage to the microwave. Additionally, metal can create hot spots that can cause the glue to overheat or burn, ruining the consistency of the glue.
Materials to Avoid When Melting Hot Glue Sticks
| Materials to Avoid | Explanation |
| — | — |
| Metal Containers | Can cause sparks and hot spots |
| Plastic Containers Not Labeled as Microwave Safe | May melt or leach chemicals into the glue |
| Styrofoam Containers | Can melt and cause a fire |
It is important to use a microwave-safe container that is not made of metal and is labeled as safe for use in microwaves. The container should also be heat-resistant and big enough to hold the glue sticks when they melt. Glass and ceramic containers are good options to use when melting glue sticks in the microwave because they are non-reactive, they don’t transfer heat quickly, and they don’t have a coating that may interact with the hot glue.
What to Look for in a Microwave-Safe Container
| Features of a Good Microwave-Safe Container | Explanation |
| — | — |
| Not Made of Metal | Metal can cause hot spots and sparks |
| Labeled as Microwave-Safe | Indicates the container is safe for use in microwaves |
| Heat-Resistant | Can withstand heat without melting or breaking |
| Big Enough | Can hold the glue without overflowing when it melts |
| Non-Reactive Material | Doesn’t react with hot glue |
| Slow Heat Transfer | Doesn’t transfer heat too quickly |
Choosing the right container is crucial when melting hot glue sticks in the microwave. By avoiding metal containers and opting for microwave-safe containers made of glass or ceramic, you can safely and effectively melt hot glue sticks for your next project.
Clean Up Spills Carefully
Accidents and spills can happen when you’re working with hot glue, so it’s important to be prepared and know how to clean up properly and safely. Here are some tips to clean up spills carefully:
- Act fast: Hot glue cools and hardens quickly, so it’s important to clean up spills as soon as possible while the glue is still warm. Waiting too long will make it more difficult to remove the glue.
- Protect your skin: Wear protective gloves when cleaning up hot glue spills, as the glue can cause burns and blisters.
- Use a scraper: Gently scrape off excess glue using a plastic scraper or butter knife. Be careful not to scratch or damage the surface underneath.
- Apply heat: If there is a large amount of glue spilled on a surface, use a heat gun or hair dryer on low heat to soften the glue. This will make it easier to remove without causing damage.
- Use rubbing alcohol: Soak a cloth in rubbing alcohol and gently rub the glue to dissolve it. This works especially well on hard surfaces like metal or glass.
- Use hot, soapy water: For fabric or carpet spills, mix hot water and dish soap and apply to the affected area. Use a soft-bristled brush or sponge to gently scrub the glue until it is removed.
Remember, safety should always be your top priority when working with hot glue. Taking the time to clean up spills properly will not only keep your work area neat and tidy, but also prevent any accidents or damage to your surroundings.
Conclusion
After following the steps mentioned in this beginner’s guide, melting hot glue sticks in the microwave will become a hassle-free task. Just remember to break the glue pieces into small chunks, microwave them in a microwave-safe container, check the consistency and stir if required. You should also keep in mind the safety precautions, such as using oven mitts, avoiding metal containers, and cleaning up spills carefully.
You can confidently use the melted glue for your DIY projects, crafts or other applications that require melted glue. This method is a quick and easy alternative to melting glue sticks using a glue gun.
Now that you know how to melt hot glue sticks in the microwave, you can save time and effort while working on your creative projects. Additionally, you will be able to manage small repairs and fixes around the house with convenience.
So, gather the necessary materials, get started, and experience the benefits of melting hot glue sticks in the microwave yourself!
Frequently Asked Questions
Can any type of glue sticks be melted in the microwave?
No, only hot glue sticks can be melted in the microwave. Other types of glue may emit harmful fumes or catch fire when microwaved.
Is it safe to melt hot glue sticks in the microwave?
Yes, it’s safe as long as you follow the proper steps and safety precautions mentioned in this article.
What happens if you overheat the glue sticks in the microwave?
If you overheat the glue sticks in the microwave, they may burn or emit fumes, which can be harmful to inhale. Make sure to follow the recommended time and temperature settings.
What should I do if the melted hot glue sticks spill in the microwave?
Turn off the microwave immediately and wait for it to cool down. Then, clean up the spill carefully with a paper towel or cloth. Avoid touching the glue with your bare hands as it can cause burns.
Why should I use a microwave-safe container to melt glue sticks?
Using a microwave-safe container ensures that the glue doesn’t react with or melt the container, potentially causing hazardous materials to enter your food or drinks later on.
Can I reuse a container that was previously used to melt hot glue?
It’s recommended to use a new container each time you melt hot glue. Reusing a container may result in cross-contamination with other chemicals or dust particles that can interfere with the melting and alter the overall texture and consistency of the glue.
Can I use other heating methods to melt hot glue sticks instead of a microwave?
Yes, you can melt hot glue sticks using a glue gun, hot plate, or double boiler. However, using a microwave is a faster and more convenient method that is commonly used by beginners.
Can I add coloring or fragrance to melted hot glue?
Yes, you can add color or fragrance oils to melted hot glue, but make sure to stir thoroughly to ensure the glue is well-mixed.
Can melted hot glue be used in cold temperatures?
Yes, melted hot glue can be used in cold temperatures, as it resists temperatures as low as -20 degrees Celsius. However, the glue may become more brittle, so make sure to test its strength before using it for your project.
Is it easy to remove hot glue residue from containers or surfaces?
No, hot glue residue can be challenging to remove from containers or surfaces. Use a scraper or razor blade to remove most of the glue, then use rubbing alcohol or hot soapy water to clean and dissolve the remaining residue.