Delving into the world of DIY box making can be a rewarding endeavor, offering the satisfaction of creating something both practical and personalized. Whether you’re crafting a simple gift box or a sturdy storage solution, mastering the box glue up process is essential. The art of how to glue wood boxes involves precision, patience, and a bit of creativity, ensuring that the final product is not only functional but also aesthetically pleasing.
Essential Materials for Box Assembly
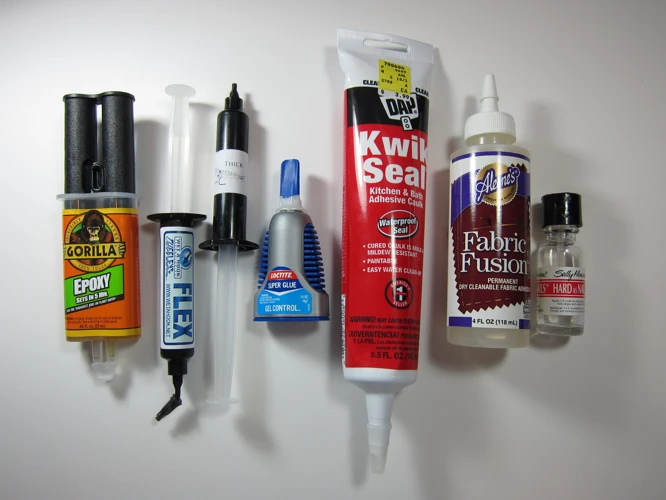
Choosing the Right Adhesive for Boxes
One of the most crucial decisions in wood box construction is selecting an appropriate adhesive for boxes. The choice of glue can affect the durability and appearance of your box. Woodworking adhesives range from PVA glues to epoxy resins, each with their own set of characteristics suitable for different types of projects.
Tools for the Glue Up Process
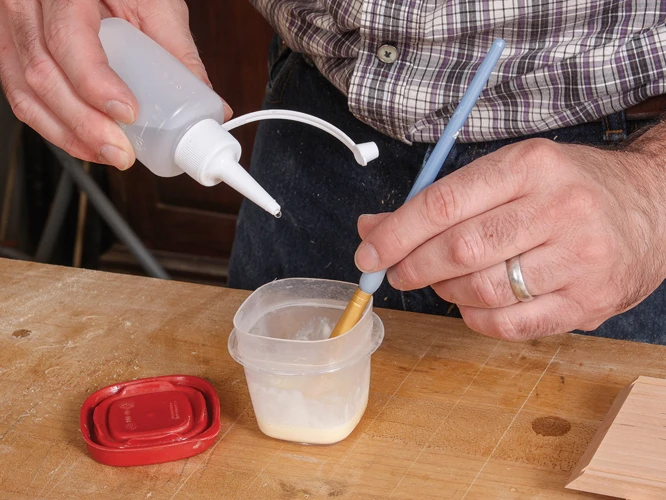
Having the right tools on hand can make the difference between a messy attempt and a seamless box assembly. Essential items include a brush or roller for even glue application, a damp cloth for cleanup, and a variety of glue up clamps to hold the pieces firmly in place as they cure.
Step-by-Step Box Glue Up Process
Preparing Your Wood
Begin by ensuring that all pieces of your box are cut to the precise dimensions and that all surfaces are smooth and ready for gluing. Meticulous preparation will result in a better fit and finish, which is vital for successful woodworking glue up.
Applying Woodworking Glue Up Techniques
When it comes to glue up techniques, consistency and coverage are key. Apply a thin, even coat of glue to both surfaces to be joined. Avoid over-applying, as this can lead to excessive squeeze-out and a weakened bond.
Assembly and Clamping Boxes
The assembly should be done swiftly after glue application. Align all parts carefully before applying pressure with clamping boxes. This stage requires a delicate balance: enough pressure to ensure a tight bond, but not so much that it distorts the wood or causes the glue to ooze out excessively.
Box Assembly Tips and Tricks

Managing Glue Squeezeout
Glue squeezeout can be a nuisance, but with proper box assembly tips, it can be easily managed. Keep a damp cloth nearby to wipe away excess glue. Some woodworkers also use masking tape along the edges to catch any drips before they reach the wood.
Ensuring Square and Even Clamping
- Always check for squareness after applying the clamps.
- Use a carpenter’s square or a measuring tape to compare diagonal measurements and adjust as necessary.
- Even pressure is crucial, so ensure that clamps are tightened uniformly.
Glue Up Clamps and Clamping Strategies
Selecting Glue Up Clamps for Different Box Sizes
Clamp selection can greatly influence the outcome of your project. For smaller boxes, bar clamps or C-clamps are often sufficient. Larger projects may require pipe clamps or parallel clamps to distribute pressure more evenly across the surface.
Clamping Pressure and Time for Optimal Bonding
The amount of pressure and the duration it is applied can affect the strength of the bond. Follow the adhesive manufacturer’s recommendations for clamping time. Generally, a period of 20-30 minutes is enough for the glue to set, but it may take 24 hours to fully cure.
Finishing Your Wood Box Construction
Sanding and Cleaning the Glued Box
Once the glue has cured, it’s time to sand the box. Start with a coarser grit and work your way up to a finer grit for a smooth finish. Any remaining glue residue should be removed during this process to ensure a professional look.
Applying Finish to Your Wood Box
Finishing the wood box can enhance its appearance and offer protection. Options include staining, painting, or applying a clear coat such as polyurethane. Each finish type has its own application method, so choose one that best suits your project’s needs.
Troubleshooting Common Glue Up Issues
Addressing Weak Joints
Weak joints are often the result of inadequate glue application or insufficient pressure during clamping. To strengthen these areas, you may need to re-glue and re-clamp, ensuring that you apply an even coat of glue and sufficient clamping pressure.
Fixing Misalignment During Glue Up
Misalignment can occur if the components shift during the clamping process. If this happens, it’s important to adjust the pieces as quickly as possible before the glue sets. Using cauls or additional clamps can help maintain alignment while the glue dries.
If you’re a woodworking enthusiast or just diving into DIY projects, mastering the art of gluing up is essential. Whether you’re creating a custom box, a tabletop, or a cutting board, the key to a successful project lies in the glue-up process. To help you on your journey, we’ve compiled a collection of articles that cover various aspects of this topic. Discover the steps for a flawless finish with our guide on how to glue up a tabletop, learn the intricacies of preparing a durable surface with our tutorial on how to glue up a cutting board, and even find out how to clean up after your project with tips from our article on how to get glue off a CD. Each piece is filled with valuable insights to make your next glue-up project a resounding success!
Conclusion: Mastering the Art of How to Glue Wood Boxes
In conclusion, DIY box making is an accessible and enjoyable craft that benefits greatly from understanding the proper glue up techniques and box assembly tips. With the right materials, tools, and methods, you can achieve durable and beautiful wood box construction. Remember that practice makes perfect, and with each box you glue up, your skills will continue to improve.