It’s that time of year again where snowflakes are everywhere – outside and inside! If you’re looking for a unique and easy way to decorate your home for the holidays, then hot glue snowflakes are the way to go. These intricate snowflakes are easy to make and the end result is stunning. In this article, we’ll guide you through the step-by-step process of making hot glue snowflakes, so you can add a touch of winter wonderland to your decorations.
What are Hot Glue Snowflakes?
Are you looking for a fun and easy DIY craft project to add to your winter decor? Look no further than hot glue snowflakes. These delicate and intricate designs can be made quickly and easily with just a few materials. Hot glue snowflakes are made by tracing a stencil or template with your hot glue gun onto wax paper. Once finished, you can add embellishments or glitter to make them even more unique. But before we begin, let’s learn more about what hot glue snowflakes are and why they make a great addition to your winter decor. For more information on hot glue and related topics, check outis hot glue toxic when dry?.
What Makes Them Unique?
Hot glue snowflakes are unique in their texture, durability, and versatility. Here are some of the reasons that make them stand out:
- Texture: The texture of a hot glue snowflake is also one of its defining features. Once the glue cools down, it hardens to create a stiff but intricate design that has a slightly bumpy texture.
- Durability: Hot glue snowflakes are also very durable due to the strength of the glue. They can withstand being dropped or bumped without breaking, making them ideal for use as decorations on holiday wreaths or other DIY projects.
- Versatility: One of the best things about making hot glue snowflakes is that they can be customized in so many ways. You can add glitter or other embellishments to make them sparkle and shine, or even experiment with different colors and textures of glue sticks. Because hot glue dries clear, it’s easy to craft a snowflake that fits perfectly with your holiday decor.
In addition to these benefits, making hot glue snowflakes is also an enjoyable and affordable DIY activity. Unlike other crafts that require expensive materials, all you need is a hot glue gun and some basic supplies. So if you’re looking for a fun and festive way to decorate your home this holiday season, give hot glue snowflakes a try!
Materials Needed
When it comes to crafting hot glue snowflakes, having the right materials is key. From the glue gun to the snowflake stencil, each item plays a crucial role in bringing your winter wonderland vision to life. Before getting started on this fun and easy DIY project, make sure you have all the necessary materials on hand. If you’re missing any items, check out our links on how to make hot glue and how to stop glue gun from dripping to get started. So, let’s gather everything we need to make hot glue snowflakes!
Hot Glue Gun
Using a hot glue gun is essential when making hot glue snowflakes. This special tool allows you to create precise lines and shapes with hot adhesive, making your snowflake look more intricate and beautiful. When choosing a hot glue gun for your project, it is important to consider the following factors:
| Factor | Importance |
| Size | Consider the size of the snowflake and choose a hot glue gun that is small enough to create fine details without dripping excess glue. |
| Temperature | Choose a high-temperature hot glue gun for faster crafting or a low-temperature one if you’re worried about burning your fingers or working with delicate materials. |
| Brand/Model | Inquire about popular brands like Surebonder, AdTech, or Gorilla and invest in a glue gun that’s reliable and durable for long-term use. |
It is important to remember that hot glue guns can be dangerous if not used properly, so follow the manufacturer’s instructions carefully and use them in a safe space. If you are new to crafting with hot glue guns, check out some tutorials or tips on hot glue gun safety.
Hot Glue Sticks
When it comes to making hot glue snowflakes, the most essential material you will need is, of course, hot glue sticks. These sticks come in a variety of sizes, colors, and types to fit different glue gun models and project needs. Before selecting a pack of hot glue sticks, make sure to check the compatibility with your glue gun to avoid jamming or other issues.
Some of the most commonly used types of hot glue sticks include clear, white, colored, and glittered sticks. Clear sticks are commonly used in projects where a discreet adhesive is needed while white sticks are great for bonding on lighter surfaces. Colored sticks, on the other hand, come in a range of vibrant hues that can add an extra pop of color to your hot glue snowflakes. If you prefer a more festive look, glitter sticks are a perfect option for creating sparkly snowflakes that catch the light.
To help you with selecting the right hot glue sticks for your snowflake project, see the table below:
| Type of Hot Glue Stick | Description |
|---|---|
| Clear | Discreet adhesive |
| White | For bonding on lighter surfaces |
| Colored | Great for adding extra pop of color |
| Glittered | For creating sparkly snowflakes |
For a more unique look, experiment with different colors and textures of glue sticks. You can also try using specialty glue sticks, like mossy sticks or scented sticks, to add a creative twist to your snowflakes.
If you want to learn more about hot gluing, check out our article on how to color hot glue for some inspiring ideas.
Snowflake Stencil or Template
Using a snowflake stencil or template is an important part of making hot glue snowflakes. This is because it allows you to create a more detailed and symmetrical design for your snowflakes. You can either create the stencil yourself, or you can find printable templates online. If you’re creating it yourself, use a ruler and pencil to draw out the snowflake design on a piece of paper or cardstock. Once you have your snowflake stencil or template, it’s important to secure it in place while you trace it onto the wax paper with your hot glue gun. You can use tape or weights to keep it in place.
Pro tip: Don’t have a printer to make a stencil? Use a cookie cutter! Just place the cookie cutter on the wax paper and trace around the edges with your hot glue gun.
It’s also important to consider the size of your snowflake stencil or template. If it’s too small, your hot glue snowflake may not turn out as well. On the other hand, if it’s too large, it may be harder to handle and maneuver with your hot glue gun. A stencil about 2-3 inches in diameter is a good size to work with.
Pro tip: You can find a variety of snowflake stencil designs online, or you can create your own by searching for images of snowflakes and tracing the design onto paper or cardstock.
While you’re tracing the stencil onto wax paper, try to work quickly but carefully, as the hot glue can harden quickly. Keep your movements smooth and steady to create clean lines and avoid air bubbles in the glue. You can also experiment with different types of hot glue sticks to create unique textures and patterns in your snowflakes. Whether you use a traditional plain snowflake template or create your own, the stencil or template is an important part of making hot glue snowflakes that look professional and polished.
Pro tip: Need a different type of glue project? Check out our guide on how to make a glue bomb for a fun, explosive experiment!
Wax Paper
One essential material you will need when making hot glue snowflakes is wax paper. Wax paper is a type of paper that has been coated with a thin layer of wax to make it non-stick and moisture-resistant. It is commonly used in baking and cooking to prevent food from sticking to surfaces. In this case, wax paper is used to prevent the hot glue snowflake from sticking to your work surface while it dries.
Why is it important to use wax paper?
Using wax paper when making hot glue snowflakes is crucial because it creates a non-stick surface for the glue to dry on. Without wax paper, the hot glue will stick to your work surface and can be difficult to remove. This would not only ruin your snowflake but also damage your work surface. Additionally, wax paper is cheap and disposable, making it a convenient option for crafting.
How to use wax paper for hot glue snowflakes?
To use wax paper for hot glue snowflakes, you will first need to lay it flat on your work surface. Then, place your snowflake stencil or template on top of the wax paper. When you begin tracing the stencil with your hot glue gun, make sure to apply the glue directly on the wax paper and not on the stencil. This will ensure that the glue will easily peel off the wax paper when it dries.
Where to find wax paper?
Wax paper can be found at most grocery stores in the baking aisle. You can also find it at online retailers like Amazon. If you happen to run out of wax paper while crafting, parchment paper can also be used as a substitute.
Using wax paper when making hot glue snowflakes is a simple and effective way to prevent the glue from sticking to your work surface. It’s an affordable and easily accessible material that can make your crafting experience much more enjoyable. Now that you know the importance of wax paper in making hot glue snowflakes, let’s move on to the next material you will need – glitter or embellishments. If you want to learn how to glue moss to wood, check out our article on How to Glue Moss to Wood.
Glitter or Embellishments (optional)
Adding glitter or other embellishments to your hot glue snowflakes is a great way to make them stand out even more. You can really get creative with this step and make each snowflake unique. Here are some ideas to get you started:
- Glitter: Adding glitter to your hot glue snowflakes is an easy way to add some sparkle and shine to your project. Simply sprinkle the glitter on the hot glue before it dries, and let it set.
- Beads: If you have small beads or other jewelry embellishments, you can add them to your snowflakes for an extra pop of color and texture. Just press them into the hot glue while it’s still wet, and they should stick in place.
- Rhinestones: Rhinestones are another great option for adding some bling to your snowflakes. You can either glue them on individually or create a pattern with them.
- Paint: If you want to get really creative, you can paint your hot glue snowflakes with acrylic paint once they are dry. This will give them a colorful, glossy finish.
Remember, these embellishments are optional, so feel free to skip this step if you prefer a more minimalist look. However, if you want to experiment with different textures and colors, adding some extra bling to your hot glue snowflakes is a fun and easy way to do so.
Pro tip: If you’re feeling really creative, you can even try making your own glitter or adding small pieces of confetti to your hot glue snowflakes for a unique and festive look.
No relevant anchor text in this part of the article, so no internal link is necessary.
Step-by-Step Instructions: How to Make Hot Glue Snowflakes
As promised, this section will walk you through the step-by-step instructions on how to make hot glue snowflakes. With just a few simple materials and a hot glue gun, you can create beautiful, unique snowflakes to decorate your home during the winter season. Whether you’re an experienced crafter or a beginner, this guide is perfect for anyone looking to get creative with hot glue. So, let’s get started and make some stunning snowflakes that will impress everyone who sees them! And while we’re on the topic of hot glue, have you ever wondered why is super glue hot?
Step 1: Print or Create Snowflake Stencil
Firstly, to make hot glue snowflakes, you’ll need to create or print a snowflake stencil. This stencil acts as a guide for your hot glue gun, making sure that you create a beautifully shaped and symmetrical snowflake. You can either find a stencil online, or create one yourself using card stock or any other thick paper.
OPTION 1: PRINT YOUR STENCIL
If you want to save time, you can easily find various snowflake designs online. Once you find a design you like, simply print out the stencil on a piece of paper. Use a thicker sheet of paper, if possible, so that your stencil will be more durable when it’s time to trace it onto the wax paper.
OPTION 2: CREATE YOUR OWN STENCIL
Alternatively, you can also create your own snowflake design. Fold a piece of paper in half and start drawing the snowflake design on one half. When you’re happy with your design, cut it out so that you have a symmetrical snowflake stencil.
TIPS:
- Use a pencil to draw your snowflake so that you can easily erase any mistakes
- Make sure that your stencil is the same size as you would like your final snowflake to be
- If you’re feeling creative, experiment with different snowflake shapes and sizes to create unique designs
Now that you have your stencil, you’re ready to move on to the next step of the process – placing your stencil onto the wax paper.
Step 2: Place Stencil on Wax Paper
Before you can start tracing your stencil, you need to set it up on a surface that will allow you to cleanly remove your snowflake once it’s dry. That’s where the wax paper comes in! Place a sheet of wax paper on a flat surface, like a table or countertop. Then, take your snowflake stencil or template and lay it on top of the wax paper.
Make sure the stencil is flat against the wax paper and isn’t moving around. You can use small pieces of tape or weights to secure it in place. This will ensure that your snowflake comes out looking neat and tidy.
It’s important to use wax paper as opposed to regular paper, as the wax coating will prevent the hot glue from sticking to the surface and allow for easy removal in the final steps. If you don’t have wax paper, you can also use parchment paper as a substitute.
Once your stencil is securely in place, you’re ready to move on to the next step and start heating up your hot glue gun. But if you’re looking for more inspiration when it comes to crafting with hot glue, check out our article on how to make fake blood with glue or learn how to make putty with glue stick in our other guide here.
Step 3: Heat Up Your Hot Glue Gun
Step 3: Before you begin tracing the snowflake stencil, heat up your hot glue gun so that the glue is easy to work with. Make sure to place the glue gun on a flat, heat-resistant surface as it can become quite hot. Most hot glue guns require approximately 5 minutes to heat up. You can check if it is ready by squeezing the trigger gently and seeing if the glue comes out easily. If the glue still seems difficult to squeeze out, allow the glue gun to heat up for a few more minutes.
| Step: | Heat up your hot glue gun |
| Materials: | Hot glue gun |
| Instructions: |
|
Remember to be cautious while handling the glue gun and its hot glue. Your safety is the first priority. Avoid making any direct contact with the glue and always be aware of the hot end of the glue gun.
So, before continuing further, make sure that your hot glue gun is heated up properly. Once it is ready, you can start tracing the snowflake stencil with ease!
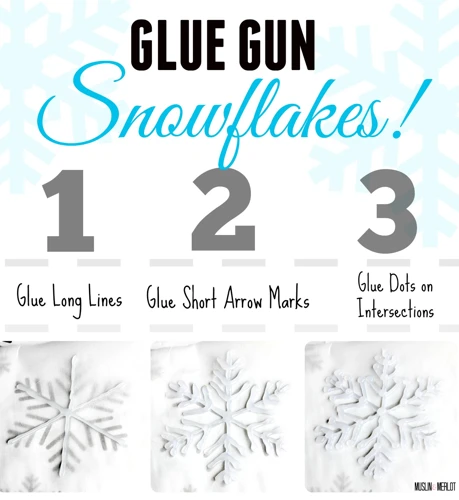
Step 4: Start Tracing the Snowflake Stencil with Hot Glue Gun
After heating up your hot glue gun, it’s time to start tracing the snowflake stencil with hot glue. This is where the magic happens and you get to see your snowflake design take shape. When tracing along the stencil, try to move the glue gun slowly so that the lines are smooth and consistent. It may take some practice to get the hang of it, so don’t worry if your first few snowflakes aren’t perfect.
Be sure to keep a steady hand and move the glue gun at a slow and even pace. As you trace the stencil, the hot glue will come out and form a delicate, lacy snowflake design. Be careful not to trace outside the lines of the stencil or your snowflake may come out lopsided or misshapen.
If you want to create a more intricate snowflake design, you can switch out the stencil for a more detailed one or create your own design freehand. Experiment with different shapes and patterns to create unique and beautiful snowflakes.
Remember to be patient as you work, and take breaks if your hand starts to cramp. It’s important to enjoy the crafting process and take your time to ensure that your snowflakes come out looking their best.
Once the snowflake design is complete, carefully remove the stencil from beneath the wax paper without touching the wet glue. It’s important to do this gently to avoid smudging the design.
Step 5: Add Embellishments or Glitter (Optional)
Once you have traced the snowflake stencil with hot glue, the next step is to add some embellishments or glitter to make the snowflakes more unique and festive. While this step is optional, it can really enhance the final look of your hot glue snowflakes.
To add embellishments or glitter, you will need to gather some additional materials:
| Materials: | Descriptions: |
|---|---|
| Embellishments: | Such as small beads, sequins or rhinestones to add sparkle to your snowflakes. |
| Glitter: | You can use a fine or chunky glitter to sprinkle over the snowflakes. You can also use different colors to make them really stand out. |
| Paint: | You can use acrylic paints and a small brush to paint over the snowflakes and add some color. |
To apply the embellishments or glitter to your hot glue snowflakes, simply add a small amount of glue to the area where you want to place the embellishment or glitter. Then, gently press the embellishment or sprinkle the glitter over the glue. Use a small brush to dust off any excess glitter.
You can also experiment with different combinations of embellishments and glitter to create a unique and personalized look for your hot glue snowflakes.
Remember that this step is optional, so feel free to skip it if you prefer a more simple and minimalist look for your snowflakes.
Tip: Don’t overdo it with the embellishments and glitter. Less is often more when it comes to crafting.
Now that you have added the final touches to your hot glue snowflakes, it’s time to let them dry completely before removing them from the wax paper.
Internal link: If you want to share your hot glue creations with others, you can use a witty phrase like “check out my snowflake squad” and link this to the article /who-put-this-shit-together-im-the-glue/.
Step 6: Let the Hot Glue Snowflake Dry
After you have completed tracing the snowflake stencil with the hot glue gun, you need to let it dry before you can move on to the next step. This is a crucial step in making sure that your hot glue snowflake turns out perfectly.
Here are some key things to remember:
- Don’t touch the hot glue snowflake until it has cooled down completely. Hot glue can burn your fingers if it is still hot.
- If you are in a rush, you can speed up the drying process by placing the wax paper with the hot glue snowflake in your fridge or freezer. This will help to cool the hot glue down more quickly.
- It is important to make sure that the hot glue snowflake is completely dry before you move on to the next step. This usually takes about 10-15 minutes, but it can take longer depending on how thick the hot glue lines are.
- A good way to check if the hot glue snowflake is dry is to gently press down on the edges. If it feels firm and doesn’t give or bend, then it is ready to be peeled off of the wax paper.
It is important to be patient during this step to ensure that your hot glue snowflake turns out just as you want it to. Once your snowflake is dry, you can move on to the next step of peeling it off of the wax paper.
Step 7: Peel off from Wax Paper
Finally, it’s time to peel your hot glue snowflake off the wax paper. This can be a delicate process, so be patient and careful to avoid damaging your creation. Here are the steps to follow:
- Gently lift the edges: Starting from one corner, use your fingers or a pair of tweezers to gently lift the edges of the hot glue snowflake off the wax paper.
- Slowly peel off: Once you have lifted an edge, continue to slowly peel the rest of the snowflake off the wax paper. Be sure to take your time and work carefully to prevent any unintentional breakage.
- Handle with care: Now that you have successfully removed your snowflake from the wax paper, be sure to handle it carefully to avoid any damage or distortion. You can place it on a flat surface or hang it up for display.
With these simple steps, you can now proudly display your handmade hot glue snowflake and admire your creativity. Remember to experiment with different stencil designs and embellishments to create unique and personalized snowflakes. Additionally, you can experiment with different colors and textures of hot glue sticks to make each snowflake stand out. Happy crafting!
Tips and Tricks
As you embark on your hot glue snowflake crafting journey, you may encounter a few bumps in the road. Fear not! We have compiled some helpful tips and tricks to ensure your snowflakes turn out beautifully and your crafting experience is as smooth as possible. From cleaning your hot glue gun to experimenting with different textures of glue sticks, these pointers will not only make your current project a success but also inspire future masterpieces. Keep reading to discover the secrets to creating stunning hot glue snowflakes.
Use High-Temperature Gun for Faster Crafting
When it comes to making hot glue snowflakes, speed is of the essence. Using a high-temperature hot glue gun is one way to expedite the crafting process. A high-temperature gun heats up the glue faster and bonds it quicker than a low-temperature gun. This is especially useful if you are making several snowflakes or have limited time.
Here are some other benefits of using a high-temperature hot glue gun:
- It can melt the glue sticks more evenly, leading to a smoother and more consistent flow of glue.
- It can melt thicker glue sticks, which makes crafting with them much easier.
- It can bond materials faster and more efficiently, making the craft project much more enjoyable and less frustrating.
However, it is important to note that high-temperature guns are generally less safe than low-temperature guns and should be handled with care. To minimize the risk of burns or other injuries, be sure to follow the manufacturer’s guidelines for use and safety precautions.
Remember these tips when using a high-temperature gun for hot glue snowflake crafting:
- Use a sturdy work surface and protect it from stray drips of melted glue.
- Wear protective gloves to shield your hands from hot glue, and avoid contact with your skin.
- Be careful not to accidentally touch the tip of the hot glue gun with any part of your body, as it can cause serious burns.
- Keep a bowl of cool water nearby in case of accidental burns, and be prepared to seek medical attention if necessary.
Using a high-temperature hot glue gun can be a valuable tool for making hot glue snowflakes in a faster, more efficient manner. With proper precautions, it can help make your crafting experience more enjoyable and productive.
Clean the Tip of Your Hot Glue Gun
As you work on your hot glue snowflakes, you may notice that the tip of your glue gun can become clogged with glue residue. This can affect the precision of your glue lines and make it difficult to create intricate designs. To prevent this issue, it’s important to clean the tip of your hot glue gun regularly.
Why You Should Clean Your Hot Glue Gun Tip
If you don’t clean your hot glue gun tip, the buildup of glue residue can harden and create a barrier that prevents the glue from flowing smoothly. This can result in uneven glue lines, interrupted flow, and even complete blockages in the tip. Cleaning your hot glue gun tip should be a regular part of your crafting routine to ensure that it works at its best.
How to Clean Your Hot Glue Gun Tip
Cleaning your hot glue gun tip is a simple process that can be done in just a few steps:
| Materials Needed: | Instructions: |
|---|---|
| Cotton swab or scrap of fabric | Unplug your glue gun and let it cool completely before working on it. |
| Isopropyl alcohol | Gently remove any excess glue from the tip of the glue gun using a cotton swab or a scrap of fabric. |
| Dip the cotton swab or fabric in a small amount of isopropyl alcohol and rub it over the tip of the glue gun. This will help dissolve any remaining glue residue. | |
| Wipe the tip of the glue gun with a clean cloth or paper towel to remove any remaining residue and ensure that it is completely dry before using it again. |
By following these steps, you can ensure that your hot glue gun tip is always ready to use and that your hot glue snowflakes turn out perfectly. Cleaning your hot glue gun tip can also prolong the life of your glue gun and prevent the need for costly repairs or replacements.
Conclusion
Taking the time to clean your hot glue gun tip is a simple but important step in ensuring that your crafting projects go smoothly. By using the right materials and following the proper process, you can keep your hot glue gun tip in top condition and get the most out of your crafting supplies.
Use Parchment Paper if You Run out of Wax Paper
If you have run out of wax paper, don’t worry because there is a very easy alternative for you: parchment paper. Parchment paper is a type of kitchen paper that is typically used for baking, but it also works great as a substitute for wax paper when making hot glue snowflakes.
Why Use Parchment Paper Instead of Wax Paper?
While wax paper is a great option for making hot glue snowflakes, parchment paper is also a good substitute because it is coated with silicone, making it heat-resistant, non-sticky, and moisture-resistant. This means that the hot glue won’t stick to it, and your snowflakes will come out just as beautifully as they would have on wax paper.
How to Use Parchment Paper for Hot Glue Snowflakes
Using parchment paper for hot glue snowflakes is incredibly easy. Simply follow the same process as you would with wax paper. Print or create your snowflake stencil, place it on the parchment paper, and use your hot glue gun to trace over the stencil. Once your hot glue snowflake has dried, gently peel it off the parchment paper.
Tips for Using Parchment Paper
While using parchment paper for hot glue snowflakes is a great option, there are a few tips to keep in mind to ensure that your snowflakes turn out perfectly:
| Tip | Description |
| Use a high-temperature hot glue gun | Parchment paper has a lower heat tolerance than wax paper, so using a high-temperature hot glue gun will help speed up the melting process and ensure that the glue sticks properly |
| Apply hot glue in thin layers | Applying hot glue in thin layers will help prevent it from bleeding through the parchment paper |
| Use a protective surface | It’s always a good idea to use a protective surface, like a cutting board or piece of cardboard, underneath the parchment paper to catch any excess glue |
If you have run out of wax paper, using parchment paper is a great alternative for making hot glue snowflakes. Just remember to use a high-temperature gun, apply the hot glue in thin layers, and use a protective surface, and you’ll have beautiful snowflakes in no time.
Experiment with Different Colors and Textures of Glue Sticks
One great tip for adding some variety and creativity to your hot glue snowflakes is to experiment with different colors and textures of glue sticks. Most hot glue guns come with clear or white glue sticks, which will give you a classic snowflake look. But, if you’re feeling adventurous, try adding some color or texture to your snowflake.
Color: Some hot glue sticks come in a variety of colors, such as red, blue, green, or even metallic shades. Adding a pop of color to your snowflakes can make them stand out and add a unique touch to your winter decor.
Texture: There are also different textures of hot glue sticks available, such as glitter, metallic, or even glow-in-the-dark. Adding a textured glue stick can give your snowflakes some added dimension and sparkle.
To help you decide which colors and textures work best for your snowflake project, consider creating a table with different options. Here’s an example:
| Glue Stick Color | Glue Stick Texture | Snowflake Style |
|---|---|---|
| Red | Metallic | Bold and Modern |
| Blue | Glitter | Sparkly and Whimsical |
| Silver | Metallic | Classic and Elegant |
| Glow-in-the-Dark | N/A | Funky and Fun |
Of course, this is just an example, and you can customize your own table to fit the specific colors and textures you have available. Additionally, don’t be afraid to mix and match colors and textures for a truly unique snowflake. Experimentation is key, so don’t be afraid to try something new and see what works best for you.
Conclusion
When it comes to creating winter decorations, hot glue snowflakes are an easy and fun DIY project. With just a few materials and some creativity, you can make beautiful, unique snowflakes to add to your holiday decor. Plus, you can add your own personal touch by experimenting with different colors of glue sticks and various embellishments like glitter and beads.
As you follow the step-by-step instructions, keep in mind the tips and tricks to make your crafting experience smoother and more enjoyable. Using a high-temperature hot glue gun and keeping the gun tip clean will help you create a neat and precise design. And don’t worry if you run out of wax paper – parchment paper works just as well.
Overall, making hot glue snowflakes is a fantastic way to spend a winter afternoon and add some seasonal charm to your home. So gather your materials, get creative, and enjoy the process of bringing your unique snowflake creations to life!
Frequently Asked Questions
What kind of hot glue gun should I use?
You should use a high-temperature hot glue gun for this project. It will melt the glue sticks faster and allow you to finish your project more quickly.
Can I use a low-temperature hot glue gun?
You can, but it may take longer for the glue to dry and the snowflake will be more delicate. It’s best to use a high-temperature gun for best results.
What if I don’t have a snowflake stencil?
You can easily create your own stencil by drawing a snowflake shape on a piece of paper and cutting it out.
Can I use colored glue sticks?
Absolutely! Using different colored glue sticks can add an extra pop of color to your snowflakes.
Do I need to let the hot glue gun heat up first?
Yes, it’s important to let the hot glue gun heat up for a few minutes before using it. This will ensure that the glue melts evenly and is easy to work with.
Can I use something other than wax paper?
Parchment paper is a good alternative to wax paper if you don’t have any on hand.
How long does it take for the hot glue snowflake to dry?
It usually takes about 10-15 minutes for the glue to dry completely and for the snowflake to be ready to remove from the wax paper.
What other embellishments can I add to my hot glue snowflake?
You can add glitter, sequins, or small beads to your snowflake to make it even more unique.
Will the hot glue stick to my stencil?
No, the hot glue should not stick to your stencil as long as you use wax or parchment paper between the stencil and the hot glue.
Can I reuse the wax paper?
You can reuse the wax paper for multiple snowflakes, but it may become less effective over time as the hot glue sticks to it.