Introduction
Gluing wax together may seem like a daunting task, but with the right materials and techniques, it can be easily accomplished. Whether you’re repairing a broken candle or creating a unique wax sculpture, knowing how to glue wax can be a valuable skill. In this article, we’ll explore the step-by-step process of gluing wax together and share tips and tricks for achieving the best results. So, let’s dive in and discover how to glue wax like a pro!
Why You Might Need to Glue Wax Together
Why You Might Need to Glue Wax Together
If you’re working on a craft project and need to attach two pieces of wax together, you may think it’s a simple task that does not require any special attention. However, before you start gluing, it’s essential to understand why you might need to glue wax together and how to do it properly.
One common reason for gluing wax together is to repair broken wax figurines or candles. You may also need to glue wax together when making candles or adding decorative elements to a wax surface. Whatever the reason, it’s crucial to choose the right glue and follow the correct steps to ensure a strong and lasting bond.
Another reason to glue wax together could be to create a unique piece of art. For example, you could create a mixed media sculpture featuring wax elements in combination with other materials such as plexiglass and metal. The possibilities are endless, but it’s important to understand the unique properties of wax and how to glue it together to achieve your desired result.
Now that you understand why you might need to glue wax, let’s delve into the steps required to do it properly.
Preparing for Gluing Wax
As you get ready to glue wax together, it’s important to properly prepare the surface to ensure the glue adheres as well as possible. Taking the time to gather the necessary materials and thoroughly clean the surface will go a long way in making your glue job a success. Not only that, but choosing the right type of glue is crucial for ensuring that your wax creation stays intact for as long as possible. So, before you get started, let’s take a closer look at how to prepare your wax surface for gluing. If you’re interested in learning more about gluing various materials together, check out our guide on how to use epoxy glue on metal.
Gather the Necessary Materials
When it comes to gluing wax together, having the right materials on hand is essential. Here are the necessary materials you will need for this project:
| Materials | Description |
|---|---|
| Wax | The item that needs to be glued together should be made of wax. |
| Glue | Choose a glue that is safe to use on wax. Check the manufacturer’s instructions to make sure it is suitable for your project. |
| Small brush | You’ll need a small brush to apply the glue to the wax surface. |
| Cotton swabs | If necessary, use cotton swabs to help spread the glue in small areas. |
| Sandpaper (optional) | If the wax surface is rough or uneven, you can use sandpaper to smooth it out before applying the glue. |
| Clamps (optional) | For larger or more complicated projects, you may need clamps to hold the wax pieces together while the glue dries. |
| Protective gloves (optional) | If the glue instructions recommend gloves, make sure to wear them to protect your hands. |
It’s important to have all of these materials ready and in good condition before you begin. If you’re missing any of them, make sure to pick them up before starting your project. And, if you need help selecting the right type of glue, check out our article on how to glue glass pieces together for some tips and recommendations.
Clean the Wax Surface
When preparing to glue wax together, it is crucial to clean the surface first. Any debris or residue will prevent the glue from properly adhering to the wax, causing the bond to be weak and eventually break. To clean the wax surface, follow these steps:
| Materials Needed | Instructions |
|---|---|
| Cotton balls | Dip a cotton ball in rubbing alcohol or white vinegar |
| Rubbing alcohol or white vinegar | Gently rub the wax surface with the wet cotton ball in a circular motion |
| Soft-bristled brush | Use the brush to remove any excess dirt or debris from the wax surface |
| Lint-free cloth | Dry the wax surface with a clean, lint-free cloth |
It is important to note that different types of wax may require different cleaning methods. For example, if you are gluing a ceramic pot, you may need to use a more gentle cleaner to avoid damaging the surface. For more information on cleaning other materials, check out our guides on how to glue ceramic pot, how to glue shells to a mirror, how to glue quartz countertop, how to glue travertine together, how to glue limestone together, and how to glue pot metal. Once the wax surface is cleaned, you are ready to move on to choosing the right glue for the job.
Choosing the Right Glue
Selecting the perfect glue for your wax project can be a daunting task. There are multiple types of adhesives available in the market and choosing the right one is crucial to achieve a long-lasting and seamless bond. You wouldn’t want your finished product falling apart the moment you pick it up. In this section, we will explore the different types of glues that can be used on wax and which ones are the best for gluing wax together. By the end of this section, you will have a clear understanding of the appropriate glue to use for your specific wax project.
Types of Glues to Use on Wax
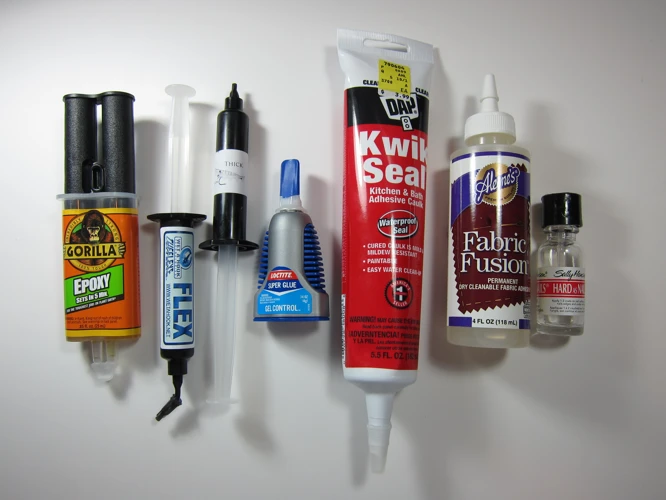
When it comes to gluing wax together, not all types of glue will be effective or suitable. This is because wax is a nonporous material and requires a specific type of adhesive that can bond to its surface. Here are some of the types of glues that can be used on wax:
- Epoxy glue: This is a two-part adhesive that forms a strong, permanent bond. Epoxy glue is perfect for gluing wax together because it can bond to nonporous surfaces like wax. It also dries clear and can resist heat and water, making it ideal for candles.
- Cyanoacrylate glue: Also known as superglue, this adhesive can bond to nonporous surfaces like wax and dries clear. It’s quick-drying and ideal for small repairs that require a strong bond.
- E6000 glue: This industrial-strength adhesive bonds to various nonporous surfaces, including wax. It can withstand temperatures and is waterproof. The precision tip version is great for glueing small wax pieces together. Learn more about how to use E6000 glue precision tip here.
- Hot glue: A common adhesive used for craft projects, hot glue can also be used on wax. It dries quickly and forms a strong bond. However, it’s important to note that hot glue can be difficult to remove if you make mistakes.
It’s important to keep in mind that not all types of glue are safe to use on candles that will be burned. Be sure to check the safety guidelines for each adhesive before using it on a candle.
Best Glues for Gluing Wax Together
When it comes to gluing wax together, choosing the right glue is crucial. Not all glues work well with wax, so it’s important to know which ones are the best to use. Here are some of the best glues for gluing wax together:
| Glue Type | Description | Pros | Cons |
|---|---|---|---|
| Epoxy | An extremely strong and durable two-part adhesive that cures by chemical reaction. | – Strong bond – Resistant to heat and chemicals |
– Takes longer to cure – Can be difficult to remove if not applied correctly |
| Hot Glue | A type of thermoplastic adhesive that is melted and applied using a hot glue gun. | – Fast and easy to use – Bonds quickly |
– Not as strong as other options – Can be messy if not applied carefully |
| Silicone | A type of adhesive that is made from a silicone-based polymer. | – Resistant to heat and water – Flexible and durable |
– Takes longer to cure – Can be difficult to remove if not applied correctly |
| Cyanoacrylate | A type of fast-drying adhesive that is also known as super glue. | – Bonds quickly – Easy to use |
– Can be brittle and break under stress – Not as long-lasting as other options |
Epoxy is one of the strongest glues for gluing wax together. It forms an incredibly strong bond and is resistant to both heat and chemicals. However, it takes longer to cure than other types of glue and can be difficult to remove if not applied correctly.
If you’re looking for a fast and easy option, hot glue may be the way to go. It bonds quickly and is easy to use, but it may not be as strong as other options and can be messy if not applied carefully.
Silicone is another good option for gluing wax together. It’s resistant to heat and water, flexible, and durable. However, like epoxy, it takes longer to cure and can be difficult to remove if not applied correctly.
Finally, cyanoacrylate, also known as super glue, is a fast-drying adhesive that bonds quickly and is easy to use. However, it can be brittle and break under stress, and it may not be as long-lasting as other options.
Applying the Glue to Wax
When it comes to gluing two wax surfaces together, applying the glue correctly is crucial for achieving a strong bond. It’s important to use the right type of glue and follow the proper steps to ensure that the glue sets properly and the bond is durable. In this section, we will delve into the step-by-step process of applying glue to wax, along with tips and tricks to make the process easier and more effective. From preparing the wax surface to applying the glue in just the right amount, read on to learn how to successfully glue wax together.
Step by Step Guide with Tips and Tricks
Gluing wax together may sound like a daunting task, but it can be achieved easily if you follow the right steps. Here is a step by step guide with tips and tricks to help you successfully glue wax together:
| Step | Description |
|---|---|
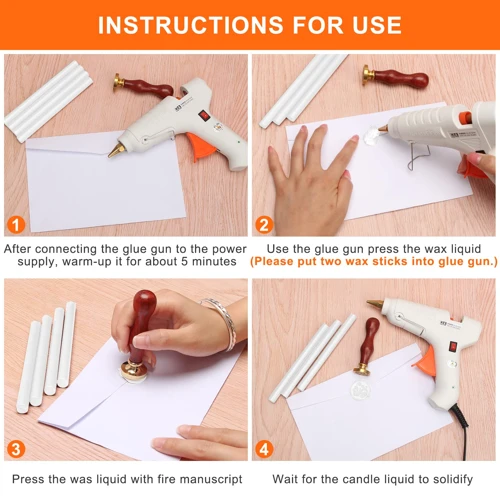
| 1. | Place the Wax Pieces Together: Before applying the glue, make sure the wax pieces are properly placed together. If the pieces do not fit perfectly, you may need to trim or sand them to get the perfect fit. |
| 2. | Apply the Glue: Apply a small amount of glue to one of the wax pieces. You can use a brush or a cotton swab to apply the glue. Be sure to apply the glue evenly and in a thin layer to avoid excess glue. |
| 3. | Press the Pieces Together: Immediately after applying the glue, press the wax pieces together. Apply gentle pressure to ensure the pieces are properly joined together. |
| 4. | Let the Glue Dry: The drying time of the glue depends on the type of glue you are using and the size of the wax pieces. However, it is advisable to let the glue dry for at least 24 hours before handling the wax. |
| 5. | Sand the Edges: After the glue has dried, you may notice a slight unevenness on the edges. You can use sandpaper to smooth out the edges and make them look even. |
| 6. | Polish the Wax: You can use a soft cloth and a wax polish to give the wax a shiny finish. This will ensure that the glue line is not visible and the wax looks seamless. |
Tips and Tricks:
– Always use a glue that is specifically made for wax, as other types of glue can damage the wax surface.
– When gluing large wax pieces together, it is advisable to use clamps to hold the pieces together while the glue dries.
– Avoid applying too much glue, as it can seep through the wax and create a mess.
– If the wax pieces are colored, make sure to use a glue that dries clear to avoid creating an unsightly glue line.
– Protect your work surface with a mat or paper to avoid getting glue on the surface.
Drying and Finishing
As you complete the gluing process and the glue has been applied, it’s time to move on to the drying and finishing stage. This step requires patience and attention to detail, as the way you finish the wax after it has dried can determine the final look and feel of your project. In this section, we’ll discuss the estimated drying time for wax glue, as well as tips and tricks for finishing and polishing your newly glued wax creation. Let’s dive in and learn more about how to properly finish a glued wax piece.
How Long Does it Take for Wax Glue to Dry?
The drying time of wax glue can vary depending on the type of glue used and the amount applied. Generally, it can take anywhere from 30 minutes to several hours for the glue to fully dry. It is important to allow enough drying time to ensure that the bond is strong and secure.
To give you a better idea of the average drying times for different types of glue, here is a table:
| Type of Glue | Drying Time | Notes |
|---|---|---|
| Hot Wax Glue | 5-10 seconds | Quick-drying, but requires a hot glue gun |
| Candle Wax | 1-2 hours | Slow-drying, but can be adjusted with heat |
| Beeswax | 2-3 hours | Slow-drying, but can be accelerated with a hairdryer |
| Epoxy Resin | 24-48 hours | Longest drying time, but creates the strongest bond |
Keep in mind that these are just general estimates and drying times can vary based on different factors such as temperature and humidity. It’s always a good idea to follow the manufacturer’s instructions for the specific glue you are using to ensure optimal results.
Additionally, avoid handling the glued wax until it is fully dry to prevent compromising the bond. Once the glue has fully dried, you can finish and polish the wax as desired.
Tips for Finishing and Polishing
To give your glued wax a polished and finished look, it is important to know the right techniques for finishing and polishing. Here are some helpful tips to achieve the best results:
- Clean the wax surface after it dries: Once the glue has dried completely, wipe the surface clean with a damp cloth or sponge to remove any excess glue residue or debris.
- Buff the wax: Use a soft cotton cloth to buff the glued area gently. Apply light pressure and circular motions to blend the glued surface with the rest of the wax. This technique will help remove any remaining glue residue and smooth out any bumps or rough spots.
- Use wax or polish: Apply a small amount of wax or polish to the glued area. Rub it in slowly and with a light touch. This step will help create a shiny and smooth finish on the glued area that will match the rest of the wax.
- Let the wax dry: Allow the wax or polish to dry for a few minutes before wiping away any excess with a soft, dry cloth. This step will ensure that the wax is sealed and protected from any further damage or wear.
Remember to be patient during the finishing and polishing process – take your time and be gentle. Rushing can result in a poorly finished product that will be unsightly and may not last as long as desired.
Conclusion
As we conclude this guide on how to glue wax together, it is important to remember the intricacies involved in the process. From properly cleaning the wax surface to selecting the right type of glue, every step matters. The drying and finishing stage is equally crucial, as it can affect the final outcome of the project. With the tips and tricks provided in this guide, one can successfully glue wax together and create a finished product that meets their desired expectations.
Final Thoughts
As you can see, gluing wax together can be a bit of a challenge, but with the right tools and techniques, it is definitely achievable. Follow our step-by-step guide for the best results.
– Remember to always prepare your surface adequately before applying any glue. Clean it thoroughly to ensure a strong bond.
– When selecting the glue, be sure to choose the right type for your particular application. Wax can be tricky to work with, so take the time to do your research, and don’t be afraid to ask for advice.
– When applying the glue, follow our step-by-step guide. Take your time and work carefully, being sure to avoid getting any glue on your skin or clothing.
– Once the glue is applied, be sure to let it dry completely before handling the wax. This can take some time, so be patient.
– Finally, once your project is complete, take the time to finish and polish it to perfection. This will not only make your project look great, but it will also help to protect it and ensure that it lasts for years to come.
Gluing wax together is a great way to create unique and beautiful projects. With a little practice and patience, you can learn to work with this versatile material and make something truly special. So get out there and start creating!
Frequently Asked Questions
Can you use any glue to glue wax together?
No, not all glues are suitable for use on wax. You need a strong glue that can bond with wax for the best results.
How do you clean the wax surface before gluing it?
You can clean the wax surface using a soft cloth or sponge and warm soapy water. Make sure to dry it thoroughly afterwards.
What are the best types of glues to use on wax?
Glues that are based on cyanoacrylate or epoxy are the best types of glues to use on wax. They offer a strong bond and are resistant to moisture.
What are the best glues for gluing wax together?
The best glues for gluing wax together are hot melt glue, superglue or epoxy glue. They offer a strong bond and are resistant to moisture.
Can you use a hairdryer to dry the glue faster?
No, using a hairdryer to dry the glue faster is not recommended as it can cause the wax to melt or become deformed.
How long does it take for wax glue to dry?
The drying time for wax glue depends on the type of glue used and the thickness of the applied layer. In general, it can take anywhere from a few hours to overnight to fully dry.
Can you add color to the glue for a better match with the wax?
Yes, you can add coloring agents to the glue for a better match with the wax. Make sure to use only small amounts so that the glue remains effective.
Do you need to clamp the wax together while the glue dries?
No, clamping the wax together while the glue dries is not necessary. However, you can hold the parts together for a few minutes to ensure they bond properly.
Do you need to finish or polish the wax after gluing it together?
Yes, you can finish or polish the wax after gluing it together. This will help to restore the wax’s shine and improve its appearance.
Can you glue wax together permanently?
Yes, you can glue wax together permanently. With the right glue and proper technique, the bonded wax can be as strong as the original.