Have you ever wondered how to glue 2x4s together? Whether you’re working on a DIY woodworking project or a home renovation, gluing 2x4s can be a useful skill to have. But with so many types of glue and clamps to choose from, it can be overwhelming to know where to start. In this guide, we’ll walk you through the step-by-step process of gluing 2x4s and provide tips on choosing the right glue, preparing the wood, and clamping the pieces together. By the end, you’ll be equipped with the knowledge to confidently glue 2x4s together for your next project.
Choosing the Right Glue
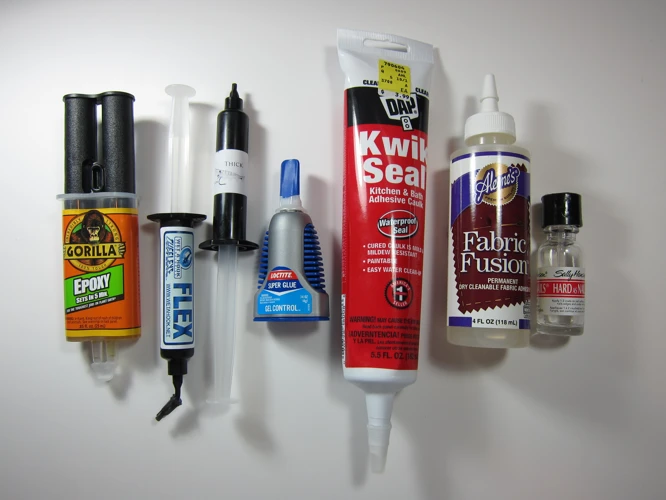
When it comes to gluing 2x4s together, choosing the right glue is absolutely crucial. You want to make sure that the bond is strong and durable, and that the glue is appropriate for the type of wood you are working with. With so many types of glue available on the market, it can be difficult to navigate. Should you use wood glue or construction adhesive? What are the different types of wood glue? In this section, we’ll explore these questions and help you determine which type of glue is best for your project. If you’re looking for information about gluing other materials together, check out our guides on how to glue metal to stone, what is mastic glue, or how to glue veneer.
Wood Glue vs. Construction Adhesive
Wood glue and construction adhesive are two different types of adhesives that can be used when gluing 2x4s together. Wood glue is specifically designed for bonding wood surfaces, making it a popular choice for woodworkers. On the other hand, construction adhesive is a versatile adhesive that can be used for bonding various materials together, including wood.
Here are some differences between wood glue and construction adhesive:
- Composition: Wood glue is made from synthetic resin and water, which results in a strong bond when applied to wood surfaces. Construction adhesive, on the other hand, is made from synthetic rubber or polyurethane and requires a chemical reaction to bond.
- Drying Time: Wood glue usually requires at least 30 minutes to dry before clamps can be removed, while construction adhesive can take up to 24 hours to fully cure.
- Strength: Wood glue is designed to bond wood fibers together, resulting in a joint that is typically stronger than the wood itself. Construction adhesive is known for its high strength and can bond a wide variety of materials together.
- Water Resistance: Some wood glues, such as polyurethane wood glue, offer water resistance once cured. Construction adhesive is also typically water-resistant once fully cured.
Depending on the project, either wood glue or construction adhesive could be the better choice for gluing 2x4s together. For most woodworking projects, traditional wood glue is the best option. However, if you need a strong bond between wood and another material, construction adhesive may be a better choice.
If you’re planning on using wood glue, make sure to choose a high-quality one, such as Titebond III or Gorilla Wood Glue, for the best results.
Types of Wood Glue
When it comes to gluing 2x4s together, there are a few types of wood glue that work best. Yellow wood glue is a popular option for bonding porous surfaces, such as wood, and it dries to a strong and durable finish. It is also water-resistant, making it ideal for outdoor projects. Another option is polyurethane glue, which creates a strong bond between different materials and can fill gaps in the wood. However, it can be difficult to work with because it expands as it dries, and it requires moisture to cure properly. Epoxy glue is a versatile option that can be used for bonding wood, metal, and plastic. It dries to a strong and waterproof finish and can fill gaps in the wood. Additionally, cyanoacrylate glue, also known as superglue, can be used for smaller projects or for bonding non-porous surfaces. It dries quickly, but it may not be the best option for larger projects that require a strong and durable bond.
If you’re not sure which type of glue to choose, it’s always a good idea to consult with a professional or to do some research on the specific project you’re working on. Remember, using the right type of glue for the job can make all the difference in the final result.
Preparing the 2x4s
Before you can start gluing your 2x4s together, it’s important to properly prepare the wood. This will ensure that the glue adheres well and that your joint is strong.
Cut and Sand the 2x4s
First, measure and cut your 2x4s to the desired length. Use a saw to cut straight, even lines on the wood. Make sure both ends are flat and square so that they join together smoothly.
Next, sand the edges of the 2x4s that will be glued together. This will help remove any bumps or rough spots that could prevent the wood from adhering together tightly. It’s also a good idea to sand any other surfaces that will be glued if they are rough or uneven.
Clean the Wood
After sanding, wipe the 2x4s down with a clean, dry cloth to remove any dust or debris. You want the wood to be as clean as possible before applying the glue.
If the wood is particularly dirty or greasy, you may need to use a mild soap and water solution to clean it. Just be sure to dry the wood thoroughly before gluing so that the excess moisture doesn’t interfere with the glue’s bonding ability.
Arrange the 2x4s
Before applying the glue, it’s a good idea to do a dry fit of the 2x4s. This means placing the pieces together to ensure a proper fit and to make sure that any knots or imperfections are positioned in a way that won’t compromise the joint.
If any of the 2x4s are warped or twisted, you’ll need to find a way to straighten them before gluing. This could involve clamping them down and letting them sit for a period of time before continuing with the gluing process.
By preparing your 2x4s properly, you’ll set your project up for success. The glue will adhere well to sanded, clean wood that has been properly arranged, resulting in a strong joint. Now you’re ready to move on to the next step of the gluing process.
Applying the Glue
Once you’ve already selected the perfect glue for your 2x4s, it’s now time to learn the proper way of applying it. Applying the glue correctly is essential to achieve a strong bond that can last for years. This step is crucial in the process of gluing 2x4s together. So, let’s get started!
Applying Glue to Edge Joints
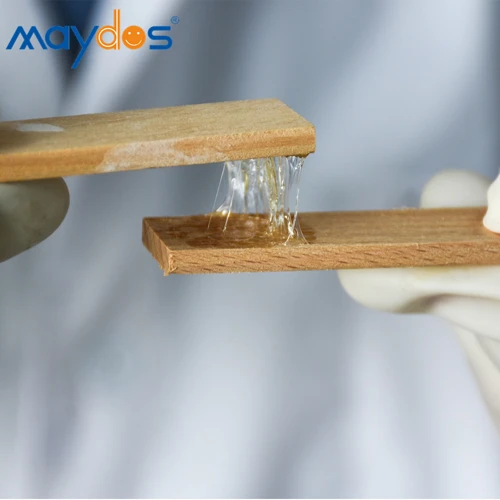
When applying glue to edge joints, there are a few important things to keep in mind to ensure a strong bond. First, it’s important to apply an even layer of glue to both surfaces that will be joined together. This can be done using a brush or a roller, depending on the size of the surfaces.
To help spread the glue evenly, use a finger or a putty knife to spread the glue in a uniform layer. This will ensure that there are no gaps between the two pieces of wood once they are clamped together.
It’s also important to use the correct type of glue for the job at hand. While wood glue is the most common choice for edge joints, it’s important to choose one that is appropriate for the type of wood you are using. For example, some wood glue is better suited for hardwoods, while others are better suited for softwoods.
Another important consideration is the clamping pressure. When clamping two pieces of wood together, you want to use enough pressure to ensure that the surfaces are firmly together, but not so much pressure that it squeezes all the glue out of the joint.
To help keep the joint aligned while clamping, use a square or a straightedge to ensure that the pieces are at a right angle to each other.
Here are some tips for applying glue to edge joints:
| Tips for Applying Glue to Edge Joints |
|---|
| Apply an even layer of glue to both surfaces |
| Use a finger or a putty knife to spread the glue |
| Choose the correct type of glue for the wood being used |
| Align the joint with a square or straightedge before clamping |
| Use enough clamping pressure to ensure a firm joint, but not so much that the glue is squeezed out |
By following these tips, you can ensure a strong bond between the two pieces of wood that will last for years to come.
Applying Glue to Face Joints
When gluing 2x4s together face-to-face, it’s essential to apply the glue evenly to ensure a solid bond. Follow these steps for applying glue to face joints:
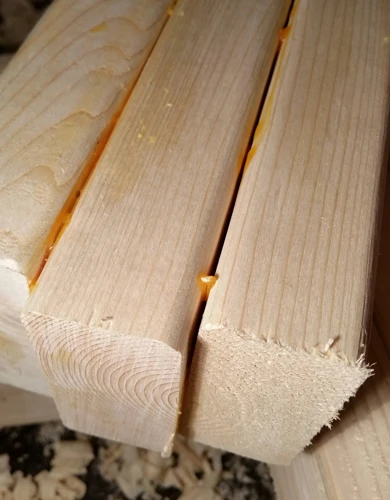
- Step 1: Apply a thin layer of glue to one of the 2×4’s broad faces using a glue roller. Be sure to apply an even coat of glue to the entire surface.
- Step 2: Once the first 2×4 is coated with glue, place the second 2×4 on top of it with the broad face aligned. Press the two pieces of wood together, using your hands to apply even pressure across the entire surface.
- Step 3: Squeeze out any excess glue that comes out from the sides of the joint to avoid a messy finish. Use a rag or a paper towel to wipe off the excess glue.
When clamped and left to dry, the two 2x4s will create a strong bond. Keep in mind that not all glues are suitable for all surfaces. Be sure to use a glue that will effectively bond the type of wood you are using.
Clamping the 2x4s
As you move on to the next step, it’s time to clamp the 2x4s together. This is a critical step in ensuring a strong and durable bond between the wood pieces. Without proper clamping, the glued joint may not hold up over time and can become weak or break. In this section, we’ll cover the different types of clamps you can use and techniques for clamping both edge joints and face joints. It’s important to choose the right type of clamp and use the correct technique to ensure the best possible results.
Choosing the Right Clamps
Strong and reliable clamps play an essential role in the success of gluing 2x4s together. When choosing the right clamps, it’s crucial to consider the size and shape of the joint, as well as the clamping pressure.
Choosing the Right Size Clamps: Clamps come in various sizes, ranging from small hand clamps to larger bar clamps. When gluing 2x4s together, it’s essential to choose a clamp size that matches the width and length of the boards. Additionally, it’s important to determine the number of clamps needed for the project. A general rule of thumb is to use one clamp for every 12 inches of the joint.
Choosing the Right Shape Clamps: Two types of clamps are commonly used when gluing 2x4s together- bar clamps and pipe clamps. Bar clamps feature a fixed and sliding jaw, ideal for edge gluing. Pipe clamps feature a stationary jaw and a clamping head that can slide along a pipe, suitable for clamping wider surfaces.
Clamping Pressure: Clamping pressure is essential for a strong and durable bond. When selecting your clamp, ensure that it has enough pressure to push the boards together firmly. It’s also important to note that too little or too much pressure can affect the quality of the glue joint. Generally, aim for a clamping pressure of 100-150 pounds per square inch.
To sum up, choosing the right clamps can make all the differences in the success of your project. Always choose the right size, shape and pressure needed to make sure that the bond is both strong and durable.
Clamping Techniques for Edge Joints
When it comes to clamping edge joints, there are a few techniques that you can use to ensure a strong and sturdy bond. Here are some of the most effective methods:
- Bar clamps: These long clamps are great for edge joints, as they can apply even pressure along the entire length of the joint. Place a clamp on each end of the joint, making sure that they are perpendicular to the joint and centered on the board. Tighten them slowly and evenly, checking to make sure the joint remains flat as you go.
- Pipe clamps: Similar to bar clamps, pipe clamps use pipe instead of a bar to apply pressure. They are more flexible in terms of length and can be easily customized to fit the size of your project. Use the same technique as with bar clamps, making sure to use protective pads to prevent damage to the wood.
- Band clamps: If you don’t have access to bar or pipe clamps, a band clamp can be a good alternative. These clamps consist of a nylon or rubber strap and a ratcheting mechanism for tightening. Wrap the strap tightly around the joint, making sure that it is centered and straight. Use the ratchet to tighten the strap until the joint is secure.
Remember to use protective pads between the clamp and the wood to prevent damage. You don’t want to have to sand out any clamp marks later on. Also, make sure to wipe away any excess glue that squeezes out of the joint before clamping.
Note: If you’re not sure whether to use wood glue or construction adhesive on your project, check out our article on what glue to use on speaker cone to help you make the right choice.
Clamping Techniques for Face Joints
When clamping face joints, the goal is to exert pressure on the glued surfaces to create a tight and secure bond. Start by applying a generous amount of glue to one of the faces and use a brush or roller to spread it evenly. Place the second 2×4 on top of the first one, making sure that the faces are flush with each other.
Clamping Method 1: Bar Clamps: Once the two 2x4s are positioned correctly, use bar clamps to secure them together. Place the clamps every 6 to 8 inches along the length of the joint, making sure that the clamps are applying equal pressure to the surface. Tighten the clamps until the glue begins to squeeze out along the entire joint.
Clamping Method 2: Pipe Clamps: Another option is to use pipe clamps, which are ideal for longer face joints. Lay the two glued 2x4s on a flat surface and place the pipe clamps around the joint every 12 to 18 inches. Make sure the clamps are positioned perpendicular to the joint, then tighten the clamps until you see glue begin to squeeze out along the entire length of the joint.
Clamping Method 3: Strap Clamps: Strap clamps are also a great option for face joints, as they can apply pressure evenly across a large surface area. Place the glued 2x4s on a flat surface and wrap the strap around the joint. Ensure that the tension is even and that the joint is flush. Tighten the strap until you see glue begin to squeeze out.
No matter which clamping method you choose, be sure to clean up any excess glue that squeezed out of the joint with a damp cloth. Leave the clamps in place for at least 24 hours to allow the glue to dry fully before moving or sanding the glued 2x4s.
If you’re interested in learning about other types of glue beyond those for woodworking, check out our article on what glue is better than E6000. Or, if you’re thinking about building a boat, you might find our article on how to build a stitch and glue kayak helpful.
Drying and Sanding the Glued 2x4s
After applying glue and clamping the 2x4s, the next step is to let them dry completely. Drying and sanding are crucial to ensure the strength and smoothness of the joints. The drying time will depend on the type of glue used and the environmental conditions. Once the 2x4s are completely dry, sanding the glued surface will create a flat and even joint. Let’s take a closer look at these steps to ensure a successful result.
Drying Time
After clamping your 2x4s together, it’s important to allow enough time for the glue to dry before removing the clamps. The length of time required for the glue to completely dry depends on the type of glue you used. Typically, wood glue takes anywhere from 30 minutes to 24 hours to fully dry, while construction adhesive can take up to 48 hours.
To ensure that the glue is completely dry, test it by applying pressure with your finger. If the glue is still wet, it will smear or come off on your finger. If it is dry, it will be hard and will not come off easily. Keep in mind that the drying time may be affected by the humidity and temperature of the environment.
It’s important not to rush the drying process. If 2x4s are removed from the clamps before the glue has fully dried, the joint may weaken and fail. Allow the glue to dry completely before moving on to the next step.
Once the glue is dry, it’s time to sand the glued surface to remove any excess glue or bumps. Sanding will also ensure that the surface is smooth and even. Use a fine-grit sandpaper and sand the surface in the direction of the grain.
Drying time is an important step in gluing 2x4s together. Don’t rush the process and make sure the glue is completely dry before moving on to the sanding step. If you need more information about different types of glue, you can read our article on what is RTV glue, how to glue metal to acrylic, or how to glue a countertop to a cabinet.
Sanding the Glued Surface
After the glue has dried, it’s time to sand the surface to make it smooth and even. Sanding is an important step to prepare it for staining or painting. Here are the steps to properly sand the glued 2×4 surface:
Step 1: Choose the right type of sandpaper for the job. If the glue residue is hard, use a coarser grit sandpaper. If the residue is light or there are no residues, a finer grit paper will suffice. Start with 80-grit sandpaper, and progress to 120-grit and 220-grit sandpapers for the smoothest finish.
Step 2: Remove any excess dried glue using a scraper or putty knife before sanding. This will prevent the sandpaper from clogging and creating uneven surfaces.
Step 3: Sand in the direction of the grain. This will prevent cross-grain scratches and uneven surfaces.
Step 4: Use a sanding block or power sander to evenly sand the surface. Be sure to apply even pressure and avoid sanding a specific area for too long.
Step 5: After sanding with the 80-grit paper, use the 120-grit paper to smooth out rough surfaces. Then, use the 220-grit paper for the final pass. The 220-grit paper will create a smooth and polished finish.
Step 6: After sanding, wipe the surface clean of any residue using mineral spirits or a damp cloth.
Remember that sanding is an essential step in the process of gluing 2x4s together. Failure to sand properly may lead to an uneven surface, making it difficult to paint or stain correctly. So take your time, use the correct sandpaper for the job, and sand in the direction of the grain for the best results.
Conclusion
After following the step-by-step guide on how to glue 2×4 together, you should have a strong and durable joint. It is important to remember that choosing the right glue and clamping technique is crucial for a successful project.
When it comes to choosing the right glue, wood glue is a popular choice due to its strong bond and ability to dry clear. However, if you need a more durable and weather-resistant bond, construction adhesive may be a better option.
Preparing the 2x4s is also an important step in ensuring a successful joint. Make sure to sand the surface to remove any rough spots or splinters. This will also help the glue adhere better to the surface.
When applying the glue, it is important to apply it evenly and in the right areas. For edge joints, apply the glue to both edges that will be joined together. For face joints, apply the glue to one of the faces.
Clamping the 2x4s is crucial for keeping the joint tight while the glue dries. Choosing the right clamps and applying them correctly is important. For edge joints, use bar clamps and apply them perpendicular to the joint. For face joints, use pipe clamps and apply them parallel to the joint.
After the glue has dried, remove the clamps and sand the surface to create a smooth and even finish. It is important to allow enough time for the glue to dry completely before sanding.
Overall, by following this step-by-step guide and taking the necessary precautions, you can successfully glue 2x4s together and create a strong joint for your project.
Frequently Asked Questions
What is the best type of glue for 2x4s?
The best type of glue for 2x4s is wood glue, specifically a polyurethane-based glue for its superior waterproofing properties.
What is the difference between wood glue and construction adhesive for 2x4s?
Wood glue is specifically designed for bonding wood together, while construction adhesive is formulated to bond a variety of materials and may not work as well on wood.
Can I use regular white glue for 2x4s?
No, regular white glue is not recommended for bonding 2x4s because it is not strong enough for heavier wood pieces and may not create a durable bond.
How do I prepare the 2x4s for gluing?
You should sand the mating surfaces of the 2x4s thoroughly to ensure they are clean and free of debris. You may also want to use a wood conditioner to help the glue bond better.
How do I apply glue to edge joints?
Apply a thin layer of glue to one of the mating surfaces and use a brush or roller to spread it evenly. Then press the surfaces together and clamp them in place.
How do I apply glue to face joints?
Place a line of glue along one of the mating surfaces and use a notched spreader to distribute it evenly. Then press the surfaces together and clamp them in place.
How long do I need to clamp the 2x4s?
The amount of time you need to clamp the 2x4s will depend on the type of glue you use. Typically, wood glue should be clamped for at least 30 minutes to an hour.
What is the best way to choose clamps for gluing 2x4s?
Choose clamps that are the appropriate size for the job, and make sure they can exert enough pressure to hold the joint together without damaging the wood.
What should I do if glue oozes out of the joint?
Wipe away any excess glue immediately with a damp cloth before it dries. If the glue has already dried, use a scraper or sandpaper to remove it.
How long do I need to let the glued 2x4s dry before using them?
The drying time for glue will depend on the type of glue you use. Generally, you should let the glue dry for at least 24 hours before using the glued 2x4s.