Introduction

Embarking on a new DIY project can be both exciting and daunting, especially when it comes to constructing something as intricate as a kayak. However, building your own stitch and glue kayak is not only enjoyable, but it also has several benefits. With this step-by-step guide, you’ll be able to confidently construct your own kayak and enjoy the fruits of your labor out on the water. So, let’s dive in and get started on your kayaking adventure!
Overview of Stitch and Glue Kayak Building
Stitch and glue kayak building is a method of constructing a kayak using plywood, fiberglass, and epoxy resin. It involves stitching together the plywood panels using wire ties or zip ties, then gluing them together with epoxy resin. This construction method is popular among both amateur and professional boat builders as it is cost-effective, requires minimal tools, and can be done in a home workshop.
The advantages of stitch and glue canoe building are:
| 1. Versatility | Can be built to a variety of shapes and sizes |
| 2. Lightweight | Due to the materials used, stitch and glue kayaks are typically lighter and therefore easier to maneuver and transport |
| 3. Customizable | Can be custom-built to fit the paddler’s personal preferences and needs, such as seat placement, footrests, and hatches |
| 4. Cost-Effective | As opposed to purchasing a ready-made kayak, building a stitch and glue kayak can save a lot of money while still providing a high-quality boat |
While there are many types of glue available, epoxy resin is the best option for stitch and glue kayak building due to its strength, durability, and water-resistant properties.
Taking the time to build your kayak using the stitch and glue method can make for a rewarding and satisfying experience. Plus, you’ll have the added benefit of being able to say that you built your own kayak.
Benefits of Building Your Own Kayak
Building your own kayak can be a rewarding experience, both in terms of the joy of paddling in a boat you made yourself, and the benefits it offers. Here are some of the benefits of building your own kayak:
| Benefits: | Explanation: |
|---|---|
| Cost-effective: | Building your own kayak can be more affordable than buying one from a store, especially if you have some of the materials and tools already. You can also customize your kayak to fit your specific needs without having to pay for additional features that you may not need. |
| Customizable: | When you build your own kayak, you have the opportunity to customize it to your specific needs. You can choose the size, shape, and features you want in your kayak, and even design it to fit your personal style. |
| Greater sense of satisfaction: | Building your own kayak can give you a sense of satisfaction that you may not get from simply purchasing a ready-made kayak. Watching your kayak come together step by step and then paddling in it can be an incredibly rewarding experience that you can be proud of. |
| Learning experience: | Building your own kayak is a great way to learn new skills and gain experience in woodworking, epoxy coating, and fiberglassing. These skills can be applied to other projects and hobbies, and can even save you money on repairs or modifications for your current kayaks. |
| Environmentally friendly: | Building your own kayak allows you to use materials and techniques that are eco-friendly and sustainable. You can use eco-friendly wood, recycled materials, and non-toxic glues and coatings, which is better for the environment than purchasing a kayak made from synthetic materials. |
Building your own kayak may seem daunting at first, but with a little patience and determination, it can be a very fulfilling and satisfying experience. Plus, with the option to customize your kayak to your own preferences and needs, you may end up with a kayak that’s even better than anything you can find in a store.
Preparing to Build Your Kayak
Before diving into the exciting process of building your own stitch and glue kayak, it’s crucial to properly prepare and gather all necessary tools and materials. Proper preparation will ensure a smooth building process and result in a high-quality finished product. Gathering all required tools and materials can be a daunting task, but fear not, we have compiled a comprehensive guide to help you. Additionally, preparing your workspace is equally important and can make a significant difference in the outcome of your project. Let’s dive into the details of how to prepare for building your kayak. For more information on the best glue for your project, check out What Type of Glue is Titebond 3?.
Gathering Materials and Tools
When gathering materials and tools for building a stitch and glue kayak, it’s essential to have everything you need before starting. This includes the following:
| Materials | Tools |
|---|---|
| Marine grade plywood sheets | Jigsaw or circular saw |
| Epoxy resin and hardener | Electric drill |
| Fiberglass cloth | Exterior paint (for finishing) |
| Wooden strips or battens for stitching | Heat gun (for shaping plywood) |
| Marine sealant or silicone glue | Clamps and screws |
| Sandpaper (various grits) | Ruler or measuring tape |
| Paint brushes and rollers | Protective gear (gloves, goggles, mask) |
It is important to choose marine grade plywood for the kayak frame, as regular plywood may not hold up to water exposure. Similarly, using high-quality epoxy resin and fiberglass cloth will ensure the kayak is durable and withstands the elements. For stitching the panels together, wooden strips or battens can be used, but some builders prefer to use copper wire.
When choosing epoxy resin and hardener, it’s important to follow the manufacturer’s instructions for mixing and application. If it’s necessary to thin the epoxy, it’s important to do so with the right solvent to avoid damaging the kayak. For example, thinning epoxy glue with acetone will cause it to dry out too quickly and crack.
It’s a good idea to wear protective gear throughout the project, especially when working with epoxy resin or using power tools. It’s also important to stay organized and keep a clean workspace to avoid any potential safety hazards. With the right materials and tools, building a stitch and glue kayak can be a fulfilling and rewarding project.
Getting Your Workspace Ready
Preparing your workspace is crucial to the success of your stitch and glue kayak building project. Here are some tips to get your workspace ready:
1. Choose a well-ventilated area
Make sure your workspace is well ventilated because epoxy fumes can be harmful to your health. Choose a location with proper ventilation, such as a garage, outdoor space, or a well-ventilated room.
2. Clean and organize your workspace
Keep your workspace clean and organized. A cluttered workspace can lead to accidents, so make sure your tools and materials are in their proper place. You don’t want to accidentally spill epoxy on your tools or workspace because of clutter.
3. Cover your workspace
Cover your workspace with a plastic sheet or drop cloth to protect the area from spills or drips. This will also make it easier to clean up afterward.
4. Prepare your tools
Make sure you have all the necessary tools on hand before you start building your kayak. Some of the essential tools you’ll need include a jigsaw, drill, sandpaper, clamps, and a heat gun. Check that all your tools are in good working condition and easily accessible.
5. Consider safety precautions
Wear appropriate safety gear, such as gloves and goggles, to protect yourself while working. Keep a fire extinguisher within reach because some of the materials used in kayak building are flammable.
By following these tips, you’ll get your workspace ready for your stitch and glue kayak building project. If you need to glue different materials together during this project, be sure to research the best type of glue to use. For example, if you need to glue plastic, check out what is the best super glue for plastic for guidance.
Creating the Kayak Frame

After gathering all the necessary materials and tools, it’s time to start building the frame of your stitch and glue kayak. This step involves cutting the plywood panels, stitching them together, adding the bulkheads and deck beams, and attaching the deck. The frame is the foundation of your kayak, so it’s important to take your time and ensure everything is done correctly. The next few sections will guide you through each step in detail, from cutting the panels to attaching the deck. With some patience and attention to detail, you’ll soon have a sturdy and reliable kayak that you can use for years to come. No need to glue stone to stone, starboard, or body repair panels for this step, but make sure to check out our guide on how to glue stainless steel if you need to attach certain hardware to your kayak.
Cutting the Plywood Panels
Cutting the Plywood Panels: Now that you have gathered all the necessary materials and tools, it’s time to start building your kayak. The first step is to cut the plywood panels to the right size and shape. You can buy pre-cut panels or cut them yourself using a jigsaw or circular saw. Make sure to double-check the measurements before cutting to avoid any mistakes. It’s important to choose the right type of plywood for your kayak. Marine-grade plywood is recommended as it is more resistant to water damage and rot.
To ensure accuracy, mark your cuts using a straightedge or T-square. Make sure to label each piece and keep track of its placement. This will help you during the assembly process and avoid confusion later on.
It’s also important to wear safety gear while cutting the panels. Safety goggles, ear protection, and a dust mask are highly recommended.
Link: If you are planning to attach stainless-steel hardware to your kayak, you may want to check out our article on how to glue stainless steel for helpful tips and tricks.
Stitching the Panels Together
Stitching the panels together is a crucial step in building your stitch and glue kayak. This is where you connect the individual panels of marine-grade plywood to form the unique shape of your boat.
To start, lay the panels on a flat surface and use clamps to hold them in place. Make sure the panels are flush against each other before drilling small holes along the edges of each panel. The holes should be evenly spaced, with about 4 inches between each hole.
Next, use wire or nylon zip ties to thread through the holes, pulling the panels tightly together. Knot the ties securely and trim any excess material.
Once the panels are stitched together, it’s time to apply epoxy to the seams. This will seal the panels together and create water-resistant seams. Make sure to wear protective gloves and properly ventilate your workspace when working with epoxy.
Apply a thin layer of epoxy to the seams using a small brush. Press fiberglass tape along the seam and brush more epoxy on top of the tape. Repeat this process until all the seams are covered with tape and epoxy.
To reinforce the seams even further, you can add another layer of fiberglass tape and epoxy. This will create a strong, durable connection between the panels.
Remember to check the manufacturer’s instructions for your particular brand of epoxy and fiberglass tape to ensure proper application and curing times.
Pro tip: If you notice any gaps between the panels, you can use thickened epoxy to fill them in before adding the fiberglass tape. This will help ensure a smooth, even surface for your kayak.
Once the epoxy has cured, you can remove the wire or zip ties and sand the seams smooth. With the panels stitched together and the seams sealed, your kayak is starting to take shape.
Continue to the next step, Adding the Bulkheads and Deck Beams, to further build out your stitch and glue kayak.
Adding the Bulkheads and Deck Beams
After stitching the plywood panels together, it’s time to add the bulkheads and deck beams to your stitch and glue kayak. These elements will provide extra support and rigidity to the structure of the kayak.
Here are the steps to add the bulkheads and deck beams:
- Step 1: Using a jigsaw or circular saw, cut the bulkhead and deck beam pieces to size according to your kayak’s design.
- Step 2: Sand the edges of the pieces smooth to ensure a snug fit against the inside of the kayak hull.
- Step 3: Place the bulkheads in their correct positions in the kayak hull, using strong tape to temporarily hold them in place. Make sure they are level and perpendicular to the hull.
- Step 4: Drill through the bulkheads and the hull, and use bolts to secure them together. Make sure to countersink the bolts so they do not interfere with the fiberglassing process.
- Step 5: Install the deck beams, which will run across the top of the kayak hull, perpendicular to the bulkheads. Again, use tape to temporarily hold them in place, and drill holes through both the beams and the hull. Secure everything together with bolts and washers.
- Step 6: Apply epoxy fillets to the joints between the bulkheads and deck beams, as well as any other joints where two pieces of wood meet. This will add more strength and stability to the structure of the kayak.
Adding the bulkheads and deck beams is an important step to ensure your stitch and glue kayak is sturdy and durable. However, it’s also important to use the right materials for the job. If you’re unsure which adhesive to use when attaching the bulkheads and deck beams, check out our guide on how to glue Starboard.
Attaching the Deck
Attaching the Deck is an essential step in building a stitch and glue kayak. It will ensure that the kayak stays watertight and will provide a stable base for the paddler. Here is a step-by-step guide on how to do it.
First, apply epoxy to the top of the bulkheads and deck beams using a small brush. Make sure to spread it evenly and get complete coverage on all the surfaces that will come into contact with the deck.
Next, place the deck on top of the bulkheads and deck beams and align it with the edges of the kayak. Make sure it is centered before you begin to stitch it in place.
Then, use a stitching technique to secure the deck to the bulkheads and deck beams. You can use a variation of the same stitch used on the hull, or you can use a different type of stitch that works better for the deck.
Once the deck is securely stitched in place, apply a fillet of epoxy along all the bulkheads and deck beams at the edge of the deck. This fillet will strengthen the bond and provide extra support for the deck.
Finally, place a piece of fiberglass tape along the fillet and smooth it down firmly into the epoxy. Use a small brush to make sure it is completely coated with epoxy to ensure it sticks well.
Tip: If you are new to stitching and gluing, it is recommended to practice on some scrap wood before attaching the deck to the kayak.
Following these steps will ensure that your kayak has a secure and watertight deck that will provide a stable base for the paddler. With attention to detail and careful work, you can confidently continue with the next steps in building your kayak.
To learn more about glueing fiberglass to different materials like metal, wood, or rubber, check out this guide on how to glue rubber to wood.
Adding the Fiberglass Layers
After completing the frame of your kayak, the next step is to add the fiberglass layers. Fiberglass coating gives your kayak additional strength and durability, making it able to withstand the rigors of the water. If you want your kayak to be more water-resistant, then fiberglass coating is also essential. In this section, we will guide you through the process of adding fiberglass coating to your stitch and glue kayak. You’ll learn about applying the epoxy coating, adding the first fiberglass layer, and sanding and adding the final fiberglass layer. So get ready to don your safety gear and let’s get started on this next exciting stage of the process. Before we start, let’s make sure all required materials and tools are ready, such as fiberglass cloth, epoxy resin, epoxy hardener, foam rollers, and foam brushes. If you need to prepare the surface beforehand, check out our guide on how to glue styrofoam to metal or learn how to glue body repair panels here.
Applying the Epoxy Coating
Before adding the fiberglass layers to your kayak, you’ll need to apply an epoxy coating to the plywood frame. The epoxy coating will protect the wood from moisture and give it a smooth surface for the fiberglass layers to adhere to. Follow these steps to apply the epoxy coating:
- Clean the Surface: Use a clean cloth or sponge to wipe down the entire surface of the kayak frame to remove any dust, debris, or oil that may be present. It’s important to have a clean surface to ensure proper adhesion of the epoxy coating.
- Mix the Epoxy: Follow the manufacturer’s instructions to mix the epoxy resin and hardener together. Be sure to mix thoroughly to ensure the epoxy cures properly.
- Apply the Epoxy: Use a brush or roller to apply the epoxy coating to the entire surface of the kayak frame, taking care to apply it evenly. Be sure to cover all edges and corners of the frame. Use a scraper to spread out any pooled epoxy to ensure a consistent coating.
- Allow to Dry: After applying the epoxy coating, allow it to dry for the recommended time before adding the fiberglass layers. This time can vary depending on temperature and humidity, so refer to the manufacturer’s instructions for guidance.
- Sand the Surface: Once the epoxy coating is dry, use sandpaper to sand the surface until it is smooth and even. This will ensure the fiberglass layers adhere properly.
By properly applying the epoxy coating to your kayak frame, you’ll be one step closer to a strong and durable finished product. Don’t rush this step and be sure to follow the manufacturer’s instructions for best results.
Adding the First Fiberglass Layer
Once the epoxy coating has dried, it’s time to start adding the fiberglass layers to your kayak. Here’s what you need to do to add the first fiberglass layer:
- Prepare the Fiberglass Cloth: First, cut the fiberglass cloth so that it is slightly larger than the section of the kayak you’ll be working on. Then, lay it flat on a clean surface and smooth out any wrinkles or folds.
- Mix the Epoxy Resin: Follow the manufacturer’s instructions to mix a new batch of epoxy resin. Typically this involves mixing two parts epoxy to one part hardener. Stir thoroughly to ensure the two parts are evenly combined.
- Apply the Epoxy Resin: Using a paintbrush or roller, apply a layer of epoxy resin to the area where you’ll be adding the fiberglass cloth. Ensure that you apply enough epoxy so that the cloth will adhere properly.
- Place the Fiberglass Cloth: Carefully lay the fiberglass cloth on top of the epoxy-coated area. Use your hands to smooth out any wrinkles or air pockets, and ensure that the cloth is centered over the section you’re working on.
- Coat with Epoxy Resin: Once the fiberglass cloth is in place, use a paintbrush or roller to apply another layer of epoxy resin over the top. Work from the center of the cloth outwards, saturating the cloth with the epoxy resin. You want to ensure that the cloth is completely coated with the resin, but not so much that it is dripping or sagging.
- Repeat as Necessary: Depending on the size of your kayak, you may need to add multiple layers of fiberglass cloth. If so, repeat the process for each layer, ensuring that each layer is properly coated and centered on the section you’re working on.
Keep in mind that it’s important to work carefully when adding the fiberglass layers to your kayak. Any air pockets or wrinkles in the cloth can cause problems later on, so take your time and focus on doing the job right. Once you’ve added the first layer of fiberglass, it’s time to move on to sanding and adding the second layer.
Sanding and Adding the Second Fiberglass Layer
Once you have applied the first layer of fiberglass, it’s time to move onto the next step: sanding and adding the second layer. Here’s how to do it:
- Sand the first layer: Before applying the second layer of fiberglass, you need to make sure the first layer is completely smooth. Use a fine-grit sandpaper to sand down any bumps or rough spots. Wipe down the kayak with a damp cloth to remove any dust or debris.
- Cut the fiberglass: Measure and cut the second layer of fiberglass cloth. Make sure it’s slightly larger than the first layer so that it fully overlaps.
- Apply the epoxy: Mix a new batch of epoxy and apply it to the kayak with a brush. Make sure to cover the entire surface of the kayak that will be covered by the second layer of fiberglass.
- Apply the fiberglass: Lay the second layer of fiberglass over the epoxy and smooth out any wrinkles or air pockets. Use a brush to apply more epoxy over the fiberglass and make sure it’s completely saturated.
- Smooth out the fiberglass: Use a squeegee to smooth out any excess epoxy and ensure the fiberglass is fully bonded to the first layer. If you notice any air pockets or bubbles, use a brush to push out the air and smooth them down.
- Sand the second layer: Allow the second layer of fiberglass to cure for at least 24 hours. Once it’s fully set, use a fine-grit sandpaper to sand any rough spots or bumps. Make sure the surface is smooth and even.
- Repeat: If you want added durability, you can repeat this process and add a third or fourth layer of fiberglass. Just make sure to sand and apply epoxy between each layer.
Remember, taking your time and being thorough during this process will ensure your kayak is strong and durable. Don’t rush the sanding process and make sure each layer of fiberglass is fully saturated with epoxy. With careful attention and a steady hand, your kayak will soon be ready for the finishing touches!
Finishing Your Kayak
As you near the end of your stitch-and-glue kayak building journey, it’s time to focus on finishing touches that will make your kayak truly shine. This is the point where you’ll be sanding and smoothing, adding a final layer of epoxy, and attaching essential components like the seat, deck lines, and hatch covers to make your kayak fully functional. With careful attention to detail and a touch of creativity, your kayak will be ready for its first adventure on the water!
Sanding and Smoothing the Kayak
After adding the final fiberglass layer to your stitched and glued kayak, it’s time to focus on sanding and smoothing the surface. This task is crucial since it will determine the appearance and overall quality of your finished product.
Materials and tools:
To sand and smooth the kayak, you’ll need the following materials and tools:
| Materials | Tools |
|---|---|
| Sanding paper (80 and 120 grit) | Sanding block |
| Rubber squeegee or plastic spatula | Electric sander (optional) |
| Clean water | Bucket |
| Detergent | Sponge |
| Masking tape | Sharp knife |
Sanding process:
1. First, remove any excess resin or fiberglass from the surface using a rubber squeegee or plastic spatula. Be careful not to apply too much pressure, as this could damage the surface of the kayak.
2. Begin sanding the epoxy coating with 80 grit sandpaper. Sand the entire surface of the kayak, including the edges, to remove any bumps, runs, or protruding fibers.
3. Sand the surface again with 120 grit sandpaper to further smooth the surface.
4. Once the initial sanding is complete, rinse the kayak with clean water and detergent to remove any debris left on the surface.
5. Allow the kayak to dry completely before proceeding.
6. Apply masking tape around the edges of the kayak to protect them from any accidental scratches during sanding.
7. Repeat the sanding process with 120 grit sandpaper, this time using a sanding block to ensure an even surface.
8. After sanding, clean the surface of the kayak with a damp sponge and allow it to dry before applying any finishing touches.
Smoothing process:
1. Inspect the surface of the kayak for any pinholes or depressions. These will need to be filled before smoothing the surface.
2. Prepare a small amount of epoxy and apply it to the depressions using a plastic spatula or knife.
3. Allow the epoxy to dry completely.
4. Sand the filled depressions with 120 grit sandpaper until they are level with the surrounding surface.
5. Finally, sand the entire surface of the kayak once more with 120 grit sandpaper to achieve a smooth surface.
By following these steps, you can ensure that your stitched and glued kayak has a smooth and polished finish that will be both visually appealing and functional on the water.
Adding the Finishing Touches: Seat, Deck Lines, and Hatch Covers
After adding the fiberglass layers, your kayak is almost complete. But before you can hit the water, you need to add a few finishing touches that will make your kayak more comfortable and functional. Here are the final steps to finish your stitch and glue kayak build:
1. Installing the Seat: The first finishing touch is to install the seat. You can purchase a pre-made kayak seat or make one yourself using foam and fabric. To install the seat, measure the center point of your kayak and attach the seat using bolts.
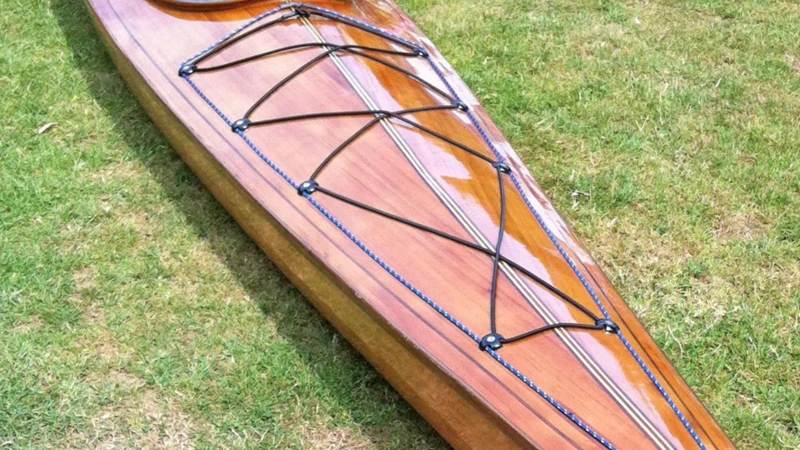
2. Adding Deck Lines: Deck lines are a vital safety feature that allows you to grab onto your kayak if it capsizes. To install them, drill holes in the sides of your kayak and thread a rope through the holes. Tie the ends of the rope to the bow and stern handles for added stability.
3. Installing Hatch Covers: If you plan to use your kayak for long trips, you’ll want to add hatch covers to keep your gear dry. To install them, cut a hole in the deck where you want the hatch to go and attach it using screws. Be sure to seal any gaps with marine sealant to prevent water from getting in.
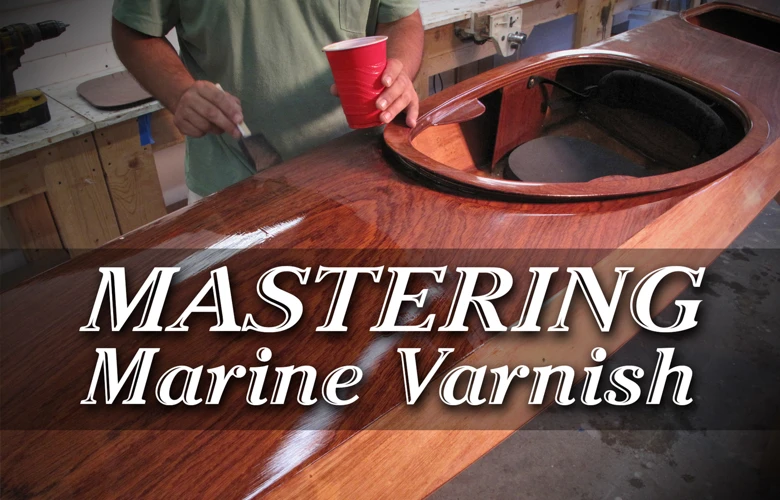
4. Painting or Varnishing: Once your kayak is finished, you’ll want to add a protective layer of paint or varnish to protect the wood and fiberglass from the elements. Use marine-grade paint or varnish and follow the manufacturer’s instructions carefully.
5. Adding Final Touches: Finally, add any custom touches to make your kayak unique. This may include adding decals, personalizing your paddles, or adding a compass or GPS.
By following these steps, you’ll have a beautiful and functional stitch and glue kayak that you can be proud of. Once you’ve completed the finishing touches, take your kayak out for a test run to make sure everything is working properly. With a bit of care and maintenance, your kayak will provide you with many exciting adventures on the water.
Troubleshooting and Common Mistakes
While building your own stitch and glue kayak can be a rewarding experience, it can also come with its fair share of challenges and setbacks. It’s important to be prepared to troubleshoot any issues that may arise during the building process, as well as learn from common mistakes that others have made. In this section, we will discuss some troubleshooting tips and common mistakes to watch out for when building your own stitch and glue kayak. By being aware of these potential pitfalls, you’ll be better equipped to navigate any bumps in the road and end up with a beautiful, functional kayak at the end of the process.
Identifying and Fixing Problems
When building a stitch and glue kayak, problems can arise at any stage of the process. Below is a table of some common issues that may occur during the building process and possible solutions to fix them:
| Problem | Solution |
|---|---|
| Uneven Panels | If the panels aren’t lining up properly, try double-checking your measurements. You may need to trim the edges to make them fit together. If the problem persists, consider using wooden battens to align the panels. |
| Inconsistent Fillet Thickness | If you notice that your fillets are uneven in thickness, try using a different application tool. You might also need to add more epoxy in some areas and/or sand down other fillets to create a smooth and even surface. |
| Bulges or Dents in the Fiberglass | If you see bulges or dents in the fiberglass, there may be an issue with the epoxy coating or application process. Sand the affected area down to the fiberglass, and apply a new layer of epoxy and fiberglass to even out the surface. |
| Voids in the Epoxy Coating | If you notice small air pockets or holes in the epoxy coating, use a small brush to apply additional epoxy to fill in the voids. Be sure to sand the area first for proper adhesion. |
It’s important to note that while these are common issues, they may not necessarily be the only ones you encounter. When facing a problem not listed above, try to analyze the issue logically, and think about what may be causing it. With some patience and problem-solving skills, you can overcome any obstacles that arise while building your stitch and glue kayak.
Avoiding Common Mistakes
It is crucial to avoid common mistakes when building your stitch and glue kayak, as they can negatively impact the kayak’s functionality and durability. Here are some common mistakes to avoid:
- Skipping or Rushing Steps: Take your time with each step of the process. Skipping or rushing steps can compromise the structural integrity of your kayak. Make sure you thoroughly understand the instructions and have all the necessary materials before starting each step.
- Using the Wrong Materials: Make sure to use the recommended materials for your kayak’s design. Substituting materials can alter the kayak’s weight, buoyancy, and strength.
- Not Sanding Enough: Sanding is a crucial step in ensuring a smooth surface for your kayak. Failing to sand enough can lead to rough patches and can compromise the effectiveness of the fiberglass coating.
- Improper Epoxy Mixing: Make sure to follow the instructions for mixing the epoxy resin precisely. Improper mixing can lead to weak spots or improper bonding of the fiberglass layers.
- Not Wearing Protective Gear: It is essential to wear protective gear such as gloves, eye protection, and a mask to avoid inhaling harmful fumes and chemicals during the building process.
By avoiding these common mistakes and paying attention to detail, you can ensure your stitch and glue kayak is structurally sound and built to last. Take your time, follow the instructions carefully, and use the recommended materials to avoid compromising the kayak’s performance or longevity.
Conclusion
As with any DIY project, building a stitch and glue kayak can be both rewarding and challenging. However, with the right guidance and a willingness to learn, constructing your own kayak can be a fulfilling experience that results in a high-quality, custom watercraft. In this final section, we’ll go over some key takeaways and final thoughts for those who have completed their kayak building journey or are considering embarking on one. So, let’s dive in and discover what lies ahead for you and your newly-built kayak!
Enjoying Your Newly-Built Kayak
After putting in the time and effort to build your own stitch and glue kayak, it’s time to finally enjoy the fruits of your labor. Here are a few tips for getting the most out of your newly-built kayak:
| Tips for Enjoying Your Kayak | Description |
|---|---|
| Choose the Right Location | Consider the water conditions, accessibility, and any boating regulations in the area. Look for calm waters to start with, and gradually work your way up to more challenging conditions as you become more confident in your skills. |
| Proper Safety Gear | Always wear a personal flotation device (PFD) and bring a whistle or other signaling device in case of emergency. Dress appropriately for the weather and water temperature. |
| Take it Slow | Don’t rush into trying advanced kayaking techniques or exploring rough waters. Start with short paddles close to shore, and gradually work your way up to longer trips and more challenging conditions. |
| Practice Your Skills | Take a kayaking course or practice your skills in calm waters before attempting more difficult conditions. Learn proper paddling technique, rescues, and safety procedures. |
| Explore and Have Fun | One of the biggest benefits of owning a kayak is the ability to explore new places and enjoy the beauty of nature from a unique perspective. Take advantage of your new hobby and enjoy the ride! |
Remember to always prioritize safety and take things slow when first starting out. As you gain more experience and confidence, you can gradually work your way up to more challenging adventures. Enjoy your new stitch and glue kayak and all the adventures it will bring!
DIY Kayak Building: Final Thoughts
As we wrap up our step-by-step guide to building a stitch and glue kayak, let’s reflect on the benefits of DIY kayak building.
- Satisfaction: There’s a sense of pride and accomplishment that comes with building your own kayak from scratch. It’s a unique feeling knowing that you created something useful and beautiful with your own hands.
- Customization: When you build your own kayak, you have complete control over the design and customization. You can choose the colors, type of wood, and even the shape to fit your personal preferences.
- Cost-effective: While buying a kayak from the store can be expensive, building your own kayak can be cost-effective especially if you already have some of the materials and tools needed.
- Educational: Building your own kayak can also be a learning experience. You can gain knowledge about different types of materials, tools, and techniques used in boat building.
- Fulfilling: Building a stitch and glue kayak can be a fulfilling experience that brings you closer to nature. There’s nothing like exploring the water in a kayak you built yourself.
So, if you have a love for the water and adventure, and enjoy DIY projects, building a stitch and glue kayak may be the perfect activity for you. With some time and patience, you can create a unique, custom kayak that provides a lifetime of enjoyment on the water.
Frequently Asked Questions
What type of plywood should I use for building a stitch and glue kayak?
You should use marine-grade plywood, which is specifically designed for use in watercraft and is more resistant to water damage and rot than regular plywood.
Do I need any special tools for building a stitch and glue kayak?
While there are some specialized tools that you may need, such as a jigsaw and a power planer, most of the tools required are basic and can be found in most home workshops.
How long does it typically take to build a stitch and glue kayak?
The amount of time it will take to build a stitch and glue kayak can vary depending on a number of factors including your level of experience, the size of the kayak, and the amount of time you are able to dedicate to the project. Generally, it can take anywhere from 50-100 hours to build a kayak.
Is building a stitch and glue kayak difficult?
Building a stitch and glue kayak can be challenging, but it is a project that can be accomplished by people with varying levels of experience in woodworking. The most important factor is taking the time to carefully follow instructions and take proper safety precautions.
Do I need to have a lot of woodworking experience to build a stitch and glue kayak?
While some woodworking experience is helpful, it is not necessarily required. There are many detailed step-by-step instructions available online and in books that can guide you through the process, even if you are a novice woodworker.
Can I customize the design of my stitch and glue kayak?
Yes, you can customize the design of your stitch and glue kayak based on your preferences and needs. You can adjust the size, shape, and features to create a kayak that fits your unique needs and preferences.
How much does it cost to build a stitch and glue kayak?
The cost of building a stitch and glue kayak can vary greatly depending on the size of the kayak, the materials used, and the tools required. In general, the cost can range from a few hundred to a few thousand dollars.
Is it safe to use a stitch and glue kayak for recreational purposes?
Yes, stitch and glue kayaks are safe to use for recreational purposes as long as they are constructed properly and you follow proper safety precautions while using them.
How can I ensure that my stitch and glue kayak is seaworthy?
To ensure that your stitch and glue kayak is seaworthy, you should follow manufacturer specifications when building the kayak and regularly inspect it for signs of wear and tear. It is also important to follow proper safety protocols while using the kayak and to never use it in conditions that exceed its capabilities.
Can I transport my stitch and glue kayak on a car roof rack?
Yes, stitch and glue kayaks can be transported on a car roof rack. However, it is important to take proper safety precautions when doing so and to follow manufacturer guidelines for proper transportation.