Introduction

Are you looking for a creative way to transform your walls or furniture? Stenciling with a roller can be a fun and easy way to add pattern and design to any surface. With a little bit of patience and the right materials, you can create a unique look that will impress your friends and family. In this comprehensive guide, we will take you through each step of the stenciling process using a roller. From preparing the surface to removing the stencil and cleaning up, you will learn all the tips and tricks to achieve a professional-looking finish. So let’s get started!
What is Stenciling and Why Choose a Roller
To begin with, stenciling is the process of adding decorative patterns or designs to a surface, using a pre-made template or stencil. This technique is widely used in wall painting, furniture redesigning, and many other DIY projects. Stenciling allows you to achieve precise and repeatable results, even if you have no prior experience in painting or drawing.
One of the main reasons to choose a roller for stenciling is that it saves time and effort. Unlike a brush, a roller covers a large area quickly and evenly, without leaving brush marks or streaks. Rollers can achieve a smoother and more consistent finish, especially on flat or gently textured surfaces.
However, not all rollers are suitable for stenciling. To get the best results, you should choose the right roller for the job. For instance, if you are using thick or textured paint, you might need a heavy-duty roller with a thicker nap. Conversely, if you are applying a thin or light-colored paint, you should opt for a roller with a shorter nap and a smoother surface.
Another important factor to consider is the roller cover. Roller covers come in different materials, such as synthetic or natural fibers, foam, or microfiber. Each type of cover has its own advantages and disadvantages in terms of paint coverage and roller loading. For stenciling, you should choose a cover that is dense enough to fill the stencil edges, but not too thick to distort the pattern.
When it comes to the actual stenciling process, rollers offer several painting techniques and pattern depth. For example, you can blend colors by rolling over wet paint or adding layers of different shades. You can also create 3D effects by using different roller sizes or angles.
However, stenciling with a roller also requires some practice and attention to detail. You should avoid common mistakes, such as overloading the roller or applying too much pressure. You should also use the “W” technique for optimal coverage and avoid overlapping areas.
Stenciling with a roller can be a fun and rewarding way to add personality and charm to your walls, furniture, fabrics, or artwork. With the right materials, techniques, and maintenance, you can achieve professional-looking results and unleash your creativity.
Materials Needed
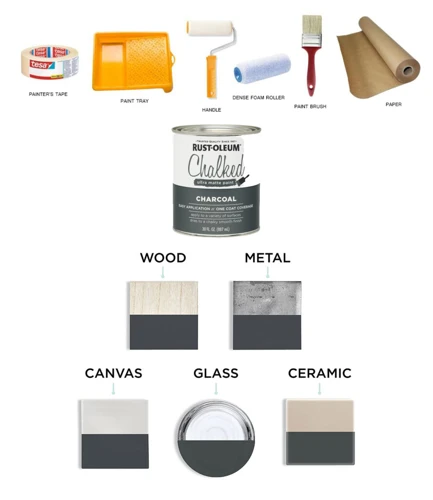
Now that you have a basic understanding of stenciling with a roller, it’s time to gather the necessary materials. Before starting your project, make sure you have the essential tools to ensure a successful outcome. These items include paint and roller types, a stencil and tape, dabbing cloth and water, and more. Choosing the right materials can make all the difference when it comes to achieving a professional look. To learn more about each of these materials and how to choose the right ones, continue reading below. And, if you’re curious about how to clean and maintain your rollers, be sure to check out our guide to cleaning and maintaining rollers. Additionally, keep in mind our previous article on coverage and the W-technique.
Paint and Roller Types
When it comes to stenciling with a roller, choosing the right paint and roller type is crucial to achieving the desired results. It’s important to keep the surface material in mind when selecting your paint and roller. Here are some factors to consider:
| Paint Type | Features |
|---|---|
| Acrlyic Paint | Water-based, dries fast, and easy to clean up with water. Ideal for most surface types, including paper, wood, and walls. |
| Oil-based Paint | Durable and long-lasting, but brushes and rollers must be cleaned with solvents. Ideal for surfaces like metal and plastic that need extra protection from weather and elements. |
| Spray Paint | Easy to apply and can quickly cover large areas. Ideal for outdoor projects like stenciling on concrete or brick walls. |
When it comes to choosing the right roller, keep in mind the texture and density of the surface you will be painting on.
| Roller Type | Features |
|---|---|
| Foam Rollers | Smooth finish and can be used on any surface. Perfect for smooth walls, ceilings, and furniture. |
| Microfiber Rollers | Great for textured surfaces like stucco or brick, as they can penetrate crevices and provide an even coverage. Can be used for both interior and exterior painting projects. |
| Flock Rollers | Holds more paint than other roller types and can be used for stenciling. However, they tend to leave a textured finish, so they are more suitable for rough or uneven surfaces. |
Keeping in mind the surface and the roller texture can help in selecting the right roller for your stenciling project. Remember to test your roller on a small area before starting the entire project.
Stencil and Tape
When it comes to stenciling with a roller, having the right materials on hand is crucial. One of the most important materials you’ll need is a stencil. A stencil is a pre-cut design that you’ll use as a guide to apply your paint. There are many different types of stencils available, from simple geometric shapes to intricate designs.
When choosing a stencil, it’s important to consider the size of the design and the size of the roller you’ll be using. Larger designs may require larger rollers to ensure even coverage, while smaller designs may work better with smaller rollers. Additionally, consider the material the stencil is made from. Plastic stencils are durable and easy to clean, while paper stencils may not be as durable but can provide a more precise edge.
Tape is another essential material when stenciling with a roller. You’ll need to use tape to secure the stencil to your surface and prevent any bleeding or smudging. Painter’s tape is a great option because it’s easy to remove and won’t damage your surface. Be sure to tape all edges of the stencil securely, making sure there are no gaps or areas where paint could seep through.
Once you have your stencil and tape, you’re ready to move on to the next step in the stenciling process: prepping the surface.
Dabbing Cloth and Water
When it comes to stenciling with rollers, it is important to have a dabbing cloth and water on hand. Here’s why:
1. Dabbing Cloth: A dabbing cloth is a piece of cloth, preferably microfiber, that is used to remove excess paint from the roller. This is crucial because using too much paint can cause it to seep under the stencil and ruin the design. The dabbing cloth should be slightly damp so that it can easily pick up any extra paint without smudging the design.
2. Water: Water is used to clean the roller between each layer of paint. This is important because any dried or excess paint on the roller can cause the design to become distorted or messy. Simply dip the roller in water and roll it on a clean cloth to remove any paint residue. It’s also a good idea to wipe the stencil with a damp cloth to remove any paint splatters.
Remember, using a dabbing cloth and water are small but important steps in achieving a clean and crisp stenciled design. Without them, your project may not turn out as expected.
Prepping the Surface
Before you begin stenciling your chosen surface, it’s important to prepare it properly. Not only will this help the stencil adhere better and produce clean lines, but it will also ensure that the final product looks professional and polished. So, grab your cleaning supplies and positioning tape, and let’s get started on prepping the surface.
Cleaning the Surface
Before you begin stenciling with a roller, it’s important to ensure that the surface you’ll be working on is clean and smooth. This will help prevent any bumps or debris from interfering with the paint and stencil. Here are the steps to follow when cleaning the surface:
- Gather your materials: Before you start cleaning, make sure you have all the necessary materials. This includes a mild detergent, warm water, and a clean cloth.
- Dust the surface: Use a soft bristle brush or a lint-free cloth to dust off any loose debris or dirt from the surface. This will prevent the dirt from getting stuck in the paint or stencil.
- Prepare the cleaning solution: Mix a small amount of mild detergent with warm water in a bucket or container.
- Scrub the surface: Use a clean cloth or sponge to gently scrub the surface with the cleaning solution. Make sure to work in small sections and rinse the cloth frequently to avoid spreading dirt or residue.
- Rinse the surface: Once you’ve scrubbed the entire surface, rinse it thoroughly with clean water. Use a clean cloth or sponge to remove any leftover soap or residue.
- Dry the surface: Allow the surface to air dry completely or use a clean, dry cloth to dry it off. Make sure the surface is completely dry before proceeding to the next step.
By taking the time to properly clean the surface, you’ll ensure that the stencil adheres properly and the paint goes on smoothly. This will also help prevent any unwanted smudging or bleeding.
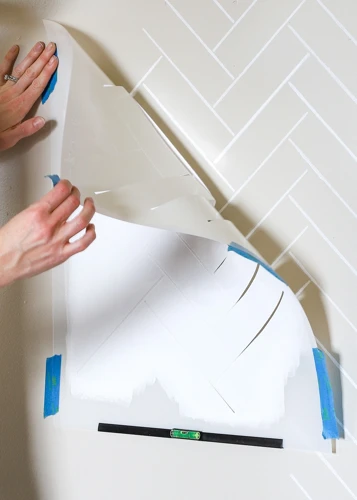
Taping and Positioning the Stencil
One important step in preparing for stenciling with a roller is properly taping and positioning the stencil on the surface. This step is crucial for achieving a clean and professional-looking stencil design. Here are the key points to keep in mind:
| Step 1: | Choose the location on the surface where you want to apply the stencil. Make sure the surface is clean and dry. |
| Step 2: | Place the stencil on the surface and make sure it is flat and even. Tape the edges of the stencil to the surface using painter’s tape. This will hold the stencil in place and prevent any paint from seeping under the edges of the stencil. |
| Step 3: | If your stencil has multiple layers or sections, you will need to align each section carefully. Use a ruler or measuring tape to ensure that each section is aligned correctly. Tape the sections down as you go along to hold them in place. |
| Step 4: | Once the stencil is properly positioned and taped down, use additional painter’s tape to cover any areas of the surface that you do not want to paint. This will prevent accidental drips or smudges on other parts of the surface. |
By taking the time to properly tape and position your stencil, you will be setting yourself up for success when it comes to rolling the paint onto the surface. A well-positioned stencil will result in a clean and crisp stencil design that you can be proud of.
Rolling the Paint
Now that you have prepped the surface and positioned the stencil, it’s time to start adding some color to your stencil design. With the help of a roller, stenciling becomes much easier and less time-consuming compared to using a brush. Additionally, due to the flat surface of the roller, it provides even coverage without any streaks. Keep reading to learn step-by-step instructions on how to expertly use a roller for stenciling.
Rolling the First Layer of Paint
Before starting to roll the first layer of paint, you should always ensure that your stencil is firmly secured in place with tape. Once you have confirmed this, it’s time to apply the paint to the roller.
Step 1: Begin by pouring your chosen paint color onto a tray or palette. Ensure that you do not overload the roller with paint, as this can lead to drips or smudging.
Step 2: Dip the roller into the paint and roll it back and forth on the tray or palette until it is evenly coated with paint.
Step 3: Roll the paint onto the stencil using gentle pressure, ensuring that you cover all the areas within the stencil. Be sure to roll in different directions to ensure even coverage.
Step 4: Once you have finished applying the first layer of paint, carefully lift the stencil away from the surface, being mindful not to smudge the design.
Step 5: Allow the first layer to dry completely before applying additional layers of paint. This will prevent any smudging or blending of colors.
Step 6: If desired, you can add additional layers of paint to create depth, shading and texture. For a blended effect, create a custom mix of colors and apply them lightly to the roller before rolling onto the stencil.
By following these steps, you can successfully roll the first layer of paint onto your stencil, creating a beautiful and professional finish for your project.
Adding Additional Layers and Blending Colors
Once you have rolled the first layer of paint onto your stencil, you’ll want to add some additional layers to create a bold, eye-catching design. It’s important to make sure that each layer is properly dried before adding another. You can speed up the drying process by using a hair dryer set to the lowest setting, but be careful not to blow the paint around or dislodge the stencil.
When adding additional layers, don’t be afraid to blend colors together for a unique look. You can blend colors by layering one color on top of another while the first layer is still wet, or by letting one color dry completely and then layering another on top.
Make sure to keep the roller evenly coated with paint and apply pressure evenly as you roll over the stencil to avoid any patchiness or uneven coverage. It’s also important to avoid pushing too hard on the roller, as this can cause the paint to seep beneath the stencil and blur the design.
Once you have finished adding layers and blending colors, let the paint dry completely before removing the stencil.
Removing the Stencil
Once you’ve finished stenciling, it’s important to remove the stencil carefully to avoid any smudging or accidental smears. Begin by spraying a light mist of water over the entire stencil using a clean spray bottle. This will help to loosen the stencil from the surface and prevent any paint from sticking to it.
Next, carefully peel back the stencil from one corner, pulling it away slowly to avoid any tearing or bending. Use a pair of tweezers or a toothpick to gently lift any areas of the stencil that may still be stuck to the surface, taking care not to damage the design or any underlying layers of paint.
Once you’ve removed the stencil, take a step back and admire your work. If any touchups are needed or if you wish to add any additional layers of paint or colors, now is the time to do so. Allow the paint to dry completely before making any further adjustments.
If you plan on using the stencil again, take care to clean it thoroughly by rinsing it with warm water and mild soap. Gently blot the stencil dry with a clean towel or cloth and hang it to dry completely before storing it in a safe place.
Properly removing and caring for your stencil will ensure that it lasts for many future stenciling projects to come.
Clean-Up and Maintenance
As fun and satisfying as stenciling with a roller can be, one thing that can quickly put a damper on the experience is the cleanup. However, it’s important to properly clean and maintain your materials to ensure their longevity and to make future projects even more enjoyable. In this section, we’ll walk you through some tips and tricks for cleaning your stencil and roller, as well as proper storage techniques. So, roll up those sleeves and let’s dive in!
Cleaning the Stencil and Roller
Keeping your stencil and roller clean is crucial for maintaining their longevity and ensuring consistently great results. Below is a step-by-step guide on how to clean your stencil and roller after a stenciling project.
| Steps | Materials Needed |
|---|---|
| Step 1: Remove Excess Paint | – Dabbing cloth or paper towel – Water |
| Step 2: Rinse with Water | – Water – Sink |
| Step 3: Clean with Soap | – Soap – Sponge or soft brush – Water |
| Step 4: Rinse with Water | – Water – Sink |
| Step 5: Dry and Store | – Towel or paper towel – Clean, dry area |
Step 1: Remove Excess Paint
After you’ve finished a stenciling project, use a dabbing cloth or paper towel to remove any excess paint from the stencil and roller. Dip the cloth or towel in water and gently dab at the roller and stencil until most of the paint comes off.
Step 2: Rinse with Water
Next, hold the stencil and roller under running water in a sink. Make sure to rinse off all remaining paint from the stencil and roller. Use your fingers or a soft-bristled brush to gently scrub any stubborn areas of dried paint.
Step 3: Clean with Soap
Squeeze a small amount of soap onto a sponge or soft brush and lather it up with water. Gently scrub the stencil and roller with the soapy sponge, making sure to remove any remaining paint. Rinse the stencil and roller under running water to remove any soap residue.
Step 4: Rinse with Water
Again, rinse the stencil and roller with running water until all soap residue is removed. This will ensure that no leftover soap gets onto your next project.
Step 5: Dry and Store
Finally, pat the stencil and roller dry with a towel or paper towel. Make sure they are completely dry before storing them in a clean, dry area. This will help prevent any mold or mildew from forming on the stencil or roller.
Storing Your Materials
Proper storage of your stenciling materials is crucial to ensure they last for future projects.
Here are some tips on how to store your materials:
- Paint and Roller: Store your leftover paint in an air-tight container to prevent it from drying out. When storing your roller, wrap it in plastic wrap or a plastic bag to keep it from drying out.
- Stencil: Place your stencil in a folder or envelope to protect it from dust and moisture. Avoid folding the stencil to prevent creases.
- Tape: Keep your tape in a dry, cool place to avoid melting or sticking together.
- Dabbing cloth and Water: Wash your dabbing cloth after every use and store it in a clean, dry place. Store your water in a container with a lid to prevent it from spilling.
Remember to check your materials periodically to make sure they are still in good condition for future use. Proper storage will help you save time and money by avoiding the need to replace materials for your next stenciling project.
Conclusion
After following this step-by-step guide, you should now have a beautifully stenciled room that you can be proud of. Using a roller to stencil is an easy and fun way to add some unique flair to any space.
Remember to take your time and not rush through any of the steps. Prep your surface by cleaning it thoroughly and ensuring your stencil is securely taped down in the desired position.
Choose your paint colors wisely and consider blending two or more colors for added depth and texture. Use a dabbing cloth and water to clean up any mistakes or excess paint.
Rolling the paint using a roller with a shorter nap will ensure that the paint does not bleed under the stencil, and keep your layers thin to prevent any smudging or uneven textures.
Removing the stencil carefully will prevent any smudging or bleeding of the paint.
Finally, clean your materials as instructed to ensure you can reuse them for future projects. Stenciling with a roller is an easy and enjoyable DIY project that can bring life to any room.
Frequently Asked Questions
How do I choose the right roller for stenciling?
You should choose a roller with a short nap, ideally a foam roller, as it will give you better control and prevent bleeding under the stencil.
Can I use any kind of paint for stenciling with a roller?
No, you should use stencil paint or acrylic paint, as they dry quickly and won’t bleed through the stencil.
How do I position the stencil correctly on the surface?
You should tape the stencil on the surface, making sure it’s straight and secure before starting to roll the paint.
Can I reuse a stencil for different projects?
Yes, if you clean it carefully after each use and store it properly, you can reuse a stencil for various projects.
What should I use to clean the stencil after painting?
You can use warm water and soap to clean the stencil, making sure to remove all the paint residue.
How long should I wait for the paint to dry before removing the stencil?
You should wait for the paint to be completely dry before removing the stencil, which may take up to several hours, or overnight.
Can I create a gradient effect with stenciling and rolling?
Yes, you can blend colors and create a gradient effect by layering different shades of paint, rolling them softly together.
What’s the best surface for stenciling with a roller?
The best surface for stenciling is a clean, flat surface that is not too textured, such as walls, wood, or fabric.
Can I use stenciling with a roller for small details and intricate patterns?
Yes, you can use stenciling with a roller for small details and complex designs, as long as you have a precise stencil and a steady hand.
How do I store my stenciling materials after use?
You should clean and dry the stencil and roller thoroughly, then store them in a dry and cool place, out of direct sunlight.