Roller painting is a skill that appears simple at first glance, but it requires finesse and knowledge to achieve a flawless finish. It’s a popular method for painting large, flat surfaces quickly and efficiently, yet many do-it-yourself decorators make avoidable errors. By being aware of common pitfalls and mastering the proper techniques, you can ensure your walls look professionally painted every time.
Understanding the Basics of Roller Painting
Before diving into your painting project, it’s crucial to understand the fundamentals of roller painting. This foundational knowledge will set the stage for a successful paint job.
The Importance of Choosing the Right Roller
One can’t stress enough the significance of selecting the appropriate roller for your painting project. The right roller can mean the difference between an uneven finish and a smooth, professional look. Factors such as the type of paint and the surface you’re painting will influence your choice.
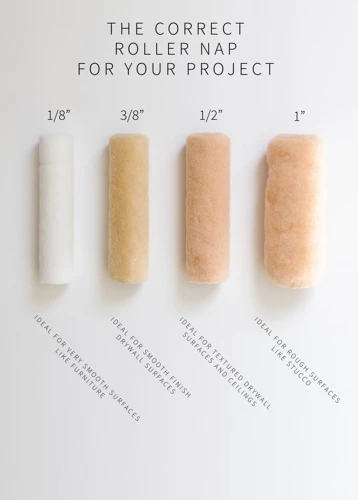
Roller Nap: What Is It and Why Does It Matter?
The term ‘roller nap’ refers to the thickness of the roller cover’s fiber surface, which can range from smooth to rough. The nap length affects how much paint the roller can hold and the texture it will leave on the wall. It is crucial to match the nap length to the painting surface for optimal coverage.
Common Roller Painting Mistakes to Avoid
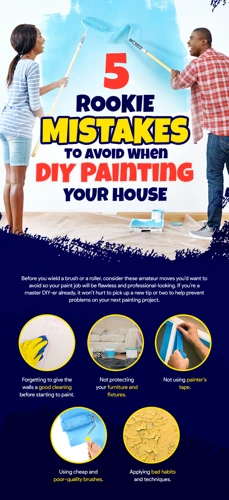
Even with the basics down, there are several common mistakes that can compromise the quality of your roller painting endeavors. Here are the pitfalls you should be wary of.
Mistake #1: Selecting the Wrong Roller Nap
Using the incorrect nap length for your roller can result in a subpar finish. A nap that’s too long for a smooth surface will leave unwanted texture, while a short nap won’t hold enough paint to adequately cover a rough surface.
Mistake #2: Inadequate Brush Quality
Investing in a high-quality roller is essential. Cheap rollers can shed fibers onto your painted surface, leading to an unsmooth finish that requires time-consuming corrections.
Mistake #3: Failing to Re-Mix Paint
Paint can separate as it sits, causing inconsistencies in color and texture. To avoid this, always re-mix your paint thoroughly before starting and occasionally during the painting process.
Mistake #4: Insufficiently Loading the Roller
Applying too little paint to the roller will not provide full coverage and can lead to a patchy appearance. Conversely, overloading the roller can cause drips and an uneven application.
Mistake #5: Incorrect Paint Application Techniques
Using improper techniques, such as pressing too hard or not maintaining a wet edge, can lead to streaks and lap marks. Proper technique is key to a smooth finish.
Proper Roller Painting Techniques

Implementing the right techniques can transform your painting project from amateur to professional-grade. Here’s how to do it.
How to Load a Paint Roller Correctly
- Gently dip the roller into the paint tray.
- Roll it back and forth on the tray’s ramp to distribute the paint evenly.
- Ensure the roller is not dripping but has enough paint to cover a reasonable area.
Applying Paint Evenly: Techniques and Tips
To apply paint evenly, start in a small section and work your way across the surface. Use a ‘W’ pattern for better coverage and always overlap the previous stroke to maintain a wet edge. This method prevents streaks and ensures a uniform finish.
Advanced Roller Painting Tips
For those looking to elevate their painting technique, these advanced tips will help achieve an even more professional outcome.
Ensuring a Smooth Finish with Roller Painting
For a super-smooth finish, lightly sand the surface between coats with a fine-grit sandpaper. This step removes any imperfections and helps the next coat adhere better.
How to Avoid Overworking the Paint
Overworking the paint by repeatedly rolling over the same area can make the finish appear textured and uneven. Apply the paint in a series of smooth, continuous strokes, and avoid going back over areas that have begun to dry.
The Right Way to Handle Second Coats and Re-Coating
Allow the first coat to dry completely before applying a second one. This prevents peeling and ensures a solid, even layer. When applying subsequent coats, use the same technique as the first for consistency.
Roller Painting FAQs
Even with all this information, there might still be questions that arise during your painting project. Let’s tackle some of the most common queries.
How to Paint with a Roller Without Leaving Marks
To paint without leaving marks, ensure your roller is evenly loaded with paint and apply it with gentle, consistent pressure. Also, keep a wet edge and roll from dry into wet areas to blend the edges seamlessly.
Brush vs. Roller: What to Use and When
Use a brush for small, intricate areas or when cutting in around edges. A roller is best for large, flat surfaces where you want to apply paint quickly and with greater uniformity.
When embarking on a roller painting project, it’s not just the technique of using a roller that can go awry; there are various pitfalls that can affect the final result. Whether it’s an issue with the paint itself or the tools you’re using, being aware of common mistakes can save you time and frustration. Discover some of the frequent errors artists make in our articles that delve into common painting mistakes with fires, the proper care and mishaps associated with paint brushes, and the intricacies of working with oil-based paints. Each guide offers valuable tips to help ensure your roller painting project goes smoothly.
Final Tips for Roller Painting Success
Ultimately, roller painting success lies in preparation, quality tools, and technique. Remember to choose the right roller, maintain your equipment, and apply paint with care and consistency. With these tips in mind, your next painting project should go smoothly, resulting in a professional-looking finish that you can take pride in.