When it comes to stucco surfaces, achieving a smooth and even finish can be a challenging task. With so many factors at play, from the condition of the surface to the equipment used, it’s no wonder that many homeowners and contractors struggle with this aspect of stucco application. However, with the right techniques and preparation, it is possible to achieve a flawless finish. In this article, we will explore various techniques for achieving a smooth and even finish on stucco surfaces, as well as the necessary preparation and clean-up steps. So, let’s dive in and discover how to create a stunning stucco finish.
Preparation
Before diving into the techniques for achieving a smooth and even finish on stucco surfaces, the preparation process is crucial for achieving the desired outcome. The quality of the preparation can directly affect the finished product, so it’s important to take the necessary steps to ensure a successful outcome. This entails cleaning the surface, repairing any damage, and protecting the surrounding areas. For a more detailed explanation of these steps, refer to our previous article on surface cleaning for painting, preventing paint blistering, priming for exterior painting, and essential tools for exterior painting.
Clean the Surface
Before stucco can be applied, it is important to clean the surface thoroughly to ensure proper adhesion of the stucco. Here are the steps to follow for a clean surface:
- Remove any loose or peeling paint, dirt or debris from the surface using a wire brush or pressure washer. This will help to ensure that the stucco adheres properly.
- Use a trisodium phosphate (TSP) solution to clean the surface. Mix TSP with water as per the instructions on the pack.
- Wash the surface using a scrub brush or sponge. Rinse the surface thoroughly with clean water once the cleaning solution has been applied. This is essential to neutralize the surface after using TSP, which is a strong alkaline cleaner.
- Allow the surface to dry thoroughly before proceeding to the next step.
For optimal results, it is recommended to use a stiff bristle brush, rather than a soft brush, to clean the surface. This will help remove any stubborn debris that has accumulated on the surface over time. Additionally, if any exterior paint is remaining on the surface, sand it off using a fine-grit sandpaper. For more information on how to properly paint exterior surfaces, visit /how-to-paint-exterior-surfaces/.
Repair Any Damage
To achieve a smooth and even finish on stucco surfaces, it’s important to repair any damage before beginning the application process. Here are the steps to follow for repairing stucco surfaces:
- Assess the Damage: Before making any repairs, assess the damage to the stucco surface. Check for cracks, holes, and other damage that needs to be repaired. If the damage is minor, you may be able to fix it yourself. However, if the damage is extensive, it’s best to hire a professional.
- Clean the Area: Use a pressure washer or a garden hose to clean the damaged area. Remove any loose stucco or other debris from the area.
- Apply Stucco Patching Compound: Apply stucco patching compound to the damaged area using a putty knife or a trowel. Fill the damaged area with the compound, and smooth out the surface. Allow the compound to dry completely before moving on to the next step.
- Sand the Area: Once the stucco patching compound is dry, use sandpaper to smooth out the surface. Make sure to feather the edges of the patching compound so that it blends in with the surrounding stucco.
- Prime the Area: Apply a coat of primer to the repaired area using a paintbrush or a roller. This will help the finish coat of stucco adhere to the surface and provide a smooth and even finish.
By following these steps, you can repair any damage on your stucco surface and achieve a flawless finish. Remember to use high-quality tools and materials such as perfect paint for exterior, stucco patching compound, and a high-quality brush or paint roller for exterior to ensure the best results.
Protect Surrounding Areas
To protect the surrounding areas from overspray, it is important to take the necessary precautions. Cover any surface that you want to keep free of stucco with plastic sheeting or drop cloths. This includes windows, doors, rooflines, and landscaping. You can also use painter’s tape to secure the plastic sheeting in place and prevent it from moving during application.
To avoid getting stucco on nearby surfaces, use a painter’s tape that adheres well to the surface and won’t peel off during application. Cover any nearby furniture or objects that cannot be removed from the area, and cover the ground with drop cloths to catch any falling debris.
Another option is to use a spray shield to help contain the overspray. A spray shield is a lightweight plastic or metal tool that attaches to the sprayer and directs the spray in one direction, minimizing the amount of overspray that escapes.
No matter which method you choose, it is important to take the time to protect the surrounding areas before beginning any stucco application. This will not only save you time and effort in the long run but will also prevent any damage to nearby surfaces.
Note: If you need to paint the stucco surface, you can use a paint roller specifically designed for exterior surfaces to apply the paint evenly and achieve a smooth finish.
Techniques
Now that the surface has been prepped and is ready to be worked on, it’s time to focus on the most important part – achieving a smooth and even finish on stucco surfaces. This can be a challenging task, but with the right techniques and tools, a professional-looking result can be achieved. Let’s take a closer look at some unique and effective methods for achieving a flawless stucco finish.
Brush Before Spraying
Before spraying stucco onto a surface, it’s essential to brush it first. This will help ensure that the stucco adheres evenly to the surface, resulting in a smooth and even finish. Here are some steps to follow when brushing before spraying:
- Clean the Surface: Make sure the surface is free of any debris or loose material before brushing.
- Select the Right Brush: Use a brush with stiff bristles that will effectively scrub the surface and remove any remaining dust or debris.
- Brush Vigorously: Apply firm pressure to the brush and move it in a circular motion over the surface. Brushing vigorously will help to ensure that the stucco adheres evenly to the surface.
- Brush Smoothly: Aim to brush the surface as smoothly and evenly as possible. This will help ensure that the stucco goes on evenly and there won’t be any lumps or bumps in the finished product.
- Brush in One Direction: Be consistent in the direction of your brushstrokes. This will help achieve a consistent and even distribution of stucco on the surface.
By following these steps, you’ll create a clean and smooth canvas for the stucco to adhere to, resulting in a smooth and even finish. Remember to always brush before spraying on stucco for the best results.
Spray at the Right Distance
When it comes to spraying stucco surfaces, one of the most important things to remember is to spray at the right distance. The ideal distance to spray stucco is between 18 and 24 inches away from the surface. This distance allows the stucco to be evenly distributed and prevents it from being too thick or too thin.
To ensure that you are spraying at the correct distance, it is essential to test your sprayer on a scrap piece of material first. By doing so, you can adjust the distance and spray pattern to achieve the desired results.
Here are some tips to help you spray at the right distance:
- Hold the sprayer at a consistent distance from the surface throughout the application process.
- Adjust the sprayer’s pressure to control the speed and amount of stucco being sprayed.
- Maintain a smooth and steady motion while spraying the stucco to ensure an even application.
- Overlap each pass by 50% to avoid any missed spots and ensure proper coverage.
It is also important to keep in mind that the right distance can vary depending on the type of stucco and the specific project you are working on. Different sprayers may require different distances as well. It is essential to read the manufacturer’s instructions and adjust accordingly.
By mastering the right distance for spraying stucco surfaces, you can achieve a smooth and even finish that is sure to impress.
Use a High-Volume Low-Pressure (HVLP) Sprayer
When it comes to achieving a smooth and even finish on a stucco surface, using the right sprayer can make all the difference. One highly recommended tool for achieving a great finish is a High-Volume Low-Pressure (HVLP) sprayer. Here are some reasons why:
- Reduces Overspray: HVLP sprayers are designed with low pressure which means they can deliver paint or stucco with a high volume without producing much overspray.
- High Transfer Efficiency: Due to their design, HVLP sprayers can achieve greater transfer efficiency, meaning more material sticks to the surface and less is wasted.
- Minimizes Clogs: The HVLP sprayer produces a consistent flow without atomization or overspray. This helps to minimize clogs and reduces the need for cleaning during application.
- More Control: Less material is wasted using an HVLP sprayer which means that there is more control over the application of stucco or paint, leading to a better finish.
Using a High-Volume Low-Pressure (HVLP) sprayer is a great way to achieve a smooth and even finish on a stucco surface. Not only does it reduce overspray and minimize clogs, but it also provides greater control and higher transfer efficiency. When choosing a sprayer, consider investing in an HVLP sprayer for a better result.
Backroll for an Even Finish
To achieve an even and smooth finish on stucco surfaces, it is important to use the backrolling technique. This technique involves rolling a paint roller over the stucco after spraying it to help distribute the stucco evenly and remove any excess material. Here are the steps to follow when backrolling:
- Step 1: Mix the stucco
- Step 2: Spray the stucco
- Step 3: Backroll the stucco
- Step 4: Check for imperfections
- Step 5: Repeat if necessary
Before starting the backrolling process, make sure the stucco is mixed properly according to the manufacturer’s instructions. This will ensure the consistency is just right for spraying.
Using a high-volume low-pressure (HVLP) sprayer, spray an even coat of stucco onto the surface. Be sure to apply the stucco in a consistent pattern and from the same distance to avoid creating an uneven surface.
After spraying the stucco, use a paint roller to backroll the material. Start from the top of the surface and work your way down, rolling in a back and forth motion. This will help distribute the stucco evenly and remove any excess material.
As you backroll, keep an eye out for any imperfections or areas that may need additional attention. If there are any bumps or uneven spots, use a trowel to smooth them out before they dry.
If necessary, apply a second coat of stucco using the same steps. This will help create a more consistent finish and fill in any gaps or voids in the first coat.
By using the backrolling technique, you can achieve a smooth and even finish on stucco surfaces. It may take some practice to perfect this technique, but the results will be well worth the effort.
Double Coat Technique
One of the techniques that can be used to achieve a smooth and even finish on stucco surfaces is the **double coat technique**. This technique involves applying two coats of stucco to the surface, with each coat being allowed to dry before applying the next. The double coat technique can help to achieve a more even finish by filling in any imperfections and creating a thicker, more durable surface.
To use the double coat technique, follow these steps:
- Prepare the Surface: Before you begin, make sure the surface is clean and free of any debris. Apply a coat of bonding agent to the surface and allow it to dry.
- Apply the First Coat: Use a steel trowel to apply the first coat of stucco. Apply it in a thin, even layer, making sure to cover the surface completely. Allow the first coat to dry completely before proceeding.
- Apply the Second Coat: Once the first coat is completely dry, apply the second coat of stucco using the same technique as the first coat. Make sure to fill in any imperfections and create an even surface. Allow the second coat to dry completely before proceeding.
- Finish the Surface: After the second coat of stucco is completely dry, use a steel trowel to finish the surface. Smooth out any rough spots or imperfections, and make sure the surface is even and smooth.
By using the double coat technique, you can achieve a smooth and even finish on stucco surfaces. However, it is important to note that this technique can be time-consuming and require a lot of effort. It may also require additional equipment and materials, such as a bonding agent and steel trowel. If you are not experienced in applying stucco, it may be best to hire a professional to ensure a high-quality finish.
Add Sand to the Finish Coat
A helpful technique for achieving a smooth and even finish on stucco surfaces is to add sand to the finish coat. This can help to create a more tactile finish that feels more substantial and durable over time. Here are some steps you can follow to try this technique:
- Step 1: Choose the right sand. Not all sand is created equal, so it’s important to choose a sand that is clean and well-graded. You don’t want to use sand that contains clay or other impurities that can affect the final texture and consistency of the finish coat. Try to use a sand that is similar in color and size to the existing stucco, if possible.
- Step 2: Mix the sand into the finish coat. Once you have the right sand, you can add it to your finish coat mixture. The amount of sand you add will depend on the desired texture and consistency. Generally, you’ll want to add around one part sand to every four parts finish coat mixture. You can adjust this as needed to achieve the desired results.
- Step 3: Apply the finish coat. Once you have mixed in the sand, you can apply the finish coat to the stucco surface using a trowel or sprayer. Make sure to spread the finish coat evenly and consistently to ensure a cohesive texture across the entire surface.
- Step 4: Combine with other techniques. Adding sand to the finish coat can be an effective way to create texture and depth, but it may not be enough to achieve a completely even and smooth finish on its own. Consider combining this technique with other stucco finishing techniques, such as the double coat technique or the wet sponge technique, to ensure the best results.
By following these steps, you can experiment with adding sand to the finish coat and see how it affects the final look and feel of your stucco surface. This technique can be especially useful for outdoor surfaces that will be exposed to the elements and need to withstand wear and tear over time.
Try Skip Trowel Technique
One unique technique for achieving a smooth and even finish on stucco surfaces is the Skip Trowel Technique. This technique involves using a trowel to apply a thin layer of stucco onto the surface and then skipping the trowel over the stucco to create a slightly uneven texture.
To use this technique, follow these steps:
- Mix the stucco: Begin by mixing the stucco according to the manufacturer’s instructions. Use a mixer to combine the stucco and water until it has a smooth, creamy consistency.
- Apply the stucco: Using a trowel, apply the stucco to the surface in a thin layer. The layer should be no more than 1/8 inch thick. Work in small sections, starting from the top of the surface and working downwards.
- Skip the trowel: Once the stucco has been applied, skip the trowel over the surface to create a slightly uneven texture. This is done by holding the trowel at a slight angle and lightly dragging it over the surface. The trowel should not be pressed hard into the stucco, but rather lightly skipped over it.
- Allow to dry: Allow the stucco to dry completely. Depending on the weather conditions, this may take several hours or even a day or two.
- Apply a second coat (optional): If you want a more pronounced texture, you can apply a second coat of stucco using the same technique. Allow this coat to dry as well.
- Smooth out high spots: Once the stucco is completely dry, use a sanding block to smooth out any high spots or rough areas. Be sure to wear a dust mask to protect yourself from the dust.
- Apply a sealer: Finally, apply a sealer to the surface to protect it from the elements and to enhance the color of the stucco. Follow the manufacturer’s instructions for application.
By following these steps, you can achieve a beautiful and unique texture on your stucco surface using the Skip Trowel Technique. It’s important to note that this technique requires some skill and practice, so don’t be discouraged if it takes a few tries to get it right. With patience and perseverance, you can achieve the desired results.
Tape and Float Technique
One effective technique for achieving a smooth and even finish on stucco surfaces is the tape and float technique. This technique involves the use of joint tape and joint compound to create a smooth and seamless finish.
The steps to follow when using the tape and float technique are:
| Step 1: | Clean the surface thoroughly and let it dry completely. |
| Step 2: | Apply a layer of joint compound to the entire stucco surface using a trowel. |
| Step 3: | Apply joint tape to the stucco surface, covering all joints and seams in the surface. |
| Step 4: | Apply another layer of joint compound to the entire surface, covering the tape and any gaps or joints. |
| Step 5: | Smooth the compound out using a trowel or drywall float, working in one direction to create an even finish. |
| Step 6: | Wait for the compound to dry completely and then sand the surface lightly to remove any imperfections or rough spots. |
| Step 7: | Clean the surface and apply a coat of stucco paint to finish. |
Tips to keep in mind when using the tape and float technique:
- Make sure the surface is completely dry and clean before applying joint compound
- Use a good quality joint compound for best results
- Work in sections to ensure that the compound doesn’t dry before you have a chance to smooth it out
- Use a light touch when sanding to avoid damaging the tape or creating new imperfections
- Choose a stucco paint that matches the color and texture of the original stucco for a seamless finish
By following the tape and float technique, you can achieve a smooth and even finish on any stucco surface, leaving it looking beautiful and well-maintained for years to come.
Texture Patching Technique
One technique for achieving a smooth and even finish on stucco surfaces is the texture patching technique. This technique is useful when you have areas of stucco that are damaged or otherwise uneven.
Step 1: Begin the repair process by cleaning the damaged area thoroughly. Remove any loose or crumbling stucco from the surface with a wire brush or scraper.
Step 2: Next, apply a bonding agent to the damaged area. This will help the new stucco adhere properly to the surface. Follow the manufacturer’s instructions for the specific bonding agent you are using.
Step 3: Prepare a small amount of stucco mix according to the manufacturer’s instructions. The consistency should be similar to pancake batter.
Step 4: Apply the stucco mix to the damaged area using a trowel. Make sure the surface is level and smooth.
Step 5: Once the stucco has been applied, use a texture brush to match the existing texture of the surrounding area.
Step 6: Allow the stucco to dry for at least 24 hours before applying any paint or other finish.
It is important to note that the texture patching technique should only be used for small to medium-sized repairs. For larger areas of damage, it may be necessary to reapply stucco to the entire surface.
Stucco Dash Technique
The Stucco Dash Technique is a variation of the traditional stucco application method that utilizes a dash brush to create a textured finish.
To apply the stucco with a dash texture, you will need to first prepare the surface by following the steps outline in the previous sections. Once the surface is ready, you can start the stucco application process using the following steps:
1. Mix the stucco: Mix the stucco according to the manufacturer’s instructions.
2. Load the dash brush: Dip the dash brush into the stucco mixture and load it with a moderate amount of material.
3. Apply the stucco with the dash brush: Using the dash brush, flick the stucco mixture onto the surface in a random pattern. Be sure to vary the intensity of the flicking motion to create a natural-looking texture.
4. Smooth the surface: After applying the stucco with the dash brush, use a trowel or float to smooth out any high points or rough areas. This will create a uniform finish while maintaining the texture.
5. Cure the stucco: Allow the stucco to cure for the recommended amount of time before applying any further coats or finishes.
The Stucco Dash Technique is a great way to add texture and character to your stucco surfaces. However, it is important to note that this technique requires some skill and practice to master. Be sure to experiment with different flicking techniques and amounts of stucco to achieve your desired look.
Wet Sponge Technique
The wet sponge technique is a unique method to achieve a smooth and even finish on stucco surfaces. This technique is particularly useful when you are working on a small area or making repairs. To accomplish this technique, you will need a sponge, water, and a trowel.
Here are the steps to follow when using the wet sponge technique:
- Clean the Surface: Start by cleaning the stucco surface and removing any dust or debris from the area you are going to work on. Use a soft-bristled brush to gently scrub the surface if needed.
- Wet the Sponge: Dip the sponge in water and squeeze out any excess water. The sponge should be damp, but not soaked.
- Smooth the Surface: Use the damp sponge to smooth out any rough spots or bumps on the stucco surface. This technique works best on small areas where you want to create a smooth finish quickly.
- Blend the Surface: Use the damp sponge to blend the edges of different stucco layers or patches. This technique works particularly well when you are making repairs and want to blend the new stucco with the existing surface.
- Let the Surface Dry: Allow the surface to dry completely before painting or adding any finishing touches.
The wet sponge technique is a quick and easy way to achieve a smooth and even finish on stucco surfaces. It is particularly useful when you are making repairs or working on a small area. Remember to start with a clean surface and allow the stucco to dry completely before any further work is done.
Hawk and Trowel Technique
The Hawk and Trowel Technique is a traditional method for achieving a smooth and even finish on stucco surfaces. This technique involves using a hawk, which is a flat tool with a handle, and a trowel, which is a flat tool with a pointed end.
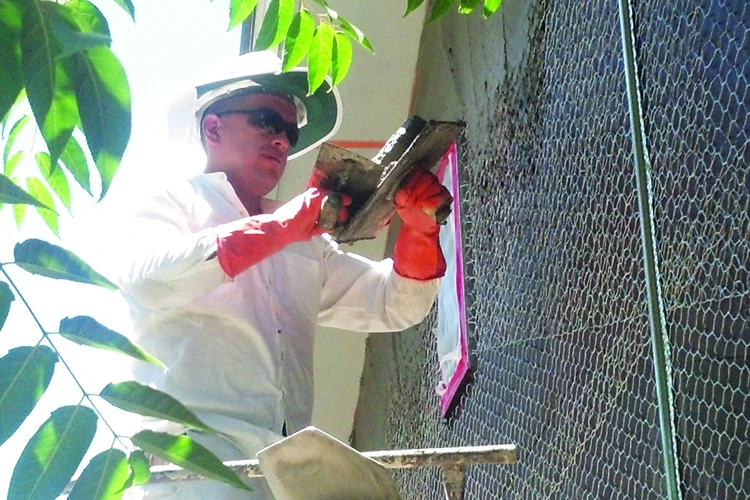
To use this technique, you will need to mix your stucco material to the appropriate consistency. Then, scoop a portion of the stucco mixture onto the hawk using the trowel. Holding the hawk in one hand and the trowel in the other, you can then apply the stucco mixture to the surface using a smooth, sweeping motion.
As you apply the stucco mixture with the trowel, you will need to use a feathering technique to ensure an even application. This means using the pointed end of the trowel to blend the edges of the stucco mixture into the surrounding areas, creating a smooth and seamless finish.
Once you have covered the entire surface with the first coat, you can let it dry completely before applying a second coat. This will help to ensure an even and consistent finish.
The Hawk and Trowel Technique can be a bit challenging to master, but with practice, it can be a highly effective way to achieve a smooth and even finish on stucco surfaces. Be sure to take your time and work carefully, using light pressure and a gentle touch to create a flawless result.
Clean Up
After completing a successful stucco application, it’s crucial to ensure that you leave the worksite clean and tidy. Proper cleanup not only keeps your tools and equipment in good condition but also prevents any damage to the surrounding areas. Neglecting this step can result in a lot of hassle down the line, so it’s essential to do it properly. In this section, we’ll explore the various steps you need to take to clean up after a stucco job. So, let’s delve into it!
Clean the Equipment
In order to ensure that your equipment remains in good condition and is ready for the next use, it is important to clean the equipment after each use. Here is a step-by-step guide for cleaning your stucco equipment:
| Step | Action |
|---|---|
| 1 | Disassemble the Equipment |
| 2 | Remove Excess Stucco – Use a brush or scraper to remove any excess stucco from the equipment. |
| 3 | Soak the Equipment – Most of the equipment can be soaked in a bucket of warm water. Make sure to submerge each part for at least 20 minutes. |
| 4 | Clean the Equipment – Use a stiff brush or sponge to scrub each part of the equipment. Rinse each part with clean water. |
| 5 | Dry the Equipment – Wipe each part of the equipment with a clean cloth and allow it to air dry. |
| 6 | Lubricate the Equipment – Apply lubricant to any moving parts of the equipment to prevent rust and ensure smooth operation. |
Proper cleaning and maintenance of your stucco equipment can help prolong its lifespan and ensure that it is always ready to use for your next stucco project.
Cleanup the Surrounding Areas
After completing the stucco application process, it is important to thoroughly clean up the surrounding areas. This will ensure that the areas surrounding the stucco surface are not damaged or affected in any way. Here are some tips for cleaning up the surrounding areas:
- Remove protective coverings: If any protective coverings were used to protect the surrounding areas, such as plastic sheeting or tape, it is important to remove them carefully. This will prevent any damage to walls or other surfaces that may have been covered during the stucco application process.
- Scrape off excess stucco: If any stucco has spilled or splattered onto surrounding areas, use a scraper or putty knife to remove the excess stucco. Be sure to do this carefully so as not to damage any surfaces.
- Use a wet sponge: To remove any stucco residue or dust that may have settled on the surrounding areas, use a wet sponge. This will help to clean the areas without causing any damage.
- Sweep or vacuum: Once the excess stucco and residue has been removed, sweep or vacuum the surrounding areas to ensure that they are completely clean.
- Dispose of waste properly: Any excess stucco or other waste materials should be disposed of properly. Follow local regulations to ensure that waste is disposed of in an environmentally friendly manner.
By following these tips, it is possible to achieve a smooth and even finish on stucco surfaces while also ensuring that surrounding areas are not damaged or affected. Remember to take the time to properly clean up after stucco application in order to achieve the best results possible.
Conclusion
After following the unique techniques mentioned above for achieving a smooth and even finish on stucco surfaces, you can ensure that your stucco project will be a success. It is important to prepare the surface properly by cleaning, repairing any damage, and protecting the surrounding areas before applying any techniques.
Moreover, utilizing techniques such as brushing before spraying, spraying at the right distance, and using a High-Volume Low-Pressure (HVLP) sprayer can significantly enhance the quality of the stucco finish. Additionally, applying the double coat technique, adding sand to the finish coat, and using the skip trowel technique can add texture and depth to the stucco surface.
Furthermore, tape and float technique, texture patching technique, stucco dash technique, wet sponge technique, and hawk and trowel technique can be used to create unique and intricate designs on the stucco surface.
After finishing the project, it is important to clean the equipment and the surrounding areas properly to maintain the quality of the stucco surface.
In conclusion, these unique techniques for achieving a smooth and even finish on stucco surfaces can help elevate the overall appearance of any stucco project. By following these guidelines, you can ensure that your stucco surface will look beautiful and professional for years to come.
Frequently Asked Questions
What materials do I need for stucco application?
You will need stucco mix, water, masonry trowel, sprayer or roller, protective gear, and plastic sheeting or painter’s tape and paper.
Should I clean the surface before applying stucco?
Yes, it is important to clean the surface thoroughly to ensure maximum adhesion of the stucco.
What should I do if there are cracks or damage on the surface?
You should repair the damage using a patching compound, and let it dry completely before applying stucco.
How do I protect surrounding areas during stucco application?
You can use plastic sheeting or painter’s tape and paper to cover or mask off areas that you do not want to be coated with stucco.
What is the backroll technique?
The backroll technique involves using a paint roller to roll over the applied stucco, creating a smooth and even finish.
What is the double coat technique?
The double coat technique involves applying a base coat of stucco and allowing it to dry before applying a second coat, creating a thicker and more durable finish.
What is the skip trowel technique?
The skip trowel technique involves applying stucco with a trowel in a random, swirling pattern, creating a textured and unique finish.
What is the texture patching technique?
The texture patching technique involves using a drywall mud knife to apply stucco patching compound in a textured pattern that matches the existing stucco finish.
What is the stucco dash technique?
The stucco dash technique involves spraying stucco onto the surface and then using a brush or trowel to create small, patterned textures by flicking or dashing the stucco in different directions.
What is the hawk and trowel technique?
The hawk and trowel technique involves using a hawk (a flat board with a handle) to hold the stucco and a trowel to apply it, creating a smooth and even finish.