Picture this scenario: you have a stunning wooden piece that you want to hang on your wall, but you’re unsure of how to do so without ruining your perfect mirror. Luckily, there’s a solution: gluing wood to a mirror! But how do you go about it? With the abundance of glue options and potential for mistakes, it can be overwhelming and perplexing, but fear not. In this beginner’s guide, we will walk you through the steps to successfully glue wood to a mirror, while also exploring the reasons why you might want to take on such a project, the best types of glue to use, and helpful tips for ensuring your project is a success. So, grab your supplies and let’s get started!
Why Glue Wood to Mirror?
Gluing wood to a mirror may not be the first DIY project that comes to mind, but it can be a unique and creative way to enhance the decor of a room. There are several reasons why one may want to glue wood to a mirror. Whether you want to add a decorative frame or create a functional piece, gluing wood to a mirror can be an easy and practical solution. Additionally, wood and mirrors are contrasting materials which can create a stunning and eye-catching design element. In this guide, we will discuss the different types of glue to use and provide step-by-step instructions on how to glue wood to a mirror successfully. So, let’s dive into it! If you are interested in a similar topic like “How to Glue Wood to Mirror”, you can check out our guide on “How to Glue Wood to Fiberglass”.
1. Decoration
Using wood to decorate a mirror can add an element of warmth and texture to a room’s decor. By gluing a frame made of wood to the outside of the mirror, it can become a decorative accent that draws the eye. Wood is a popular material for decorating mirrors because it can come in a variety of finishes and colors, making it easy to match to any room’s color scheme and style.
One popular way to decorate a mirror with wood is to create a rustic or farmhouse look by using unfinished or reclaimed wood. The natural look of the wood can create a warm and cozy atmosphere, especially when paired with other natural materials like stone or metal. This type of decoration is perfect for a bedroom or living room that has a rustic or country theme.
Another way to decorate a mirror with wood is to create a modern or sleek look. This can be accomplished by using a dark, rich wood and a minimalistic design. A thin frame of wood can provide a clean, polished look that is perfect for a bathroom or vanity. This style works well in a room with a modern or industrial feel.
Using wood to decorate a mirror can also add a personal touch to a room. By using wood that is special to the homeowner, such as a piece of barn wood from a family farm or a piece of driftwood collected on a beach vacation, the mirror becomes a cherished piece of decor. The personal touch can make the room feel more welcoming and homey.
Whether for decoration, functionality, or creativity, using wood to decorate a mirror is a fun and easy way to dress up a room. By following the steps and tips outlined in this article, you can successfully attach the wood to the mirror and create a unique and personalized piece of decor. If you’d like to learn more about gluing wood to other surfaces, check out our article on how to glue clay to wood.
2. Functionality
When it comes to functionality, gluing wood to a mirror can serve more than just an aesthetic purpose. It can also provide practical solutions to existing problems. One of the most common reasons for gluing wood to mirrors is to increase its sturdiness.
Table:
| Functionality | Solutions |
|---|---|
| Prevent breakage | By attaching a wooden frame, you can help avoid shattering in case the mirror falls. |
| Create storage space | You can attach wooden shelves to the mirror to help store toiletries or makeup. |
| Hide imperfections | By adding a wooden frame or accent, you can cover up chips, cracks, or other defects on the edges of the mirror. |
By adding a wooden frame, you can also create a cohesive design within the room. For instance, if you have wooden furniture, adding a wooden frame to the mirror can help bring the room together and elevate the overall design. Plus, you can use different types of wood to create a unique look, depending on your preference.
If you need more inspiration for gluing wood to other surfaces, consider checking out our article on how to glue a guitar neck or our article on industrial glue for more information.
3. Creativity
Woodworking enthusiasts are always searching for new ideas to add an edge to their craft projects. Gluing wood to mirror is a great way to add a touch of creativity to otherwise plain looking mirrors. By using different types of wood and attaching them to the mirror in unique patterns, one can transform an ordinary mirror into a work of art.
With a little imagination and a few simple tools, you can create:
| Project | Description |
|---|---|
| A Rustic Mirror | Attach thick, rugged branches to a simple mirror frame for a rustic look |
| A Modern Mirror | Attach small wooden triangles or hexagons to a plain rectangular frame for a modern, minimalist look |
| A Beach-Inspired Mirror | Glue together thin strips of driftwood in a sunburst shape for a beachy vibe |
| A Vintage Mirror | Add elegance to your mirror with ornate wooden designs in a Victorian or Baroque style |
The possibilities are endless! However, keep in mind that some types of wood are more suitable for mirror gluing than others. Soft woods like pine or spruce are easier to work with and provide a better surface for bonding with the mirror.
Pro Tip: To add further creativity, you can stain or paint the wood before attaching it to the mirror to create a truly unique look.
Now that you have some ideas for your creative mirror project, it’s time to choose the right glue to make it happen. Check out our earlier section on “Types of Glue to Use” to see which glue will work best for your project. For instance, epoxy glue is a great option for its ability to bond wood to almost any surface seamlessly, while hot glue provides an easy and quick bonding solution for wood to mirror projects.
So let your creativity soar and create a one-of-a-kind mirror with wood attachment – it’s the perfect way to add a personal touch to any room!
Types of Glue to Use
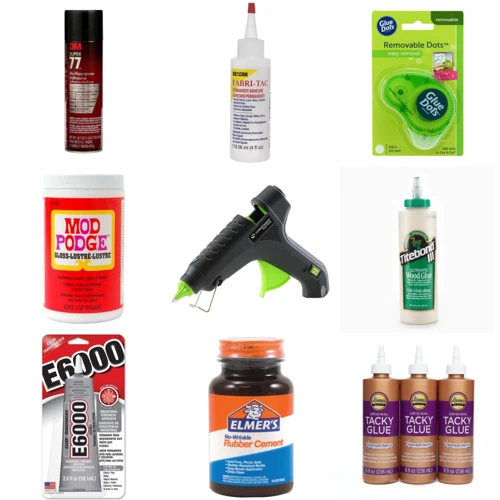
When it comes to gluing wood to a mirror, choosing the proper glue is crucial. The adhesive you select will determine the strength and durability of the bond between the pieces. There are various types of glues to use, including epoxy, silicon adhesive, construction adhesive, polyurethane glue, super glue, and hot glue. Each of these has its particular properties and works best for specific tasks. Understanding the differences between these glues will help you pick the one that will work best for your project.
1. Epoxy Glue
Epoxy glue is a popular choice for gluing wood to mirrors due to its strong and durable bond. It consists of two components, the resin and hardener, which must be mixed together in equal parts prior to application. One of the benefits of using epoxy glue is its ability to fill gaps, making it an ideal choice for uneven surfaces.
Advantages of epoxy glue:
- Strong and durable bond
- Waterproof
- Heat resistant
- Chemical resistant
- Can fill gaps
However, epoxy glue has a longer curing time compared to other types of adhesives, typically 24-48 hours. It is important to note that the curing time may be affected by factors such as temperature and humidity. Also, it can be difficult to remove once cured, so it is important to use it carefully.
When to use epoxy glue:
- For heavy-duty bonding
- When a waterproof bond is needed
- For bonding uneven surfaces with gaps
- When a strong and durable bond is needed
Epoxy glue is a great choice for gluing wood to mirrors due to its strength, durability, and ability to fill gaps. However, it is important to consider curing time and proper application techniques to ensure a successful project. If you want to learn more about how to glue metal to wood, check out our article about what to use to glue metal to wood.
2. Silicon Adhesive
Silicon adhesive is another excellent option for gluing wood to mirror. One of the primary benefits of using a silicon adhesive is its water-resistant properties. It can withstand exposure to moisture and humidity, meaning that it is a great option for high-humidity environments like bathrooms or kitchens. Additionally, it is easy to apply and dries to a clear finish.
The table below compares some of the key features of silicon adhesive with other types of glue that are commonly used for woodworking projects.
| Silicon Adhesive | Epoxy Glue | Construction Adhesive | |
|---|---|---|---|
| Bonding Strength | Good | Excellent | Excellent |
| Drying Time | 24 hours | 24-48 hours | 24-48 hours |
| Water Resistance | Excellent | Good | Good |
| Application Method | Caulk gun or squeeze tube | 2-part mix | Caulk gun or squeeze tube |
As with any adhesive, it is important to follow the manufacturer’s instructions when using silicon adhesive. Generally, the surface should be clean and dry before applying the adhesive. Apply a bead of adhesive along the back of the wood and press it firmly onto the mirror. Use a clamp or heavy object to apply pressure and hold it in place while the adhesive sets. Leave the clamp or weight in place for 24 hours, or as recommended by the manufacturer, to ensure that the bond is strong and set.
Overall, silicon adhesive is a great option for bonding wood to mirror due to its water-resistant properties, easy application, and clear finish. However, it may not be the best option for larger or heavier pieces of wood, as it may not have the same bonding strength as other types of adhesives. Consider the size and weight of the wood when choosing the right adhesive for your project.
3. Construction Adhesive
Construction adhesive is another popular option for gluing wood to a mirror. This type of adhesive is commonly used in construction projects and provides a strong and durable bond. It can be used on a variety of surfaces, including wood and glass, making it an ideal choice for this project.
One of the advantages of using construction adhesive is that it has a long working time, which means you have more time to position the wood on the mirror. It also dries clear, which is great for when you want the wood to be the main focus of the project.
Here are the steps to follow when using construction adhesive:
- Step 1: Clean the surface of the mirror and the wood. Make sure there is no dirt, dust or residue on either surface.
- Step 2: Apply the construction adhesive to the back of the wood. Use a toothpick or a brush to apply the adhesive evenly and avoid applying too much.
- Step 3: Press the wood firmly onto the mirror. Make sure it is in the desired position and apply pressure evenly across the surface to ensure a secure bond.
- Step 4: Allow the adhesive to dry completely. The drying time can vary depending on the brand you are using, so make sure to check the label for specific instructions. It may take anywhere from 24 hours to 48 hours to completely dry and cure.
When using construction adhesive, keep the following tips in mind:
- Measure the surface area carefully before applying the adhesive. You don’t want to apply too much adhesive or too little.
- Be sure to choose a high-quality construction adhesive that is suitable for bonding wood and glass.
- Sand the wood before applying the adhesive to ensure that it adheres properly. This will also give the wood a smooth finish.
- Secure the wood in place with clamps or tape while the adhesive is drying. This will help ensure that it bonds properly.
- Patience is key. Allow the adhesive to dry completely before handling the project. You can check out how long epoxy glue lasts to get an idea of the drying times for different types of adhesive.
By following these steps and tips, you can successfully attach wood to a mirror using construction adhesive.
4. Polyurethane Glue
Polyurethane glue, also known as PU glue or Gorilla glue, is a popular adhesive for bonding wood to mirror. This type of glue is highly durable and creates a strong bond between two surfaces, making it an excellent choice for a DIY project.
Unlike other glues, polyurethane glue expands when it dries. This expansion creates a tight fit between the wood and the mirror, resulting in a strong bond. However, the expansion can also create some mess, so it is important to use this type of glue sparingly.
Here are some benefits of using polyurethane glue for gluing wood to mirror:
- Creates a strong and durable bond
- Expands to fill gaps and create a tight fit
- Can be used on a variety of surfaces
- Dries clear
Before using polyurethane glue, be sure to follow these precautions:
- Wear gloves to avoid getting glue on your skin
- Work in a well-ventilated area to avoid inhaling the fumes
- Use a small amount of glue to avoid excessive expansion and mess
To use polyurethane glue for bonding wood to mirror, first, follow the preparation steps mentioned earlier in the article. Apply the glue in a zig-zag pattern on one surface (either the mirror or the wood). Then, gently press the wood onto the mirror and clamp it firmly together for at least an hour. Once the glue is dry, you can remove the clamps and sand off any excess glue.
It is important to note that polyurethane glue requires moisture to activate, so you may need to mist the surface with water before applying the glue. This will help to ensure a strong bond.
Polyurethane glue is an excellent choice for bonding wood to mirror due to its strength, durability, and ability to fill gaps. However, it must be used carefully to avoid excessive expansion and mess. If you want to learn more about gluing different materials together, check out our article on how to glue metal to concrete.
5. Super Glue
Super glue, or cyanoacrylate glue, is an adhesive that can bond almost any surface securely. It is a fast-drying and strong adhesive that can bind wood to glass in just a few minutes. This type of glue works by reacting with the moisture in the air to form a hard and durable bond. However, it is important to note that it may not work well with certain types of wood due to the natural oils present in them.
Here are some tips for using super glue to bond wood to a mirror surface:
- Clean the Surfaces: Before applying the glue, make sure that the surfaces of both the wood and mirror are clean and dry. Any dust or dirt can impede the bonding process.
- Apply the Glue Carefully: Super glue is a very strong adhesive, so a little goes a long way. Apply a small amount of glue to the wood and mirror surfaces, and then spread it evenly with a toothpick or a small brush. Do not apply too much pressure or force while spreading the glue.
- Press the Surfaces Together Firmly: Once the glue is evenly spread, place the wood piece on the mirror surface and press it down firmly. Hold it in place for a few minutes to allow the glue to set.
- Let it Dry: Super glue dries very quickly, so it’s essential to work fast and accurately. Leave the glued surfaces untouched for at least 24 hours to ensure a strong and long-lasting bond.
- Be Careful: Always wear protective gloves while working with super glue to avoid skin contact. Also, keep it away from your eyes and mouth.
To bond wood to a mirror surface, super glue can be an excellent solution. However, for other types of surfaces, like cracked glass or marble to metal, you may need a specific adhesive. Check out our articles on how to glue cracked glass and how to glue marble to metal for more information. If you want to learn about other types of adhesives, check out our article on what is acrylic glue.
6. Hot Glue
When it comes to gluing wood to mirror, hot glue may seem like a good option due to its quick drying time and ease of use. However, it’s important to consider the strength and longevity of the bond before using hot glue.
Hot glue is a thermoplastic adhesive that is melted with a hot glue gun and applied directly to the surface. The glue solidifies as it cools, creating a bond between the two materials. Here’s a table comparing the pros and cons of hot glue:
| Pros | Cons |
|---|---|
| – Quick drying time | – Not as strong as other types of glue |
| – Easy to use | – Not suitable for high heat or moisture |
| – Can be removed with heat gun or solvent | – May leave residue on surfaces |
While hot glue can be a convenient option, it may not provide a strong enough bond between wood and mirror for long-term use. It’s best used for lightweight decorative accents or temporary projects.
If you do choose to use hot glue for your project, there are a few tips to keep in mind:
– Use a high-temperature hot glue gun for a stronger bond
– Apply the glue in small dots or lines to avoid excess glue that may seep out
– Make sure both surfaces are clean and dry before applying the glue
– Press the wood firmly into place and hold for a few seconds to ensure a good bond
– Avoid exposing the glued area to high heat or moisture to prevent the bond from breaking down
While hot glue can be a quick and easy option for gluing wood to mirror, it may not provide the durability and strength needed for long-term use. Consider other types of glue that are better suited for this type of project, such as epoxy or construction adhesive.
Steps to Glue Wood to Mirror

Now that you have your desired type of glue and tools prepared, it’s time to begin the process of gluing your wood to a mirror. While this process may seem daunting, following the steps below will help ensure a successful and sturdy attachment. Make sure to read through each step and take your time to ensure everything is done correctly. Let’s get started with the steps to glue wood to mirror.
1. Prepare the Surface
Preparing the surface is a crucial step when it comes to gluing wood to a mirror. Without proper preparation, the glue won’t bond effectively, and the project may not hold up over time. Here are the steps you should take to prepare the surface:
Clean the Mirror: Wipe the mirror down with a clean cloth and glass cleaner to remove any dirt, dust, or residue. This is essential because any debris on the surface can prevent the glue from adhering.
Mark the Wood: Using a pencil, mark the areas on the wood where it will be glued to the mirror. This will help you apply the glue precisely where it is needed and avoid any mess.
Sand the Wood: Using a fine-grit sandpaper, sand the area of the wood that will be in contact with the mirror. This step is crucial to achieving a strong, lasting bond between the wood and the mirror. Sanding the wood creates a rough surface that the glue can adhere to better.
Clean the Wood: After sanding the wood, clean it with a clean cloth to remove any sawdust or debris. This ensures that the wood surface is properly prepared for gluing.
Masking Tape: To prevent the glue from spreading outside the area, use masking tape to mask the edges of the wood.
By following these steps, you will have an effectively prepared surface for gluing wood to a mirror. Remember, taking the time to prepare the surface properly will ultimately lead to a more successful project.
2. Apply the Glue
Applying the glue is a crucial step in gluing wood to a mirror. It’s essential to choose the right glue for the job, as using the wrong type of glue can lead to a weak bond and potential damage to both the wood and mirror. Below is a table highlighting the steps to apply the glue, as well as the recommended amount of glue to use for each type of glue:
| Type of Glue | Steps to Apply | Recommended Amount |
|---|---|---|
| Epoxy Glue | Apply equal parts of the adhesive and hardener onto a mixing surface and mix together thoroughly with a spatula. | Thin layer |
| Silicon Adhesive | Cut the tip of the tube and apply the adhesive to the wood in a zigzag pattern. | Small beads |
| Construction Adhesive | Squeeze the adhesive out of the tube and onto the wood in a zigzag pattern. | Quarter-size beads |
| Polyurethane Glue | Apply the glue to the wood in a zigzag pattern. | Quarter-size beads |
| Super Glue | Apply a small amount of glue to the mirror and then hold the wood firmly against it for several seconds. | Small dots |
| Hot Glue | Plug in the glue gun and wait for it to heat up. Apply a generous amount of glue to the wood. | Generous amount |
It’s important to note that the amount of glue needed may vary depending on the size and weight of the wood being used. It’s always better to start with a little bit of glue and then add more if needed.
When applying the glue, it’s important to pay attention to the consistency of the glue. Make sure it’s not too thick or too thin, as this can affect the bond’s strength. Additionally, make sure not to apply too much pressure to either the mirror or the wood when applying the glue, as this can cause damage or misalignment.
3. Attach the Wood to the Mirror
Now that you have applied the glue to both surfaces, it is time to attach the wood to the mirror. This step requires careful attention to ensure that the wood is properly aligned and securely attached to the mirror. Here are the steps you should follow:
| Step 1: | Position the wood where you want it to be on the mirror. |
| Step 2: | Press the wood firmly against the mirror. |
| Step 3: | Slide the wood around slightly to spread the glue evenly. |
| Step 4: | Hold the wood in place for at least a minute to give the glue time to set. |
It is important to note that you should avoid sliding the wood around too much once it is in position, as this can cause the glue to become uneven and create gaps between the wood and the mirror. It is also a good idea to use clamps or weights to hold the wood in place while the glue dries, as this will ensure a strong bond.
Remember to be patient and allow the glue to dry completely before removing the clamps or weights and using the wood and mirror. Rushing the process can result in a weak bond that will not last. By following these steps and taking your time, you can successfully attach wood to a mirror and create a beautiful and functional piece for your home.
4. Let the Glue Dry
Once you have attached the wood to the mirror using your chosen type of glue, it is important to let the glue dry completely before attempting to move or manipulate the project. Allowing the glue to dry completely will ensure a strong and durable bond between the wood and the mirror surface. The drying time can vary depending on the type of glue you used and the temperature and humidity levels in your workspace.
Here are some estimated drying times for the different types of glue commonly used when gluing wood to mirror:
| Type of Glue | Estimated Drying Time |
|---|---|
| Epoxy Glue | 24 hours |
| Silicon Adhesive | 24-48 hours |
| Construction Adhesive | 24 hours |
| Polyurethane Glue | 4 hours |
| Super Glue | 10-30 seconds |
| Hot Glue | 1-5 minutes |
It’s important not to rush the drying process as this can compromise the strength of the bond between the wood and the mirror. Be patient and allow the glue to dry completely according to the estimated drying time.
Once the glue has dried completely, you can inspect the bond and ensure that it is strong and secure. You can then proceed with any other finishing touches or embellishments you have planned for your project. Remember, the key to a successful project is allowing the glue to dry completely to achieve a strong, durable bond.
Tips for a Successful Project
Now that you are armed with knowledge about the types of glue to use and the steps to follow, you are ready to tackle your wood-to-mirror project. To ensure a successful and long-lasting result, follow these essential tips that will help you avoid common mistakes and pitfalls. With these tips in mind, you can achieve a professional-looking finish and enjoy your unique creation for years to come.
1. Measure Twice, Glue Once
It is important to measure the wood and the mirror accurately before gluing them together. As the saying goes, “Measure Twice, Glue Once.” A slight miscalculation in measurement can lead to an unsuccessful project and a waste of materials. Here are some tips to keep in mind when measuring:
- Use a tape measure: A tape measure is crucial for accurate measurements. Make sure the tape measure is straight and taut when measuring.
- Take into account the thickness of the wood: When measuring the wood, be sure to factor in the thickness of the wood. This will help determine how much glue is needed and where it should be applied.
- Measure the mirror as well: In addition to measuring the wood, measure the mirror as well. This will ensure that the wood is cut to the proper size and meets the mirror’s dimensions perfectly.
- Double-check the measurements: Once the measurements have been taken, double-check to ensure their accuracy. This will save you time, money, and frustration in the long run.
By taking the time to measure accurately, you can avoid any issues during the gluing process. Be patient and thorough to achieve a successful project.
2. Choose the Right Glue
As you embark on this woodworking project, choosing the right glue is essential to ensure a successful outcome. Here are some factors to consider when choosing the right glue:
- Type of Wood: Different types of wood may require different types of glue. Some woods, such as oily or acidic woods like teak or cedar, may require a specific type of glue like epoxy glue to ensure a strong bond.
- Type of Mirror: The type of mirror you are using will also impact your choice of glue. For example, a heavy mirror might require a stronger adhesive like construction adhesive, while a lighter mirror might be okay with a less strong adhesive like hot glue.
- Indoor vs. Outdoor Use: Consider the environment your finished product will be in. If it will be exposed to the elements, you’ll need a waterproof and weather-resistant adhesive such as polyurethane glue.
- Drying Time: Depending on your schedule, you may need a glue that dries quickly or allows for some repositioning time. Super glue dries very quickly, while epoxy glue allows for some repositioning before it sets.
- Application Method: Different adhesives may require different application methods. Silicon adhesive, for example, is typically applied with a caulking gun while hot glue is applied with a glue gun.
Taking these factors into account when choosing the right glue will help ensure a strong and lasting bond between the wood and mirror. Don’t forget to read the instructions carefully and test the glue on a small, inconspicuous area before applying it to the entire surface.
3. Sand the Wood
Before gluing wood to a mirror, it is important to sand the surface of the wood to ensure a strong bond and smooth finish. Here are some tips to consider when sanding the wood:
- Choose the right sandpaper grit: Depending on the type of wood you are using, you will need to select the appropriate grit of sandpaper. For softer woods, such as pine, use a lower grit sandpaper to remove any rough spots or imperfections. For harder woods, such as oak, use a higher grit sandpaper to smooth out the surface.
- Start with coarse sandpaper: Begin sanding with a coarse grit sandpaper, gradually moving to higher grits until the wood is completely smooth. This will help to remove any rough areas or bumps that could prevent the wood from adhering properly to the mirror.
- Buff with a fine-grit sandpaper: Finish the sanding process by buffing the wood with a fine-grit sandpaper. This will create a smooth and even surface, creating a better bond between the wood and mirror.
- Remove any dust: After sanding, be sure to remove any sanding dust with a clean, dry cloth. Any remaining dust particles or debris can prevent the glue from adhering properly.
Remember, sanding the wood before attaching it to the mirror is an important step in ensuring that your project is successful. Take your time and follow these tips to achieve the best results.
4. Secure the Wood
To ensure that the wood remains securely attached to the mirror, it’s essential to take a few extra steps. Here are some ways to do it.
1. Use Clamps: Clamps are extremely useful for holding the wood in place while the glue dries. Simply clamp the wood to the mirror and leave it until the glue has fully cured. This is especially useful for larger pieces of wood that may be prone to shifting or moving.
2. Use Tape: Another simple way of securing the wood to the mirror is by using tape. You can use painter’s tape or masking tape to hold the wood in place. Simply apply the tape to the wood and mirror, making sure to apply firm pressure. This will help keep the wood from shifting or moving.
3. Nail or Screw the Wood, if Possible: If the wood piece allows for it, you can use nails or screws to hold the wood in place. This is especially useful for thicker pieces of wood. Align the wood and drill a pilot hole before securing the wood to the mirror with nails or screws.
4. Use Weights: For smaller projects, using weights can be helpful. Place heavy objects on top of the wood to hold it in place while the glue dries. This can be especially useful when gluing onto vertical surfaces.
By taking extra care to securely attach the wood to the mirror, you can prevent potential accidents or damage that could ruin your project.
5. Wait for the Glue to Dry
Waiting for the glue to dry is one of the most crucial steps in the process of gluing wood to a mirror. The recommended drying time varies depending on the type of glue used, but it is usually between 24 to 48 hours. During this time, it’s essential to avoid bumping or moving the wood-mirror assembly, as it can result in a weak bond or completely ruin the project.
To ensure maximum adhesion, it’s important to maintain proper temperature and humidity in the room. Extreme temperatures or humidity levels can interfere with the curing process and weaken the bond between the wood and mirror. Ideally, the room temperature should be between 65 and 75 degrees Fahrenheit, and the humidity level should be around 50%.
Table: Recommended drying times for different types of glue
| Type of Glue | Recommended Drying Time |
|---|---|
| Epoxy glue | 24-48 hours |
| Silicon adhesive | 24-48 hours |
| Construction adhesive | 24-72 hours |
| Polyurethane glue | 24-48 hours |
| Super glue | 10-30 seconds |
| Hot glue | 5-10 minutes |
It’s important to note that some types of glue, such as super glue and hot glue, have a significantly shorter drying time than others. While this may seem like an advantage, it’s essential to exercise caution as these glues set quickly, leaving little room for error.
Once the recommended drying time has elapsed, you can gently test the bond between the wood and the mirror. Apply slight pressure on the wood, and if it’s secure and doesn’t move, the project is complete.
Remember, patience is the key to a successful wood to mirror gluing project. Wait for the glue to dry completely, and your project will be a strong and long-lasting success.
Conclusion
In conclusion, gluing wood to a mirror is a simple yet creative way to give your space an eye-catching touch. With the right glue and careful preparation, you can attach wood to your mirror and use it for various decorative and functional purposes.
Remember to measure twice and choose the right glue for your project. Based on your needs and the type of wood and mirror, you may opt for epoxy glue, silicone adhesive, construction adhesive, polyurethane glue, super glue or hot glue.
Before gluing, prepare the surface by cleaning and drying it thoroughly, and sanding the wood for better adhesion. When applying the glue, use a steady hand and apply enough to cover the entire surface area. When attaching the wood to the mirror, press firmly and hold it in place until the glue dries.
For a successful project, make sure to secure the wood properly and allow enough time for the glue to dry completely. Patience is key, so resist the urge to move or check on the piece until the recommended drying time has passed.
In summary, gluing wood to a mirror is a fun and easy DIY project that can add a personal touch to your living space. With the tips and tricks mentioned in this article, you are sure to create a beautiful and functional result. So go ahead and get creative!
Frequently Asked Questions
What types of wood can be glued to a mirror?
Almost any type of wood can be glued to a mirror, but it’s best to use a solid and flat wood like pine or oak.
Can I use regular wood glue to attach wood to a mirror?
No, regular wood glue is not recommended for gluing wood to a mirror because it does not provide a strong enough bond and may cause damage to the mirror.
What is the strongest type of glue to use for wood and mirror?
Epoxy glue is considered the strongest type of glue to use for wood and mirror because it provides a strong, long-lasting bond.
Do I need to sand the wood before gluing it to a mirror?
Yes, sanding the wood before gluing it to a mirror will help ensure a better bond and a smoother finish.
How long does it take for the glue to dry?
The drying time for glue will depend on the type of glue used. It can range from a few minutes to several hours.
Can I remove the wood from the mirror once it’s glued?
It’s not recommended to remove the wood from the mirror once it’s glued because it may cause damage to the mirror and the wood.
Is it safe to use hot glue for gluing wood to a mirror?
Yes, it’s safe to use hot glue for gluing wood to a mirror, but it’s not the strongest type of glue and may not provide a long-lasting bond.
What if the wood and mirror have different finishes?
If the wood and mirror have different finishes, it’s best to sand them both first and then choose a glue that will bond well to both surfaces.
Can I paint or stain the wood after it’s glued to the mirror?
Yes, you can paint or stain the wood after it’s glued to the mirror, but it’s best to wait until the glue has fully dried and cured.
Why is it important to choose the right glue?
Choosing the right glue is important because it will determine the strength and durability of the bond between the wood and mirror. Using the wrong glue can result in a weak bond or damage to the mirror or wood.