As a DIY enthusiast or a professional craftsman, you may come across situations where you need to join two different materials, such as wood and fiberglass, to create a single functional unit. Gluing wood to fiberglass can be a challenging task, considering the differences in material properties and the need for a strong and lasting bond. But fear not! With the right techniques and materials, you can achieve a secure bond that can withstand various stresses and strains. In this article, we will guide you through the process of gluing wood to fiberglass, step by step, and provide you with valuable information and tips to ensure a successful outcome. So, let’s dive into the world of adhesives and bonding!
Why Glue Wood to Fiberglass?
When it comes to bonding wood to fiberglass, there are various reasons why this may be necessary. Whether you’re looking to improve structural strength, add design elements, or create marine and automotive applications, gluing wood to fiberglass can be a necessary approach. In fact, there are several other materials to which one may need to bond. For example, did you know that you could glue wax together? Or metal to plastic? Or even granite and rocks? You can learn more about how these bonding processes work on our website. But for now, let’s focus specifically on the process of bonding wood to fiberglass.
Improving Structural Strength
Gluing wood to fiberglass can be extremely useful when improving the overall structural strength of a particular object. This technique is particularly useful for boat-building, automotive housing, and other applications where the combination of these materials is necessary. However, achieving this bonding is dependent on choosing the right type of glue, surface preparation, and proper technique.
The following list highlights some benefits of improving structural strength by gluing wood to fiberglass:
- Creates a stronger and more rigid structure to support heavier loads
- Can improve the durability of the overall object
- Prevents splitting or gaps in the wood component of the overall structure
- Resistant to extreme temperatures and weather conditions
Improving the structural strength of an object can vary, but most commonly, it provides a stronger foundation for supports or additional reinforcement in key areas of an object. This is crucial in automotive and boat applications, where water and other factors can weaken the integrity of the structure over time.
If you want to use this technique in boat-building, for example, it is crucial to create a strong and sturdy structure in order to help distribute weight and provide added support. It is important to note that without proper technique and preparation, the actual bonding can be weak and even cause failure over time.
To ensure the strength of the final product, always use high-quality glue and prepare the surfaces appropriately before the actual gluing process begins.
As mentioned before, there are several types of glue that can be used. While some will perform better than others depending on the situation, most importantly, one must choose a glue that is specifically designed to bond fiberglass and wood together.
This article is an excellent guide on how to glue wood to fiberglass, however, techniques to glue other materials may differ. If you want to learn about gluing other materials like metal to plastic, granite, rocks, pool tiles, or steel, check out our other resources on these topics.
Adding Design Elements
When gluing wood to fiberglass, you can also add design elements to your project. By adding different types of wood or shapes, you can create a unique look that enhances the overall appearance of your project. If you’re adding wood to the exterior of a boat or an automotive application, you can use the design to match the existing aesthetic.
When choosing different types of wood or shapes to add, you should consider their strength and durability. Woods like cedar or redwood are resistant to decay and rot, while still providing an attractive appearance. You can also choose to use exotic woods like teak, which are known for their durability and beautiful color. Adding decorative shapes like spirals or other patterns can also enhance the design.
To ensure a secure bond between the wood and fiberglass, choose a glue that can withstand environmental factors like humidity and temperature changes. Epoxy resin and polyurethane glue are good choices for this application. Before adding any design elements to your project, it’s important to test the glue on scrap pieces to ensure it adheres properly.
Adding design elements when gluing wood to fiberglass can add a personal touch to your project and create a unique look. Just be sure to choose a strong and durable glue and test it before moving forward with your design. Industrial glue might also be a good option for this application, depending on the specific needs of your project.
Creating Marine and Automotive Applications
Creating Marine and Automotive Applications
Gluing wood to fiberglass is a common practice in the marine and automotive industries. In the marine industry, boat builders often use wood and fiberglass to create the hull of the boat. Fiberglass provides the boat with strength and durability, while wood is often used for aesthetic purposes. Gluing wood to fiberglass is a great way to provide a secure and permanent bond between the two materials.
In the automotive industry, wood is often used for interior trim pieces, such as dashboards and door panels. Gluing wood to fiberglass can add a unique and stylish element to a car’s interior. It can also be used to repair and restore vintage cars, where wood and fiberglass were commonly used in the construction of car bodies.
When creating marine and automotive applications, it’s important to choose the right type of glue for the job. The glue needs to be strong, waterproof, and able to withstand the rigors of the marine and automotive environments. Epoxy resin is a popular choice for marine applications, while polyurethane glue is often used in automotive applications.
No matter the application, it’s crucial to prepare the surfaces properly before glueing. This will ensure that the bond between the wood and fiberglass is strong and long-lasting. Sanding the surfaces, cleaning them with a solvent, and applying a primer will help the glue adhere properly.
Gluing wood to fiberglass can be a great way to add strength, durability, and design elements to marine and automotive applications. With the right techniques and materials, it’s possible to create a bond that will last for years to come.
Internal link: What is B7000 glue?
Choosing the Right Type of Glue
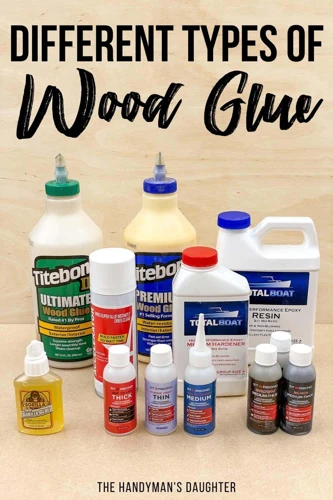
When it comes to gluing wood to fiberglass, choosing the right type of glue is crucial for the success of your project. Not all glues are created equal, and different types have varying degrees of strength, drying time, and waterproofing capabilities. It’s important to consider these factors when selecting the right glue for your specific project needs. In this section, we’ll explore the different types of glues commonly used for wood to fiberglass applications and their respective pros and cons. So, let’s dive in and find out which glue will work best for your project. If you want to know about other types of glue, check our article on how to glue granite.
Epoxy Resin
Instead of using traditional wood glue, epoxy resin can be used to attach wood to fiberglass for a stronger bond. Epoxy can bond to a wide range of materials and has excellent adhesive properties. Additionally, it is water-resistant and can withstand constant exposure to moisture. This makes it a great choice for marine and automotive applications where the bond will be exposed to water on a regular basis.
When using epoxy resin, it’s important to keep in mind that the drying time can be quite long. It typically takes 24-48 hours for the epoxy to fully cure, depending on the temperature and humidity of the environment. However, this time can be reduced if a faster drying epoxy hardener is used.
To use epoxy resin for attaching wood to fiberglass, follow these steps:
- Step 1: Prepare the surfaces. The surfaces to be bonded need to be clean and free of any dirt or debris. Sand the surfaces lightly to create a rough texture for better adhesion.
- Step 2: Mix the epoxy. Mix the epoxy resin and hardener according to the manufacturer’s instructions. Make sure to mix only the amount that can be used within the pot life of the epoxy. This is the amount of time that the resin can be worked with before it starts to set.
- Step 3: Apply the epoxy to the surfaces. Apply the mixed epoxy to both the wood and fiberglass surfaces using a brush or spatula. Spread it evenly to ensure complete coverage.
- Step 4: Clamp the pieces together. Clamp the wood and fiberglass pieces together firmly. Make sure that the pieces are aligned properly before the epoxy begins to set.
- Step 5: Let the epoxy dry. Leave the pieces clamped together until the epoxy has fully cured. This process can take 24-48 hours.
- Step 6: Trim the excess glue. Once the epoxy has dried completely, any excess glue can be trimmed away with a sharp knife.
- Step 7: Final sanding. Sand the area to create an even surface.
It is important to note that like other types of adhesives, epoxy resin has its limitations. It may not be suitable for all types of wood or fiberglass. It is always a good idea to test the epoxy on scrap pieces before applying it to the main project. Also, make sure to work in a well-ventilated area and wear protective gear such as gloves and a face mask to avoid inhaling any harmful fumes.
For more information on gluing different materials together, check out our other guides on how to glue metal to plastic, how to glue wax together, and how to glue rocks.
Polyurethane Glue
Polyurethane glue is a strong adhesive option for bonding wood to fiberglass due to its ability to expand and fill gaps during the curing process. This type of glue, also known as Gorilla Glue, is water-resistant and sets quickly. Polyurethane glue is ideal for those who need to complete a job quickly, as it dries in just 10 to 30 minutes. However, it is important to note that the glue will continue to expand for several hours after application, which may cause some complications if not handled correctly.
Here is a table that compares and contrasts the features of polyurethane glue with other types of glue:
| Polyurethane Glue | Epoxy Resin | Acrylic Adhesive | |
|---|---|---|---|
| Strength | Strong | Very Strong | Strong |
| Drying Time | 10 to 30 minutes, depending on temperature and humidity | 24 to 72 hours | 1 hour, depending on temperature and humidity |
| Waterproofing | Water-resistant, but not fully waterproof | Waterproof | Water-resistant |
Polyurethane glue also has a unique foaming property that can help fill gaps and irregularities in the surface of the materials being joined. This makes it an especially good choice for projects that require a tight and gap-free bond. Additionally, this type of glue can be sanded, stained, and painted over once it has fully cured.
However, polyurethane glue can be difficult to work with if not handled correctly. The glue must be applied carefully, as any excess glue that isn’t wiped away can expand and create unsightly foam during the curing process. It is also important to note that polyurethane glue may not be the best option for projects that require a completely waterproof bond, as it is only water-resistant and not fully waterproof.
Polyurethane glue is a strong adhesive option for bonding wood to fiberglass that dries quickly and expands to fill gaps during the curing process. While it may not be the best option for completely waterproof bonds, it is a good choice for projects that require a tight and gap-free bond. Remember to work carefully when using polyurethane glue and wipe away any excess glue to avoid unwanted foam during the curing process.
Acrylic Adhesive
Acrylic Adhesive is a popular glue used for bonding wood to fiberglass. It is a water-based adhesive that forms a strong bond and dries clear. Acrylic adhesive is also known as PVA glue or white glue.
Advantages
One of the main advantages of acrylic adhesive is its affordability. It is also readily available in most hardware stores. Another advantage of this adhesive is that it can be easily cleaned up with water.
Another advantage of acrylic adhesive is that it has a relatively fast drying time. It typically dries within an hour, but the drying time can vary depending on the temperature and humidity.
Disadvantages
Acrylic adhesive may not be the best choice for certain applications. It is not recommended for use on surfaces that will be submerged in water for extended periods, as it is not completely waterproof. For underwater applications of glue, you may consider epoxy glue.
Another disadvantage of acrylic adhesive is that it is not as strong as other types of adhesive, such as epoxy or polyurethane glue. It is not recommended to use this glue if you need a strong permanent bond.
Compatibility
Acrylic adhesive is compatible with most woods and fiberglass. However, before using acrylic adhesive, it is always a good idea to test it on a small piece of wood and fiberglass to ensure compatibility.
Summary Table
Here is a summary table to help you compare Acrylic Adhesive to other types of glue:
| Glue Type | Strength | Drying Time | Waterproofing |
|---|---|---|---|
| Acrylic Adhesive | Low to Medium | 1 Hour | Not Completely Waterproof |
| Cyanoacrylate (Super Glue) | High | 10-30 Seconds | Water Resistant |
| Epoxy Resin | High | 24 Hours | Completely Waterproof |
| Polyurethane Glue | High | 24 Hours | Completely Waterproof |
| Polyester Resin | High | 24 Hours | Completely Waterproof |
Conclusion
Acrylic Adhesive is a good choice for bonding wood to fiberglass for non-critical applications where a strong bond is not necessary. It is affordable, readily available, and has a fast drying time. However, it is not completely waterproof and may not provide the desired strength for certain applications. If you want complete watertight bonding, you may consider epoxy or polyurethane glue for your project.
Polyester Resin
Polyester resin is a type of adhesive that is commonly used in fiberglass applications. It is a two-part adhesive that consists of a resin and a hardener. When combined, the two parts create a strong, durable bond that can be applied to a variety of surfaces including fiberglass and wood.
Advantages of Polyester Resin
Polyester resin is an affordable, versatile adhesive that offers a number of advantages over other types of glues. One of the main advantages of polyester resin is its strength. It creates a very strong bond that is ideal for high-stress applications. It is also very resistant to water and other corrosive substances, making it ideal for outdoor projects.
Another advantage of polyester resin is its ability to fill gaps and voids in surfaces. This can be particularly useful when gluing wood to fiberglass, as it can help to create a seamless bond.
Disadvantages of Polyester Resin
While polyester resin has many advantages, it also has some disadvantages. One of the main disadvantages is its toxicity. Polyester resin gives off fumes that can be harmful if inhaled. It is important to work in a well-ventilated area when using polyester resin and to wear protective gear.
Another disadvantage of polyester resin is its drying time. It can take several hours for the adhesive to dry, which can be an issue if you are working on a project that requires a quick turnaround time.
Tips for Using Polyester Resin
Before using polyester resin, it is important to read the instructions carefully and to follow them closely. Here are a few additional tips to keep in mind:
- Store the resin and hardener in a cool, dry place away from direct sunlight.
- Mix the resin and hardener in the correct ratio to ensure a strong bond.
- Apply the adhesive to both surfaces that you wish to join.
- Use clamps to hold the pieces in place while the adhesive dries.
- Trim any excess adhesive with a razor blade or sandpaper.
Polyester resin can be a good option for gluing wood to fiberglass. However, it is important to take the necessary precautions when using it and to follow the instructions carefully to ensure a strong, durable bond. If you’re curious about how to glue steel, you can find more information in our article on How to Glue Steel to Steel: Step-by-Step Guide.
Cyanoacrylate (Super Glue)
Cyanoacrylate, commonly known as “Super Glue,” is a fast-drying adhesive that can bond a variety of materials, including wood and fiberglass. Super Glue is a popular adhesive because it is easy to use and dries quickly, making it ideal for quick fixes.
However, it is essential to note that Super Glue may not be the best option for bonding wood to fiberglass permanently. It is not waterproof and may not bond well under prolonged exposure to heat and sunlight.
If you still choose to use Super Glue, make sure to follow these tips:
- Use Sparingly: A little goes a long way with Super Glue. It sets quickly, so only apply a small amount at a time.
- Clean the surfaces: Ensure that the surfaces to be bonded are clean and dry. A dirty surface may inhibit or weaken the bond.
- Apply Pressure: To get the best results, apply pressure to the bond, such as clamping the pieces together, until the glue dries.
- Use a primer: Applying a primer can help the bond by creating a more secure surface.
- Be cautious: Super Glue is strong and binds quickly. Be careful when handling it not to get it on your skin, eyes, or clothing.
While Super Glue may be useful for temporary fixes, it may not be the best choice for permanent bonding of wood to fiberglass. Consider using other types of adhesive, such as Epoxy Resin or Polyurethane Glue for a more sturdy and waterproof bond.
Choosing Factors: Strength, Drying Time, and Waterproofing
When it comes to choosing the right glue for your wood to fiberglass project, there are several factors you need to consider to get the best possible outcome. Here are the key factors you need to keep in mind:
- Strength: It’s important to choose a glue that can hold up to the weight and stress of your application. Epoxy resin and polyurethane glue are two of the best choices for strong bonding.
- Drying Time: Depending on the size and complexity of your project, drying time can be a critical factor. Cyanoacrylate glue (Super Glue) dries very quickly and is ideal for small projects, while epoxy resin can take a few hours to dry.
- Waterproofing: If your project is exposed to water or moisture, it’s important to choose a glue that can resist those conditions. Epoxy resin, polyurethane glue, and polyester resin are great options for waterproofing.
It’s crucial to choose a glue that fits your specific needs and requirements. Take the time to carefully evaluate your project and determine which glue will give you the best results. Keep in mind that some glues may be more expensive than others, but they could save you time and money in the long run by providing a stronger and more durable bond.
Preparing the Surfaces
Before applying glue to wood and fiberglass, it is essential to prepare the surfaces properly. This step is crucial to ensure that the glue adheres well to both materials and creates a strong bond. The preparation process involves cleaning the surfaces, sanding them, and applying a primer to promote adhesion. These steps may seem time-consuming, but they are vital for a successful gluing process. Skipping or rushing through any of these steps can lead to a weak bond and might result in the project falling apart. Let’s dive deeper into the surface preparation process and explore each step in detail.
Cleaning the Surfaces
Before gluing wood to fiberglass, it is essential to clean the surfaces thoroughly. Any dirt, grease, or debris can compromise the bonding process, resulting in a weak joint. Follow the steps below to ensure a clean surface for gluing:
- Remove any loose particles: Begin by using a soft-bristled brush or compressed air to remove any loose particles from the surface of both the wood and fiberglass. This step is crucial as it ensures that the surfaces are clean and free from any debris that can compromise the bonding process.
- Clean with soap and water: Next, grab a clean rag and dip it into a solution of warm water and dish soap. Wring out any excess water from the rag and use it to clean the surface of the wood and fiberglass thoroughly. Be sure to remove any dirt, grease, or contaminants that can affect the bond. Rinse with clean water and let it dry completely.
- Use acetone or denatured alcohol: After cleaning with soap and water, a final wipe down with acetone or denatured alcohol helps ensure that the surfaces are free from any contaminants. Dampen a clean rag with acetone or denatured alcohol and wipe down the surfaces. This step will help remove any remaining dirt or grease that the soap and water could not remove.
By cleaning the surfaces properly, you ensure that the bonding process will be successful, and the bond will last. Remember, the key to a strong bond is a clean and stable surface.
Sanding the Surfaces
Before bonding wood to fiberglass, it is important to properly sand the surfaces to ensure that they are smooth and have enough texture for the glue to adhere to. Sanding the surfaces is a crucial step in the preparation process and can make or break the bond between the materials.
To begin, gather the necessary materials, such as sandpaper or a sanding block, and a dust mask to protect yourself from inhaling any particles. Start by sanding the fiberglass surface with coarse grit sandpaper to create a rough and textured surface for the glue to adhere to. Use light pressure and work in a circular motion, being careful not to sand too aggressively and damage the fiberglass.
Once the fiberglass surface is adequately sanded, move on to the wood surface. Sand it in the same way as the fiberglass, with a coarse grit sandpaper. This will remove any rough spots and create a textured surface that is easier for the glue to bond to. Be sure to sand the edges of the wood pieces to promote a more seamless bond.
After sanding, use a vacuum or compressed air to remove any sawdust or debris left on both surfaces. This will ensure that the glue can properly bond to the surfaces.
| Sanding Tips: |
|---|
| Use a dust mask to avoid inhaling particles |
| Sand in a circular motion with light pressure |
| Start with a coarse grit sandpaper and move to a finer grit |
| Be careful not to sand too aggressively and damage the material |
| Sand the edges of the wood pieces as well |
| Remove all sawdust and debris before gluing |
By properly sanding the surfaces before gluing, you will create a strong bond that will last. Taking the time to prepare the surfaces is a crucial step in the process of gluing wood to fiberglass and will ensure a successful end result.
Applying a Primer
Before applying glue to wood and fiberglass surfaces, it’s important to properly prepare and prime them for adhesion. Here are the steps you should follow to apply a primer before gluing wood to fiberglass:
- Clean the surfaces: The surfaces should be clean and free of any debris or dust. Use a clean cloth and some acetone to wipe the surfaces thoroughly.
- Sand the surfaces: Use a medium-grit sandpaper to lightly sand both the wood and fiberglass surfaces. This will help create more surface area for the primer to adhere to.
- Apply the primer: Using a brush, apply a thin layer of primer to the surfaces. Make sure to follow the manufacturer’s instructions for best results. Allow the primer to dry completely before applying the glue.
Applying a primer is an important step in ensuring that the wood and fiberglass surfaces bond properly. The primer creates a barrier between the two surfaces and gives the glue a better surface to adhere to. Using a primer can also improve the overall strength of the bond and prevent any future separation. Make sure to choose a primer that is compatible with both the wood and fiberglass materials. By following these steps, you’ll be on your way to creating a strong and durable bond between wood and fiberglass.
Gluing Wood to Fiberglass

So, you’ve chosen the perfect glue and prepared the surfaces properly. Now, it’s time to start gluing wood to fiberglass. This may seem like a daunting task, but with the right techniques and a bit of patience, you’ll be able to complete the project with ease. In this section, we’ll guide you through the steps of applying the glue, clamping the pieces together, and finishing the process. Let’s dive in!
Applying the Glue
Before applying the glue, make sure that the surfaces are clean and dry. A damp surface can cause the glue to react and weaken the bond. Once the surfaces are ready, it’s time to apply the glue. Here’s how:
Step 1: Squeeze the glue out onto one surface. Use a spatula or brush to spread the glue evenly over the surface, making sure to cover the entire area.
Step 2: Apply the glue to the other surface in the same manner.
Step 3: Bring the two surfaces together, aligning them carefully. Apply pressure to ensure a tight bond, but don’t press so hard that the excess glue is squeezed out.
Step 4: Check for any gaps between the two surfaces. If there are gaps, apply more glue and press the surfaces together again.
Step 5: Once the pieces are clamped together, check for any excess glue that may have squeezed out. Use a damp cloth or paper towel to wipe away any excess glue.
Step 6: Let the glue dry according to the manufacturer’s instructions. Don’t disturb the pieces during this time, as it could affect the bond.
Remember, different types of glue have different drying times. Some may dry in as little as 15 minutes, while others may take several hours to dry completely. Be sure to read the instructions on the label carefully.
By following these steps and choosing the right glue, you can achieve a strong bond between wood and fiberglass. However, it’s important to take safety precautions when using glue and to work in a well-ventilated area. Additionally, always test the glue on scrap pieces before using it on your project to ensure that it’s the right choice.
Clamping the Pieces Together
One of the most critical steps when gluing wood to fiberglass is clamping the pieces together to ensure a strong bond. Securing the surfaces in place with the appropriate amount of pressure will increase the chances of a successful adhesive application. Here’s what you’ll need to know about clamping:
| Factor | Description |
|---|---|
| Clamp Types | There are numerous types of clamps available. Some of the most popular ones include spring clamps, bar clamps, hand screws, and C-clamps. The anvil-style C-clamp is commonly used because it is easy to place and position. |
| Clamp Placement | You will want to space your clamps approximately 6-8 inches apart from one another. This spacing ensures a uniform bond across the entire glued surface. For particularly large projects, consider using additional clamps to ensure an even distribution of pressure. |
| Clamp Pressure | When applying clamp pressure, be sure to strike the right balance to avoid damaging the materials or disrupting the adhesive strength. Use enough pressure to close any gaps between the surfaces without squeezing out excess adhesive. |
| Clamp Time | The time required to keep the clamps in place depends on the specific adhesive being used. Read the manufacturer’s instructions for suggested clamp times. Once you remove the clamps, let the glue dry completely before proceeding to the next step. |
Taking the time to prepare the surfaces and apply the right amount of clamping pressure is essential for creating a strong and durable bond between wood and fiberglass. Once you have secured the surfaces together, move on to letting the glue dry before trimming the excess glue and sanding the surfaces down to a smooth finish.
Letting the Glue Dry
After applying the glue and clamping the pieces together, it’s important to let the glue dry thoroughly to ensure a strong and lasting bond. The drying time for different types of glue can vary, so it’s important to refer to the manufacturer’s instructions for specific guidance.
Glue Type | Drying Time
— | —
Epoxy Resin | 24-72 hours
Polyurethane Glue | 4-24 hours
Acrylic Adhesive | 24 hours
Polyester Resin | 24-48 hours
Cyanoacrylate (Super Glue) | 10-30 seconds
It’s important to note that temperature and humidity can also affect drying time. Generally, higher temperatures and lower humidity will lead to faster drying times, while lower temperatures and higher humidity can slow down the process.
During the drying period, it’s important to keep the clamped pieces in a stable and undisturbed position to prevent any movement or shifting of the pieces. If the pieces are moved or shifted during the drying process, it can lead to a weak bond or even a complete failure of the glue joint.
Once the glue is completely dry, remove the clamps and check the bond strength. If there are any weak spots or gaps in the joint, apply additional glue and clamp the pieces again. It’s important to note that the full strength of the bond may not be achieved immediately after the glue has dried and may continue to strengthen over time.
There may be excess glue that has seeped out from the joint during the drying process. Trim off any excess glue with a sharp chisel or sandpaper, taking care not to damage the surrounding surfaces.
The final step is to perform a final sanding of the joint to ensure a smooth and seamless finish. Use fine-grit sandpaper to carefully sand the joint, taking care not to sand away too much material or damage the surrounding surfaces. This will ensure a smooth and professional-looking finish for your project.
Trimming the Excess Glue
After the glue has fully dried, you can proceed to trim the excess glue from the joint. This is an essential step as it not only improves the appearance of the finished product but also reduces the amount of sanding required.
To trim excess glue, you will need a sharp chisel or scraper. The process involves gently scraping away the glue that has squeezed out from the joint. Be sure to hold the chisel at a shallow angle and carefully scrape off the excess glue without damaging the wood or fiberglass.
It is important to make the edge of the joint neat and attractive. This is especially important if you plan to paint or varnish the finished product.
Here’s a helpful table outlining some tips for trimming excess glue:
| Tips for trimming excess glue: |
|---|
| Use a sharp chisel or scraper |
| Hold the chisel at a shallow angle |
| Be careful not to damage the wood or fiberglass |
| Trim away all visible glue |
| Make the joint edge neat and attractive |
By following these tips, you will be able to trim excess glue safely and effectively, leaving you with a clean, professional-looking joint.
Final Sanding
After the glue has dried, it’s time to perform the final sanding to ensure a smooth and even finish. This step is critical for achieving a professional and polished look. Here’s how to do it:
- Start by using coarse-grit sandpaper, such as 60 or 80 grit, to sand down any high spots or excess glue that may have squeezed out during the clamping process. Be sure to sand evenly and with moderate pressure to avoid damaging the wood or fiberglass.
- Next, switch to a finer-grit sandpaper, such as 120 or 150 grit, and continue sanding the joint until it feels smooth to the touch. Take your time and use light pressure to avoid creating visible scratches or divots in the surface.
- As you are sanding, inspect the joint closely for any imperfections that may need additional attention. If necessary, apply a small amount of wood filler or epoxy putty to fill in gaps or holes. Sand these areas carefully once they have dried.
- After you’ve sanded the joint to your satisfaction, wipe it down with a clean, damp cloth to remove any dust or debris left from the sanding process.
- Finally, apply a coat of primer or sealer to the joint to protect it from moisture and provide a smooth surface for painting or staining. Let the primer or sealer dry completely before proceeding with any further finishing steps.
It’s important to take your time and be patient while sanding the joint to ensure a high-quality finish. Rushing this step can lead to a rough, uneven surface that will detract from the overall appearance of the project. By following these steps and using the right techniques and materials, you can achieve a strong and attractive bond between wood and fiberglass that will last for years to come.
Tips and Tricks
When it comes to gluing wood to fiberglass, every detail matters. To ensure that your project comes out perfect, it’s important to know a few tips and tricks. These tips will help you avoid common mistakes and make the gluing process easier. To help you get started, we’ve compiled some valuable advice that will help you achieve the desired results. From working in a well-ventilated area to testing the glue on scrap pieces, let’s explore some simple but effective tips and tricks that can make a big difference in the success of your project.
Working in a Well-Ventilated Area
Ensuring proper ventilation is crucial when working with any type of adhesive, including those used for gluing wood to fiberglass. Without proper ventilation, the fumes emitted by the glue can be harmful to your health, causing dizziness, headaches, and even nausea. It is essential to work in a well-ventilated area.
Why is ventilation important when working with adhesives?
When an adhesive is applied, it releases fumes into the air. These fumes can accumulate in an enclosed space, which is why proper ventilation is necessary. The fumes can lead to respiratory problems and even be flammable, potentially leading to a fire or explosion. Inhaling these fumes can also be harmful to your health, causing irritation to your eyes, nose, throat, and lungs.
How to create a well-ventilated workspace
To ensure proper ventilation while gluing wood to fiberglass, it is best to work in an open and well-ventilated area, like a garage or outdoor workspace. If you are unable to work in an open area, then ensure that the workspace has good ventilation by opening windows and doors. You can use a fan or ventilation system to circulate the air properly.
Wearing a mask and protective gear
In addition to working in a well-ventilated area, it is important to wear a mask and other protective gear. This will help reduce your exposure to the fumes and minimize any harm to your health. You can use a respirator mask to filter out any harmful chemicals in the air. Wearing gloves and protective eyewear is also recommended to avoid direct contact with the adhesive and any other materials.
Conclusion
Proper ventilation is an essential part of working with adhesives, including when gluing wood to fiberglass. Always ensure that you are working in a well-ventilated area, wearing protective gear like a mask and gloves, and using a fan or ventilation system to circulate the air. By following these precautions, you can safely and effectively complete your project.
Wearing Protective Gear
It is important to take safety seriously when working with adhesives. Wearing protective gear can protect you from exposure to toxic chemicals and prevent injuries. Here are some essential protective gear you should wear when gluing wood to fiberglass:
| Protective Gear | Purpose |
|---|---|
| Gloves | Protect your hands from getting in direct contact with the adhesive, preventing chemical burns or skin irritation. |
| Eye Protection | Protect your eyes from adhesive splashes, droplets, and dust. |
| Respirator | Prevent inhalation of fumes and vapors from the adhesive, which can be harmful to your lungs. |
| Apron or Disposable Clothing | Protect your clothing from adhesive spills, which can be difficult to remove and make you uncomfortable. |
Always use protective gear that is appropriate for the type of adhesive you are using. Some adhesives may require additional protective gear, so be sure to read the instructions on the label or consult with an expert before starting your project.
Don’t take chances with your safety. By wearing protective gear, you can reduce the risk of injury and exposure to toxic chemicals, and ensure a safer working environment.
Testing the Glue on Scrap Pieces
Before applying the glue to the wood and fiberglass, it’s important to make sure it will hold strong. One way to do this is by testing the glue on scrap pieces of both materials first.
Here are the steps:
- Take a small piece of wood and fiberglass and apply the chosen glue to each piece.
- Place the two pieces together and give them some time to dry according to the glue’s instructions.
- Once the glue has dried, try to separate the two pieces of material. If the bond is strong and the pieces are difficult to separate, then the glue is suitable for the job.
- If the bond is weak and the pieces easily separate, then try another glue until finding the right one that will create a strong bond.
Testing the glue on scrap pieces may save time and money in the long run, as it prevents applying the glue to the actual pieces that need to be bonded only to have them fail later on. This step ensures that the chosen glue will bond the wood to the fiberglass with the desired strength and durability.
Avoiding Glue Starvation
One of the main challenges when gluing wood to fiberglass is avoiding glue starvation. This occurs when the fiberglass absorbs too much of the glue, leaving the wood without enough adhesive to create a strong bond. Here are some tips to prevent this:
- Apply glue generously: When applying the glue, make sure to use enough to account for absorption by the fiberglass. It’s better to have a little excess than not enough.
- Use a filler: If you’re worried about glue starvation, you can add a filler, such as sawdust or microballoons, to the glue. This will help it bridge gaps and create a stronger bond.
- Apply pressure: Applying pressure with clamps or weights can help squeeze excess glue out of the fiberglass and onto the wood. This will ensure that both surfaces have enough glue for a secure bond.
- Apply in stages: Rather than trying to glue the entire surface at once, apply glue and clamp smaller sections at a time. This will give you more control over the amount of glue used and prevent starvation.
By following these tips, you can avoid glue starvation and create a strong bond between the wood and fiberglass. Remember to experiment with scrap pieces before committing to a larger project, and always wear protective gear when working with glue and fiberglass.
Conclusion
After reading this complete guide, you should feel confident in your ability to glue wood to fiberglass. You now know the benefits of gluing wood to fiberglass, the different types of glue available, and how to prepare your surfaces to ensure a strong bond.
Remember that when choosing the type of glue to use, you need to consider the factors of strength, drying time, and waterproofing. Make sure to clean and sand the surfaces before applying primer and glue.
When gluing the wood to the fiberglass, take your time and carefully apply the glue. Use clamps to keep the pieces together and allow plenty of drying time before removing the clamps. Once the excess glue has been trimmed and the final sanding is complete, you will have a strong and visually appealing bond.
It is important to work in a well-ventilated area, wear protective gear, and test on scrap pieces to avoid any mistakes or injury. Always remember to avoid glue starvation to ensure the best results.
Overall, gluing wood to fiberglass can be a great way to improve structural strength, add design elements, and create marine and automotive applications. By following this guide, you can successfully complete your project and enjoy the benefits of a strong and long-lasting bond.
Frequently Asked Questions
1. Can any glue be used to bond wood to fiberglass?
No, not all glue types are suitable for bonding wood to fiberglass. You need to choose a glue type that is specifically designed for this purpose.
2. How do I know which type of glue to use?
Consider the drying time, waterproofing capabilities, and strength needed for your project. Epoxy resin, polyurethane glue, and cyanoacrylate are among the best options for this type of bond.
3. What safety precautions should I take while working with glue?
Wear protective gear, work in a well-ventilated area, and avoid getting the glue on your skin. In case of skin contact, rinse with water immediately.
4. Do I need to sand the surfaces of the wood and fiberglass before gluing them?
Yes, the surfaces need to be sanded to create a rough surface for the glue to adhere to. This improves the strength of the bond.
5. What primer should I use on the surfaces?
Choose a primer made for both wood and fiberglass to ensure the best possible bond.
6. Can I glue wood to fiberglass without clamping the pieces together?
No, clamping the pieces together is necessary to ensure that they bond together without any gaps.
7. How long does it take for the glue to dry?
Most glues recommended for this type of bond take anywhere from a few hours to overnight to dry completely.
8. Can I trim the excess glue after it has dried?
Yes, once the glue has dried, you can use a sharp blade or sandpaper to trim any excess glue that may have seeped out of the bond.
9. What do I do if the bond fails?
If the bond fails, you need to re-sand the surfaces, reapply the primer, and repeat the gluing process. If necessary, consider using a stronger glue type or clamping the pieces together for a longer period of time.
10. How can I test the glue before applying it to my project?
You can test the glue on a small scrap piece of wood and fiberglass. This helps you determine the strength and drying time of the glue and see how it reacts to the surfaces.