Metal and wood are two popular materials used in various DIY projects and home repairs. When it comes to bonding metal to wood, using the right adhesive is essential to ensure a strong and durable bond. With so many adhesives available, it can be overwhelming to make a choice. In this article, we’ll discuss the best adhesives for gluing metal to wood and provide a step-by-step guide on how to achieve a successful bond. We’ll also give you some tips on surface preparation and other factors to consider when choosing the right adhesive. By the end of this article, you’ll have all the information you need to make an informed decision for your project.
Why is Choosing the Right Adhesive Important?
Choosing the right adhesive is critical when it comes to gluing metal to wood. Metal and wood have different physical properties, so using the wrong adhesive can result in weak bonds that can fail under stress.
Factors to Consider When Choosing an Adhesive
Before choosing an adhesive, there are several factors to consider. The first factor is the type of metal and wood you are bonding. Some metals, such as aluminum, require special adhesives. Likewise, certain woods, such as cedar or teak, can also be problematic when it comes to adhesion.
The second factor is the strength of the bond required. If the bonded surfaces will be subjected to heavy loads or stress, a stronger adhesive will be required.
Another factor to consider is the environment in which the bonded surfaces will be used. Will the surfaces be exposed to moisture, heat, or cold? Some adhesives are better suited to different environmental conditions.
Finally, the curing time of the adhesive is also a factor to consider. Some adhesives cure quickly, while others can take several hours or even days to fully cure.
It’s crucial to take these factors into account when selecting the right adhesive for your project. Using the wrong adhesive can cause the bond to fail, which can be dangerous as well as costly.
Types of Adhesives for Metal-to-Wood Bonding
There are several types of adhesives that can be used for bonding metal to wood. The most commonly used adhesives include:
Epoxy Adhesives: Epoxy adhesives are particularly suited for bonding metal to wood because of their strength and toughness. Epoxy adhesives can also withstand a wide range of temperatures and can be used in high-stress applications.
Polyurethane (PU) Adhesives: PU adhesives are a good choice if flexibility is required in the bonded area. These adhesives are known for their strength and resistance to impact and vibration.
Cyanoacrylate (CA) Adhesives: Also known as superglue, CA adhesives are ideal for bonding small metal parts to wood. These adhesives cure quickly and can create a strong bond when used correctly.
Urethane Adhesives: Urethane adhesives are a good choice for bonding dissimilar materials, such as metal and wood. These adhesives are also highly resistant to impact and weathering.
Silicone Adhesives: Silicone adhesives are a good choice if a watertight bond is required. These adhesives are also highly resistant to heat and cold.
Mechanical Fasteners: Mechanical fasteners, such as bolts or screws, can be used to bond metal to wood. However, these fasteners can weaken over time and require regular maintenance.
Conclusion
Choosing the right adhesive is essential when it comes to bonding metal to wood. Make sure to take into account the type of metal and wood, the strength of the bond required, the environmental conditions, and the curing time of the adhesive. By selecting the right adhesive, you can ensure a strong and durable bond between metal and wood. If you are also interested in bonding metal to concrete, check out our article on this topic.
Factors to Consider When Choosing an Adhesive
When choosing an adhesive for metal-to-wood bonding, there are several crucial factors to consider to make sure you achieve a successful and long-lasting bond. The first factor to consider is the strength of the bond you require. Depending on the application, you may need an adhesive that can withstand high levels of stress, bending, and impact.
Another factor to consider is the compatibility of the adhesive with the materials you are bonding. While some adhesives work well with certain metals and wood types, they may not work with others. It’s important to choose an adhesive that is specifically formulated for bonding metal to wood.
The curing time of the adhesive is also important to consider. Some adhesives cure quickly and form a bond in minutes, while others take longer to cure. If you have a project that requires quick bonding, you may prefer an adhesive with a short curing time.
The temperature and humidity conditions of the application area are also critical factors to consider. Some adhesives require certain temperature and humidity conditions to cure properly. It’s important to choose an adhesive that can withstand the conditions of the application area.
Finally, consider if the adhesive should be visible or invisible after application. If you want the bond to be invisible, choose an adhesive that dries clear and doesn’t leave a residue.
Considering these factors, you can narrow down your options and choose an adhesive that best suits your needs. In the next section of this article, we’ll discuss the different types of adhesives suitable for metal-to-wood bonding and their specific advantages and disadvantages.
Types of Adhesives for Metal-to-Wood Bonding
When it comes to bonding metal to wood, there are several types of adhesives to choose from. Each type has its own unique properties and is best suited for specific applications. It’s important to choose the right adhesive to ensure a strong and durable bond between the two surfaces.
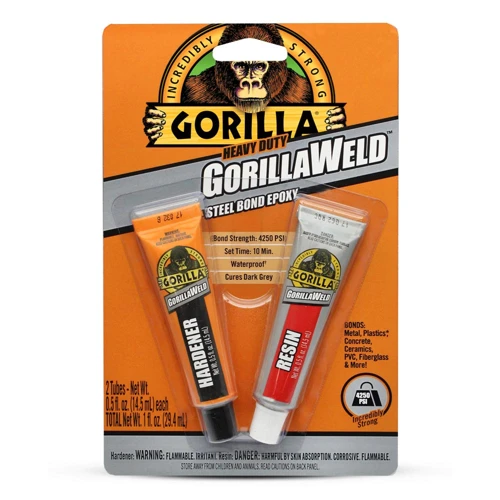
Epoxy Adhesives: Epoxy adhesives are known for their high strength and durability. They consist of two parts, a resin and hardener, which are mixed together before application. Once mixed, the adhesive begins to set and harden. Epoxy adhesives are ideal for bonding metal to wood because they can withstand high stress and strain.
Polyurethane (PU) Adhesives: Polyurethane adhesives are also popular for metal-to-wood bonding. They can bond a wide range of materials, including metal and wood, and are resistant to water and heat. They are also flexible and can absorb shock, making them ideal for applications where there is movement or vibration.
Cyanoacrylate (CA) Adhesives: Often referred to as superglue, cyanoacrylate adhesives bond quickly and are ideal for bonding small metal parts to wood. They are not as strong as epoxy or polyurethane adhesives, but they are fast-drying and easy to use.
Urethane Adhesives: Urethane adhesives are moisture-curing adhesives that are known for their strength and durability. They are ideal for bonding metal to wood because they are resistant to water and heat. They also have good chemical resistance and can bond a variety of materials.
Silicone Adhesives: Silicone adhesives are flexible and can withstand extreme temperatures, making them ideal for high-temperature applications. They are also resistant to water and chemicals, making them a good choice for outdoor applications. However, they are not as strong as other types of adhesives and may not be suitable for heavy-duty bonding applications.
Mechanical Fasteners: Another option for bonding metal to wood is to use mechanical fasteners such as screws, nuts, and bolts. These are ideal for heavy-duty applications where a strong, permanent bond is required. However, they may not be suitable for applications where a seamless appearance is required.
The best adhesive for bonding metal to wood will depend on the specific application and the strength required. It’s important to choose an adhesive that is strong, durable, and can withstand the conditions the bond will be exposed to.
E6000 glue is another popular adhesive that can be used for metal-to-wood bonding. It is known for its industrial strength and versatile bonding capabilities. However, it is primarily used for bonding plastics, fabrics, and other materials and may not be the best choice for metal-to-wood bonding.
Epoxy Adhesives
When it comes to gluing metal to wood, epoxy adhesives are a popular choice for their strong and durable bond. Epoxy consists of a resin and a hardener that are combined to create a chemical reaction and bond the metals and wood together. The resulting bond is highly resistant to water, heat, and chemicals, making it perfect for industrial and outdoor applications. Epoxy adhesives can also fill gaps between surfaces and can be sanded and painted over once cured.
One important factor to consider when using epoxy is the curing time. Epoxy adhesives can take anywhere from a few minutes to several hours to fully cure, depending on the type and brand of the adhesive. Some epoxies require a curing period of up to 48 hours before the bond reaches full strength, so patience is crucial during the bonding process. It’s also important to note that epoxy can be brittle and break under stress if not applied properly.
To use epoxy adhesive for gluing metal to wood, first, clean and dry the surfaces being bonded thoroughly. Mix the resin and hardener together according to the instructions on the package, and then apply the mixture evenly to one surface using a brush or a spatula. Press the metal and wood surfaces together firmly, making sure the adhesive spreads evenly. Clamp the bonded surfaces into place and leave to cure for the recommended time.
It’s worth noting that some epoxies have UV stabilizers that provide added resistance to the sun’s harmful rays. This feature can be particularly useful when gluing metal to wood for outdoor applications since it will prevent the bond from breaking down over time due to UV damage.
Epoxy adhesives are an excellent choice for bonding metal to wood due to their strength, durability, and resistance to various environmental factors. However, it’s crucial to choose the right type of epoxy and follow the instructions carefully to ensure a successful bond.
Polyurethane (PU) Adhesives
Polyurethane (PU) Adhesives: Polyurethane (PU) adhesives are known for their exceptional strength and flexibility, making them suitable for bonding metal to wood. They have a high resistance to impact and vibration, which means that the bond created is more durable and long-lasting. Additionally, PU adhesives offer good resistance to moisture and chemicals, which makes them ideal for outdoor metal-to-wood bonding applications.
One of the benefits of PU adhesives is that they have a longer open time, which gives the user more time to work with the adhesive before it sets. They are also able to bond a variety of metal surfaces to wood, including aluminum, brass, copper, and steel.
Before applying the adhesive, it is important to ensure that both the metal and wood surfaces are clean and free of any contaminants such as dirt, oil, or grease. This can be accomplished by wiping the surfaces down with a clean cloth and a mild solvent such as alcohol.
When applying PU adhesive to metal and wood surfaces, it is important to apply an even layer of the adhesive to one surface and then press the two surfaces firmly together. Clamping or holding the surfaces together with a weight is highly recommended to ensure a strong bond. PU adhesives typically cure in 24 to 48 hours, depending on temperature and humidity.
As with any adhesive, it is important to follow the manufacturer’s instructions for use and safety. Wear gloves and avoid getting the adhesive on your skin or in your eyes. If the adhesive does come in contact with the skin, it can be removed with soap and water or a skin adhesive remover.
Polyurethane (PU) adhesives are a great choice for bonding metal to wood because of their strength, flexibility, and resistance to impact, vibration, and moisture. With proper surface preparation and application techniques, a strong and long-lasting bond can be achieved. For more information on specific bonding applications, check out our related articles linked below.
Cyanoacrylate (CA) Adhesives
Cyanoacrylate (CA) Adhesives are popularly known as superglue. They have a fast-setting time, making them ideal for quickly bonding metal to wood. CA adhesives form a strong bond that can hold small parts together with ease. They work well in projects that don’t have a heavy load, but they are not recommended for high-stress applications.
Choosing the right CA adhesive is important to ensure a successful bond. Low-viscosity cyanoacrylates penetrate the surface of the materials and create a strong bond. On the other hand, high-viscosity cyanoacrylates are ideal for bonding irregular surfaces.
One downside to using CA adhesive is that it has poor resistance to heat and chemicals. It is not recommended for projects that will be exposed to extreme temperatures or chemicals.
When using CA adhesive, it is crucial to follow safety precautions. These adhesives release fumes that can irritate the eyes and throat, so it is important to use them in a well-ventilated area. It is also essential to keep them out of reach of children.
To achieve the best results when using CA adhesive, ensure that the surfaces to be bonded are clean and dry. Roughen up the metal surface with sandpaper to improve adhesion. Apply a small amount of the adhesive to one surface, press the two surfaces together and hold them firmly for 10 to 30 seconds.
CA adhesive is an excellent choice for bonding metal to wood, especially for small projects with minimal stress. However, it’s not the right choice for projects exposed to heat and harsh chemicals. If you’re looking to glue more challenging materials together or in higher-load applications, consider using other adhesives like epoxy or polyurethane.
If you’re interested in learning more about gluing resin to plastic, you can check out our guide on how to glue resin to plastic.
Urethane Adhesives
Urethane Adhesives: Another type of adhesive that can bond metal to wood is a urethane adhesive. Urethane adhesives are known for their high-strength bonding and flexibility, making them ideal for bonding materials that experience constant movement and vibration or have different coefficients of thermal expansion. They also offer excellent resistance to water, chemicals, and UV radiation, making them perfect for outdoor applications.
One of the popular urethane adhesives that is used for metal-to-wood bonding is the Sikaflex-252 adhesive. This adhesive is designed for use in structural bonding applications and can provide a strong and flexible bond between metals and woods, making it ideal for automotive and marine applications.
When using urethane adhesives, it’s essential to follow the manufacturer’s instructions carefully and ensure that the surfaces are clean, dry, and free of any debris before applying the adhesive. The bonding surfaces should also be slightly roughened or sanded to promote adhesion. Additionally, it’s recommended to use clamps or other holding devices to keep the surfaces in contact until the adhesive cures fully.
Urethane adhesives are a excellent choice for bonding metals to woods, thanks to their high-strength bonding, flexibility, and resistance to environmental factors. However, they can be challenging to remove once cured, so it is important to ensure proper positioning and alignment before bonding. If you want to learn more about how to glue countertop with urethane adhesives, click here.
Silicone Adhesives
Silicone Adhesives are versatile and multi-purpose adhesives that work well for bonding metal to wood. One of their most significant benefits is their excellent resistance to high temperatures, making them a perfect choice for applications where heat is a concern. They are also great at filling gaps and offer good sealing capabilities.
Silicone adhesives come in two forms: one-part and two-part. One-part silicone adhesives cure at room temperature when exposed to humidity, while two-part silicone adhesives require mixing before application. They have excellent flexibility and can withstand high stress and impact.
When using silicone adhesives, the surfaces to be bonded must be clean and free from any dirt, dust, or debris. Unlike other adhesives, surfaces to be bonded with silicone adhesives do not need to be roughened or sanded.
One of the drawbacks of silicone adhesives is their relatively low strength compared to other adhesives, such as epoxies or polyurethanes. They may not be the best choice for applications that require a high degree of bonding strength.
Nevertheless, they are still great options for bonding certain types of metal to wood, such as aluminum or stainless steel. They can also be used for sealing and waterproofing applications.
Internal link: If you want to learn more about gluing rocks to wood, check out our article on ‘How to Glue Rocks to Wood‘.
Mechanical Fasteners
Mechanical fasteners, such as screws and nails, are another option for bonding metal to wood. Unlike adhesives, they do not require any curing time and can provide an immediate and secure hold. However, they do have some drawbacks.
One concern is the risk of splitting the wood when driving in fasteners. To prevent this, it’s important to pre-drill pilot holes in the wood before inserting screws or nails. This can also help to ensure that the fastener goes in straight and flush with the surface.
Another consideration with mechanical fasteners is their aesthetic appeal. While they can be covered with wood filler and sanded down to create a seamless appearance, there will still be visible holes where the fasteners were inserted. This might not be desirable for certain projects where a clean and smooth finish is needed.
Mechanical fasteners are not always the most durable option. Over time, the metal and wood can expand and contract at different rates due to changes in temperature and humidity. This can cause the fasteners to loosen and create gaps in the bond. In such cases, supplementary adhesives may be needed to strengthen the joint and maintain a tight hold.
Mechanical fasteners can be a quick and easy solution for bonding metal to wood, especially for temporary or low-stress applications. However, they may not be the best choice for long-term or high-stress projects where stability and durability are critical. For such situations, using a strong adhesive such as epoxy or Loctite can offer better bonding performance.
How to Prepare the Surfaces for Gluing
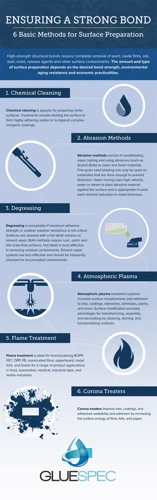
Proper surface preparation is crucial in achieving a strong bond between metal and wood. Before gluing, make sure that both surfaces are clean, dry, and free of any debris or grease.
Cleaning the Metal Surface
If the metal surface is dirty or greasy, use a degreaser or rubbing alcohol to clean it. Scrub the surface with a clean cloth until no dirt or grease remains. Once the metal surface is clean, use sandpaper or a wire brush to roughen it. This process will create a texture that will help the adhesive bond better to the metal surface. Make sure to wipe the surface with a clean cloth to remove any debris from the sanding or brushing.
Preparing the Wood Surface
For wooden surfaces, ensure that the surface is smooth and free of any bumps, ridges, or splinters. If necessary, sand the surface of the wood until it is smooth. Avoid using water to clean the surface of the wood, as this can cause it to swell. Instead, use a dry cloth to wipe the surface clean.
Using a Primer
Some adhesives may require the use of a primer before gluing. Primers contain chemicals that help increase the bond strength between the adhesive and the surfaces being bonded. Follow the instructions provided by the adhesive manufacturer to determine if a primer is necessary and which one to use.
By following these steps to prepare the surfaces for gluing, you can ensure that the bond between the metal and wood is strong and long-lasting. For more information on gluing different materials together, check out our articles on how to glue an undermount sink, how to glue rubber to glass, and how to glue rubber to wood.
Step-by-Step Guide to Gluing Metal to Wood
When it comes to gluing metal to wood, following a step-by-step guide can make the process easier and ensure a strong bond. Here are the key steps to follow:
Step 1: Surface Preparation
Before gluing, the metal and wood surfaces must be clean and free of dust and debris. Use a degreaser to remove any oils or grease from the metal surface. Sand the wood surface to remove any old finishes, paint, or rough spots. If necessary, use a solvent such as acetone to remove any remaining debris.
Step 2: Choosing the Right Adhesive
As discussed earlier, there are several types of adhesives to choose from when bonding metal to wood. Consider the environment in which the bond will be used, the load-bearing requirements, and the curing time needed. Choose an adhesive that is compatible with both the metal and wood surfaces.
Step 3: Adhesive Application
Follow the manufacturer’s instructions for mixing and applying the adhesive. Apply a thin layer of adhesive to one of the surfaces, using a brush or applicator. Be careful not to apply too much adhesive, as this can cause the bond to weaken.
Step 4: Clamping or Holding the Bonded Surfaces Together
Once the adhesive has been applied, hold or clamp the metal and wood surfaces together until the adhesive sets. The amount of time required for the adhesive to set will vary depending on the type of adhesive used. Follow the manufacturer’s recommended curing time.
Step 5: Cleaning Up
After the adhesive has set, gently remove any excess adhesive from the bonding surfaces using a scraper or sandpaper. Clean up any spills or drips with a solvent such as acetone.
By following these steps, you can ensure a strong bond between the metal and wood surfaces. Keep in mind that the bond will be stronger if the surfaces are properly prepared and the right adhesive is chosen.
Step 1: Surface Preparation
Before gluing metal to wood, it is essential to prepare the surfaces properly to ensure a strong and long-lasting bond. This step is crucial as any dirt, oil, or debris left on the surfaces can prevent the adhesive from adhering correctly and weaken the bond.
Clean and Dry Surfaces: The first step is to clean both the metal and wood surfaces. Start by removing any dirt, debris, and oil from the surfaces using a clean cloth or rag. For stubborn stains or residue, use an appropriate cleaning solution recommended by the adhesive manufacturer.
Remove Any Rust or Corrosion: If the metal surface has rust or corrosion, it must be removed before gluing. Use sandpaper, a wire brush, or a solvent recommended by the adhesive manufacturer to remove any rust or corrosion.
Smooth and Even Surfaces: After cleaning and removing any rust, make sure both surfaces are dry and smooth. If necessary, use sandpaper to smooth out any rough spots or uneven areas. This is important as it will provide a larger surface area for the adhesive to bond to and create a stronger bond.
De-Gloss the Surface (Optional): Some adhesive types require de-glossed or roughened surfaces to create a better bond. In this case, use sandpaper or a deglosser recommended by the adhesive manufacturer to roughen the surface.
Remove Sawdust: If you are gluing freshly cut wood, make sure to remove any sawdust from the wood surface. The sawdust can interfere with the adhesive bonding and weaken the bond.
Completely Dry Surfaces: Make sure both surfaces are completely dry before applying the adhesive. Any moisture left on the surfaces can interfere with the adhesive bonding and weaken the bond.
Following these steps and preparing the surfaces correctly will ensure a strong and long-lasting bond between the metal and wood surfaces. Taking the extra time to properly prepare the surfaces can make a significant difference in the quality of the bond and prevent any issues in the future.
Step 2: Choosing the Right Adhesive
When it comes to bonding metal to wood, choosing the right adhesive is crucial. Not all adhesives are created equal, and each has its own strengths and weaknesses. Here are some things to consider when choosing the right adhesive for your metal-to-wood project:
Bond Strength: The strength of the bond needed for your project will determine which adhesive to choose. Epoxy adhesives, for example, are known for their exceptional bond strength and are ideal for heavy-duty applications.
Curing Time: Some adhesives require longer curing times than others. If you need a bonding solution that sets quickly, cyanoacrylate (CA) adhesives may be your best option.
Temperature Resistance: Consider the temperature range of your project environment. Some adhesives, like silicone adhesives, offer superior temperature resistance and can withstand extreme heat or cold.
Surface Compatibility: Not all adhesives work well with every surface. Make sure to choose an adhesive that is compatible with both your metal and wood surfaces. For instance, polyurethane (PU) adhesives are known for their ability to bond well to a wide range of surfaces.
Application Method: Depending on the size and shape of your metal and wood surfaces, you may need an adhesive that can be easily applied with precision. Urethane adhesives, for example, can be applied with a brush or roller for greater accuracy.
Flexibility: If your application requires some flexibility, such as bonding metal parts to a wooden surface that may expand or contract over time, a rubberized adhesive like silicone might be a good choice.
It’s important to carefully consider all of these factors when choosing an adhesive for your metal-to-wood project. Test the adhesive on a small, inconspicuous area before applying it to the entire surface to make sure it will provide the necessary strength and durability for your particular application.
Step 3: Adhesive Application
After preparing the surfaces and choosing the right adhesive, the next step is to apply the adhesive. The application process may vary depending on the type of adhesive you choose, so be sure to follow the manufacturer’s instructions.
Epoxy: Epoxy adhesives come in two parts, the resin and the hardener, which must be mixed together before application. Follow the manufacturer’s instructions for the correct ratio of resin to hardener. Apply the mixed epoxy to one surface using a brush or spatula, and then press the two surfaces together. Use a clamp or other holding device to keep the surfaces in place while the epoxy sets. Epoxy adhesives typically take 24 hours to reach full strength.
Polyurethane: Polyurethane adhesives also come in two parts, the resin and the hardener. Mix the two together according to the manufacturer’s instructions. Apply the mixed adhesive to one surface using a brush or roller, and then press the two surfaces together. Use clamps or other holding devices to keep the surfaces in place while the adhesive sets. Polyurethane adhesives typically dry within 4-24 hours.
Cyanoacrylate: Cyanoacrylate adhesives are also known as superglues. Apply a small amount to one surface, and then press the two surfaces together. Hold the surfaces in place for a few seconds until the adhesive sets. Cyanoacrylate adhesives dry quickly, usually within seconds.
Urethane: Urethane adhesives typically come in a single part and are applied like a traditional glue using a brush or spatula. Apply the adhesive to one surface and then press the two surfaces together. Use clamps or other holding devices to keep the surfaces in place while the adhesive sets. Urethane adhesives typically dry within 24 hours.
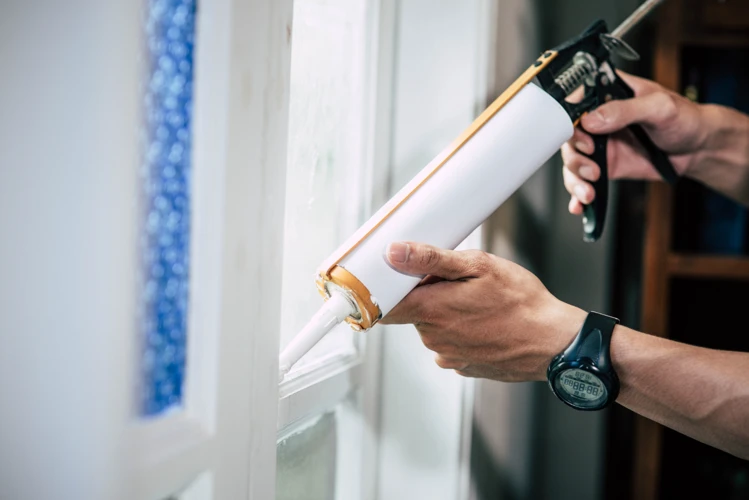
Silicone: Silicone adhesives are also known as sealants and are applied using a caulking gun. Apply a bead of adhesive along one surface, and then press the two surfaces together. Use clamps or other holding devices to keep the surfaces in place while the adhesive sets. Silicone adhesives typically take 24-48 hours to dry completely.
Mechanical Fasteners: If you choose to use mechanical fasteners like screws or bolts, drill pilot holes in the wood surface to prevent splitting and then screw or bolt the metal surface to the wood surface. Use washers or other hardware to distribute the load and prevent damage to the surfaces.
Remember to apply the adhesive evenly and follow the manufacturer’s instructions for application and drying times. This will ensure that the bond between the metal and wood surfaces is strong and durable.
Step 4: Clamping or Holding the Bonded Surfaces Together
After applying the adhesive, it is crucial to clamp or hold the bonded surfaces together to ensure a strong and durable bond. This step is especially important for larger and heavier metal objects that need to be firmly attached to the wood surface.
Clamping: To clamp the surfaces, first, align the metal and wood pieces in their desired positions. Then, use clamps to hold the surfaces tightly together. Select the appropriate size and number of clamps based on the size and weight of the metal object. For best results, use a clamp at each end and one in the middle, applying equal pressure across the entire surface. Tighten the clamps until the adhesive oozes out slightly from the sides. Leave the clamps in place for the adhesive’s full curing time, usually 24-48 hours, before removing them.
Holding: If clamps are not available, holding the surfaces together manually is an alternative. This method requires patience and proper technique to hold the surfaces steadily in place until the adhesive dries. Foam blocks or wooden blocks positioned against either side of the adhesive bond can provide some support. Place weight on top of the metal object to press the surfaces together. However, note that this method might not work for heavy objects as it can be difficult to hold them in place for an extended period.
Regardless of the method you choose, it is crucial to prevent any movement or shifting of the surfaces during the curing time. Once the adhesive is fully cured, remove the clamps or holding mechanisms and allow the adhesive to dry completely.
By taking extra care during the clamping or holding process, you can ensure a strong bond between the metal and wood surfaces, resulting in a long-lasting and secure attachment.
Additional Tips for Gluing Metal to Wood

When it comes to gluing metal to wood, there are a few additional tips that can help ensure a strong and long-lasting bond. Here are some tips to keep in mind:
Tip 1: Choose the Right Clamping Method
After applying the adhesive to the metal and wood surfaces, it is important to clamp or hold them together firmly until the adhesive dries. However, not all clamping methods are suitable for metal-to-wood bonding. For example, using a rubber band or tape may not provide enough pressure to create a strong bond. Instead, consider using a C-clamp, bar clamp, or woodworking clamp to hold the two surfaces together.
Tip 2: Check the Compatibility of Materials
Different types of metals and woods may have different reactions to different types of adhesives. Before applying the adhesive, check its compatibility with both the metal and wood materials. Some adhesives may cause discoloration, warping or other damage to certain metals or woods.
Tip 3: Allow Time for Curing
Most adhesives require time to cure, which means the bond may not be strong immediately after application. Allow the adhesive to cure completely before subjecting the bond to any stress or weight. Follow the manufacturer’s instructions for curing time, which may vary depending on the type of adhesive used.
Tip 4: Avoid Overuse of Adhesive
While it may be tempting to apply a thick layer of adhesive to create a stronger bond, overuse of adhesive can actually weaken the bond. Excess adhesive can create air pockets that weaken the bond or cause the adhesive to ooze out and interfere with the bond. Use only the amount of adhesive recommended by the manufacturer, and apply it evenly and thinly for the best results.
Tip 5: Protect the Bonded Surfaces from Moisture and Heat
Moisture and heat can weaken or even break the bond between metal and wood surfaces. To protect the bond, avoid exposing the bonded surfaces to extreme temperatures or moisture. If the bonded item will be exposed to moisture, consider using an adhesive specifically designed for waterproofing.
By following these additional tips, you can ensure a strong and long-lasting bond when gluing metal to wood. Remember to choose the right adhesive, prepare the surfaces carefully, apply the adhesive evenly, and use appropriate clamping method, and allow time for curing to achieve the best results.
Conclusion
Choosing the right adhesive for bonding metal to wood is crucial for ensuring a strong and long-lasting bond. The factors to consider include the environment, load-bearing requirements, and the types of substrates being bonded.
After considering these factors, it is important to select from the different types of adhesives available, such as epoxy, polyurethane, cyanoacrylate, urethane, silicone, or mechanical fasteners. Each type has its strengths and weaknesses, but all are effective in their own ways.
To ensure a successful bond, surface preparation is also essential. Both the metal and wood surfaces should be cleaned and free of any debris or oils that could interfere with the bonding process.
During the adhesive application process, following the instructions on the adhesive packaging is key to achieving the best results. Additionally, clamping or holding the bonded surfaces together for a sufficient amount of time is necessary for a strong and durable bond.
By following the step-by-step guide and additional tips outlined in this article, you can successfully bond metal to wood and create a strong and lasting bond. Remember, taking the time to select the right adhesive, prepare the surfaces, and follow proper application techniques can make all the difference in the success of your metal-to-wood bond.
Frequently Asked Questions
1. Can any adhesive be used to bond metal to wood?
No, only certain types of adhesive are suitable for bonding metal to wood. Choose an adhesive based on the factors that affect the bond strength of metal and wood.
2. Can metal be glued to painted wood surfaces?
It is not recommended to glue metal to painted wood surfaces. The paint can interfere with the bonding and weaken the strength of the adhesive.
3. How do I choose the right adhesive for metal-to-wood bonding?
Choose an adhesive based on the factors such as the type of metal and wood being bonded, the operating environment, and the required bond strength.
4. Can I use mechanical fasteners instead of adhesives?
Yes, you can use mechanical fasteners such as screws, nails, or bolts. However, the bond created by adhesives is stronger and more durable.
5. Do I need to clean the metal and wood surfaces before bonding?
Yes, it is crucial to clean the surfaces thoroughly before bonding to remove any dirt, oil, or debris that could impair the bonding process.
6. Can adhesives be used for structural bonding?
Yes, adhesives can be used for structural bonding, but only certain types of adhesives are suitable for this purpose. Consult with the adhesive manufacturer and follow their guidelines.
7. How long does the adhesive take to cure?
The curing time varies depending on the type of adhesive used. Refer to the adhesive manufacturer’s instructions for curing time and optimal conditions for curing.
8. Is it necessary to clamp the surfaces together during the bonding process?
Yes, clamping the surfaces together during the bonding process is necessary to ensure maximum contact and optimal bonding strength.
9. Can the bonded metal-to-wood surfaces be painted or stained?
Yes, the bonded surfaces can be painted or stained after the curing process is complete. Check the adhesive manufacturer’s guidelines to ensure compatibility with the paint or stain product.
10. Can adhesive bonding be used for outdoor applications?
Yes, there are adhesives specifically designed for outdoor applications. Ensure the adhesive you choose is suitable for the intensive outdoor environments.