It’s not every day that we think about our dryer seals, but when they begin to fail, it can quickly become a major inconvenience. Suddenly, laundry that once came out fresh and clean now comes out damp and musty. Not only is this frustrating, but it can also pose a health hazard. If you find yourself in this situation, you might be wondering what kind of glue would be best to fix your dryer seal. With so many options available, it can be confusing to figure out which one is right. In this article, we’ll help you decide which glue is the best fit for your dryer seal, and we’ll guide you through the steps to fix it.
Why Do You Need to Fix Your Dryer Seal?
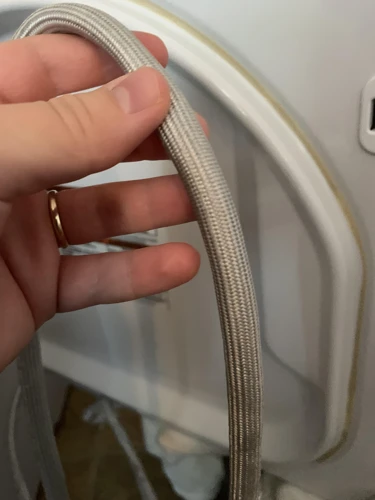
Taking care of your appliances is essential for ensuring their longevity and preventing potential hazards. Among the many components that can wear down over time, a faulty dryer seal can cause a lot of problems. Ignoring the issue can lead to inefficiency, energy loss, and even hazardous outcomes. Taking the time to understand why you need to fix your dryer seal and how to do it right is crucial for keeping your home safe and functional.
Common Problems
Common problems with dryer seals are not uncommon, and can lead to various issues such as air leaks and energy loss. Neglecting to repair or replace the seal can also lead to potential hazards such as fire, electrocution, and gas leaks. Some common problems that require fixing the dryer seal include:
| Problem | Cause | Effect |
|---|---|---|
| Tears or cracks in seal | Normal wear and tear, age, or physical damage | Air leaks, energy loss, potential fire hazards, and inefficient drying |
| Loose seal | Normal wear and tear or improper installation | Air leaks, energy loss, potential fire hazards, and inefficient drying |
| Collapsed seal | Normal wear and tear, age, or improper installation | Air leaks, energy loss, potential fire hazards, and inefficient drying |
If you’re experiencing any of these common problems, it’s important to take immediate action to fix your dryer seal. Failure to do so can result in hazardous and costly issues down the road. So, don’t hesitate to fix that seal as soon as possible.
Note: If you’re looking for tips on how to store CA glue or what glue to use on glass bottles, click on the links.
Inefficiency and Energy Loss
When your dryer seal is not properly sealed, it can cause inefficiency and energy loss in your dryer. This is because when your dryer is not sealed correctly, hot air can escape, making your dryer work harder to maintain the desired temperature. This extra work can cause your energy bills to skyrocket. Additionally, when you’re constantly running your dryer because it’s not efficiency drying your clothes, it can reduce the lifespan of your dryer’s heating element.
To illustrate this point, here is a table of estimated annual energy costs for a 7.3 cubic foot capacity dryer running for three hours per week:
| Seal Condition | Annual Energy Cost |
|---|---|
| Perfectly Sealed | $16.72 |
| 1/4 inch gap in seal | $22.38 |
| 1/2 inch gap in seal | $28.05 |
| 1 inch gap in seal | $44.78 |
As you can see, a small 1/4 inch gap in the dryer seal can increase the annual energy cost by nearly $6. To save money and reduce energy waste, it’s important to fix any issues with your dryer seal as soon as possible.
If you’re unsure whether or not your dryer seal is causing inefficiency and energy loss, look for these signs: clothes taking an unusually long time to dry, the outside of your dryer feeling hot to the touch, and higher energy bills than normal.
To learn how to fix your dryer seal using the right glue for the job, keep reading. If you’re interested in learning more about different types of glues and how to use them, check out our article on what glue to use for models.
Potential Hazards
When your dryer seal is damaged, it can cause potential hazards that could lead to serious consequences. Here are some of the potential hazards that you need to be aware of:
- Fire: One of the most dangerous hazards that can occur due to a damaged dryer seal is a fire. If the heat and lint from the dryer escape through the damaged seal, it can ignite and cause a fire.
- Gas Leaks: For gas dryers, a damaged seal could cause a leak, which is a serious safety concern. Gas leaks can lead to explosions, fires, and carbon monoxide poisoning.
- Carbon Monoxide Poisoning: Carbon monoxide is a colorless and odorless gas that is poisonous to humans and animals. If your dryer seal is damaged, it can lead to carbon monoxide leaks that can have adverse health effects on you and your family.
- Increased Energy Bills: A damaged dryer seal can cause your dryer to work less efficiently, meaning it will consume more energy trying to dry your clothes. This increased energy usage will result in higher energy bills.
It is essential to fix your dryer seal immediately to prevent these potential hazards from occurring. In the next section, we will explore the different types of glues that you can use to fix your dryer seal.
If you want to learn more about glue, check out our article on how to store CA glue, how to make bird seed blocks with glue, what glue to use on poster board, how to thin CA glue, how to make methyl cellulose glue or how to make super glue at home without petrol. Or, if you need information about glue for a specific project, check out our articles on what glue to use on glass bottles, what to use for wallpaper glue, or how to make rolling paper glue.
What Kind of Glue Can You Use on Your Dryer Seal?
When it comes to fixing your dryer seal, using the right kind of glue is crucial. You want something that can withstand high temperatures and won’t break down easily. But with so many different types of glue out there, it can be confusing to know which one will work best for your dryer seal. In this section, we’ll explore some of the most effective types of glue you can use, including heat-resistant glues, silicone adhesives, Contact Cement, Epoxy, and Gorilla Glue. Each of these glues has its own unique properties and strengths, so it’s important to choose the one that’s right for your specific needs. Let’s take a closer look.
Heat-Resistant Glues
Heat-resistant glues are a great option for repairing your dryer seal. These types of glues are typically designed to withstand high temperatures without breaking down or losing their adhesive properties. This makes them ideal for use on dryer seals, which are regularly exposed to high temperatures during the drying cycle.
One of the most popular types of heat-resistant glue is ceramic cement. This type of glue is specially formulated to bond ceramic surfaces together, but it can also be used on metal and other materials. Ceramic cement is able to withstand high temperatures, making it ideal for use on dryer seals. Another type of heat-resistant glue is epoxy. Epoxy is a two-part adhesive that consists of a resin and hardener. When mixed together, these two components create a strong, durable bond that can withstand high temperatures.
| Heat-Resistant Glue | Temperature Resistance | Recommended Materials |
|---|---|---|
| Ceramic Cement | Up to 2000°F | Ceramic, metal |
| Epoxy | Up to 600°F | Metal, plastic, ceramic |
| High-Temperature Silicone | Up to 550°F | Rubber, metal, glass |
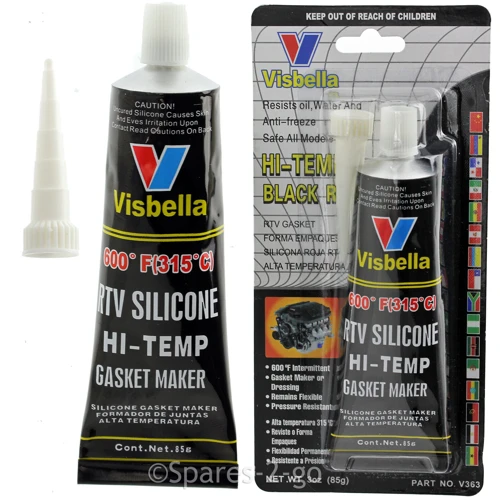
Another good option for a heat-resistant glue is high-temperature silicone. This glue is designed to withstand temperatures up to 550°F, making it perfect for dryer seals. It can be used on a variety of materials including rubber, metal, and glass.
It’s important to note that while heat-resistant glues are a great option for dryer seal repairs, they should only be used if the seal is completely dry and free of any moisture. If there is any moisture present, it can cause the glue to break down and lose its adhesive properties. It’s important to ensure that your dryer seal is completely dry before applying any heat-resistant glue.
When choosing a glue for your dryer seal, consider using heat-resistant glues such as ceramic cement, epoxy, or high-temperature silicone. These glues are specifically designed to withstand high temperatures and provide a strong, durable bond. Just remember to apply them to a completely dry surface and follow all manufacturer instructions for best results.
Silicone Adhesives
When it comes to choosing the right glue for your dryer seal, silicone adhesives are another popular option. They are a type of rubber glue that can withstand high temperatures and offer great flexibility, making them a perfect fit for dryer seals.
Advantages:
- Silicone adhesives are highly resistant to heat, which makes them perfect for use in high-temperature environments such as your dryer.
- They are also waterproof, which means that they can prevent water from entering your dryer and causing damage.
- Silicone adhesives offer excellent flexibility, which helps to prevent cracking and splitting in your dryer seal.
- They are non-corrosive, which means that they will not damage the materials they are being applied to.
Disadvantages:
- Although silicone adhesives are highly effective, they tend to be more expensive than other types of glue.
- They may also take longer to cure than other types of glue, so you should plan on giving them extra time to dry before testing your dryer.
When using silicone adhesives on your dryer seal, it’s important to follow the manufacturer’s instructions carefully. Wear protective gear such as gloves and eye protection when using this type of adhesive. You should also make sure that the surface of the seal is clean and free of debris before applying the adhesive. Apply a small amount of the silicone adhesive to the seal and then use a brush or your fingers to spread it out evenly. Let the adhesive dry completely before testing your dryer.
In conclusion, silicone adhesives are a great option for fixing your dryer seal due to their high heat resistance and flexibility. However, they may be more expensive than other glue types, and they require time to cure properly. Considering the advantages and disadvantages of silicone adhesives can help you make an informed decision before repairing your dryer seal.
Contact Cement
Contact cement is another possible adhesive option for your dryer seal. This type of glue is known for its strong bonding properties and is perfect for sealing large gaps. It is also resistant to heat, water and most chemicals, making it ideal for use in high-moisture environments like the inside of a dryer.
When using contact cement on your dryer seal, it is important to have a clean and dry surface. Be sure to follow the manufacturer’s instructions when applying the glue, as this will ensure a secure bond. First, apply a thin layer of the contact cement to the seal, then apply a second layer to the dryer itself. Wait a few minutes for the cement to become tacky before bringing the two surfaces together. Once they make contact, the bond will be extremely strong and nearly impossible to break.
Keep in mind that contact cement can be quite messy to work with and may require a bit of finesse to apply. Be sure to protect your work area with newspaper or a drop cloth, and wear gloves to prevent the glue from sticking to your fingers. Proper ventilation is also important, as contact cement can give off fumes that can be harmful if inhaled.
While it is possible to fix a dryer seal without glue, using contact cement will ensure a strong and reliable bond that will withstand the heat and moisture of your dryer. With the proper precautions and techniques, applying contact cement to your dryer seal can be a simple and effective DIY solution to keep your dryer running smoothly.
If you are looking for more information on what kind of glue to use on glass bottles, check out our article on it here.
Epoxy
Epoxy is another glue option for fixing your dryer seal. It is a two-part adhesive that consists of a resin and hardener, which when combined, create a durable, waterproof bond. Epoxy is commonly used in households for various repair needs due to its strength and versatility. Here are some advantages and disadvantages of using epoxy for your dryer seal repair:
| Advantages | Disadvantages |
| Epoxy can withstand high temperatures, making it ideal for sealing dryer parts that get hot. | Epoxy can be messy to work with and requires precise mixing of the resin and hardener. |
| Epoxy creates a strong and durable bond that can withstand wear and tear over time. | Epoxy can take a long time to dry and harden, which may not be ideal if you need to use your dryer soon. |
| Once cured, epoxy is waterproof, resistant to chemicals, and won’t shrink or crack. | Epoxy can be expensive compared to other glue options. |
| Epoxy comes in different formulas, including some that have added heat resistance, making it an excellent option for high-temperature repairs. | It can be challenging to remove epoxy once it has cured. |
When choosing epoxy for your dryer seal repair, make sure to select one that can withstand high temperatures to ensure durability. Follow the instructions carefully when mixing and applying the epoxy to avoid any mess or errors. Keep in mind that epoxy can take a while to dry and harden, so be patient and allow ample time for it to do so before testing your dryer.
Epoxy can be a reliable and long-lasting adhesive for your dryer seal repair needs. However, it may not be the best option if you need a quick and easy fix or if you are working on a tight budget. Be sure to consider the advantages and disadvantages before making your decision.
Gorilla Glue
When it comes to fixing your dryer seal, Gorilla Glue is another option that you may consider. This glue is a polyurethane-based adhesive that creates a strong and durable bond. It has been marketed as one of the toughest glue available in the market, making it ideal for heavy-duty applications.
Here’s a table comparing Gorilla Glue to the other types of glue mentioned in this article:
| Type of Glue | Strength | Water Resistance | Heat Resistance | Cure Time |
|---|---|---|---|---|
| Gorilla Glue | Very Strong | Waterproof | Resistant up to 200˚F | 24 hours |
| Heat-Resistant Glues | Moderately Strong | Not Waterproof | Resistant up to 400˚F | 24-48 hours |
| Silicone Adhesives | Moderately Strong | Waterproof | Resistant up to 450˚F | 24 hours |
| Contact Cement | Moderately Strong | Not Waterproof | Resistant up to 180˚F | 15-30 minutes |
| Epoxy | Very Strong | Not Waterproof | Resistant up to 200˚F | 24-48 hours |
One of the advantages of Gorilla Glue is its water resistance. It can withstand exposure to moisture without losing its adhesion, making it suitable for use in a humid environment, such as a laundry room. Additionally, Gorilla Glue can resist heat up to 200˚F, making it a good option for a dryer seal, where high temperatures are involved.
However, Gorilla Glue has a few drawbacks. One is its longer cure time, which takes 24 hours to dry completely. You may need to clamp the seal and wait for it to cure, which may be inconvenient if you need to use the dryer immediately. Another disadvantage is its tendency to expand during the curing process. This means that if you apply too much, the glue may push out of the seal and make a mess.
Gorilla Glue can be an effective alternative to other types of glue, depending on your specific needs. When choosing the right glue for your dryer seal, it is important to consider its strength, water and heat resistance, and cure time.
How to Choose the Perfect Glue for Your Dryer Seal

When it comes to choosing the perfect glue for your dryer seal, the options can be overwhelming. It’s important to select a glue that can withstand high temperatures and provide a strong bond to ensure your dryer’s efficiency and safety. But how do you determine which glue to use? Keep reading to learn about the different factors to consider when selecting the most suitable glue for your dryer seal.
Consider These Factors
When choosing the perfect glue for your dryer seal, it’s important to consider several factors to ensure that you make the right choice. Here are the factors that you should keep in mind:
- Temperature: One of the biggest factors to consider when choosing glue for your dryer seal is the temperature of your dryer. Dryers can reach incredibly high temperatures, so you need to choose a glue that can withstand that heat. Make sure you choose a heat-resistant glue that can withstand the specific temperature of your dryer.
- Type of Material: Another factor to consider is the type of material that your dryer seal is made from. Different materials have different properties, so you need to choose a glue that is suitable for the specific material of your dryer seal. Silicone adhesives work well on rubber seals, while epoxy is good for metal seals.
- Level of Flexibility: The glue you choose should also depend on the level of flexibility that you require for your dryer seal. If your dryer seal needs to stretch or move, you should choose a flexible glue that can bend and stretch without breaking.
- Drying Time: The drying time of a glue is also an important consideration. Some glues dry very quickly, while others take a longer time to dry. If you’re in a rush, you might want to choose a glue that dries quickly, but if you have more time, a slower-drying glue can provide a stronger hold.
- Level of Adhesion: The level of adhesion that a glue provides is also an important factor to consider. You want a glue that will stick to your dryer seal strongly and securely, so make sure you choose a glue that provides a high level of adhesion.
By considering these factors, you can choose the perfect glue for your dryer seal that will provide a strong, long-lasting hold and ensure that your dryer works efficiently and safely.
Steps to Follow When Applying Glue to Your Dryer Seal

Now that you have selected the perfect glue for your dryer seal, it’s time to apply it correctly to ensure a durable and efficient seal. The process may seem straightforward, but there are important steps to follow to achieve the best results. By taking the time to clean the seal and apply the glue meticulously, you can avoid future problems and save yourself the hassle of repairing or replacing the seal again. So, let’s dive into the steps you should follow to apply glue to your dryer seal effectively.
Gather Your Supplies
Before starting any repair work, it’s crucial to have all the necessary supplies. Here are the things you’ll need to gather before fixing your dryer seal:
| Supplies | Description |
|---|---|
| Glue | Choose from heat-resistant glues, silicone adhesives, contact cement, epoxy, or Gorilla Glue, depending on your needs. |
| Sandpaper | Use a fine-grit sandpaper to smoothen the surface of the seal and remove any dirt and debris. |
| Clean cloth | Get a clean, dry cloth to wipe away any remaining dust or sandpaper particles. |
| Protective gear | Wear gloves, a mask, and goggles to prevent skin irritation, inhaling particles, and eye irritation from the glue fumes. |
| Weighing scale | Use a weighing scale to measure the amount of glue you’re going to use. This is especially vital if you’re using epoxy, as an incorrect mixture can lead to an ineffective bond. |
Having these supplies ready beforehand will make the process of repairing your dryer seal more efficient and organized. Remember to follow the instructions on the glue packaging for the best results.
Clean the Seal
Before applying any glue to your dryer seal, it’s important to properly clean the seal to ensure maximum adhesion. Follow these steps to clean your dryer seal:
- Unplug your dryer – Always make sure your dryer is unplugged to prevent any accidents or injuries while you are working on it.
- Remove the dryer seal – Depending on your dryer model, you may need to remove the seal to clean it thoroughly. Refer to your dryer’s user manual for specific instructions on how to do this.
- Remove any debris or residue – Check for any debris or residue on the seal such as lint, dust, or old glue. Use a soft-bristled brush to gently scrub any debris off the seal. For stubborn residue, a mixture of warm water and mild detergent can be applied. Be sure to rinse the seal thoroughly with clean water and let it dry completely before proceeding to the next step.
- Inspect the seal for cracks or tears – Once the seal is clean and dry, inspect it for any cracks or tears. If any are found, you may need to replace the seal entirely before applying any glue.
Taking the time to properly clean your dryer seal ensures that the glue will properly adhere to the surface and create a strong bond. Remember, a clean seal is a key factor in successfully repairing your dryer seal and preventing future inefficiencies or hazards.
Apply the Glue
When it comes to applying glue to your dryer seal, there are steps you should follow to ensure that it is done successfully. Here are the steps to follow:
| Step | Action |
|---|---|
| Step 1 | Apply the glue to the dryer seal in a thin and even layer. This will ensure that the glue will bond properly and not leave any air pockets. |
| Step 2 | Use a small brush or a cotton swab to apply the glue. This will allow you to apply the glue with precision and make sure that it gets into all the crevices. |
| Step 3 | Apply pressure to the seal to ensure that it bonds properly with the glue. You can use a rubber mallet or a heavy object to apply pressure. Make sure to apply pressure evenly across the entire seal to avoid any bubbles or gaps. |
It’s important to note that you should avoid using too much glue, as this can lead to messy and uneven bonds. Also, be sure to read the instructions on the glue you’ve chosen before applying, as there may be specific instructions or limitations on the application process.
Let Dry and Test
After applying the glue, the next step is to let it dry completely to ensure that it is bonded firmly. The amount of time it takes for the glue to dry will depend on the type of glue used. Refer to the instructions on the glue packaging for specific drying times.
Once the glue has dried, it is crucial to test the seal to ensure that it is secure. To do this, you can perform a simple test by closing the dryer door and measuring the gap between the door and the dryer.
Here’s a simple way to test if your seal is working properly:
| Step | Instructions |
|---|---|
| Step 1 | Close the dryer door as tightly as possible. |
| Step 2 | Insert a dollar bill or thin piece of paper between the dryer door and the dryer drum. |
| Step 3 | Attempt to pull the bill or paper out while the door is still closed tightly. |
| Step 4 | If the bill or paper can be removed easily, it means that the seal is not tight enough and needs to be re-glued. |
It’s important to do this test before running the dryer again. Running the dryer with a faulty seal can lead to overheating or even a fire. So always ensure that the seal is fixed properly before using the dryer.
Allowing the glue to dry completely and performing a simple seal test is essential to ensure that the seal is fixed properly, and the dryer is running safely and efficiently.
Essential Tips for Applying Glue on Your Dryer Seal
When it comes to applying glue on your dryer seal, it’s important to do it carefully and with precision. After all, the seal helps to prevent energy loss and potential hazards in your home. To ensure that your dryer seal stays intact, there are a few essential tips that you need to follow, and we’ve outlined them below. So put on your protective gear and let’s get started!
Always Use Protective Gear
When it comes to applying glue to your dryer seal, it is important to wear protective gear to avoid any accidents or mishaps. Here are some of the protective gear items that you should consider using:
- Gloves: Always wear gloves to protect your hands from the glue. Heat-resistant gloves are the best option, especially if you are using a heat-resistant glue.
- Goggles: To avoid any glue splashes getting into your eyes, always wear protective goggles. This is especially important if you are using a contact cement or epoxy.
- Mask: Depending on the type of glue you are using, wearing a protective mask may be necessary to avoid inhaling any harmful chemicals or fumes.
- Protective Clothing: It is best to wear old clothes that you wouldn’t mind getting dirty or stained with glue. Avoid wearing anything loose or baggy that could potentially get caught in machinery or around the seal.
Remember, wearing protective gear is crucial for your safety and the proper execution of the task. So don’t skip this step and ensure that you are wearing the right protective gear before you begin applying glue to your dryer seal.
Don’t Overdo the Glue
When it comes to fixing your dryer seal with glue, it’s crucial not to overdo it. Using too much glue can cause a mess and even damage the seal. So, here are some tips to help you avoid overusing glue:
- Apply the glue in small amounts: Start by applying just a small amount of glue to the seal. You can always add more later, but you can’t take it back once it’s been applied. So, be careful about how much you use.
- Spread the glue evenly: Make sure to spread the glue evenly on the entire surface of the seal. This will ensure that the seal is properly secured and prevent any leaks from occurring. If you don’t spread the glue evenly, you might end up with gaps in the seal, which could lead to problems later on.
- Avoid using too much pressure: Keep in mind that using too much pressure while applying the glue can cause the seal to warp or become misshapen. This could make it harder to use the dryer and might even require you to replace the seal altogether.
- Follow the manufacturer’s instructions: Always read and follow the manufacturer’s instructions when using glue. They will provide specific guidelines on how much glue to use and how to apply it properly. Following these instructions will help you avoid overdoing it and ensure that the seal is properly secured.
- Don’t rush: Take your time when applying the glue. Rushing could cause you to use too much glue or spread it unevenly, which could lead to problems down the line. So, be patient, take a deep breath, and focus on getting the job done right.
Remember, when it comes to using glue to fix your dryer seal, less is often more. So, take your time, apply the glue carefully, and don’t overdo it. With a little patience and attention to detail, you can secure your dryer seal and get back to doing your laundry with ease.
Be Precise in Applying
When it comes to applying glue to your dryer seal, precision is essential. Any inaccuracies during the application process can compromise the effectiveness of your repair and even cause further damage. Here are some tips to help you be precise in your glue application:
- Use a brush: When applying glue to your dryer seal, it’s best to use a brush rather than a nozzle or tube. This will give you more control over the amount of glue you apply and ensure an even distribution.
- Apply sparingly: While it’s important to ensure adequate coverage, using too much glue can be just as detrimental as using too little. Be cautious and apply just enough to cover any leaks or cracks.
- Work in small sections: Rather than trying to apply an entire bead or layer of glue all at once, work in small sections. This will allow you to be precise with your application and minimize the risk of making mistakes.
- Smooth and level: After you’ve applied the glue, use a small tool like a toothpick or a flathead screwdriver to smooth and level it out. This will ensure that the glue fully covers any problem areas and that there are no clumps or bumps that could interfere with the seal.
Remember, being precise in your glue application is key to a successful repair. Take your time, work carefully, and don’t rush the process. Your diligence will pay off in the form of a fully functional and efficient dryer.
Can You Fix Your Dryer Seal Without Glue?
If you’re someone who prefers a DIY approach instead of relying on adhesives, you may wonder if it’s possible to fix your dryer seal without using glue. While there are alternative methods, they may not be as effective or long-lasting as using glue. It’s worth noting that these options may only serve as temporary fixes, and you may need to use glue eventually.
One way to fix small tears or gaps on your dryer seal is by using duct tape. While duct tape sticks well to the seal and effectively covers any gaps, it’s not a long-term solution. Since duct tape isn’t heat-resistant, it may not hold up well under high temperatures and could deteriorate over time. Additionally, duct tape may leave behind adhesive residue if it’s left on the seal for too long, which could negatively impact its effectiveness.
Another possible solution is to sew up any tears in the dryer seal, particularly if the seal is made of fabric. While sewing can be effective in closing small holes, it may not be practical for larger tears or for rubber or silicone seals. Additionally, sewing may not be a viable solution for all dryers, as some models have seals that are glued onto the dryer.
If you’re concerned about using glue due to potential health risks or environmental concerns, there are eco-friendly and non-toxic options available. Some popular choices include plant-based adhesives and water-based glues, which are safe for both you and the environment. However, it’s still important to follow appropriate safety precautions when using any glue, such as wearing gloves and a protective mask.
Ultimately, while it’s possible to fix your dryer seal without glue, it may not be the most practical or effective solution, particularly for long-term repairs. By using one of the recommended glue options and following the appropriate steps, you can safely and effectively fix any tears or gaps in your dryer seal.
Conclusion
After considering the different types of glue that can be used on a dryer seal, it is essential to understand that choosing the right glue for your needs is crucial. The type of glue you choose will depend on factors such as the temperature range in which it will be used, the dryer’s brand and model, and the type of material of the seal.
When applying glue to your dryer seal, it is also important to follow the proper steps carefully. Always take the necessary precautions, such as wearing protective gear, to avoid any accidents. Ensure that you clean the seal thoroughly, apply the glue precisely without overdoing it, and allow it to dry before testing it.
While glueing is the preferred option for fixing a dryer seal, it is also possible to fix a seal without using glue. However, this is only a temporary solution, and the seal will need to be replaced.
In conclusion, fixing your dryer seal using the right glue can save you money and prevent any potential hazards. By choosing the appropriate type of glue, following the necessary steps, and taking the proper precautions, you can successfully repair a dryer seal in most cases. Don’t hesitate to seek professional help if you are unsure of how to proceed.
Frequently Asked Questions
Q: What is a dryer seal?
A: A dryer seal is the gasket or seal around the door or drum opening of your dryer that prevents warm air from escaping and also keeps moisture from getting into the unit.
Q: Can I ignore a damaged dryer seal?
A: Ignoring a damaged dryer seal can lead to increased energy consumption, air leaks, longer drying times, and potential hazards. It’s important to address any damage as soon as possible.
Q: What problems can a damaged dryer seal cause?
A: A damaged dryer seal can cause air leaks, longer drying times, warmer laundry rooms, an increase in energy consumption, and can even potentially cause a fire hazard.
Q: How often should I check my dryer seal?
A: It’s a good idea to check your dryer seal for damage or wear every six months or so. Regularly checking your seal can help prevent any potential problems.
Q: Can I use any glue to fix a dryer seal?
A: No, not all glues are suitable or safe to use on a dryer seal. You should use a glue that is heat-resistant and safe to use on the materials your dryer seal is made of.
Q: What kind of glue is safe to use on a dryer seal?
A: Heat-resistant glues, silicone adhesives, contact cement, epoxy, and Gorilla Glue are all safe and effective options for repairing a dryer seal.
Q: Can I fix my dryer seal without using glue?
A: While using glue is the most effective way to repair a damaged dryer seal, there are alternative methods such as replacing the seal entirely or using aluminum duct tape as a temporary fix.
Q: Why is choosing the right glue important?
A: Choosing the right glue is important because it ensures that the seal will remain durable, withstand high temperatures, and not pose a potential fire hazard.
Q: What should I consider when choosing a glue for my dryer seal?
A: You should consider the type of materials your dryer seal is made of, the level of heat resistance required, and the durability of the glue to ensure a long-lasting repair.
Q: How long will it take for the glue to dry on my dryer seal?
A: The drying time will depend on the type of glue used and the surrounding temperature and humidity. It’s best to follow the manufacturer’s instructions for drying times and to allow for a few hours of drying time before using the dryer again.