As you embark on the journey of wallpapering your walls, one of the most crucial things to consider is the type of wallpaper glue to use. With so many options and variations available, it can be overwhelming to choose the right wall adhesive. Do you choose starch-based wallpaper glue or vinyl-based wallpaper glue? What about the surface you’re applying the wallpaper on? Your level of DIY skills and budget also come into play. To take the guesswork out of the equation, we’ve put together a comprehensive guide on what to use for wallpaper glue. By the end of this guide, you’ll be equipped with the knowledge and skills needed to ensure your wallpaper sticks and stays in place.
What is Wallpaper Glue?

If you’re thinking about giving your walls a facelift or adding some personality to your furniture or decor, you’ve probably thought about exploring wallpapers. And if so, you’ve likely also come across the term “wallpaper glue”. But what exactly is wallpaper glue and how does it work? Wallpaper glue, also known as wallpaper adhesive, is a type of adhesive used to attach wallpaper to walls or other surfaces. Using the right wallpaper glue ensures the paper stays in place and doesn’t peel or bubble over time. In this article, we will guide you through the different types of wallpaper glue and offer tips for choosing and applying the right glue for your wallpaper project.
What does Wallpaper Glue do?
Wallpaper glue is a type of adhesive specifically designed for applying wallpaper to walls, ceilings or other surfaces. Once applied, the wallpaper glue holds the wallpaper in place, ensuring it doesn’t peel off or shift over time. Wallpaper glue is made with a water-soluble formula that becomes sticky when it dries, creating a smooth and even surface for wallpapering.
There are several reasons why using wallpaper glue is important for the application of wallpaper. Firstly, it helps to create a strong bond between the wallpaper and the surface it is being applied to. This ensures that the wallpaper does not fall off or start to peel away from the wall after a short period of time. Secondly, wallpaper glue helps to make the wallpaper look smooth and free of any air bubbles or other imperfections that can occur during the wallpapering process. Finally, the glue helps to make sure that the wallpaper stays in place, even in humid or damp conditions that may cause the wallpaper to otherwise come loose.
By choosing the right type of wallpaper glue and applying it properly, you can ensure that your wallpaper will look great and last for years to come. In the following sections of this article, we will explore different types of wallpaper glue, how to prepare and apply wallpaper glue, as well as troubleshoot some common problems that may arise during the wallpapering process.
Internal Link: What is non-toxic glue?
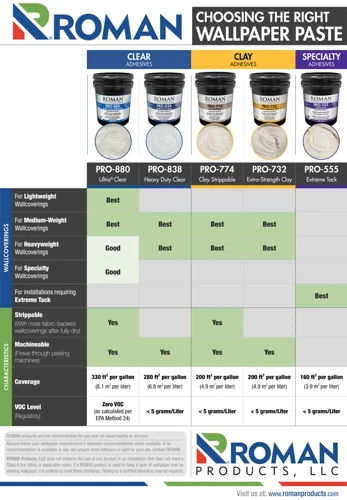
Types of wallpaper Glue
Types of Wallpaper Glue
When it comes to wallpaper glue, there are several types available in the market, each with different properties and purposes. Here are some of the most common types of wallpaper glue:
| Wallpaper Glue Type | Description |
|---|---|
| Starch-Based Wallpaper Glue | As the name suggests, this type of wallpaper glue is made from starch. It is often the least expensive option and is best suited for porous surfaces. |
| Cellulose-Based Wallpaper Glue | This type of glue is made from cellulose and is suitable for both porous and non-porous surfaces. It is also easy to clean up and is less likely to stain the wallpaper. |
| Vinyl-Based Wallpaper Glue | Vinyl-based glue is best suited for vinyl wallpaper, as it creates a strong bond with the material and is less likely to cause any damage or warping. |
| Pre-Mixed Wallpaper Glue | Pre-mixed glue is very convenient and easy to use, as it comes ready to use straight out of the container. However, it is often more expensive than other types of glue. |
| Wheat-Based Wallpaper Glue | Wheat-based wallpaper glue is made from natural ingredients and is eco-friendly. It is also easy to clean up and is best suited for non-porous surfaces. |
It is important to choose the right type of wallpaper glue based on the type of wallpaper you’re using, the surface you’ll be applying it to, your level of DIY skills and your budget. If you’re unsure which type of glue is best for your project, consult with a professional or seek advice online.
What to Consider When Choosing Wallpaper Glue?
When it comes to choosing the right wallpaper glue for your project, there are several factors that you need to take into consideration. Not all wallpaper glue products are created equal, and what may work for one project may not work for another. In this section, we’ll explore some important things to keep in mind when selecting the right wallpaper glue for your needs. By the end, you’ll be well-equipped to make a smart decision when it comes to selecting the best wallpaper glue for your project.
The Type of Wallpaper You’re Using
When it comes to choosing the right wallpaper glue, one important factor to consider is the type of wallpaper you will be using. Different wallpaper materials require different types of glue for the best adhesion. Here are some types of wallpaper and the recommended glue:
- Standard wallpaper: This type of wallpaper is often made from paper and requires a starch-based glue for proper adhesion. Starch-based glue is easy to make and is affordable. You can make a wallpaper paste by mixing corn starch with water and a little vinegar. Check the manufacturer’s instructions to ensure you are using the right type of glue.
- Vinyl wallpaper: Vinyl wallpaper is a popular choice because of its durability and ease of cleaning. Vinyl-based glue is the best fit for this type of wallpaper. This adhesive is suitable for vinyl wallpaper because it can bond to the vinyl’s surface and provide a strong hold. It is best to use pre-mixed vinyl-based glue for this type of wallpaper.
- Foil wallpaper: Foil wallpaper is a metallic foil material and requires special glue that is gentle and doesn’t damage the foil. A cellulose-based glue is recommended for this, as it provides a strong hold and it won’t damage the foil while applying or removing.
- Grasscloth wallpaper: Grasscloth wallpaper is made of natural fibers and is a popular pick for people who want to add texture to their walls. Wheat-based wallpaper glue is the ideal adhesive because it works perfectly for porous materials. It can lock the fibers, and at the same time, keep the fabric look and provide a durable hold.
- Textured wallpaper: Textured wallpaper refers to a broad group of wallpapers that have a raised pattern or design. These types can be made of different materials, and will therefore require different types of glue. It is essential to follow the manufacturer’s instructions to give them the best hold. In most cases, a pre-mixed wallpaper glue is the best adhesive choice.
Remember to check the wallpaper manufacturer’s recommendations on the glue type and specific requirements before selecting the glue type. Also, ensure that you choose a high-quality adhesive to guarantee the wallpaper will stay in place. If you are not sure which type of glue to use for your specific wallpaper, then seek the advice of a professional wallpaper installer or talk to a customer service representative.
The Surface You’ll be Applying the Wallpaper On
The surface you’ll be applying the wallpaper on:
The surface where you will be applying the wallpaper plays a crucial role in deciding the type of wallpaper glue you should use. Here are some of the surfaces to consider:
- Drywall: Drywall can be tricky to work with, but it is possible to apply wallpaper to it if you prepare the surface correctly. Use a good quality primer to seal the drywall and prevent it from absorbing too much moisture from the wallpaper glue.
- Plaster: Plaster walls are smooth and flat but can be quite porous, so you need to choose wallpaper glue that works well with porous surfaces. A starch-based wallpaper glue is a good option for plaster walls.
- Wood: Applying wallpaper to wood is an effective way to create a unique look, but it can be challenging. You need to ensure that the wood is smooth and clean before applying wallpaper glue. If you’re working with unfinished wood or wood that has cracks, you may want to glue boards together before applying wallpaper. (Learn more about how to glue boards together without warping)
- Masonry: Applying wallpaper to masonry surfaces can be challenging due to its rough texture. You need to use a good quality wallpaper glue that works well with rough surfaces.
- Glass: Wallpapering glass surfaces requires a special type of wallpaper glue, so it’s essential to choose the right adhesive.
Remember that preparing the surface before applying the wallpaper glue is essential to ensure a smooth and successful installation. If you’re unsure about the type of surface you’re working with, do some research first or consult with a professional.
Your Level of DIY Skills
Your level of DIY skills is another important factor to consider when choosing wallpaper glue. Some types of wallpaper glue may be more difficult to work with than others, and if you’re not experienced in applying wallpaper, you may want to opt for a simpler product.
If you’re a beginner in DIY projects, pre-mixed wallpaper glue might be the best choice for you. This type of glue is already formulated and is easy to use straight out of the container. It allows for some margin of error and can be adjusted when needed.
On the other hand, if you have some experience in applying wallpaper and want to try a more challenging project, you might choose wheat-based wallpaper glue or cellulose-based wallpaper glue. However, these require a bit more preparation and knowledge in order to achieve proper consistency before application.
It’s important to choose a wallpaper glue that suits your skill level to ensure an easy and successful installation. If you’re unsure which wallpaper glue to choose, do some research or consult with a professional to obtain advice on which glue will work best for your project.
Becoming skilled in DIY projects is a good idea, as it can help in a number of areas such as home improvement, decorating, and even crafting. If you’re looking for more DIY ideas or want to expand your crafting skills, you can check out how to make goo with starch and glue. This can be a fun and easy project that can be done with family members of all ages!
Your Budget
Your Budget
Your budget is an important factor when choosing wallpaper glue. If you’re on a tight budget, you may want to consider using starch-based wallpaper glue, which is the most affordable option. You can even make your own homemade starch-based wallpaper glue using everyday kitchen ingredients like cornstarch. Our article on “How to Make Bath Bomb Slime Without Glue” goes into detail on how to make your own wallpaper glue from these ingredients.
However, if you have a bigger budget, you may want to consider using vinyl-based wallpaper glue. This type of glue is more expensive than other options, but it provides a strong hold and is specially designed for vinyl wallpapers. If you’re working with delicate wallpaper or trying to avoid damaging your walls, you may want to invest the time and money in using a higher-quality glue like this.
It’s important to consider the quantity of wallpaper glue you’ll need for your project when considering your budget. Some wallpaper glues are sold in larger quantities and may be more cost-effective in the long run. Be sure to calculate the amount of wallpaper glue you’ll need based on the size of your project, and factor in any extra glue for mistakes or adjustments.
Your budget will play a significant role in determining which type of wallpaper glue you choose. But even if you have a limited budget, you can still find a reliable option that will get the job done. For more budget-friendly DIY projects, check out our article on “How to Make Paper Car Without Glue”.
The Different Types of Wallpaper Glue
When it comes to wallpapering, the type of glue you choose can make a big difference in the final result. There are several types of wallpaper glue available on the market, each with their own advantages and disadvantages. Some are better suited for certain types of wallpaper, while others are more versatile. In this section, we’ll take a look at the different types of wallpaper glue and what sets them apart from one another. Let’s dive in!
Starch-Based Wallpaper Glue
Starch-based wallpaper glue is one of the most popular types of wallpaper glue available. It is made from natural ingredients such as maize, wheat, or potato starch mixed with water. Starch-based glue is easy to make and use, making it a favorite among DIY enthusiasts. Below are some of the benefits of using starch-based wallpaper glue:
- Non-Toxic: Starch-based glue is non-toxic, making it safe to use even in households with children and pets. Unlike some other types of glue that contain harmful chemicals, starch-based glue is eco-friendly and poses no health risk.
- Easy to Prepare: To prepare starch-based wallpaper glue, you only need to mix the starch with water until it achieves a smooth consistency. The glue can then be used immediately.
- Affordable: Starch-based wallpaper glue is relatively affordable compared to other types of wallpaper glue, making it a favorite for budget-conscious homeowners.
- Great for Paper-Based Wallpaper: Starch-based glue is ideal for paper-based wallpaper since it gives a strong bond without damaging the paper. It also prevents the paper from warping or wrinkling.
- Easy to Remove: Starch-based wallpaper glue is easy to remove from walls since it dissolves in water. This means that you can easily remove the wallpaper without damaging the wall surface.
If you are planning to use starch-based wallpaper glue, you will need to have the following tools and materials:
- Starch (maize, wheat, or potato)
- Water
- Saucepan
- Wooden spoon
- Large bowl
- Measuring cup
To prepare the glue, you will need to follow these steps:
- Mix 1/4 cup of starch with 1/2 cup of cold water in a large bowl. Stir until the starch is completely dissolved.
- Boil 2 cups of water in a saucepan over medium heat.
- Add the starch mixture to the boiling water, stirring constantly for 1 minute.
- Reduce the heat and continue stirring until the mixture thickens and becomes translucent.
- Remove the mixture from the heat and transfer it to a large bowl.
- Allow the glue to cool before using it.
Starch-based wallpaper glue is easy to apply. You can use a brush or roller to apply it to the wallpaper or to the wall surface. Apply the glue evenly to ensure that you achieve a strong bond between the wallpaper and wall. If you experience any problems with the wallpaper or the glue, you can refer to the troubleshooting section of this article.
Making your own wallpaper glue can be a fun DIY project that you can accomplish in no time. However, if you prefer to use pre-mixed wallpaper glue, you can find it in most home improvement stores. Fibrin glue is another type of glue used in the medical field, and it is not recommended for use as wallpaper glue.
Cellulose-Based Wallpaper Glue
Cellulose-based wallpaper glue consists of cellulose or methyl cellulose mixed with water. It is a common type of wallpaper glue that is suitable for most types of wallpaper, including standard and heavy-duty options. Cellulose glue is affordable and easy to mix, making it a popular choice for DIYers.
Advantages of Cellulose-Based Wallpaper Glue
One of the main advantages of cellulose-based wallpaper glue is that it dries clear, making it a great choice for hanging wallpaper with light or translucent designs. It is also easy to clean up with warm water, and it has a long working time, allowing for easy adjustment of the wallpaper during installation.
Disadvantages of Cellulose-Based Wallpaper Glue
One disadvantage of cellulose-based wallpaper glue is that it may not hold up well in high-humidity areas, such as bathrooms or kitchens. In these cases, a vinyl-based glue may be a better choice. Additionally, cellulose glue may not be as strong as other types of wallpaper glue, so it may not be the best choice for heavy-duty wallpaper or for walls with imperfections.
Best Uses for Cellulose-Based Wallpaper Glue
Cellulose-based wallpaper glue is an excellent choice for most standard wallpaper installations on dry and smooth surfaces. It is well-suited for wallpaper with light or translucent designs and can be used on both permanent and removable wallpapers. It is not recommended for use on wallpaper that is designed to be washable or in areas subject to high humidity.
| Pros | Cons |
|---|---|
| Dries clear | May not hold up well in high-humidity areas |
| Easy to clean up with warm water | May not be as strong as other types of wallpaper glue |
| Long working time, allowing for easy installation adjustments | Not suitable for wallpaper designed to be washable |
If you are considering using cellulose-based wallpaper glue for your wallpaper installation project, it is important to note that different brands and products may have slightly different instructions and requirements. Always refer to the manufacturer’s instructions when using any type of wallpaper glue to ensure a successful installation.
Vinyl-Based Wallpaper Glue
Vinyl-Based Wallpaper Glue is specifically designed for vinyl wallpapers. It can also be used for other types of wallpaper but not on unprimed drywall. This type of glue has a more durable hold and is moisture-resistant, making it perfect for use in high-humidity areas like bathrooms or kitchens, where traditional wallpaper glue might fail.
Here is a table comparing vinyl-based wallpaper glue with other types of glue:
| Type of Glue | Bond Strength | Moisture Resistance | Suitable for Vinyl |
| — | — | — | — |
| Vinyl-Based Glue | Strong | High | Yes |
| Starch-Based Glue | Weak | Low | No |
| Cellulose-Based Glue | Moderate | Moderate | No |
| Pre-Mixed Glue | Moderate | High | Some |
| Wheat-Based Glue | Moderate | Moderate | No |
As you can see, vinyl-based glue stands out in terms of bond strength and moisture resistance compared to other types. However, it may not be suitable for all applications. It is always essential to consider the type of wallpaper and the surface you are applying it to before choosing the glue to use.
One of the benefits of vinyl-based glue is that it can be easily cleaned off with soap and water if there is any excess glue on your wallpaper or workspace. It is also relatively easy to prepare, usually requiring only water and mixing according to the manufacturer’s instructions.
If you’re planning to work with vinyl wallpaper, it is highly recommended to use vinyl-based glue for best results. However, it may not be the best option for other types of wallpaper and surfaces. So, it’s best to read the manufacturer’s instructions and do your research before making a final decision.
Note: if you’re interested in learning how to make bath bomb slime without glue, check out our guide here.
Pre-Mixed Wallpaper Glue
Pre-mixed wallpaper glue is the most user-friendly type of wallpaper adhesive, making it the preferred option for many DIY enthusiasts. As suggested by its name, pre-mixed wallpaper glue is a ready-to-use product that doesn’t require any additional mixing. This type of wallpaper glue is available in various formulations that cater to different types of wallpapers, such as traditional wallpapers, heavy-duty wallpapers, and vinyl wallpapers.
One benefit of using pre-mixed wallpaper glue is that it eliminates the need for you to measure or mix the product, making it a convenient option for amateur users. Another advantage is the consistency of the glue, which is generally more uniform compared to other types of wallpaper adhesive. This ensures that the wallpaper adheres well to the surface and minimizes any lumps or bumps.
However, pre-mixed wallpaper glue tends to be more expensive compared to other types of wallpaper adhesive, making it less suitable for larger wallpapering projects. Also, as pre-mixed wallpaper glue is a ready-to-use product, it is not customizable, meaning that it may not be the ideal adhesive for delicate or intricate wallpaper designs.
Pre-mixed wallpaper glue is a convenient and easy-to-use option that is ideal for smaller wallpapering projects or for those with limited experience in DIY. However, for more complex projects, or if you’re working with delicate wallpapers, you may want to consider other types of wallpaper adhesive.
If you want to learn more about other types of glue, be sure to check out our article on “What is the best glue for plastic toys?“.
Wheat-Based Wallpaper Glue
Wheat-based wallpaper glue is a more modern alternative to traditional wallpaper paste. It is made from natural cellulose and renewable resources such as wheat, making it eco-friendly and non-toxic. This type of glue has gained popularity in recent years due to its ease of use and sustainability.
Here are some benefits of using wheat-based wallpaper glue:
- It is environmentally friendly and non-toxic, making it safer to work with and better for the environment.
- It has a smooth consistency that makes it easy to apply and work with.
- It has excellent adhesion and can handle heavyweight wallpapers.
- It is easy to clean up with just soap and water.
- It is pH-neutral, which helps prevent wallpaper from yellowing or discolouring over time.
One of the most significant advantages of wheat-based wallpaper glue is that it is suitable for all types of wallpapers, including vinyl, embossed, and textile wallpapers. Additionally, it can adhere well to most surfaces, including plaster, drywall, and wood.
When using wheat-based wallpaper glue, it is essential to prepare the mixture correctly to achieve the right consistency. The process is relatively easy; you can either mix the powder with water or use a pre-mixed formula.
Here are some useful tips for preparing and using wheat-based wallpaper glue:
- Use cold or room temperature water when mixing the powder to avoid clumping.
- Stir the mixture thoroughly until it becomes a smooth, lump-free consistency.
- Allow the mixture to rest for about 10 minutes before using it to let it thicken.
- Apply the glue evenly onto the wallpaper using a brush or roller.
- Make sure to smooth out any bubbles or wrinkles before the glue dries.
Wheat-based wallpaper glue is an excellent option for those who want a natural and eco-friendly alternative to traditional wallpaper paste. It provides exceptional adhesion, is easy to work with, and is safe for both users and the environment. Additionally, it is an excellent option for those who want to avoid harsh chemicals in their home.
If you want to try making something special without using glue, like making a paper car without glue, you can follow our tutorial.
How to Prepare Wallpaper Glue
Preparing wallpaper glue is a crucial step in ensuring a smooth and successful installation of your wallpaper. Before you can start applying wallpaper glue, you need to ensure that you have all the necessary tools and materials. Once you have gathered all the required items, you can begin preparing the wallpaper glue. In this section, we will guide you through the process of preparing wallpaper glue step-by-step to ensure that your wallpaper adheres properly to the wall. So, let’s dive in and learn more about how to prepare wallpaper glue!
Tools and Materials Needed
To prepare wallpaper glue, there are certain tools and materials that you will need to have on hand. Make sure that you have everything you need before you begin, as this will make the process much smoother. The materials needed may vary depending on the type of wallpaper glue you are using, but some basic tools are universally required.
Here is a general list of what you’ll need:
| TOOLS | MATERIALS |
| Measuring cup or jug | Wallpaper glue powder or pre-mixed glue |
| Large mixing bowl | Cold water |
| Whisk or electric mixer | Optional: wallpaper liner or sizing |
| Paste brush or roller | |
| Utility knife or scissors | |
| Smoothing brush or wallpaper brush | |
| Sponge or cloth |
It’s important to note that some types of wallpaper glue may require additional tools. For example, if you’re using pre-mixed wallpaper glue, you may only need a roller or brush for application. If you’re using wallpaper liner or sizing, you may need additional materials such as a primer or sealant. Make sure to read the instructions carefully before beginning the preparation process.
Pro Tip: If you’re in a bind and don’t have wallpaper glue, you can make your own using flour and water. Check out our article on How to Make Cold Porcelain without Glue for a step-by-step guide on this DIY alternative.
Regardless of the type of wallpaper glue you choose, having the proper tools and materials will help ensure that the job is done correctly and efficiently.
Preparing the Wallpaper Glue
Preparing the Wallpaper Glue is an essential step to ensure a smooth and successful installation process. Here are the things you need to do to prepare your wallpaper glue:
Step 1: Read the instructions
The first step is to carefully read the instructions on the wallpaper glue package. Different brands may have different instructions on how to prepare the wallpaper glue, and it is essential to follow the instructions to ensure that the glue will work appropriately with your wallpaper.
Step 2: Determine the amount of glue to prepare
Next, you need to determine the amount of glue that you need to prepare. Measure the walls’ width and height to calculate the square footage. Double-check the wallpaper manufacturer’s instructions to know the recommended amount of glue for the square footage of your room.
Step 3: Mix the wallpaper glue
Mix the wallpaper glue according to the manufacturer’s instructions. Most wallpaper glues require mixing with cold water, but again, it may vary by brand. Mix the wallpaper glue in a clean bucket, and use a stir stick to blend it properly. Do not mix the wallpaper glue in a container that is too small, as it may slosh out during mixing.
Step 4: Let the glue settle
After mixing, let the wallpaper glue settle for 5-10 minutes before using it. During this time, the wallpaper glue will thicken, which helps it adhere to the wallpaper correctly.
Step 5: Strain the glue
Before using the glue, strain it to remove any lumps or debris. Pour the glue through a strainer or cheesecloth into another bucket or container. This step is necessary to ensure that the glue is entirely smooth and without any clumps that may affect the wallpaper’s smoothness.
Once you finish preparing the wallpaper glue, move on to the next step, which is applying the glue for the wallpaper installation. If you want to learn more about glue and adhesive, such as how to stick wood together without glue or how to glue intricate die-cuts, check out these guides from our website.
How to Apply Wallpaper Glue
You’ve chosen the perfect wallpaper to give your room a new look and now you’re ready to start hanging it up. But before you begin, it’s important to learn how to properly apply wallpaper glue. Applying wallpaper glue correctly is crucial to ensure that your wallpaper adheres properly and looks seamless. In this section, we’ll guide you through the step-by-step process of applying wallpaper glue, so that you can get it right the first time. By following these steps carefully, you can be sure that your wallpaper will look beautiful for years to come. So, let’s get started!
Step-by-Step Guide for Applying Wallpaper Glue
Step 1: Prepare the surface where you will apply the wallpaper. Make sure the surface is clean, free from any dirt or debris, and dry. Use sandpaper to smooth any rough spots, and repair any cracks or holes in the wall before applying wallpaper glue.
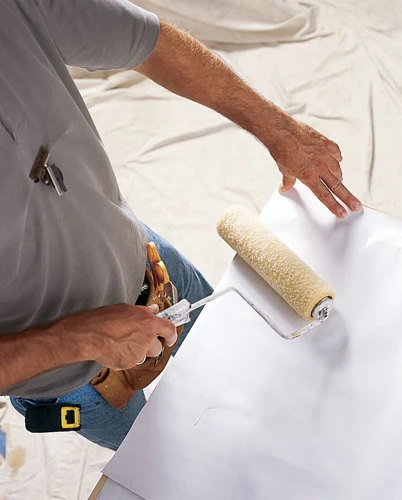
Step 2: Measure the wallpaper to fit the wall. Apply the glue to the backside of the wallpaper using a paint roller or brush, being careful to apply it evenly.
Step 3: Fold the wallpaper in half, glue-side to glue-side, with the edges slightly overlapping. This is called “booking.” Let it sit for the amount of time specified on the wallpaper glue instructions. Booking allows the glue to saturate completely into the wallpaper, making it easier to hang.
Step 4: Hang the wallpaper. Start at the top corner of the wall, aligning the edge of the wallpaper with the corner. Press the wallpaper firmly against the wall and smooth it out with a wallpaper brush or smoothing tool to remove any air bubbles. Continue hanging the wallpaper until you reach the end of the wall.
Step 5: Trim the excess wallpaper using a sharp utility knife, cutting along the edge of the wall or baseboard. Be careful not to damage the surface underneath.
Step 6: Let the wallpaper dry completely according to the wallpaper glue instructions before painting or adding any accent pieces to the wallpaper.
By following these step-by-step instructions, you should be able to successfully hang your wallpaper with no problems. If you encounter any issues, refer to the Troubleshooting Common Problems section of this article for tips on how to fix them.
Troubleshooting Common Problems with Wallpaper Glue
It can be frustrating when you’ve spent hours meticulously applying wallpaper, only to have issues arise after it has dried. But don’t worry, we’ve got you covered with some solutions to common problems with wallpaper glue. From peeling wallpaper to uneven adhesion, we’ll go over the possible causes and how to fix them. Keep reading to find out how to troubleshoot these issues and get your wallpaper looking its best. And if you’re looking for other useful tips and tricks for working with adhesive materials, check out our guides on how to stick wood together without glue and how to glue intricate die cuts.
Peeling Wallpaper
Peeling wallpaper is a common problem that many people encounter. It can be frustrating to see your wallpaper begin to lift and peel, especially if you invested a lot of time and effort in hanging it. The good news is that there are several reasons why wallpaper peels and several ways to fix it.
One of the main causes of peeling wallpaper is improper preparation of the surface. If the wall wasn’t cleaned and primed correctly before hanging the wallpaper, it won’t adhere properly and will eventually peel. Another reason for peeling wallpaper is poor quality wallpaper glue. Using a high-quality wallpaper glue will help ensure that your wallpaper stays in place.
Another reason why wallpaper may peel is due to excess moisture in the room. Moisture can cause the glue to soften and the wallpaper to loosen and peel. This is particularly common in bathrooms or other areas where there’s a lot of humidity. If this is the case, you may need to install an extractor fan or a dehumidifier to reduce the moisture levels in the room.
Sometimes, peeling wallpaper is caused by temperature changes and fluctuations. If the room gets too hot or too cold, the wallpaper may expand or contract, causing it to peel. To prevent this from happening, make sure you maintain a consistent temperature in the room and avoid hanging wallpaper in areas that are exposed to direct heat sources.
To fix peeling wallpaper, there are a few things you can do. The first step is to identify the cause of the problem and address it. If the surface wasn’t properly prepared, you may need to remove the wallpaper, re-prepare the surface, and rehang the wallpaper using high-quality glue. If excess moisture is the issue, you may need to fix any leaks, install a fan, or use a dehumidifier.
If the wallpaper is only peeling in small areas, you may be able to fix it without having to remove the entire piece. Simply apply some wallpaper glue to the affected area and gently press the wallpaper back into place. If the wallpaper has started to tear or is severely damaged, you will need to remove it and start over.
Peeling wallpaper can be a nuisance, but there are several reasons why it happens and several ways to fix it. By properly preparing the surface, using high-quality wallpaper glue, controlling the moisture and temperature levels, and identifying and addressing any problems early on, you can help ensure that your wallpaper stays in place and looks great for years to come.
| Causes of Peeling Wallpaper | How to Fix Peeling Wallpaper |
|---|---|
| Improper preparation of surface | Remove wallpaper and re-prepare surface |
| Poor quality wallpaper glue | Use high-quality wallpaper glue |
| Excess moisture in the room | Install a fan or dehumidifier to reduce moisture levels |
| Temperature changes and fluctuations | Maintain a consistent temperature and avoid direct heat sources |
| Small areas of peeling wallpaper | Apply wallpaper glue and press wallpaper back into place |
| Severe damage to wallpaper | Remove wallpaper and start over |
Rippling Wallpaper
Rippling wallpaper is one of the most frustrating issues that can arise after installing wallpaper. Rippling can occur due to a variety of reasons, such as improper application of the wallpaper glue, the use of the wrong type of wallpaper glue, or changes in temperature or humidity. Here are some common reasons why wallpaper may ripple and what you can do to fix it:
- Insufficient Adhesive: One of the main reasons why wallpaper may ripple is due to insufficient adhesive. If you have not applied enough adhesive during installation, the wallpaper may lift away from the wall, causing ripples. To fix this issue, you will need to carefully lift the affected areas of the wallpaper and reapply the adhesive underneath.
- Uneven Surface: An uneven surface can also cause wallpaper to ripple. If there are any bumps or dips in the wall, the wallpaper may not be able to adhere properly, causing ripples. To fix this issue, you will need to smooth out the wall as much as possible before applying the wallpaper.
- Excess Moisture: Excess moisture can also cause wallpaper to ripple. This can occur if there is excessive humidity or if the wallpaper is installed in an area with frequent temperature changes. To fix this issue, you will need to ensure that the room is well-ventilated and that the wallpaper is properly adhered to the wall.
- Dry Room Conditions: Conversely, overly dry room conditions can also cause wallpaper to ripple. If your home has low humidity levels, the wallpaper may shrink and pull away from the wall, causing ripples. To fix this issue, you may need to install a humidifier in the room to increase the humidity levels.
Rippling wallpaper can be a frustrating issue to deal with, but it can usually be fixed with some careful attention to detail. By identifying the underlying cause of the problem and addressing it appropriately, you can get your wallpaper looking smooth and beautiful once again.
Uneven Wallpaper
Uneven wallpaper is a common issue that occurs when installing wallpaper. This problem can be caused by several factors, including an uneven wall surface or incorrect mixing of the wallpaper paste.
Causes of Uneven Wallpaper
- An uneven wall surface: If your wall surface is not smooth, it can cause the wallpaper to appear bumpy or uneven.
- Incorrect mixing of wallpaper paste: If you don’t mix your wallpaper paste correctly, it can cause the wallpaper to dry unevenly, resulting in a bumpy texture on the wall.
- Poorly aligned wallpaper: If your wallpaper is not properly aligned while hanging, it can create bumps and ridges in the seams where the wallpaper meets.
- Low-quality wallpaper: Low-quality wallpaper can be more susceptible to wrinkling and warping than high-quality wallpaper, leading to an uneven appearance on the wall.
Solutions for Uneven Wallpaper
There are several solutions you can try if you encounter the problem of uneven wallpaper while installing wallpaper in your home.
- Sand the Wall: Sanding your wall down to a smoother surface can help to reduce the appearance of bumps and ridges. This solution works best if the unevenness is caused by the wall surface itself.
- Reposition the Wallpaper: If the unevenness is caused by poorly aligned wallpaper, you can reposition the wallpaper so that the seams are flush and there are no bumps or ridges.
- Smooth Out the Wallpaper: If the issue is caused by the wallpaper drying unevenly, you can use a smoothing tool to press out any bumps or ridges while the wallpaper is still wet.
- Apply a Second Coat of Wallpaper Paste: Applying a second coat of wallpaper paste to areas that have dried unevenly can help to smooth out the surface and reduce the appearance of bumps and ridges.
- Replace the Wallpaper: If you’ve tried all of these solutions and the unevenness is still present, it may be time to replace the wallpaper with a higher-quality option that is less prone to wrinkling and warping.
Uneven wallpaper can be frustrating, but it’s important to remember that there are solutions available to help fix the issue. Whether it’s sanding the wall, repositioning the wallpaper, or applying a second coat of wallpaper paste, taking the time to address the issue can ensure that your finished wallpaper looks smooth and flawless on your walls.
Bubbled Wallpaper
One of the common problems that can occur when installing wallpaper is bubbled wallpaper. This happens when there are air pockets between the wallpaper and the wall. Not only does it look unsightly, but it can also lead to the wallpaper peeling off over time. If you notice bubbles in your wallpaper, don’t panic — there are ways to fix it.
1. Identify the Cause of the Bubbles: Bubbles can occur due to various reasons such as improper application, lack of adhesive, or even humidity. Identifying the cause is important to prevent the same problem from happening again in the future.
2. Release Air Pockets: A quick fix for bubbled wallpaper is to release the air pockets. Use a sharp utility knife or needle to create a small puncture in the center of the bubble. Press the wallpaper gently to release the air, and then smooth out the area.
3. Apply Heat: An effective way to fix bubbling is to apply heat. This involves using a wallpaper steam stripper or a hairdryer on low heat. Hold the heat source a few inches away from the wallpaper and move it in a circular motion. The heat will soften the adhesive, allowing you to smooth out the area.
4. Use Extra Adhesive: If the wallpaper does not stick well, it may need extra adhesive. Apply a small amount of wallpaper adhesive behind the lifted area, and then press it gently against the wall. Smooth out any bubbles using a wallpaper brush or squeegee.
5. Call a Professional: If bubbling happens frequently, it may be due to an underlying issue such as structural problems or poor ventilation. In such cases, it’s best to call a professional to assess and fix the problem.
By following these tips, you can fix bubbled wallpaper and ensure that the wallpaper stays in place for years to come. Remember to take your time and be gentle when smoothing out the bubbles to avoid causing any damage to the wallpaper.
Problems with the Wallpaper Adhesion
When your wallpaper doesn’t stick properly to the wall, it can be frustrating to deal with. Here are some common problems that you may encounter with wallpaper adhesion and how to troubleshoot them:
| Problem | Cause | Solution |
|---|---|---|
| The wallpaper is peeling off the wall. | The wall wasn’t properly prepared before applying the wallpaper, the adhesive wasn’t evenly spread, or the adhesive was weak. | Remove the wallpaper and start from scratch, ensuring the wall is clean and primed before applying the new wallpaper. Make sure the adhesive is applied evenly and use a stronger adhesive if necessary. |
| The wallpaper is rippling or puckering on the wall. | The adhesive was applied unevenly or the wallpaper was stretched during installation. | Remove the affected area of wallpaper and reapply with fresh adhesive, smoothing out any ripples or bubbles as you go. Be careful not to stretch the wallpaper during installation. |
| The wallpaper isn’t adhering to the wall. | The wall wasn’t properly prepared, the adhesive wasn’t applied or spread evenly, the adhesive has dried out, or the wallpaper is too heavy for the adhesive. | Ensure that the wall is smooth, clean, and primed before applying the wallpaper. Apply the adhesive evenly and liberally, especially on the edges and corners. If the adhesive has dried out, it may require reactivating with a damp cloth or misting. If the wallpaper is heavy, consider using a stronger adhesive or a different type of wallpaper glue. |
By understanding the cause of these common problems with wallpaper adhesion, you can take the necessary steps to troubleshoot and fix them. It’s important to properly prepare the wall, use the appropriate adhesive, and apply it evenly to ensure a successful wallpaper installation.
Conclusion
In conclusion, choosing the right wallpaper glue is crucial to the success of your wallpapering project. When deciding on the type of glue to use, you should consider several factors such as the type of wallpaper you’re using, the surface you’ll be applying it on, your level of DIY skills, and your budget.
Once you’ve chosen the right wallpaper glue, it’s important to prepare it correctly to ensure that it works effectively. Using the appropriate tools and materials and following the manufacturer’s instructions are key to achieving the desired results.
When applying the wallpaper glue, it’s important to follow a step-by-step guide to ensure that you achieve a smooth and even finish. Troubleshooting common problems such as peeling, rippling, uneven or bubbled wallpaper can be frustrating, but with the right approach, they can be easily fixed.
In summary, using the right type of wallpaper glue and preparing and applying it correctly is essential to achieving a successful wallpapering project. By taking the time to choose the right type of glue and following the proper instructions, you can ensure that your wallpaper will look flawless and last for years to come.
Frequently Asked Questions
What is the best type of wallpaper glue?
The best type of wallpaper glue depends on the type of wallpaper you’re using and the surface you’ll be applying the wallpaper on. Starch-based glue is great for porous surfaces, while cellulose-based glue works well on non-porous surfaces. Pre-mixed glue is a good option for beginners as it saves time and effort.
How do I know which wallpaper glue to use?
You should consider the type of wallpaper you’re using, the surface you’ll be applying the wallpaper on, your level of DIY skills, and your budget. Consult the manufacturer’s instructions or seek professional advice if you’re unsure.
Why is my wallpaper peeling off?
Your wallpaper may be peeling off due to poor adhesion. This may be caused by not enough glue being used, not applying the glue correctly, or using the wrong type of glue. Other factors like humidity and temperature can also affect the adhesion of wallpaper.
Can I make my own wallpaper glue at home?
Yes, you can make your own wallpaper glue at home using common household materials like flour, sugar, and water. However, homemade glue may not provide the same level of adhesion as store-bought options or be as suitable for certain types of wallpaper and surfaces.
How do I fix rippling wallpaper?
Fixing rippling wallpaper involves carefully peeling back the affected area and reapplying glue with a brush or roller. Smooth out any wrinkles or bubbles and allow the glue to dry completely before reattaching the wallpaper.
What is the difference between starch-based and cellulose-based wallpaper glue?
Starch-based glue is made from natural materials like wheat, corn, or potato starch and is ideal for porous surfaces like plaster or drywall. Cellulose-based glue is made from cellulose ether and is better suited for non-porous surfaces like tiles or metal.
Can I use wallpaper adhesive as a substitute for wallpaper glue?
Yes, wallpaper adhesive can be used as a substitute for wallpaper glue. However, adhesive is generally stronger than glue, which may cause issues when removing the wallpaper in the future.
How do I remove excess wallpaper glue from the wall?
To remove excess wallpaper glue from the wall, use a damp sponge or cloth to gently wipe away any residue. Avoid using too much water as it may cause the wallpaper to lose adhesion or peel off.
Why is my wallpaper uneven?
Your wallpaper may be uneven due to not applying the glue evenly or not aligning the wallpaper properly. Making sure the wall is clean and smooth before applying the glue can also help prevent uneven wallpaper.
Can I apply wallpaper glue to painted walls?
Yes, you can apply wallpaper glue to painted walls. However, make sure the paint is dry and the surface is clean and smooth before applying the glue. Consider using a primer if the wall is heavily textured or has multiple layers of paint.