Crafting intricate die cuts is a labor of love. Our creativity takes center stage as we translate our imaginations into three-dimensional works of art. The finishing touch – gluing everything together – can be a bit daunting, however. With countless types and brands of glue available, it can be hard to know which to choose. Intricate designs pose a unique challenge, and the wrong choice of adhesive can lead to disastrous results. But fear not, we’ve got your back! In this article, you’ll learn how to glue your intricate die cuts with ease, ensuring they come together beautifully, every single time. So let’s dive in!
Choosing the Right Glue
When it comes to intricate die cuts, choosing the appropriate adhesive can make all the difference in successfully completing your project. With so many options available, it can be overwhelming to select the right one. Considerations such as the material of your die cuts and their size and shape are important factors in determining which glue to use. Read on to discover some helpful tips for selecting the right glue for your die cut project.
Consider the Material
When considering the material of your intricate die cuts, it’s important to keep in mind that not all glues are ideal for all materials. Some glues may be too harsh for delicate materials, while others may not be strong enough for tougher materials.
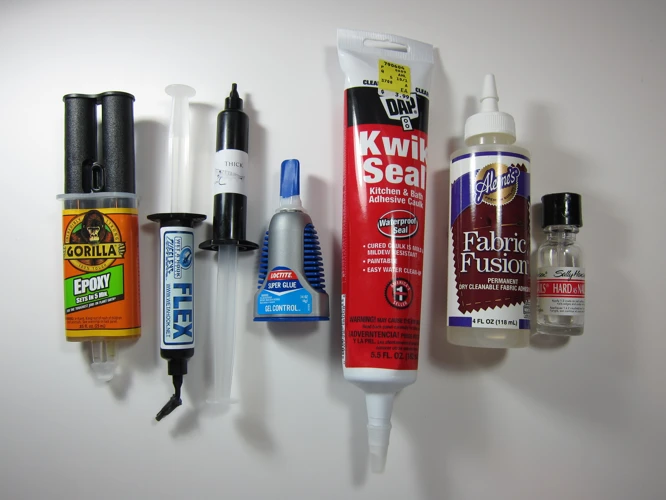
Here are some popular materials and the recommended glue:
- Paper: For paper die cuts, consider using a liquid adhesive such as PVA glue or a tape runner. These types of adhesive are easy to use and won’t soak through the paper, causing wrinkling or warping.
- Foam: Foam can be a bit trickier to adhere, but a strong adhesive such as super glue or hot glue will work well. Just be sure to use it sparingly to avoid melting or warping the foam.
- Chipboard: Chipboard is a sturdier material and requires a stronger adhesive such as liquid glue or a glue stick.
- Fabric: For fabric die cuts, consider using a fabric glue or a hot glue gun. These types of adhesives will bond the fabric together without leaving any residue or damage.
- Metal: For metal die cuts, try using super glue or epoxy. These types of adhesive are super strong and will successfully bond metal together.
It’s important to always check the manufacturer’s recommendations for the specific adhesive and material you will be using. In case you are not sure which type of glue to use on certain materials, you can visit what-glue-to-use-on-wall for some helpful tips.
Consider the Size and Shape of Die Cut
When considering the size and shape of your die cut, it’s important to take into account the intricate details and small areas that may need to be glued. Using the wrong glue or technique could result in parts not sticking together properly and ruining the overall design. One tip is to use a more viscous glue for larger pieces and a thinner glue for smaller pieces. Another consideration is the shape of your die cut. If it has curves or bends, you’ll need to use a glue that can adhere to those uneven surfaces. For example, a flexible glue like surgical glue could be a great option for complex shapes. However, a more rigid glue may work better for flatter pieces. Don’t be afraid to try out different types of glue to see what works best for your specific project. Remember to also consider the surface where the die cut will be placed and choose a glue that’s appropriate for that material (see our guide to basing miniatures for more information on various surfaces and glues).
Preparing Your Die Cuts for Gluing
Preparing your die cuts for gluing can make all the difference when it comes to the final result of your project. Skipping this step can lead to issues such as uneven application of glue, and die cuts not sticking properly. By following a few simple steps, your die cuts will be ready to receive glue and will be sure to stick in the right place. Let’s dive into the details.
Clean the Surface
When it comes to gluing intricate die cuts, “Clean the Surface” happens to be one of the most critical steps, which is often overlooked. Gluing over dirt, dust, or debris can prevent the glue from adhering correctly, resulting in a weak bond or uneven appearance.
Here are the essential steps to follow when preparing your surface for gluing:
- Remove Excess Dust: Before beginning the gluing process, make sure you remove any excess dust on the surface of your die cuts. You can use a soft-bristled brush or a clean cloth to dust off the particles from your die cuts. Don’t use water to clean the die cuts unless they are specifically designed for it.
- Clean with Alcohol: If you’re using a paper, cardstock, or even metal die cuts to glue, it’s important to clean the surface with alcohol. Rubbing alcohol is perfect for removing any dirt, oil residue, or fingerprints that could interfere with the adhesive’s performance. Just dab a soft cloth into the alcohol and gently rub the surface of the die cuts to clean it. Allow the alcohol to evaporate completely before moving on to the next step.
- Use a Tacky Cloth: A tacky cloth is a sticky piece of fabric that helps collect any small debris or dirt left on the surface. It is easy to find in the craft store. All you have to do is wipe the surface of the die cuts with the tacky cloth before gluing. Be sure to use gentle pressure and avoid pressing too hard while gluing the intricate die cuts.
- Let it Dry: After cleaning the die cuts, it’s important to let them dry completely before gluing. Moisture on the surface of the material can interfere with the adhesive performance. Be patient and wait a few minutes or use a fan to speed up the drying process.
Taking the above steps will significantly improve the adhesive performance and ensure that the die cuts stick for a long time. Now that you know how to clean the surface correctly let’s move on to the next step – Test-Fit the Die Cuts.
Test-Fit the Die Cuts
Test-fitting your die cuts before applying glue can save you a lot of time and frustration. This step allows you to make sure that all the pieces fit together properly and in the right position. To test-fit your die cuts, place each piece on the surface where you want to glue them. Make sure that each piece is facing the right way and that the edges fit together without any gaps.
You can use a table to keep your die cuts organized and in position while you test-fit them. Simply draw a template of your project on a piece of paper or cardboard, and then place it on the table. You can use tape to hold it in place and prevent it from sliding around. Place each die cut piece in its corresponding position on the template to make sure everything fits together as planned.
It’s important to remember that if your die cuts are not fitting together correctly during the test-fit stage, then they will not stick properly once you apply glue. This can cause frustration and potential damage to your project. Take the time to adjust any pieces that do not fit perfectly before moving forward with glue application.
Once you’re happy with the overall fit, you can move on to applying glue to your die cuts. For more information on how to glue intricate die cuts, check out our article How to Make Cold Glue.
Add Adhesive to Small or Thin Areas
When working with intricate die cuts, it’s important to pay close attention to small or thin areas that may not have enough surface area for the glue to adhere properly. In these cases, adding adhesive strategically can make all the difference in creating a secure bond.
One option for adding adhesive to small areas is to use a toothpick or a fine-tipped brush. Dip the tip into the glue and gently apply it to the area. Another option is to use a glue pen or a precision applicator with a small tip that can reach into tight spaces.
If you find that the glue is too thick or viscous to apply this way, try thin it down with a small amount of water or rubbing alcohol to make it more manageable. This can also help prevent excess glue from seeping out and ruining your project.
It’s important to note that adding too much adhesive to small or thin areas can actually have the opposite effect and cause the die cut to buckle or warp. Remember to apply the glue sparingly and allow it to dry completely before handling the piece.
Taking the time to add adhesive to small or thin areas can greatly improve the quality and longevity of your die cut project. By using precision tools and techniques, you can ensure that every part of your design is securely attached and looks its best.
Internal link: Learn more about how to apply surgical glue here.
Applying Glue to Your Die Cuts
Now that you have properly prepared your intricate die cuts, it’s time to move on to the next step – applying glue. Applying glue to your delicate die cuts can be a daunting task, but with the right technique and tools, you can ensure a flawless finish. Let’s dive into some tips and tricks on how to flawlessly apply glue to your intricate die cuts for a perfect finish.
Use a Fine-Tip Applicator
When it comes to gluing intricate die cuts, a fine-tip applicator can be your best friend. It allows for precise application of glue to those hard-to-reach areas and can also minimize the risk of using too much glue. Here are some tips to keep in mind when using a fine-tip applicator:
- Choose the Right Size Applicator: Depending on the size of your die cuts, you may need to experiment with different sizes of fine-tip applicators to find the one that works best. A smaller tip may be ideal for those tiny pieces, while a slightly larger tip may be better for larger areas.
- Keep the Tip Clean: Buildup of glue at the tip can cause the applicator to clog and affect the flow of glue. Wipe the tip regularly and keep an extra needle or tip on hand in case of clogging.
- Use the Right Amount of Pressure: Squeezing too hard on the bottle can cause too much glue to come out, while not applying enough pressure can cause glue to drip. Experiment with the amount of pressure on the bottle to find the right amount to apply just the right amount of glue.
By using a fine-tip applicator, you can have better control over where you apply the glue and avoid over-gluing your intricate die cuts. Remember, practice makes perfect so keep at it until you find the technique that works best for you.
Apply Glue in Small Amounts
When you’re gluing intricate die cuts, one of the most important things to keep in mind is to apply glue in small amounts. This will help prevent excess glue from seeping out and ruining your project.
To apply glue in small amounts, you can use a fine-tip applicator or a toothpick to place small dots of glue where it’s needed. You can also use a glue pen, which is designed to dispense a controlled amount of glue. Another option is to use a small brush to paint a thin layer of glue onto the back of your die cut.
To ensure that you’re applying the right amount of glue, you can test it on a scrap piece of paper or cardboard first. Apply a small amount of glue to the surface and place your die cut on top. Press down gently to see if the glue is holding the die cut in place. If it is, then you’ve applied the right amount of glue. If not, you may need to apply a bit more glue to ensure that the die cut adheres properly.
Remember, when it comes to gluing intricate die cuts, less is often more. It’s better to apply a small amount of glue and add more if needed than to apply too much and risk ruining your project.
Internal link: How much slime does a gallon of glue make?
Take Your Time
When it comes to gluing intricate die cuts, it’s important to take your time. Rushing the process may result in a messy finished product. Gluing is an art, and like any art, it requires patience and attention to detail. Here are some tips for taking your time and ensuring a successful finished product:
- Eliminate Distractions: Find a quiet, well-lit space to work in and avoid any distractions that could lead to mistakes.
- Break it Down: If your die cut has many small pieces, consider gluing it together in stages. This will allow you to focus on one part at a time and prevent mistakes.
- Apply Glue in Small Amounts: Don’t rush to apply large amounts of glue at once. Instead, use a fine-tip applicator to apply small amounts of glue where needed.
- Double Check: Before placing your die cut pieces together, take a moment to ensure they are aligned correctly. If you rush and place them incorrectly, it will be difficult to fix the mistake without damaging the pieces.
By taking your time and following these tips, you’ll be able to create a clean and professional finished product. Remember, patience is key when it comes to gluing intricate die cuts. If you’re feeling frustrated or stuck, take a break and come back to your project with a fresh perspective later.
If you’re interested in other gluing techniques, check out our article on how to reseal an envelope without glue.
Assembling Your Die Cuts
Now that you have applied glue to your intricate die cuts, it’s time to assemble them. This step requires patience, precision, and attention to detail. Incorrectly placing your die cuts could result in a messy and uneven project. But don’t worry, by following these tips, you’ll have a beautifully assembled project in no time. Remember, if you’re looking for more information on gluing, you can check out our article on how to glue posters to walls.
Place the Die Cut Carefully
When assembling your intricate die cuts, it’s important to place them carefully on your project. Start by lifting the die cut piece with your fingers or a pair of tweezers and positioning it exactly where you want it to go. Keep in mind that the glue will bond quickly, so you won’t have much time to make adjustments once the die cut contacts the surface.
Make sure the die cut is lined up correctly to avoid any mistakes or crooked placement. If you’re working on a larger project with multiple die cuts, it’s worth taking the time to lay out your design before you start gluing anything down. This will help you visualize the end result and ensure that everything is where it’s supposed to be before you apply any adhesive.
Additionally, be mindful of the glue that you apply to the die cut. Too much glue can cause the die cut to shift or slide, ruining your carefully placed design. Apply glue cautiously and in small amounts to prevent excess glue and mistakes from occurring.
If you’re struggling to place the die cut exactly where you want it, try using a toothpick or a small paintbrush to adjust its position before the glue sets. Once you’ve got it in the right place, apply pressure with your fingertips by lightly pressing down on the die cut. Be careful not to shift the paper while doing this.
Remember, the way you place your die cuts can make or break your entire project, so take your time and approach this step with patience and care.
As a reminder, always refer to the instructions on the glue’s packaging for drying and setting times before handling your project. If you’re still having trouble with your die cuts, don’t hesitate to refer back to our troubleshooting section for guidance.
Apply Pressure
Once you have carefully placed the die cut, it’s time to apply pressure to ensure that the glue adheres properly. Using your fingers, press down gently on the die cut to get it to stick to the surface. You can also use a bone folder, which is a hand tool that helps to create crisp folds and score lines on paper. Run the bone folder over the die cut with a firm, even pressure, making sure to press down on all areas of the die cut.
When applying pressure, it’s important to be gentle yet firm. You don’t want to crush the delicate die cut, but you do need to apply enough pressure to ensure that the glue sets properly. Hold the die cut in place for a few seconds, or until you feel the glue start to adhere.
If you’re gluing a particularly complex or intricate die cut with lots of tiny pieces, it can be helpful to weight it down while the glue dries. You could use a stack of books or a heavy object to apply weight evenly across the surface. Alternatively, you could use a clamping tool designed specifically for crafting.
Remember, depending on the type of glue you used and the material you are adhering to, it may take some time for the glue to set properly. Refer to the instructions on your glue for the recommended drying time.
Pro Tip: If you are gluing larger die cuts, you may want to apply the glue in smaller sections, and work on one section at a time to ensure that you can apply enough pressure to the area before the glue dries.
Finally, be sure to clean any excess glue from your fingertips and tools before it dries. Excess glue that dries on the surface of the die cut can be difficult to remove and may leave an unsightly residue.
Gobbledy Glue is a fantastic adhesive for intricate die cuts as it dries clear and doesn’t leave any residue. It’s also strong enough to hold the die cut in place without needing additional pressure. But regardless of the type of glue you use, applying pressure is a crucial step in ensuring that your die cuts stay firmly in place.
Drying and Setting Time
Once you’ve assembled your intricate die cuts, it’s important to give them enough time to dry and set properly. This step is crucial, as rushing it could potentially ruin all of your hard work.
Drying Time: The drying time of your glue will depend on the type of glue you’ve chosen. Reference the product instructions for specific drying times. In general, a good rule of thumb is to allow your project to dry for at least 24 hours, even if the glue appears to be dry to the touch before then. Keep in mind that the thicker the layer of glue, the longer the drying time required.
Setting Time: After your die cuts have dried, it’s important to give them enough time to fully set before handling them. This will ensure that the glue has had enough time to thoroughly adhere to the materials and your die cuts won’t shift or come apart when handled. Again, this will depend on the type of glue, but most will require at least a few hours for setting time.
Tips for Drying and Setting: While waiting for your project to dry and set, it’s important to handle it as little as possible. Moving or repositioning the die cuts before the glue has fully set can cause them to shift or come apart, which is the last thing you want after all your hard work. Additionally, make sure your project is kept in a flat and level position during drying and setting to prevent any warping or bending.
Remember, patience is key when it comes to proper drying and setting. If you rush this step, you may end up having to start the whole project over again. Take the time to properly let your die cuts dry and set, and you’ll be rewarded with a beautiful finished product.
If you’re unsure about the proper drying and setting times for your type of glue, check out this helpful article what glue to stick wallpaper to furniture. For tips on removing excess glue or cleaning up any mistakes, check out our guide on destiny how to get paper glue.
Troubleshooting Common Gluing Issues
Even with the most careful preparation and application techniques, glitches can still occur when gluing intricate die cuts. Don’t get discouraged though – it’s common to encounter some issues, and most of them can be easily solved with a bit of patience and know-how. Let’s take a look at some of the most common problems that you might run into while gluing and how to fix them.
Glue Seeping Out
One common issue that can arise when gluing intricate die cuts is the glue seeping out. This can be frustrating, as it can ruin the appearance of your project and make it difficult to clean up. Here are some tips to help prevent glue seeping out:
- Use a minimal amount of glue: One of the main reasons that glue seeps out is because too much glue was used. When applying glue, use a fine-tip applicator and apply it in small amounts.
- Wait before placing the die cuts together: Once you have applied the glue, wait a few seconds before placing the die cuts together. This will allow the glue to begin to set and become tacky, which will help prevent it from seeping out.
- Use a stronger adhesive: If you find that the glue you are using is still seeping out, consider switching to a stronger adhesive. There are many options available, including stronger types of glue, double-sided tape, or even glue dots.
- Apply pressure: Once your die cuts are in place, apply pressure to ensure they are firmly affixed. You can use a bone folder or your fingers to apply pressure. This will help ensure that the glue stays in place and does not seep out.
By following these tips, you can help prevent glue seeping out and create a beautiful, seamless project. Remember to use a minimal amount of glue, wait before placing the die cuts together, use a stronger adhesive if necessary, and apply pressure to ensure a secure bond.
Uneven or Excess Glue
When it comes to gluing intricate die cuts, uneven or excess glue can be a common issue. This problem can result from using too much glue or not applying it evenly across the surface. Fortunately, there are several steps you can take to troubleshoot this issue:
- Scrape off excess glue: If you notice excess glue on your die cut, use a small spatula or toothpick to remove it. Be sure to do this carefully to avoid damaging your die cut.
- Use a damp cloth: If the glue has already dried and hardened, try using a damp cloth to gently wipe away any excess glue. Be sure to do this carefully to avoid smudging or tearing your die cut.
- Avoid using too much glue: When applying glue, use a small amount and spread it evenly over the surface of your die cut. This can prevent excess glue from seeping out and causing unevenness.
- Let the glue dry completely: Before assembling your die cuts, be sure to let the glue dry completely. This can help prevent excess glue from smudging or creating bumps on your finished project.
- Consider using a glue pen: If you’re having trouble getting the right amount of glue onto your die cut, consider using a glue pen. These pens have fine tips that allow you to apply small amounts of glue precisely where you need it.
By taking these steps, you can prevent uneven or excess glue from ruining your intricate die cut project. Remember to be patient and take your time when applying and troubleshooting glue issues. With a little practice and perseverance, you can create beautiful and perfectly glued die cuts every time.
Die Cut Not Sticking
One frustrating issue that can arise when gluing intricate die cuts is when they simply do not stick. This can be due to a variety of factors, but there are some common solutions that can help resolve the problem.
1. Insufficient Glue Application: One possible reason for a die cut not sticking is that there wasn’t enough glue applied to the surface. Double-check that you’ve applied enough glue, especially in delicate or small areas of the die cut.
2. Incorrect Glue Type: Another reason your die cuts may not be sticking could be the type of glue you’re using. Some materials, such as acetate or vellum, may require a specialized glue that can handle their unique properties. Check the label on your glue to ensure it’s compatible with the material you’re using.
3. Surface Contamination: Dirty or contaminated surfaces can also prevent a die cut from sticking. Make sure you’ve cleaned the surface thoroughly before applying the glue. If you’re working with a porous material like paper or cardboard, excess moisture or grease on your fingers can also be a problem. Wear gloves or use a tissue to handle the die cut to avoid getting oils or moisture on the surface.
4. Improper Drying Time: Make sure you allow enough time for the glue to dry before attempting to stick the die cut. Depending on your glue type, atmospheric conditions, and the thickness of the glue layer, drying times can vary. Check the package of your adhesive for the recommended drying time, and be sure to give it ample time to set up.
5. Insufficient Pressure: Finally, it could be that you’re not applying enough pressure to the die cut after gluing. Use your fingers or a roller to press down firmly on the die cut, paying close attention to the edges and corners. Make sure you’re using enough pressure to bond the adhesive firmly to the surface.
If you’re still having issues with your die cuts not sticking, it may be helpful to experiment with different glue types or techniques to find what works best for you. With some perseverance and careful attention to detail, you can achieve beautiful, long-lasting results with even the most intricate die cuts.
Conclusion
After following the tips and tricks outlined in this article, you should have no problem gluing intricate die cuts. Remember, choosing the right glue is key, as well as preparing your die cuts properly and applying the glue carefully and patiently.
It’s important to be patient when it comes to drying and setting time, as rushing this step can cause the die cut to become unglued or warped. Troubleshooting common gluing issues can also help ensure success with your project.
Overall, with the proper tools and techniques, gluing intricate die cuts can be a fun and rewarding process. So don’t be afraid to experiment and try out different adhesives and methods to find what works best for you. Happy crafting!
Frequently Asked Questions
1. What is the best glue to use for intricate die cuts?
The best glue to use for intricate die cuts depends on the material of the die cut and the surface it will be adhered to. For paper, a strong liquid glue like Aleene’s Original Tacky Glue works well. For heavier materials like chipboard or felt, a strong adhesive like E6000 is recommended.
2. Can I use a glue stick for die cuts?
A glue stick can be used for simple and small die cuts, but it may not be strong enough for intricate and heavy die cuts. It is recommended to use a liquid glue or adhesive for intricate die cuts.
3. How do I clean the surface before gluing die cuts?
To clean the surface before gluing die cuts, use a clean, dry cloth to remove any dust or debris. For more stubborn dirt or residue, a damp cloth with mild soap can be used. Allow the surface to dry completely before applying glue.
4. Can I use a brush to apply glue?
A fine-tip brush can be used to apply glue to small and intricate areas of the die cut. However, it is recommended to use a fine-tip applicator for more precision and control.
5. How long should I wait for the glue to dry?
The drying time of glue depends on the type of glue used and the humidity of the environment. Generally, it takes 30 minutes to 1 hour for the glue to dry completely.
6. What should I do if the die cut is not sticking?
If the die cut is not sticking, it may be due to insufficient glue or not enough pressure applied during assembly. Apply a small amount of additional glue and press firmly to the surface.
7. Can I reposition the die cut after it has been glued?
It is not recommended to reposition the die cut once it has been glued as it may cause the die cut to tear or become misaligned. It is important to test-fit the die cut before gluing to ensure proper placement.
8. How can I avoid excess glue seeping out?
To avoid excess glue seeping out, use a small amount of glue and apply it to the center of the die cut. Avoid applying too much pressure when assembling the die cut to prevent glue from seeping out.
9. Can I use a heat gun to speed up the drying time of glue?
While a heat gun can speed up the drying time of glue, it is not recommended as it may cause the glue to bubble or wrinkle. It is best to allow the glue to dry naturally.
10. Can I glue intricate die cuts onto fabric?
Yes, intricate die cuts can be glued onto fabric using a strong adhesive like E6000 or Aleene’s Fabric Fusion glue. It is important to test the glue on a small area before applying to the die cut to ensure it does not damage the fabric.