You’ve just got your hands on a brand new poster, and you can’t wait to display it for everyone to see! But how to glue it to the wall without it falling off or damaging the surface? Don’t fret – we’ve got you covered with this complete guide on how to glue posters to walls. From choosing the right adhesive to applying it properly, we’ll show you every step of the way. Whether you’re an art collector, student or just want to spruce up your living space, this guide will help you achieve a professional-looking display in no time!
Materials You Will Need
As you prepare to hang your posters, it’s important to gather all the necessary materials so that you can complete the project smoothly and efficiently. Here are some essential materials that you will need to glue posters to walls. From tape to adhesive strips, we’ll explore the different options you have to choose from. We’ll also cover the best types of glue to use, depending on the specific poster and wall surface. So gather your supplies and let’s get started!
Tape, Glue, or Adhesive Strips?
When it comes to hanging posters on walls, choosing the right adhesive is key to ensuring they stay securely in place. While tape might seem like a quick and easy option, it may not be strong enough to hold up larger or heavier posters. So, what are the options?
Adhesive strips are a popular choice for those who want a clean and easy solution that won’t leave a residue. These strips come in various sizes and strengths, so be sure to select the appropriate ones for your poster size and weight. One advantage of adhesive strips is that they are removable, making them a great option for those who like to switch out their posters frequently. However, they may not be the best option for posters that need to stay up for a long period of time as they can lose their stickiness over time.
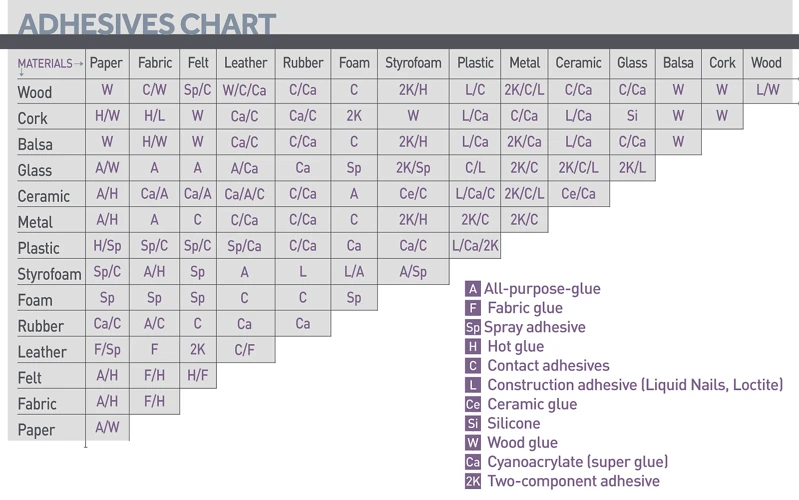
Glue is another option, and can be very effective in holding up posters. However, it’s important to choose the right type of glue and use it appropriately. For example, Elmer’s glue is a popular option for many types of paper and can be found at most office supply stores. Gorilla glue is another option that is especially effective for heavier posters. Keep in mind that glue can be messy and may leave a residue, so be sure to apply it with care and follow the instructions for drying time. If you’re unsure which glue to use, check out this guide to choosing the right glue.
Tape can be a good option for smaller posters or those that are not too heavy, but it’s important to use the right kind of tape. Masking tape or painter’s tape can work well, but avoid using duct tape or other heavy-duty tapes as they can damage the poster or the wall. Keep in mind that tape may not be the best option for posters that need to stay up for a long period of time.
The choice between tape, glue, or adhesive strips depends largely on the size and weight of the poster, as well as how long you want it to stay up. Adhesive strips are a good option for those who like to switch out their posters frequently, while glue can be more effective for heavier posters that need to stay up for a while. Tape can work well for smaller posters, but be sure to use the right type of tape to avoid damage. For those wanting to glue posters, but are unsure of the drying time, check out this guide to drying time for adhesive glue.
Preparing the Area
As with any project, preparing the area is important to ensure success in gluing your posters to walls. This step involves cleaning the wall, marking the placement, and protecting the surface. By taking these measures, you can avoid any potential damage or mistakes during the gluing process. Once the area is prepared, you can move on to applying the glue or adhesive. But before we dive into that, let’s explore each step of preparing the area in more detail. And if you’re interested in other DIY projects using glue, you may want to check out how to make paper hard with glue.
Clean the Wall
Before gluing a poster to a wall, it is important to clean the wall thoroughly to ensure that the glue adheres properly. Any dust, dirt, or oil on the wall can cause the glue to not stick properly, which can cause your poster to fall down.
To clean the wall, follow these steps:
| Step 1: | Gather Materials |
| You will need a soft cloth or sponge, warm water, and mild soap or detergent. | |
| Step 2: | Remove Dust And Dirt |
| Using a soft cloth or sponge, remove any dust or dirt from the wall. If there is too much dirt, it may be better to use a vacuum cleaner with a soft bristle brush attachment to remove the excess dirt. | |
| Step 3: | Make The Cleaning Solution |
| Mix warm water and mild soap or detergent to make a cleaning solution. Be sure to use only a small amount of soap or detergent as too much can leave behind a residue that can interfere with the adhesion of the glue. | |
| Step 4: | Clean The Wall |
| Using the soft cloth or sponge dipped in the cleaning solution, gently clean the wall in circular motions. Start from the top of the wall and work your way down. | |
| Step 5: | Rinse The Wall |
| Using a clean rag or sponge and clean water, rinse the wall thoroughly to remove any soap residue and then allow it to dry completely before applying glue or adhesive strips. |
It is important to note that certain types of walls may require different cleaning methods. For example, cleaning a painted wall may require a different cleaning solution than cleaning a brick or concrete wall. Make sure to use a cleaning solution that is appropriate for the type of wall you are working with to avoid damaging it.
To learn how to remove glue residue from walls once you’re ready to take down your poster, check out our article on how to dry clear glue fast.
Mark the Placement
Before gluing posters to the wall, it’s important to mark their placement. This will prevent you from making mistakes while applying the adhesive. Additionally, it will help you determine the amount of glue or adhesive strips you’ll need for each poster.
Here are the steps to follow when marking the placement:
- Use measuring tape to determine the width and length of the poster.
- Using a pencil, lightly mark the top corners of the poster’s backside.
- Measure these markings to ensure they’re level and match the width of the poster.
- Lightly mark the placement of the bottom two corners.
Make sure that your markings are level with one another and that they are positioned at the correct height on the wall. This will not only ensure that the posters look professional but will also make the gluing process easier and more manageable.
Once you’ve made these markings, you can start applying the adhesive to the back of the poster. However, before doing so, make sure to protect the surface where you’ll be working. For a complete guide on how to glue posters to walls, keep reading or follow this link to learn how to make glue dry faster: “/how-to-make-glue-dry-faster-elmer-s-glue/”.
Protect the Surface
One of the most important things to keep in mind when gluing posters to the wall is to protect the surface. Glue can be messy and may damage the wall or surrounding area if not applied carefully. Here are some tips to help protect the surface:
- Cover the surrounding area with old newspapers or a drop cloth to avoid getting glue on any nearby furniture or floors.
- Be sure to use the right amount of glue and spread it evenly on the back of the poster.
- If using adhesive strips, carefully remove the backing and apply the strip to the poster before placing it on the wall. This can prevent the adhesive from sticking to the surface and causing damage.
- For glossy or delicate surfaces, consider using removable adhesive putty instead of glue or adhesive strips. This putty will not damage surfaces and can easily be removed without leaving any residue behind.
It is always better to be safe than sorry, so take the time to properly protect the surface before applying the glue or adhesive strips. With these simple steps, you can avoid any damage and ensure your posters stay looking great for as long as you want.
If you’re curious about making crafts without glue or using glue for other purposes, check out our article on how to make a wand without a glue gun.
Applying the Glue or Adhesive
Assembling your perfect collage or displaying that stylish poster on your wall will require appropriate adhesive. With a variety of options available, it’s important to carefully consider which type of glue or adhesive will work best for your specific materials and surface. Depending on the weight of your poster, the texture of your wall, and your desired longevity, certain adhesives or glues may be better suited than others. In this section, we’ll discuss how to choose the right glue, how to apply the adhesive, and the best practices for optimal display. But first, let’s consider some alternative ways to use glue that you may not have tried yet, such as making bath bomb slime or using it in bed bug traps.
Choosing the Right Glue
Choosing the right glue or adhesive is crucial to ensuring that your posters stick to the wall securely and stay put. Using the wrong adhesive can damage both the poster and the wall, leaving you with a mess to clean up. Here are some things to consider when selecting the right glue or adhesive:
| Type of Poster | Type of Wall | Best Glue/Adhesive Choice |
|---|---|---|
| Standard Paper Posters | Smooth and Flat Walls | Spray Adhesive or Rubber Cement |
| Cardstock Posters | Textured Walls | Double-Sided Foam Tape or Mounting Squares |
| Large or Heavy Posters | Concrete or Brick Walls | Epoxy Glue or Construction Adhesive |
It’s important to remember that not all glues and adhesives are created equal. Some may work better on certain types of walls or posters than others, so it’s important to do some research and choose the right one for your particular situation. Don’t be afraid to experiment with different types of adhesives until you find one that works well for you.
If you’re still unsure about which glue or adhesive to use, consider asking for advice at your local hardware or DIY store. They will likely have a variety of options available and be able to recommend the best choice for your specific needs.
Tacky glue is a popular choice for many DIY projects, but it may not be the best choice when it comes to hanging posters. It tends to dry brittle, which can cause the poster to peel away from the wall over time.
Choosing the right glue or adhesive is an important step in ensuring that your posters stay securely on the wall. Take the time to choose the right one for your needs, and you’ll be able to enjoy your posters without worrying about them falling down.
Using Adhesive Strips
Adhesive strips are an easy-to-use and mess-free method for hanging posters. They can be found in most hardware stores and are affordable. Adhesive strips are great because they adhere strongly to the wall and can hold lightweight posters without damaging the surface. Here are the steps to follow when using adhesive strips:
| # | Steps |
|---|---|
| 1 | Choose the right adhesive strips for the weight of your poster. For larger posters or those with heavier frames, it’s best to use multiple strips to distribute the weight more evenly. |
| 2 | Attach the strips to the back of your poster. Make sure to align them with the edges of the poster for even support. |
| 3 | Remove the protective covering from one side of the adhesive strips and attach them to the wall. Press firmly on the strips to ensure a strong hold. |
| 4 | Remove the protective covering from the other side of the adhesive strips and carefully align the poster with the markings on the wall. Press firmly against the wall to secure the poster. |
| 5 | Step back and examine the poster to ensure it is level and straight. Adjust if needed. |
Using adhesive strips is a great option for those who don’t want to use glue or tape, or want to avoid damaging the wall surface. However, keep in mind that adhesive strips may not hold up well in humid environments or high-traffic areas. If your poster is larger or heavier, it’s recommended to use another hanging method such as nails or picture hangers.
Pro tip: If you’re struggling to remove adhesive residue from the wall or need to remove excess glue, try using a bed bug glue trap, which can be found in most home improvement stores. For tips on how to use bed bug glue traps, check out our article /how-to-use-bed-bug-glue-traps/. If you’re looking for another fun project to do with glue, learn /how-to-glue-puzzle/ together with your friends or family!
Applying Glue to the Poster
Before applying glue to the poster, it’s important to understand how much to apply and where to apply it. Follow these simple steps to ensure a successful application:
- Apply a Small Amount of Glue: Use a glue stick or a small amount of liquid glue to coat the corners and edges of the back of the poster. Avoid putting too much glue on the poster as the excess glue can create unsightly smudges or bubbles when you attach it to the wall.
- Spread Glue Evenly: For large posters, it may be necessary to spread a thin layer of glue across the entire back. Use a paper towel or a glue spreader to get the glue on evenly. Be sure to cover the corners and edges where the poster is most likely to peel away from the wall.
- Avoid Applying Glue to the Front of the Poster: Make sure not to get any glue on the front of the poster as it can create permanent damage, including stains or wrinkles to the paper.
- Avoid Overlap: Be careful not to overlap the glue areas or create any bumps as these will be visible on the front of the poster once it’s hang.
- Let the Glue Dry Before Hanging: Allow the glue enough time to dry completely before hanging the poster. Check the manufacturer’s instructions for specific drying times.
Following these steps will ensure a clean and successful application of glue to the poster. Remember, only use enough glue to keep the poster in place, don’t overdo it.
Gluing the Poster to the Wall
Now that you have prepared the area and applied the glue or adhesive to your poster, it’s time to attach it to the wall. Follow these steps for best results:
- Start at the top: Holding the top corners of the poster, carefully line it up with the markings you made on the wall. Make sure it’s level before pressing it against the wall.
- Smooth out the bubbles: Use your hands or a flat tool, such as a credit card, to smooth out any bubbles or bumps in the poster. This will ensure that it’s completely flush against the wall and has a neat appearance.
- Work from top to bottom: Slowly work your way down the poster, smoothing out any bumps or wrinkles as you go. Don’t rush this process, as it’s important to get it right the first time.
- Press firmly: Once the poster is in place, press firmly on all areas to ensure that it’s securely attached to the wall. This will also help the glue or adhesive to spread evenly, ensuring long-lasting adherence.
Remember, different types of glue or adhesive strips may have different instructions for application. Always follow the manufacturer’s instructions and recommendations for best results. With these tips and proper application, your poster should stay attached to the wall for as long as you desire.
Best Practices
Ensuring your posters stay in place and look their best is crucial when displaying them on your walls. While applying glue or adhesive may seem straightforward, there are some best practices that can help make your posters last longer and prevent damage to your walls. In this section, we’ll cover some tips and tricks to help you get the most out of each poster you display. Take note of these helpful hints and your posters will be sure to stay looking fresh and vibrant.
How to Avoid Curling
One common problem with gluing posters to walls is that they can start to curl at the edges over time. This can be unsightly and make the poster difficult to read. To avoid this issue, there are a few things you can do.
1. Use a heavier paper stock: Posters printed on heavier paper stock are less likely to curl than those printed on lighter paper. If you have the choice, opt for a heavier paper stock to minimize the risk of curling.
2. Apply glue or adhesive evenly: When applying glue or adhesive to the back of your poster, be sure to spread it evenly to avoid creating areas where the paper will dry at different rates. Uneven drying can cause the edges to curl.
3. Trim excess paper: If there is excess paper around the edges of your poster, trim it off before gluing it to the wall. This will reduce the amount of paper that could curl over time.
4. Avoid high humidity areas: Exposing your poster to high levels of humidity can increase the likelihood of curling. Place your poster in a dry area, away from sources of moisture like bathrooms or kitchens.
5. Add weight to the corners: Once your poster is glued to the wall, you can help prevent curling by adding weight to the corners. Simply place a small object like a book or paperweight on each corner of the poster to keep it flat.
By following these tips, you can help ensure that your poster stays looking its best for as long as possible. Remember to choose the right paper stock, apply your glue or adhesive evenly, trim excess paper, avoid high humidity areas, and add weight to the corners to prevent curling.
How to Remove Poster Residue
If you’re wondering how to remove poster residue from your wall, don’t worry, it’s not as difficult as you may think. Here are a few ways to remove poster residue from your wall:
- Warm Soapy Water: This is the easiest and most common method. Simply mix some warm water with a small amount of dish soap. Use a soft cloth to gently rub the area where the residue is, until it comes off. Rinse the area with clean water and dry it with another soft cloth.
- Vinegar: Vinegar is another good option to remove poster residue. Mix equal parts of white vinegar and warm water in a bowl. Dip a cloth or sponge in the solution, then gently rub the affected area. Rinse with clean water and dry with a soft cloth.
- Rubbing Alcohol: Dip a cotton ball or soft cloth into rubbing alcohol, and rub the area with the residue until it starts to come off. Avoid using too much alcohol, and check the paint on your wall during the process to make sure it’s not being damaged.
- Baking Soda: Mix equal parts of baking soda and water to create a paste. Apply the paste to the affected area, and use a soft cloth or sponge to rub it in small circular motions. Rinse the area with clean water and dry it with a soft cloth.
Remember to always test these methods on a small, inconspicuous area first and check for any damage before proceeding with the rest of the wall. With these simple tricks, you can enjoy your posters without worrying about residual damage or leftover residue on your walls.
How to Rearrange Posters
Rearranging posters can be a fun and easy way to switch up the look of a room, but it’s important to do so carefully to avoid damaging the wall or the poster itself. Here are some steps to follow:
| Step 1: | Remove the poster gently from the wall. If it was glued on, use a plastic scraper or a credit card to carefully loosen the edges. |
| Step 2: | Store the poster in a safe place, such as a cardboard tube, to prevent it from getting damaged. |
| Step 3: | Clean the wall where the poster was previously hanging. Use a mild cleaner and a soft cloth to avoid damaging the paint or wallpaper. |
| Step 4: | Determine the new location for the poster. Use a tape measure to ensure it is hung at the desired height and level. |
| Step 5: | Reapply the adhesive method used previously, whether it be glue, tape, or adhesive strips, following the same steps as before. |
| Step 6: | Press the poster onto the wall, starting at the top and working your way down. Use a plastic scraper or a credit card to smooth out any air bubbles. |
When rearranging posters, it’s important to pay attention to the condition of the poster itself. Over time, adhesive methods can cause damage to the paper or cause the ink to bleed. If the poster appears to be in poor condition, it may be best to retire it and find a replacement.
Pro tip: If you want to rearrange posters frequently, consider using adhesive strips or removable putty instead of glue. These methods are less likely to damage the wall and make it easier to rearrange posters without causing wear and tear.
When to Consider Other Display Methods
It’s important to consider other display methods when gluing posters to walls isn’t the right option. Here are some scenarios where it may be best to explore other options:
- Wallpapered walls: If the walls are wallpapered, it’s best to avoid gluing posters to them as the wallpaper may peel away with the poster leaving behind a mess.
- Painted walls: If the walls have just been painted or if the paint hasn’t had enough time to cure, gluing posters may cause the paint to peel or leave behind residue. It’s best to wait a few weeks before attempting to hang posters.
- Temporary displays: If you only plan on displaying the posters for a short period of time, it may be best to consider alternative display methods such as poster frames or stands. These methods can be easily moved and won’t leave behind any residue.
- Excessively heavy posters: If you’re dealing with overly heavy posters, it’s best to consider other display methods. Regular glue or adhesive strips may not be strong enough to hold these posters securely to the wall.
Remember, it’s important to take the time to properly evaluate your display environment before choosing a display method for your posters. By doing so, you can ensure your posters stay securely in place without causing any damage to the walls or surface they’re displayed on.
Conclusion
After going through this complete guide, you should now be equipped with the knowledge required to glue a poster to a wall. There are different methods and materials that can be used, and the one you choose will depend on your preference and the specific conditions of the area you want to display your poster.
Remember, preparation is key before applying any adhesive to your poster and wall. You need to clean the wall, mark the area, and protect the surface to achieve a professional look. Also, choosing the right adhesive is essential for a strong and long-lasting bond.
If you’re worried about curling or adhesive residue, then don’t fret, as there are simple and effective solutions to address these common issues. Additionally, consider alternative display methods if you’re unsure about the condition of your wall.
Overall, with the right materials, techniques, and best practices, you can easily glue your poster to a wall and create a stunning display. So, get started on bringing your creative vision to life and enjoy the satisfaction of seeing your poster admired by all who view it.
Frequently Asked Questions
How do I choose the right type of adhesive for my poster?
The type of adhesive you choose depends on several factors, including the weight of your poster, the wall surface, and whether you want to be able to remove the poster in the future. Adhesive strips are typically best for lightweight posters on smooth surfaces, while glue or tape may be better for heavier posters or rough surfaces.
Can I use regular tape to hang my poster?
Regular tape may not be strong enough to hold heavier posters, and it may damage the poster or the wall surface when removed. It’s best to use a dedicated poster tape or adhesive strip to ensure a secure hold without leaving residue.
How should I clean the wall before putting up my poster?
Clean the wall with a damp cloth or sponge to remove any dust, dirt, or oil that could prevent the adhesive from sticking properly. Let the wall dry completely before applying tape or adhesive.
What should I do if my poster starts to curl at the edges?
To avoid curling, be sure to use a strong adhesive that can support the weight of the poster. If your poster has already started to curl, try using a heavy object such as a book or paperweight to press the edges down until they adhere properly.
Can I reuse adhesive strips after removing my poster?
No, adhesive strips are designed for one-time use and should be disposed of after removing your poster. Using a used strip may result in weak adhesion or residue left behind on the wall.
How can I remove residue left behind by poster glue?
Try using a solution of warm water and soap to gently scrub away any leftover residue. If that doesn’t work, you can try using rubbing alcohol or a specialized adhesive remover, but be sure to test a small area first to avoid damaging the wall surface.
How can I protect my poster from fading or discoloration?
Avoid hanging your poster in direct sunlight or in areas with high humidity or temperature fluctuations. Consider using UV-resistant frames or sleeves to protect your poster from damage over time.
Can I hang posters on wallpaper?
It depends on the type of wallpaper and the weight of the poster. Adhesive strips or tape may be safe for lightweight posters on smooth wallpaper, but for heavier posters or textured wallpaper it’s best to use a removable adhesive putty or other specialized hanger.
How can I prevent my poster from tearing when removing it?
Be sure to remove the poster slowly and gently, pulling at a low angle and supporting the back of the poster with your other hand. If the poster does start to tear, carefully stop pulling and apply more adhesive to the torn area before continuing removal.
When is it time to retire my poster and try a new display method?
If your poster is damaged, faded, or no longer suits your aesthetic preferences, it may be time to retire it and try a new display method such as framing, matting, or mounting. Remember to properly dispose of your old poster according to local regulations.