Woodworking is an intricate craft that requires a great deal of skill and patience. One of the most important aspects of woodworking is joining pieces of wood together to create a sturdy and long-lasting structure. Glue is often the go-to choice for many woodworkers when it comes to joining wood, but what if you don’t have glue or simply don’t want to use it? In this article, we’ll explore alternative techniques that you can use to stick wood together without glue. These techniques range from traditional joinery methods to using mechanical fasteners and even adhesive tape. So, whether you’re a beginner or a seasoned woodworker, read on to learn how to join pieces of wood together without the use of glue.
Option 1: Joinery Techniques
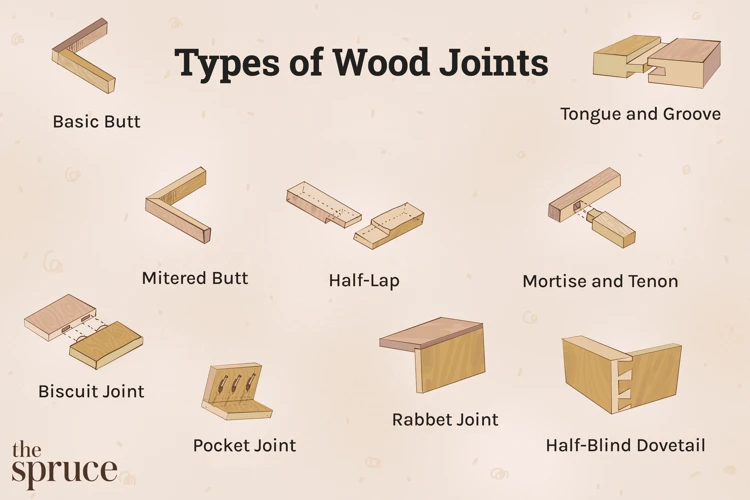
Joinery techniques are methods that have been used for centuries to stick wood together without glue. These techniques not only create a strong bond, but also add a touch of elegance to the finished product. Using different joinery techniques can be an exciting way to test your carpentry skills and creativity. From using pegs and rabbets to mortise and tenon joints, each technique requires a different set of tools and skills. In this article, we will guide you through different joinery techniques and explain how to use them. So, let’s get started! And if you’re interested in learning about glue options, check out what glue does Sondra Celli use for PDR.
Pegs and Rabbets
When joining two pieces of wood without glue, one option is to use pegs and rabbets.
A rabbet is a groove cut into the edge of a piece of wood, while a peg is a small wooden dowel that fits into a hole drilled into the joint. To use this technique, you will need to measure and cut the rabbet and peg holes with precision. This can be done with hand tools or a table saw.
An advantage of this method is that it creates a strong joint without the need for glue. However, it can be time-consuming and may require some experience and skill level. Additionally, the appearance of the joint may not be as visually appealing as other methods.
Here is a table summarizing the pros and cons of using pegs and rabbets for sticking wood together:
| Pros | Cons |
|---|---|
| Creates a strong joint without glue | May be time-consuming |
| May require experience or skill level | |
| Appearance of joint may not be as visually appealing as other methods |
If you want to learn more about what glue to use for different projects, check out our article on what is a glue job.
Dovetails
Dovetails are an excellent way to join wood pieces without glue. This technique requires some skill, but it creates incredibly sturdy joints. Dovetails are commonly used on drawers, cabinets, and other furniture pieces that require durability. This technique involves cutting interlocking joints on two wood pieces- one piece has pins, and another one has tails. When the two pieces are fit together, the tails fill the gaps between the pins, creating a solid joint. Dovetails can be cut by hand using a saw and chisel or by using a dovetail jig on a router.
Here are some steps to create dovetails using a saw and chisel:
- Measure and mark the wood pieces where the dovetail joint will be.
- Cut the pins on one piece with angled cuts using a dovetail saw. Be careful not to cut too deep and ruin the joint.
- Chisel out the wood between the cuts, making sure the chisel stays straight. Use a small chisel to clean the corners and edges.
- Use the pins to mark the tails on the other piece. Cut the tails just like you cut the pins. Make sure the width of the tails matches the width of the pins.
- Chisel the waste out between the tails, and make sure to clean the corners and edges.
- Fit the two pieces together, making adjustments with a chisel if needed. The joint should fit tightly without any gaps or wiggling.
- Glue is not necessary if the joint fits tightly. Sand and finish the wood as desired.
While it is a complex technique, dovetail joints are one of the strongest and most beautiful ways to join pieces of wood together without glue. With some patience and practice, you can master this skill.
If you’re interested in glue types for other types of woodworking projects, check out our guide on what glue to use for PDR, what glue to use for a guitar bridge, or what glue is safe for fish.
Biscuits
Biscuits are another popular joinery technique that can be used to stick wood together without glue. Biscuits are oval-shaped, thin wooden pieces that are inserted into slots that are cut into two pieces of wood. The result is a strong bond between the two pieces of wood.
Here is a step-by-step guide on how to use biscuits:
- First, you need to buy a biscuit joiner, which is a power tool used to cut slots in the wood.
- Next, mark where you want to cut your slots on each side of the wood.
- Then, use the biscuit joiner to cut a slot at each mark.
- After that, apply some glue inside the slot and insert the biscuit.
- Finally, bring the two pieces of wood together and clamp them tightly until the glue has dried.
Biscuits are a great option for joining two pieces of wood at a right angle, and they can be used for a variety of furniture projects such as cabinets and tables. They also add a decorative touch to your woodworking projects.
If you prefer not to use glue or other adhesives, biscuits can be a reliable alternative method of joining two pieces of wood. However, keep in mind that the use of biscuits alone may not be strong enough for certain projects. If you want to make sure your project is sturdy and durable, you may also want to consider using other joinery techniques or mechanical fasteners.
If you want to learn more about glue and adhesive options for wood projects, check out our article “How to Glue Wood: A Complete Guide.”
Tongue and Groove
One effective way to join wood without glue is by using the tongue and groove method. This technique creates a strong, seamless joint between two pieces of wood. The tongue and groove method involves cutting a “tongue” on one end of a board and a “groove” on the other end of a second board, allowing them to interlock with each other.
The Steps for Creating a Tongue and Groove Joint:
| Step 1: | Choose the two pieces of wood to be joined and mark a line along the edge where the joint will be made. |
| Step 2: | Using a table saw, cut the “tongue” on one end of one board and the “groove” on the other end of the second board. The tongue should fit snugly into the groove. |
| Step 3: | Fit the tongue and groove together and clamp the boards securely in place. |
| Step 4: | Use a finish nailer or pin nailer to secure the joint in place. |
It’s important to note that the tongue and groove method works best for joining boards that are the same thickness. If you try to join boards that are different sizes, you may end up with gaps or an uneven joint. Additionally, this method can be time-consuming and requires some specialized tools, so it may not be the best option for beginners.
If you’re interested in trying out the tongue and groove method, be sure to take your time and follow each step carefully. With practice, this technique can produce beautiful, seamless joints that will hold up over time. To learn more about other types of wood glue, check out our guide to making homemade puzzle glue.
Mortise and Tenon Joints
A mortise and tenon joint is a classic woodworking technique for joinery. It involves two parts: the mortise, which is a square or rectangular hole, and the tenon, which is a corresponding projection at the end of another piece of wood. The tenon is inserted into the mortise and glued in place, creating a strong, durable joint.
To create a mortise and tenon joint, you’ll need to use a saw and chisel. First, mark out where the mortise will go on one piece of wood, and then carefully cut out the mortise with a saw. Make sure the mortise is slightly smaller than the tenon, so that it fits snugly. Then, mark out and cut the tenon on the other piece of wood, making sure it’s the correct size to fit into the mortise.
Advantages of Mortise and Tenon Joints
There are several advantages to using mortise and tenon joints. Firstly, they are incredibly strong and durable, making them ideal for furniture and structural components. They also allow for a large surface area for gluing, providing a stronger bond compared to other joinery techniques. Additionally, mortise and tenon joints have a classic appearance that can add to the overall aesthetic of a woodworking project.
Disadvantages of Mortise and Tenon Joints
However, there are some disadvantages to using mortise and tenon joints. They can be time-consuming and difficult to create accurately, requiring a high level of skill and precision. They also require specialized tools, such as a saw and chisel, which may not be readily available to beginners. Finally, while the joint itself is strong, it can weaken the surrounding wood if not properly designed and executed.
Mortise and tenon joints are a classic and effective way to join wood without using glue. They offer many advantages, such as strength and durability, while also being aesthetically pleasing. However, they require a high level of skill and precision to create, making them a challenge for beginners. If you want to learn about different types of glue, check out What Glue to Use for Twine on Glass.
Option 2: Mechanical Fasteners
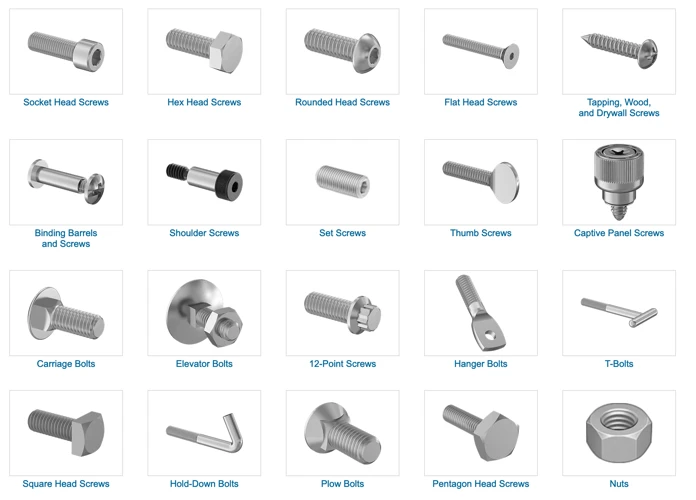
When sticking wood together, sometimes glue may not be the best option due to personal preferences or specific project requirements. Mechanical fasteners are a great alternative that can provide sturdy and reliable results with proper execution. From screws and nails to bolts and dowel screws, there are various types of mechanical fasteners to choose from depending on the wood material and joining technique needed. Let’s dive into some of the most popular mechanical fasteners for sticking wood together without glue.
Screws and Nails
One alternative option for joining wood without using glue is using screws and nails. These are mechanical fasteners that hold two pieces of wood together by piercing through them. Screws and nails are ideal for projects that require a strong and durable hold. In fact, they are commonly used in furniture making, carpentry, and cabinet installation.
While nails are easier to use, especially for beginners, screws provide a stronger and more secure hold. Screws are threaded, which means they create more friction against the wood, making it harder to pull the pieces apart. Additionally, screws can be removed and replaced more easily than nails, making them a better option for projects that might require disassembly.
When using screws or nails, it’s important to choose the right type and size for the job. For instance, using a nail that is too thin or too short might not provide enough hold and could easily break or bend. The same goes for screws; make sure they are long enough to go through both pieces of wood and provide a strong grip.
Another thing to consider is the placement of the screws or nails. You’ll want to place them strategically, so they don’t split or damage the wood. Pre-drilling small guide holes before inserting screws or nails can reduce the risk of splitting, especially when working with hardwoods.
Screws and nails are a reliable option for joining wood together without glue, provided that the right type and size are chosen and they are placed appropriately.
Bolts and Dowel Screws
Bolts and Dowel Screws
Bolts and dowel screws are another commonly used mechanical fastener to stick wood together without glue. Bolts provide a secure and permanent hold with the ability to withstand heavy loads. They are widely used in furniture and construction industries.
Dowel screws are similar to bolts but have wood threads at both ends, making them ideal for joining wood pieces together. They offer excellent tensile strength and are perfect for joining boards where a flush surface is needed on both sides.
Here are the steps to stick wood together using bolts and dowel screws:
- Measure and mark the points where you want to attach the two pieces of wood with a pencil.
- Drill a hole in the first piece of wood. Make sure the hole’s diameter is slightly larger than the bolt or dowel screw you’ll be using.
- Insert the bolt or dowel screw in the hole of the first piece of wood and secure it tightly with a spanner or pliers.
- Now, drill a hole into the second piece of wood at the marked spot. The size should be the same as the bolt or dowel screw.
- Apply wood glue around the hole on the second piece of wood. This will help to reinforce the joint.
- Insert the bolt or dowel screw from the first piece of wood into the hole in the second piece.
- Screw a nut over the protruding bolt-end or thread-in the dowel to tighten and secure the joint, making it strong and durable.
Using bolts and dowel screws to stick wood together without glue provides a long-lasting, robust joint that can withstand significant weight and pressure. It’s an excellent option for furniture construction, tabletops, and similar projects.
If you’re interested to know how to make glue without harmful chemicals, check out our article on how to make envelope glue. Or if you want to have fun with your kids, we also have an article on how to make fluffy slime without glue.
Bolts and Washers
If you’re looking for a strong and durable way to join wood without using glue, bolts and washers are an excellent option to consider. Bolts provide a solid connection between the two pieces of wood, and washers help to distribute the load evenly, which makes the joint even stronger. Here are the steps to follow for joining wood using bolts and washers:
Step 1: Choose the Right Bolts and Washers
The first thing you need to do is select the right bolts and washers for the job. You will need to choose bolts that are the correct length, diameter, and thread type for the wood you are joining. The washers you choose should also be the right size and shape for the job, and should be made of a durable material like steel or brass.
Step 2: Drill the Holes
The next step is to drill the holes for the bolts. You will need to drill a hole through each piece of wood where you want the bolt to go. The size of the hole should be slightly larger than the diameter of the bolt itself. You can use a drill and drill bit to make the holes.
Step 3: Insert the Bolts
Next, you will need to insert the bolts through the holes in the wood. Make sure that the bolt goes all the way through the wood and that the threads are on the side of the wood where you want the nut to be. Use pliers or a wrench to tighten the bolt and ensure that it is as tight as possible.
Step 4: Add the Washers
After the bolts are in place, you’ll need to add the washers. Place a washer on each side of the wood, between the bolt head and the wood on one side, and between the nut and the wood on the other side. This will help to distribute the load evenly and prevent the wood from splitting.
Step 5: Tighten the Nuts
Finally, tighten the nuts onto the threaded ends of the bolts. Use a wrench to make sure that the nuts are as tight as possible. This will ensure that the joint is strong and secure.
Bolts and washers are an effective way to join pieces of wood without using glue. They are easy to use and provide a strong, long-lasting joint that can withstand heavy loads and constant use. Just remember to choose the right bolts and washers for the job, drill the holes carefully, and tighten everything securely to ensure the best results.
Option 3: Adhesive Tape
Are you looking for an easy and quick solution to stick wood together without using glue, screws, or nails? Well, you might want to consider using adhesive tape. Yes, you heard it right! Adhesive tapes are not just handy for sticking paper or cardboard together, but they can also work wonders when it comes to joining wooden pieces. In this section, we will look at the different types of adhesive tapes you can use for your woodworking projects and how to use them effectively. So, let’s dive in and explore this unconventional yet feasible option.
Double-Sided Tape
Double-sided tape is a popular adhesive option for sticking wood together without glue. It is a type of pressure-sensitive tape with adhesive on both sides, making it easy and convenient to use. This type of tape is perfect for smaller wood projects or those that require a temporary bond. Here are some things to consider when using double-sided tape:
| Pros of Double-Sided Tape | Cons of Double-Sided Tape |
|---|---|
| Convenient: Double-sided tape is easy to use and apply, making it a popular choice for smaller wood projects or temporary fixes. | Strength: Double-sided tape may not provide as strong of a hold as other joining methods, making it unsuitable for long-term or heavy-duty construction projects. |
| Minimal Mess: Double-sided tape leaves behind little to no mess or residue, making clean-up quick and easy. | Cost: While double-sided tape is convenient, the cost may add up over time as it may need to be replaced frequently depending on the project. |
| Versatile: Double-sided tape can be used on a variety of surfaces, including wood, plastic, and metal. | Temperature Sensitivity: Extreme temperatures may cause the adhesive of the tape to weaken, making it unsuitable for outdoor projects or those exposed to heat or cold. |
While double-sided tape may not be the strongest adhesive option for wood projects, its convenience and versatility make it a great choice for smaller or temporary projects. Just be sure to consider the strength needed for your specific project and the cost of using double-sided tape repeatedly.
Carpet Tape
When you think of carpet tape, the first thing that probably comes to mind is using it to secure a rug in place. However, carpet tape can also be a great option for joining wood without the use of glue. Here’s how you can use carpet tape as a wood adhesive:
Step 1: Clean the surfaces of the wood that you wish to join with carpet tape. Make sure that they are free of dust, dirt, and debris. This will ensure that the tape can make a strong bond with the wood.
Step 2: Cut a piece of carpet tape to the desired length. Make sure that it’s slightly longer than the surface of the wood that you’re taping. This will provide extra security and prevent the tape from slipping.
Step 3: Remove the backing from the tape to expose the adhesive. Place the tape on one surface of the wood and press firmly.
Step 4: Next, carefully line up the second piece of wood with the first, making sure that they are perfectly aligned. Press the two pieces of wood together firmly.
Step 5: Once the tape is fully adhered, you can trim any excess tape with a pair of scissors.
Carpet tape is a great option for wood joining because it provides a strong, long-lasting bond that can withstand heavy use. Additionally, it’s easy to use and requires no messy cleanup like traditional wood glue.
However, it’s important to note that carpet tape may not be the best option for certain projects. For example, if you need to separate the pieces of wood in the future, you may find that the tape leaves behind a sticky residue that’s difficult to remove. Additionally, carpet tape may not hold up well in extreme temperatures or in situations where the wood will be exposed to moisture.
Carpet tape can be a great alternative to glue when joining wood. It’s quick, easy, and provides a strong bond. Give it a try on your next woodworking project and see how it works for you!
Gorilla Tape
When it comes to sticking wood pieces together without glue, one option that you can consider is Gorilla Tape. It is a strong, double-sided adhesive tape that has a heavy-duty and weather-resistant construction. Compared to regular duct tape, Gorilla Tape is considered to be superior in terms of its holding power and durability.
What Makes Gorilla Tape a Good Choice?
The adhesive used in Gorilla Tape is made from a thick rubber-based material that provides a strong and reliable grip, even on rough or uneven surfaces. It is also designed to be UV and temperature-resistant, making it ideal for outdoor projects or projects that require exposure to environmental factors.
In addition to its durability and strength, Gorilla Tape is also easy to use. Simply cut the tape to the desired length and apply it to the surface that you wish to stick together. You can apply as much or as little pressure as necessary to achieve a strong hold.
When to Use Gorilla Tape
Gorilla Tape is best used in situations where traditional glue or other fastening methods are not suitable. For example, if you need a temporary fix or a quick solution for a minor repair, Gorilla Tape can be an excellent choice. It can also be used for mounting small objects or for attaching decorations to a wooden surface.
However, keep in mind that Gorilla Tape is not recommended for use on surfaces that are painted or treated with oil or other types of coatings, as this can affect the tape’s adhesive properties.
Summary: Pros and Cons of Using Gorilla Tape
Here are some advantages and disadvantages of using Gorilla Tape for sticking wood together without glue:
Pros
- Strong and durable
- Weather and temperature-resistant
- Easy to use
Cons
- Not suitable for use on painted or coated surfaces
- May not be as strong as traditional glue or fastening methods
- Can be more expensive than other types of adhesive tape
Gorilla Tape can be a great choice for various woodworking projects, especially those that require a quick and easy fix. However, it may not be the best option for more complex or heavy-duty applications.
Conclusion
After exploring various methods for sticking wood together without the use of glue, it becomes clear that the best option depends on various factors like the type of project, the kind of wood, the level of skill and expertise, and personal preference.
Joinery techniques provide a strong and seamless bond that is aesthetically pleasing for furniture and cabinetry. Pegs and rabbets offer a simple and effective way to join two pieces of wood while creating a stable joint. Dovetails are perfect for more complex joints that require a lot of strength and precision. Biscuits are ideal when simple alignment is not enough. Tongue and groove joints provide might not have enough strength alone but can be combined with traditional joinery techniques.
Mechanical fasteners offer a balance of strength and ease of use. Screws and nails are perfect for joining thinner and softer woods. Bolts and Dowel Screws are great for construction projects that require a more industrial look and feel. Bolts and washers are ideal for outdoor furniture that needs to withstand the test of time.
Adhesive tape provides a quick and easy way to bond smaller pieces of wood. Double-sided tape is an excellent option for temporary or decorative projects. Carpet tape is perfect for heavier and permanent installations like flooring. Gorilla tape is ideal for outdoor applications and has superior strength than other tapes.
In conclusion, no matter which option for sticking wood together without glue you choose, it is essential to have a solid understanding of the project and the materials being used. We hope this guide provides helpful insights and inspires you to tackle your next woodwork project with confidence.
Frequently Asked Questions
Can wood really be joined without glue?
Yes, there are several joinery techniques and mechanical fasteners that can be used to join wood without glue.
What is the strongest joinery technique?
Mortise and tenon joints are considered to be one of the strongest joinery techniques, as they provide a lot of surface area for the glue or fastener to hold onto.
Are joinery techniques difficult to master?
It depends on the technique and your level of experience. Some joinery techniques are more complex and require more skill, while others are more straightforward and easier to learn.
What type of screws are best for joining wood?
Wood screws with deep threads and sharp points are best for joining wood. They should also be long enough to go through both pieces of wood and provide a tight fit.
Can mechanical fasteners damage the wood?
Yes, mechanical fasteners like screws and nails can cause splitting or cracking in the wood if not used properly. It’s important to use the right size and type of fastener and to drill pilot holes to prevent damage.
What type of adhesive tape is best for joining wood?
Double-sided tape is a good option for temporary bondin, while carpet tape and Gorilla tape are stronger and can create a more permanent bond.
Can wood be joined without any visible fasteners?
Yes, joinery techniques like dovetails and mortise and tenon joints can create a strong bond without any visible fasteners.
Do I need specialty tools to use joinery techniques?
Some joinery techniques, like dovetails, require specialty hand tools. However, others can be done with basic tools like a saw, chisel, and mallet.
How do I choose the right joinery technique or fastener for my project?
Consider the type of wood you’re working with, the stress the joint will be under, and the overall design of your project when choosing a joinery technique or fastener. A woodworker or hardware store expert can also provide guidance.
Is a joint without glue as strong as one with glue?
It depends on the joinery technique or fastener used. Some techniques can create a bond just as strong as glue, while others may not be as strong. It’s important to choose the right technique or fastener for your specific project.