Have you ever found yourself in the frustrating position of having run out of envelope glue? It’s an inconvenient problem that can easily turn a quick task into a time-consuming trip to the store. But what if we told you that you could make your own envelope glue at home in just five easy steps? That’s right, with a few simple ingredients and a little bit of know-how, you can avoid a last-minute dash to the stationery store. Follow our guide below to learn how to make envelope glue at home and never lick another envelope again!
Why Make Your Own Envelope Glue?
Why Make Your Own Envelope Glue?
There are several reasons why you might want to make your own envelope glue rather than buying pre-made glue. Firstly, it can be cost-effective as you only need a few inexpensive ingredients to create a large batch of glue. Secondly, making your own envelope glue allows you to have complete control over the ingredients and ensure that they are safe and non-toxic. Additionally, you can customize the glue to your liking by experimenting with different consistencies and adding fun colors. Finally, it can be a fun and satisfying DIY project, and you can impress your friends and family with your newfound envelope glue making skills.
If you enjoy making your own DIY projects, you may also be interested in learning how to make decoupage glue or how to glue plaster of Paris. Alternatively, if you’re interested in other types of adhesive, you can check out our guides on topics such as what is the best glue for plastic toys or what glue dries clear on glass.
Ingredients Needed to Make Envelope Glue
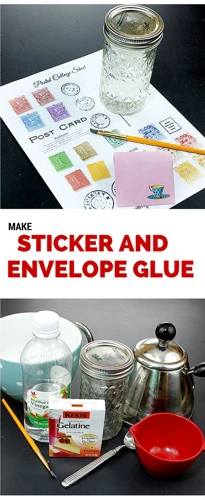
One of the best things about making your own envelope glue is that it only requires a few simple ingredients, most of which you probably already have in your kitchen. Here are the ingredients you will need to make envelope glue at home:
Cornstarch: This is the main ingredient in the glue mixture and will give your glue its thick texture.
Water: You will need water to mix in with the cornstarch to create the glue mixture.
Vinegar: The addition of vinegar to the mixture will help to preserve the glue and prevent it from spoiling over time.
That’s it! With just these three ingredients, you’ll be able to create a high-quality glue that will work perfectly for sealing envelopes. It’s worth noting that you can experiment with the thickness of the glue by adjusting the amount of cornstarch you use in the mixture.
To make sure you have everything you need, it’s always a good idea to double-check that you have all the ingredients before you start making the glue. This will help you avoid any unnecessary trips to the grocery store. In case you need glue for other purposes like jewelry or diamond painting, visit the following pages for getting useful tips: how to glue jewelry, how to use glue for diamond painting, which Loctite super glue is best, how to get glue in Destiny, how long does leather glue take to dry, how long does Citadel glue take to dry.
Step-by-Step Guide to Making Envelope Glue
Are you tired of buying expensive envelope glue? Why not try making your own at home? Making envelope glue is easier than you might think and requires only a few simple ingredients. In this step-by-step guide, we’ll show you exactly how to make your own envelope glue in 5 easy steps. It’s a fun and easy DIY project that will save you money in the long run. So, let’s get started!
Step 1: Mix Together the Cornstarch and Water
To create your own envelope glue, the first step is to mix together cornstarch and water. This is a simple process that requires just two ingredients. Here are the detailed steps:
- Ingredients: Gather the ingredients needed to make your envelope glue. You will need one part cornstarch and three parts water. For example, you could use 1/4 cup cornstarch and 3/4 cup water to make a small batch of glue.
- Mix: In a saucepan, mix the cornstarch and water together until there are no lumps. It’s important to mix the ingredients together well to ensure the glue is smooth and consistent.
- Heat: Heat the mixture over low to medium heat while stirring constantly. As the mixture heats up, it will begin to thicken. Continue stirring to prevent any lumps from forming.
Mixing the cornstarch and water together is the first step in creating your own envelope glue. It’s important to make sure the ingredients are mixed together well in order to create a smooth and consistent glue. Heating the mixture over low to medium heat while stirring constantly is also important in preventing lumps from forming and ensuring the glue thickens properly. Once the mixture has thickened, it’s time to move on to the next step in creating your homemade envelope glue.
Step 2: Boil the Mixture
After mixing the cornstarch and water together in a saucepan, it’s time to boil the mixture. This step is crucial to ensure the glue’s smooth consistency. Here’s what you need to do:
| Step | Instructions |
|---|---|
| Step 2 | Place the saucepan on the stove and turn the heat on medium-high. |
| Stir the mixture constantly to prevent it from scorching or forming lumps. | |
| Keep stirring until the mixture starts to thicken and come to a low boil. | |
| Once the mixture has begun boiling, continue stirring and boiling it for about one minute. | |
| Then, lower the heat to low and proceed to the next step. |
It’s essential to keep an eye on the mixture during this step and to stir it constantly. Otherwise, the cornstarch and water may separate, leading to an uneven mixture that won’t spread well on envelopes. So, take care to keep stirring until the mixture thickens and comes to a low boil.
After boiling the mixture for a minute, reduce the heat to low to prevent it from burning or overcooking. This step ensures that the glue is neither too thick nor too runny, making it perfect for sealing envelopes.
Now that the mixture has boiled, it’s time to move on to the next step. Keep following the guide to learn how to make your envelope glue like a pro.
Step 3: Add Vinegar to the Mixture
Once the mixture has come to a boil, it is time to add vinegar to it. Vinegar is a key ingredient in making envelope glue as it helps to prevent the glue from spoiling and going bad quickly. In addition to this, it also helps to give the glue a bit of flexibility, making it easier to work with.
To add vinegar to the mixture, measure out a Tablespoon of white vinegar and slowly pour it into the mixture as you stir continuously. Make sure that the entire mixture is well combined before proceeding to the next step.
| Ingredients needed: | Amount: |
|---|---|
| Cornstarch | 3 tablespoons |
| Water | 2 cups |
| White vinegar | 1 tablespoon |
Once vinegar has been added, stir the mixture again for a minute or so, ensuring that all the ingredients are well-combined and mixed thoroughly. This will help to keep the glue smooth and free from lumps.
Be careful not to add too much Vinegar to the mixture as it can cause the glue to become too thin and runny, making it difficult to work with. Just enough vinegar should be added to the mixture to keep it from going bad quickly and to give it the necessary flexibility.
Step 4: Cool the Mixture
Once the mixture has boiled for about 1-2 minutes, remove it from heat and allow it to cool down. It’s important to let the mixture cool down before you start using it because hot glue can cause envelopes to warp or even stick together. Here are some tips for cooling down the mixture:
- Let it sit at room temperature for 10-15 minutes before use.
- Place the bowl of mixture in the fridge or freezer for a faster cooling process.
- Stir the mixture occasionally to help it cool down faster.
- Do not try to use the mixture while it’s still hot.
Be patient and wait for the mixture to cool down completely before applying it to envelopes. While the waiting time might feel inconvenient, it’s worth the effort to ensure that your envelopes look great and are easy to seal.
Step 5: Store the Envelope Glue
After making your envelope glue, it’s important to properly store it to ensure its longevity and effectiveness. To store your homemade envelope glue, follow these simple steps:
| Step | Instructions |
|---|---|
| Step 1 | Cool it down: Let your homemade envelope glue cool down to room temperature. |
| Step 2 | Transfer to a container: Transfer the glue to an airtight container, such as a glass jar or plastic container with a sealable lid. |
| Step 3 | Label: Label the container with the date and type of glue, so you know how long it has been stored and what it is. |
| Step 4 | Store in a cool, dry place: Store your envelope glue in a cool, dry place away from direct sunlight and heat sources. This will help prevent the glue from drying out or losing its adhesive properties. |
Following these steps will help ensure that your homemade envelope glue stays fresh and effective for as long as possible. If stored properly, your envelope glue can last for several weeks or even months. It’s a great way to save money on store-bought glue while also having the satisfaction of making something yourself.
Tips for Making the Best Envelope Glue
Are you looking to take your envelope glue game to the next level? Look no further because we’ve got some great tips to help you make the best envelope glue possible. With just a few small adjustments to the recipe, you can create a glue that is perfect for your specific needs. From experimenting with thickness to adding some fun color, these tips will make your homemade envelope glue truly stand out. So, let’s dive into the details and learn how to make the best envelope glue possible.
Tip 1: Use Distilled Water
When it comes to making envelope glue, using distilled water is a crucial tip that many people overlook. Distilled water is water that has been purified through a process called distillation, which removes any impurities or contaminants. This is important because tap water or other types of water may contain minerals or other substances that could affect the consistency and effectiveness of your envelope glue.
To further explain, here is a table showing the key differences between distilled water and tap water:
| Distilled Water | Tap Water | |
|---|---|---|
| Method of Purification | Distillation | Chemical treatment and filtration |
| Purity | 99.9% | Varies depending on location and treatment methods |
| Minerals and Contaminants | Removed through distillation | May be present |
Using tap water may result in a glue that is too thick or too thin, which could cause issues with sealing envelopes. Additionally, impurities in tap water could affect the color or texture of the glue. So, to ensure that your envelope glue turns out just right, make sure to use distilled water.
You can easily purchase distilled water at your local grocery store or online. It may cost a bit more than tap water, but the purity and consistency are worth it. So, give it a try and see the difference it makes in your homemade envelope glue!
Tip 2: Experiment with Thickness
When making envelope glue, it’s important to experiment with the thickness of the mixture to achieve optimal results. It’s recommended to begin with a thinner consistency and gradually make it thicker until you reach your desired thickness. Here are some tips to help you experiment with the thickness of your envelope glue:
| Tip | Description |
|---|---|
| 1 | Adjust the Cornstarch-Water Ratio. The ratio of cornstarch to water will greatly affect the thickness of your glue. Start with a ratio of 1:4 and then incrementally add more cornstarch until the mixture reaches your desired consistency. |
| 2 | Stir Vigorously. The thickness of your envelope glue can also be changed by how well you stir the mixture. Make sure to stir vigorously during the boiling process to avoid clumps and to create a smoother, more consistent mixture. |
| 3 | Use a Whisk. For best results, use a whisk to stir your envelope glue mixture. This will help you achieve a more uniform and even consistency. |
| 4 | Let it Cool. After boiling your mixture, it’s important to let it cool before adjusting the thickness. This will give you a better idea of the true consistency of the glue. If the glue is too thick, slowly add more water until it reaches your desired consistency. |
Remember, the thickness of your envelope glue is important, so take the time to experiment until you find your perfect formula.
Tip 3: Add Food Coloring for Fun
Looking to add some personality to your homemade envelope glue? Try adding food coloring for a fun twist! A splash of color can brighten up an envelope and make it stand out from the rest. Here are some tips for using food coloring in your envelope glue:
| Tip | Description |
|---|---|
| 1 | Start with small amounts of food coloring and gradually add more until you reach the desired shade. Keep in mind that the color will appear lighter when the glue is wet and darker when it dries. |
| 2 | Use gel or powdered food coloring to avoid adding extra liquid to the glue mixture. Liquid food coloring can change the consistency of the glue and make it too runny. |
| 3 | You can mix different colors to create custom shades. For example, mix red and yellow to make orange or blue and yellow to make green. |
| 4 | Consider the color of the envelope when choosing a food color. A light-colored envelope will showcase a darker color better, while a darker envelope may require a lighter shade to show up clearly. |
| 5 | Stir the mixture well after adding food coloring to ensure that it is evenly distributed. You don’t want streaks of color in your glue! |
Adding food coloring to your homemade envelope glue is a simple and fun way to add some personality to your letters and invitations. With these tips and a little experimentation, you’ll be creating custom shades in no time!
Tip 4: Adjust Recipe for Large Batches
When making envelope glue, it’s important to adjust the recipe if you’re making a large batch. Not only does this ensure that you have enough glue to fulfill all of your needs, but it also helps to maintain consistency in the final product. Here are some tips to keep in mind when making a large batch of envelope glue:
- Double or Triple the Recipe: If you need a lot of envelope glue, simply double or triple the initial recipe. Remember to keep the ratios consistent to avoid any errors.
- Use a Larger Pot: When making larger batches, a bigger pot can be very helpful. This way, the mixture won’t boil over, and it’s easier to stir everything together without making a mess.
- Be Patient: Be patient when making larger batches of envelope glue. While the process may take longer than making a smaller batch, it’s important to stay focused and stick to the recipe.
- Store Properly: Once you’ve made your large batch of envelope glue, store it properly. Use an airtight container to keep the glue fresh and ready to use whenever you need it.
- Adjust the Recipe as Needed: If you find that your recipe doesn’t quite work for a large batch, don’t be afraid to adjust it. Try using slightly less cornstarch, or adding a bit more water, until you find the right consistency and texture for your needs.
By following these tips, you should be able to adjust the recipe for a large batch of envelope glue with minimal difficulties. Just remember to take your time, stay focused, and adjust the recipe as needed to achieve the perfect consistency.
Tip 5: Make Only What You Need
When it comes to making your own envelope glue at home, one important tip to keep in mind is to only make what you need. This means that instead of making a large batch of envelope glue that may go to waste, it’s better to make a smaller amount that will be just enough for the envelopes you need to seal.
Here are a few reasons why:
- Making a smaller amount of envelope glue will save you time and ingredients in the long run. You won’t have to worry about storing excess glue or figuring out what to do with it once it starts to go bad.
- If you make too much envelope glue, it may dry out or go bad before you can use it all. This will not only be wasteful, but it will also result in having to make a new batch of glue next time you need to seal an envelope.
- By making only what you need, you can experiment with the recipe and adjust it according to your preferences. This means that you’ll be able to perfect your envelope glue recipe over time and make it just the way you like it.
To determine how much envelope glue you need to make, consider how many envelopes you need to seal and how much glue you typically use for each one. You may also want to factor in a little extra for mistakes or spillage.
Making only what you need may seem like a small detail, but it can actually make a big difference in how successful your envelope glue-making endeavors are. So, next time you’re ready to make a batch of envelope glue at home, keep this tip in mind and save yourself time, ingredients, and frustration.
Conclusion
After following the 5 easy steps outlined in this article, you should now have your very own homemade envelope glue! Not only is making your own envelope glue simple and cost-effective, but it also allows you to control the ingredients used and avoid any unnecessary chemicals or additives.
By using easily accessible ingredients like cornstarch, water, and vinegar, you can create an adhesive that is perfect for sealing envelopes, crafting projects, and more. Plus, the flexibility to adjust the recipe to your needs and preferences makes it all the more worthwhile.
Remember to use distilled water for the best results and experiment with the thickness of the glue to suit your needs. You can even add some food coloring for a fun touch. However, keep in mind that making large batches of envelope glue may require some recipe adjustments.
Ultimately, making your own envelope glue at home is a great way to save money and have more control over the products you use in your crafting and mailing endeavors. So go ahead and put this newfound knowledge into practice and impress your friends and family with your DIY skills!
Frequently Asked Questions
Can I use regular tap water for making envelope glue?
It’s best to use distilled water for making envelope glue as it will produce a clearer and smoother glue.
Is it safe to use vinegar in the envelope glue?
Yes, vinegar is safe to use and adds acidity to the mixture which helps prevent the growth of bacteria in the glue.
Can I add essential oil to the glue mixture for scent?
Absolutely! Adding a few drops of essential oil to the mixture can add a pleasant scent to your envelope glue.
Can I store the envelope glue in a plastic container?
It’s best to avoid storing the envelope glue in a plastic container as it can cling to the container and become difficult to remove. Instead, store it in a glass container with a lid.
How long does the envelope glue last?
When stored properly, the envelope glue can last for up to 6 months.
Can I adjust the recipe for larger batches?
Yes, simply double or triple the recipe to make larger batches of envelope glue.
Can I use the envelope glue for other projects besides envelopes?
Yes, the envelope glue can be used for various other paper crafts and projects that require glue.
Can I reuse leftover envelope glue?
Yes, simply reheat the leftover glue and add a bit of water to thin it out to make it usable again.
Can I use cornflour instead of cornstarch?
Yes, cornflour can be used as a substitute for cornstarch in this recipe.
Why does the glue need to be boiled?
Boiling the mixture helps to thicken the glue and create the right consistency for use.