Rolling papers are an essential tool for anyone who smokes cigarettes or other substances. But what happens when your rolling paper won’t stick? Don’t worry; help is on the way! In this article, we’ll show you how to make your own rolling paper glue using DIY glue recipes. You’ll be surprised just how easy it is to make your own glue at home. Plus, it’s cost-effective, eco-friendly, and customizable. So, put on your creative cap and let’s get started!
Why Make Your Own Rolling Paper Glue?

When it comes to rolling papers, most people just use the glue that comes with the product. However, there are many reasons why someone might want to make their own rolling paper glue.
1. It saves you money. Rolling paper glue can be expensive, and making your own can save you a lot of money in the long run.
2. It’s customizable. When you make your own glue, you have the flexibility to customize it to your liking. You can experiment with different ingredients and ratios until you find the perfect recipe for your needs. This can result in a more enjoyable smoking experience.
3. It’s eco-friendly. Making your own glue means you know exactly what ingredients are going into it, which can be a huge benefit for those who are environmentally conscious. Many commercial rolling paper glues contain chemicals that are not only harmful to the environment but to humans as well. By making your own, you can ensure that you are using natural ingredients that are safe for your body and the Earth.
In short, making your own rolling paper glue can be a great way to save money, customize your smoking experience, and reduce your impact on the environment. So let’s take a look at some DIY recipes and steps for making your own rolling paper glue.
1. It saves you money
Have you ever realized just how much money you spend on rolling paper glue? It might not seem like much, but over time, those little purchases add up. By making your own DIY rolling paper glue, you can save money in the long run and still have a high-quality adhesive. Plus, you can customize it to your liking and be eco-friendly at the same time. No more running to the store for a quick fix – you can make your own rolling paper glue right at home. So let’s dive into the recipe and steps! Don’t forget to check out our guide on how to glue paper for even more helpful tips.
2. It’s customizable
One of the greatest advantages of making your own rolling paper glue is its customizability. You can choose from a variety of recipes and pick the one that suits your preferences the most. It also allows you to modify the recipe and add your own twist to it, like using flavored honey or adding some color to the glue.
To give you an idea of how you can customize your own rolling paper glue, here’s an html table showing some variations you can try:
| Type of Glue | Customization Options |
|---|---|
| Wheat Paste Glue | Substitute water with fruit juice to add flavor. Add food coloring to create colorful glue. Add essential oils for aroma therapy while rolling. |
| Rice Glue | Add honey for a sweeter taste. Add herbs or spices for an exciting twist. Mix with food coloring for a colorful effect. |
| Honey Glue | Substitute honey with agave syrup for a vegan option. Add fruit puree for a fruity flavor. Add edible glitter for a sparkling effect. |
By customizing your own rolling paper glue, you can make your smoking experience more enjoyable and personalized. So, get creative and experiment with different recipes until you find the perfect one for you.
If you’re interested in making more types of DIY glue, check out our article on how to make goo with starch and glue.
3. It’s eco-friendly
Making your own rolling paper glue is not only a fun and personalized way to enhance your rolling experience, it is also an eco-friendly alternative to buying pre-made glues. By using natural ingredients such as wheat paste, rice, and honey, you are reducing the amount of chemicals and non-renewable resources used in the production of commercial rolling paper glues.
Here are some benefits of making your own eco-friendly glue:
| Benefits | Explanation |
| Reduced Carbon Footprint | By using natural ingredients, we are preserving the environment and reducing the amount of greenhouse gases released into the atmosphere during the production and transportation of commercial glues. |
| Chemical-Free | Commercial glues can contain harmful chemicals that can cause respiratory and skin problems with prolonged exposure. By making your own glue, you can be sure of the ingredients used and customize it to fit your personal preferences. |
| Budget-Friendly | Buying rolling paper glue can add up overtime, making it an expensive accessory to constantly repurchase. By making your own glue, you can save money in the long run while also reducing your environmental impact. |
By making the conscious decision to make your own rolling paper glue you are not only doing your part in reducing your carbon footprint but also improving the health and safety of yourself and those around you.
DIY Rolling Paper Glue Recipes and Steps
Making your own rolling paper glue is a simple and cost-effective way of ensuring that your rolling papers stick together perfectly every time. There are several recipes you can try that use easily accessible household materials. Here are three popular DIY rolling paper glue recipes you can make at home:
1. Wheat Paste Glue Recipe
Wheat paste glue has been used for centuries for bookbinding and paper crafts, and it’s perfect for rolling paper. Here’s how to make it:
Materials:
– Water
– Flour
– Small pan or pot
– Heat source (e.g. stove)
Steps:
1. Mix a quarter cup of flour into a cup of water.
2. Pour the mixture into your pan or pot.
3. Heat the mixture on medium heat, while stirring continuously until it thickens.
4. Once it thickens, remove from heat and let it cool.
5. Once it has cooled, you can start using it as your rolling paper glue.
2. Rice Glue Recipe
Rice glue is another popular option and is easy to make with rice flour. Here’s how to make it:
Materials:
– Rice flour
– Water
– Small pan or pot
– Heat source (e.g. stove)
Steps:
1. Mix equal parts of water and rice flour (1:1 ratio).
2. Pour the mixture into your pan or pot.
3. Heat the mixture on medium heat, while stirring continuously until it thickens.
4. Once it thickens, remove from heat and let it cool.
5. Once it has cooled, you can start using it as your rolling paper glue.
3. Honey Glue Recipe
Honey glue is perfect for those who prefer an organic and sweet-smelling option. Here’s how to make it:
Materials:
– Honey
– Water
– Small pan or pot
– Heat source (e.g. stove)
Steps:
1. Mix equal parts of honey and water (1:1 ratio).
2. Pour the mixture into your pan or pot.
3. Heat the mixture on medium heat, while stirring continuously until it thickens.
4. Once it thickens, remove from heat and let it cool.
5. Once it has cooled, you can start using it as your rolling paper glue.
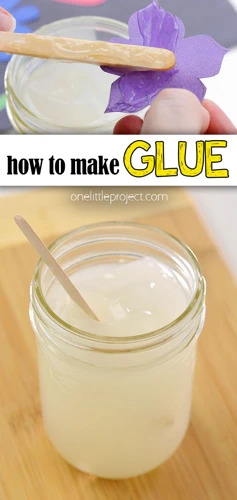
Once you have made your rolling paper glue, the next step is to apply it to your rolling papers. Simply apply a thin layer of glue to one end of the rolling paper and stick it to the other end. Be sure to let the paper dry completely before rolling your cigarette.
Making your own rolling paper glue may take some effort, but it is a great way to ensure that you always have a reliable adhesive on hand. Plus, you get to customize your glue according to your preference. So, feel free to experiment with different recipes until you find a rolling paper glue that works best for you.
1. Wheat Paste Glue Recipe
If you are looking for a natural and cost-effective way to make glue for your rolling papers, then the wheat paste recipe might be perfect for you. This simple and easy-to-make glue is made from flour and water and has been used for centuries in bookbinding and paper-mache projects. Let’s dive into the steps to make this homemade wheat paste glue that will keep your rolling papers securely sealed without any harsh chemicals or additives.
Looking to bind a book without glue? Check out our article “How to Bind a Book Without Glue” for some alternative bookbinding techniques.
2. Rice Glue Recipe
For those who prefer using edible substances as glue, rice glue is a perfect option. This type of glue has been used for centuries in Asian countries for paper and craft projects. The recipe is quite simple and cheap, requiring only two ingredients: rice grains and water.
Ingredients:
| Rice grains | Water |
|---|---|
| 1 cup | 4 cups |
Steps:
- Soak the rice grains in water for at least 3 hours to soften them.
- Drain the water and blend the rice until it forms a smooth paste.
- In a pot, mix the rice paste and 4 cups of water.
- Stir the mixture constantly over medium heat until it thickens and becomes transparent.
- Remove the pot from the heat and strain the mixture through a sieve to remove any solid particles.
- Transfer the glue to a container and let it cool down before use.
Rice glue is a perfect option for those who want to use eco-friendly materials and avoid harsh chemicals. It’s also an excellent alternative for those who have an allergic reaction to traditional glue. This glue can be kept for several days in the fridge but should be stirred before each use to regain its consistency.
It’s essential to note that rice glue might not be suitable for heavy-duty projects such as gluing plastic or metal. However, it’s perfect for light paper crafts, making it ideal for school projects or scrapbooking.
Tip: If you prefer a stronger hold, you can add small amounts of vinegar to the rice paste before cooking it. Vinegar helps increase the adhesive properties of the rice glue.
Now that you have learned how to make two different types of rolling paper glue, it’s time to gather the materials needed before proceeding with the recipe. If you’re interested in other glue types, check out our article on the best spray glue.
3. Honey Glue Recipe
For those who prefer a sweeter option, honey glue is an excellent choice. This DIY glue is really easy to make and requires only two ingredients. The sweetness of honey can be a perfect addition to the flavor profile of your cannabis.
First, gather the necessary materials: honey and warm water.
Next, follow these simple steps to make honey glue:
| Step | Instructions |
|---|---|
| Step 1 | Mix 1 tablespoon of honey with 2 tablespoons of warm water until the honey has dissolved. |
| Step 2 | Allow the mixture to cool to room temperature. |
| Step 3 | Use a paintbrush or a cotton swab to apply the honey glue to your rolling paper in a thin and consistent layer. |
| Step 4 | Roll your joint and let it dry for a few minutes before smoking. |
It is important to note that honey glue may not be the strongest option out there, but it is still worth trying out for those who are looking for a quick and easy option. Plus, the natural sweetness of honey can enhance the flavor of your cannabis and make the smoking experience all the more enjoyable.
One tip to keep in mind when using honey glue is to be careful not to use too much of it, as it can be difficult to control the amount of honey on the rolling paper. However, this recipe is worth trying out for those who want to experiment with different flavors in their rolling paper glue.
Materials You’ll Need
Making your own rolling paper glue is easy and requires only a few materials that you may already have at home. For wheat paste and rice glue, you will need all-purpose flour and water. Meanwhile, for honey glue, you will need honey. Here’s a breakdown of the materials and quantities you’ll need for each recipe:
1. For Wheat Paste and Rice Glue:
– 1 cup of all-purpose flour
– 1 1/2 cups of water
These quantities are enough to make a small batch of glue that can last several sessions. If you plan on making a larger batch, increase the quantity of flour and water accordingly.
2. For Honey Glue:
– 1 tablespoon of honey
This amount is adequate for making a few strips of rolling paper glue that can last you for a while. Keep in mind that the sweetness of the honey may affect the taste of your rolling paper.
As for the tools, you will need a bowl and a whisk or spoon for mixing the ingredients, as well as a stove for cooking the wheat paste.
It’s worth noting that this recipe isn’t suitable for people who have a gluten allergy or intolerance. In such cases, you can try making a gluten-free rolling paper glue by using a gluten-free flour like rice flour or cornstarch instead of all-purpose flour.
In the next section, we’ll discuss the steps to make each type of rolling paper glue. But before that, it’s important to mention that homemade glue can also be used for various other projects like making paper bags without glue, fixing broken items, or even making crunchy slime without glue. So, keep these recipes in mind for your next DIY project.
1. For Wheat Paste and Rice Glue
When it comes to making your own rolling paper glue, there are several recipes to choose from. Two of the most popular ones are wheat paste and rice glue. Both of these glues are eco-friendly, easy to make, and perfect for rolling your own cigarettes. The best thing about these two recipes is that you probably already have all the materials you need at home. Let’s take a look at what you’ll need to get started.
2. For Honey Glue
To make honey glue, you’ll only need two simple ingredients: honey and water. This is perfect for those who prefer natural ingredients. Honey contains trace enzymes and minerals that are beneficial for health, such as antioxidants, amino acids, and vitamins.
Below is a table that lists the materials you’ll need and the steps to make honey glue:
| Materials: | Steps: |
|---|---|
| 1/4 cup honey | Measure 1/4 cup of honey. Any type of honey will do. |
| 1/4 cup boiling water | Boil water and measure 1/4 cup. |
| Bowl and spoon | Get a bowl and spoon for mixing. |
| Airtight container | Prepare an airtight container for storage. |
Mix the honey and boiling water in a bowl until they are fully combined. Let the mixture cool down before using it. You can transfer any excess honey glue to an airtight container for later use. Honey glue should last for a few days if stored properly.
Honey glue’s consistency can be altered by adding more or less water. If you want a thicker glue, add less water. If you prefer a thinner glue, add more water. Keep in mind that honey glue might not stick as well as other adhesives, so make sure to apply enough glue to make your rolling paper secure.
Note: If you are allergic to honey, this glue recipe is not recommended.
Now that you have learned how to make honey glue, it’s time to try it out and see how you like it!
How to Use Your DIY Rolling Paper Glue
Using Your DIY Rolling Paper Glue
Now that you’ve made your own rolling paper glue, it’s time to use it! Here’s a step-by-step guide on how to use your DIY rolling paper glue:
Step 1: Prepare your rolling papers. Start by laying the rolling paper with the gummed edge facing up. It’s important that the gum edge is facing up, as this is where you will apply the glue.
Step 2: Apply the glue. Dip your brush or applicator into the glue mixture. Make sure you have enough glue on the brush to cover the entire gummed edge of the paper. Apply a thin and even layer of the glue to the gummed edge.
Step 3: Let it dry. Once you’ve applied the glue, let it dry for a few seconds until it becomes tacky. This will help ensure that the paper sticks together properly.
Step 4: Roll your cigarette. Place your tobacco onto the paper, and use your fingers to shape it into a cylinder shape. Begin to roll the paper, using your fingers to keep the tobacco in place. Lick the glue edge and roll the cigarette all the way up to seal it.
Step 5: Let it dry. Once you’ve rolled your cigarette, let it dry for a few minutes before smoking it.
Using your DIY rolling paper glue is that simple! Now that you know how to use it, you can enjoy smoking rolled cigarettes without worrying about the toxic chemicals found in store-bought glue.
Tip: Make sure to only use enough glue to cover the gummed edge. Using too much glue can make it difficult to roll your cigarette and lead to a sticky mess.
If you want to learn more about different types of glue and their uses, check out our article on what glue to use for gold leaf. Or, if you’re interested in making other types of glue, check out our article on how to make a paper bag without glue for a fun DIY project!
Tips and Tricks
When it comes to making your own rolling paper glue, there are a few tips and tricks that can help you ensure your glue is high-quality. Here are some of the things to keep in mind:
1. Be consistent with the thickness: The thickness of your glue can affect how well it works. If it’s too thin, it may not hold the paper together well enough. If it’s too thick, it may be difficult to spread evenly. Strive for a consistency similar to that of store-bought glue, and use a brush or applicator to ensure even coverage.
2. Store excess glue properly: If you have leftover glue, you’ll want to store it in an airtight container to prevent it from drying out. Keeping it in the refrigerator can also help extend its life. When you’re ready to use it again, you may need to add a bit of water to thin it out and restore its consistency.
3. Experiment with different recipes: There’s no one “right” way to make rolling paper glue. As you experiment with different recipes, you’ll discover which ones work best for you. Consider trying out different types of flour, sweeteners, and other ingredients to achieve a glue that meets your needs.
By keeping these tips and tricks in mind, you’ll be well on your way to creating your own DIY rolling paper glue. For more information on the gluing process itself, check out our article on how to glue mix together or discover unique ideas about what to do with glue, for example what to do with glue. Alternatively, if you’re feeling adventurous, you can even try making crunchy slime without glue or learn how to glue vocals to beat for music production. Happy gluing!
1. Be consistent with the thickness
When making your own rolling paper glue, consistency is key to ensuring a successful finished product. The thickness of your glue can drastically affect how well it sticks and rolls, so it’s important to pay attention to this detail throughout the DIY process. In this section, we’ll explore some tips to help you maintain consistent glue thickness and avoid any potential issues with your rolling papers.
2. Store excess glue properly
When making your own rolling paper glue, you’ll likely end up with more than you need for a single session. It’s important to store the excess glue properly to ensure that it remains usable for future joints.
Here are some tips for storing your excess DIY rolling paper glue:
- Choose an airtight container: When storing your glue, make sure to choose a container that’s airtight. This will help prevent the glue from drying out or being exposed to excess moisture in the air.
- Label the container: To avoid confusion, be sure to label your container with the type of glue and the date it was made. This will help you keep track of how long it’s been stored and which glue to use first.
- Store in a cool, dark place: Exposing your glue to heat or direct sunlight can cause it to break down and become less effective. Keep your storage container in a cool, dark place to ensure the glue stays usable.
- Check the consistency before using: Before using your stored glue, check the consistency to make sure it hasn’t dried out or become too thick. If it has, you may need to add a small amount of water and stir until it’s smooth and spreadable again.
By following these simple tips, you can ensure that your excess rolling paper glue stays fresh and effective for future use. Proper storage will help save you time and money in the long run, while also ensuring that you can enjoy the benefits of homemade glue whenever you need it.
3. Experiment with different recipes
If you’re feeling adventurous and want to experiment with different rolling paper glue recipes, we encourage you to do so! Not only can it be fun to try out new recipes, but it can also help you find the perfect glue for your specific needs. Here are some different recipes to try out:
- Flour glue: Replace the wheat starch in the wheat paste recipe with all-purpose flour for a slightly different consistency.
- Agar Glue: Agar is a plant-based gelatin substitute that can be used to make a vegan-friendly glue. Simply heat up 2 cups of water with 1/4 cup agar powder, stirring constantly until dissolved. Let the mixture cool and thicken before using.
- Potato Starch Glue: Boil one peeled and chopped potato in two cups of water until it’s soft. Mash the potato into the water until it forms a smooth paste and let it cool. This glue will be thicker and tackier than other recipes, so use it sparingly.
- Acacia Gum Glue: Heat up 2 cups of water with 1 tablespoon of acacia gum powder, stirring constantly until it dissolves. Let the mixture cool and thicken before using. Acacia gum is a natural plant-based glue that works well for rolling papers.
Remember to use caution when experimenting with different recipes. Always make sure to properly measure ingredients and follow instructions closely. You never know, you might discover a new favorite glue recipe that works perfectly for your rolling papers.
Conclusion
In conclusion, making your own rolling paper glue is an easy and fun project that can save you money and also provide you with a customizable and eco-friendly option. By following the simple recipes and steps provided in this article, you can create your own glue using ingredients that are readily available in your kitchen pantry. Using wheat paste or rice glue can be a great option for those who prefer a vegan and gluten-free option. Honey glue is also a great option if you prefer a sweeter taste. Make sure to use the right materials for each recipe and be consistent with the thickness of your glue. Also, store any excess glue properly to ensure its longevity. Lastly, don’t be afraid to experiment with different recipes and find the one that works best for you. With these tips and tricks, you can easily make your own rolling paper glue in the comfort of your own home.
Frequently Asked Questions
What is rolling paper glue?
Rolling paper glue is a type of adhesive used to seal rolling papers and hold them together while smoking. It is often made from natural ingredients.
Why do rolling papers need glue?
Rolling papers need glue to keep them together and prevent the contents inside from falling out. It also helps to create a tight seal that helps with smoking.
What are the benefits of making your own rolling paper glue?
Making your own rolling paper glue can save you money, allow for customization, and be eco-friendly with natural ingredients.
Is it difficult to make your own rolling paper glue?
No, making your own rolling paper glue is a simple process that only requires a few ingredients and steps.
What materials are needed to make rolling paper glue?
The materials needed to make rolling paper glue vary depending on the recipe, but generally include things like flour, water, rice, honey, and a saucepan.
Can I use regular glue instead of rolling paper glue?
No, regular glue should not be used as rolling paper glue as it can be toxic when inhaled. Rolling paper glue is made from all-natural ingredients that are safe to smoke.
What is the best recipe for making rolling paper glue?
There is no one-size-fits-all answer to this question, as the best recipe for making rolling paper glue depends on personal preferences and needs. Some popular recipes include wheat paste glue, rice glue, and honey glue.
Can rolling paper glue be made without gluten?
Yes, rolling paper glue can be made without gluten by using gluten-free flour such as rice flour or cornstarch.
How long does rolling paper glue last?
Rolling paper glue can last for several weeks when stored properly in an airtight container at room temperature. It may need to be mixed or stirred before each use.
Can rolling paper glue be used for anything else?
Yes, rolling paper glue can also be used for other crafts and DIY projects that require a natural adhesive.