Introduction
As kids, we loved making slime. Whether it was slimy, gooey, or crunchy, we couldn’t get enough of it. However, most slime recipes require glue as an ingredient, which can be messy and difficult to clean up. But what if there was a way to make crunchy slime without glue? In this guide, we’ll show you a simple recipe for making crunchy slime without glue using easily available ingredients. Get ready to have some squishy, crunchy fun!
What is crunchy slime?
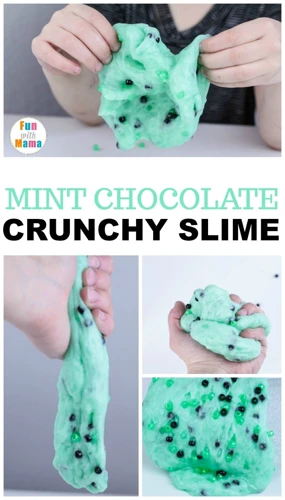
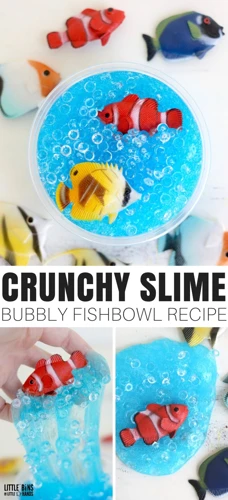
Crunchy slime is a type of slime that has a satisfying crunch when played with. It is a popular variation of slime for those who enjoy sensory play and unique textures. To achieve the signature crunch, crunchy slime is made with foam beads, which create a sound and texture similar to Rice Krispies. This type of slime is a great way to engage the senses and relax, and it’s easy to make at home with a few simple ingredients. Unlike regular slime, crunchy slime does not require glue and can be made with common household products. By using borax and cornstarch, shampoo, and foam beads, you can create a fun and unique slime without the messy hassle of glue.
Why make slime without glue?
Why make slime without glue?
Slime is a popular toy for kids and adults, but many people have concerns about using glue in their slime recipes. Here are some reasons why you might want to make slime without glue:
| Reason | Description |
| No mess | Using glue can be messy, and it’s hard to clean up if it spills. Making slime without glue can be less messy and easier to clean up. |
| No toxins | Some people have concerns about the safety of the chemicals in glue. Making slime without glue can eliminate these worries. |
| No waiting | Many slime recipes that include glue require waiting for the glue to dry and bond with the other ingredients. Making slime without glue can be a quicker process. |
| No need to buy glue | If you don’t have glue on hand or don’t want to buy it, you can still make fun and crunchy slime without it. |
If you’re interested in making other crafts without glue, check out our article on how to harden paper without glue.
Ingredients
When it comes to making crunchy slime without glue, the ingredients you choose are crucial in ensuring that your slime turns out just right. While regular slime recipes require glue, this recipe uses a different set of ingredients to achieve the same satisfying crunch. Below are the main ingredients you will need for this recipe, including borax, cornstarch, shampoo, and foam beads. Each ingredient plays a unique role in the consistency and texture of the slime. If you’re wondering where to find these ingredients, you may want to check out this helpful guide on what glue will stick to laminate or this tutorial on how to make glue-free slime.
Borax
Borax is a crucial ingredient when it comes to slime-making, especially if you’re looking to create a crunchy texture. Borax has a unique chemical compound that helps the slime come together, giving it the perfect consistency. To use Borax, you will need to dissolve it first. Here are the ingredients and steps to dissolve Borax:
- Borax
- Water
- Dissolve one spoonful of Borax into one cup of warm water.
- Stir the solution until the Borax dissolves entirely.
- Your Borax solution is now ready to add to your slime mixture.
While Borax is an important ingredient in making crunchy slime, It could be unsafe for kids and pets. Also, it may not be readily available in all countries. In such a case, you could use an alternative like contact lens solution or a baking soda and saline solution. However, make sure to read the label and ensure that these alternatives contain borate or boric acid as an active ingredient.
If you don’t want to use Borax at all, there are many recipes out there for making glue-free slime that don’t require it. You may want to check out how to make glue-free slime if you want to avoid using any kind of Borax and glue.
Cornstarch
Cornstarch is the next key ingredient in making crunchy slime without glue. This ingredient is a fine, powdery substance commonly used in cooking and baking. It acts as a thickener and binder in recipies. With slime, cornstarch works in tandem with borax to create a gooey, malleable texture that can be molded and stretched without falling apart. It is also great for absorbing moisture, giving the slime a firmer consistency.
When adding cornstarch to the slime mixture, it is important to do so a little at a time, stirring constantly, to avoid clumping. Failing to do this can result in a lumpy, unusable mixture. About one tablespoon of cornstarch is enough for a basic slime recipe, although this may vary depending on the desired consistency and amount of slime being made.
In addition to its slime-making properties, cornstarch has many other practical applications. It can be used to make an adhesive glue by mixing it with water and heating it on the stove. It is also handy for creating textured frosting for cakes or cookies.
Cornstarch is a versatile and important ingredient when making slime without glue. Its ability to create texture, absorb moisture, and bind ingredients together makes it a staple in many slime recipes. For more information on glue alternatives and how to glue specific materials, be sure to check out the informative articles on our website such as what glue will stick to laminate or how to make icing glue.
Shampoo
Shampoo is a key ingredient when it comes to making crunchy slime without glue. It acts as a binding agent and helps hold all the other ingredients together. It is important to note that only certain types of shampoo work well when making slime. These shampoos have high levels of sodium lauryl sulfate, which is an ingredient commonly found in many cleaning products. The table below lists some of the best shampoos to use when making crunchy slime.
| Shampoo Brand | Key Ingredient(s) |
|---|---|
| Pantene Pro-V | Sodium Lauryl Sulfate (SLS) |
| Head & Shoulders | Pyridoxine Hydrochloride (Vitamin B6) |
| Garnier Fructis | Sodium Laureth Sulfate (SLES) |
| Herbal Essences | Sodium Lauryl Sulfate (SLS) |
It is important to note that not all shampoos will work well when making slime. Shampoos that are low in sulfates or do not contain any sulfates at all may not be as effective. When selecting a shampoo, make sure to read the label carefully and look for shampoos that contain high levels of sodium lauryl sulfate or sodium laureth sulfate. In case you don’t have any shampoo available, you could also try liquid dish soap.
When choosing a shampoo for making crunchy slime, look for one that contains sulfates and is not moisturizing. Also, make sure to follow the recipe instructions carefully and measure out the proper amount of shampoo needed for your slime recipe. With the right shampoo and other ingredients, you can make fantastic crunchy slime that is both fun to play with and easy to clean up.
Foam Beads
Foam beads are a crucial ingredient in making crunchy slime without glue. These beads add the much-needed crunch and texture to the slime. It is essential to use the right amount of foam beads as adding too little can result in a slime that does not crunch, while adding too many can make the slime too hard and stiff.
To use foam beads, simply mix them into the slime mixture after adding the shampoo. Use a measuring cup to determine the amount of beads to add to the mixture. Typically, a quarter cup of foam beads works well for a standard slime recipe. However, you can experiment with the amount of beads used depending on the thickness or liquidity that is desired.
Incorporating foam beads into the slime mixture can be a messy affair, which adds to the allure of creating slime. The beads can easily fall out of the mixture and start rolling on the floor. To avoid this, it is recommended to stir the beads into the mixture in a slow and controlled manner using a spatula or spoon. Alternatively, you can knead the beads into the slime in a bowl using your hands.
Pro tip: If you do not have foam beads, you can improvise and substitute them with other materials such as sand or rice. However, the texture and crunch that foam beads give to crunchy slime cannot be replicated.
Important Note: Always buy foam beads that are specifically made for slime making. Do not use foam beads that are meant for other purposes as you may end up with a slime that is too hard or does not stretch well. Also, make sure to store unused beads in an airtight container to keep them fresh and pliable for future use.
Internal link: How to Use Adhesive Glue
Steps to Make Crunchy Slime Without Glue
As with any recipe, making crunchy slime without glue requires a certain amount of precision and attention to detail. By following these simple steps, you can create a fun and satisfying slime that is perfect for playtime. So, without further ado, let’s get started on making our crunchy slime masterpiece! And if you’re looking for other projects that don’t require glue, check out our guide on how to mix sawdust and glue to make homemade wood filler.
Step 1: Mix Borax and Cornstarch
Step 1: Firstly, to create crunchy slime without glue, you will need to mix borax and cornstarch together in a bowl (source). Borax, also known as sodium borate, is a mineral that acts as a binding agent. Cornstarch, on the other hand, is a natural binding agent that helps to make the slime thick and stretchy.
To make the mixture, take two tablespoons of cornstarch and add it to a bowl. Then, add one tablespoon of borax powder to the same bowl. Mix it thoroughly with a spoon (source), making sure that the borax and cornstarch are completely combined.
It’s important to mix it properly to avoid uneven consistency and potential lumps in the slime later on. Once it is mixed, put the bowl aside and move on to the next step.
Step 2: Add Shampoo
Step 2: Adding shampoo to the mixture is an essential step in making crunchy slime without glue. Shampoo acts as a binding agent that helps the foam beads stick together. You can use any clear or white shampoo you have on hand, but we recommend using a natural or baby shampoo as it is gentler on the skin.
Here’s what you need to do to add shampoo:
| Ingredients | Measurements |
|---|---|
| Borax and Cornstarch Mixture | 2 tablespoons |
| Shampoo | 1 tablespoon |
| Foam Beads | 1 cup |
1. Add 1 tablespoon of shampoo to the borax and cornstarch mixture.
2. Mix the ingredients well. You should see that the mixture becomes less sticky and more pliable.
3. If the mixture is still too sticky, add a small amount of shampoo and knead again.
By adding shampoo, your slime will not only be crunchy, but it will also have a pleasant scent and be gentle on your skin. Remember, the amount of shampoo you add will directly affect the consistency of your slime. So, be sure to use the right amount to get the desired result.
Pro tip: If you want to add an extra oomph to your slime, you can add a few drops of scented oil to the shampoo before adding it to the mixture. This will give your slime a unique and pleasant scent. But, be careful not to add too much scented oil as it can cause adverse reactions.
When you are done playing with your slime, store it in an airtight container to keep it from drying out. If you find that your slime has become too dry or stringy, simply add a few drops of shampoo and knead it again.
Remember to follow the precautions and clean up procedures to ensure that you and your workspace remain safe and slime-free.
Step 3: Add Foam Beads
Adding foam beads is the key to giving your slime the crunchy texture that everyone loves. These beads are small, lightweight, and won’t stick to your hands. You can buy them at any craft store or online. Here is how to add foam beads to your slime:
| Steps | Instructions |
|---|---|
| Step 1 | Take a handful of foam beads and add them to the slime mixture. |
| Step 2 | Stir the beads into the slime mixture with a spoon or your hands. Make sure they are evenly distributed throughout the slime. |
| Step 3 | Add more foam beads if you want a crunchier texture. Keep in mind that the more beads you add, the less stretchy the slime will be. |
It’s important to mix the foam beads thoroughly, or else they may clump together and ruin the texture of your slime. Be sure to also knead the slime with your hands after adding the foam beads to help them distribute evenly.
Pro Tip: Consider adding different colors of foam beads to add a fun, visual element to your slime. Just be sure not to overdo it and use too many beads.
While adding foam beads to your slime is fun and easy, cleanup may be a bit more difficult. These small beads can get everywhere! So, be sure to clean up your workspace thoroughly after making crunchy slime. If you do happen to get foam beads on your clothes or carpet, use a lint roller to pick them up.
Link: For more tips on using glue, check out how to use bed bug glue traps. However, if you need information on how to glue things back together, we recommend how to glue laptop rubber feet.
Step 4: Knead the Slime
Once you have added the foam beads to the slime mixture, it’s time to knead the slime. Kneading the slime will help to evenly distribute the foam beads into the mixture, ensuring that the slime is crunchy and fun to play with. Here are the steps for kneading the slime:
| Step | Instructions |
|---|---|
| 1 | Use your hands to knead the slime. Start by pressing the slime down and then folding it over on itself. Repeat this process several times, using a gentle but firm pressure. |
| 2 | Continue to knead the slime until the foam beads are evenly distributed throughout the mixture. You should be able to feel the crunchiness of the slime as you work it with your hands. |
| 3 | If the slime is too sticky, add a little bit more cornstarch and knead it into the mixture. If the slime is too dry, add a small amount of shampoo and work it in with your hands. |
Kneading the slime can be a fun and satisfying experience. It allows you to fully engage with the slime, feeling the texture and hearing the crunch as you work it with your hands. However, be careful not to overwork the slime, as this could cause it to lose its crunchiness. Once you are happy with the consistency of the slime, it’s ready to play with!
Tips for Making Crunchy Slime
Making crunchy slime without glue can be a fun and engaging activity to do with friends or family. If you want to add some extra pizzazz to your slime creation, consider trying out some of these tips for making crunchy slime. These tips will help you add some extra flair to your slime and take your sensory experience to the next level. So, let’s dive into some of the ways you can make your crunchy slime even more exciting!
Tip 1: Add Food Coloring
Adding food coloring to your crunchy slime is a great way to add some visual interest. To make your slime look even more appealing, experiment with different colors or even combine a few.
Here’s a table showing some popular food coloring options and the colors they produce:
| Food Coloring | Color Produced |
|---|---|
| Red | Produces a bright red color |
| Blue | Produces a cool blue color |
| Green | Produces a bright green color |
| Yellow | Produces a sunny yellow color |
| Purple | Produces a regal purple color |
| Pink | Produces a sweet pink color |
When adding food coloring, start with just a few drops and mix well before adding more. This will help you achieve the exact color you want without making the slime too saturated or overwhelming.
If you want to create more than one color, divide your slime into equal parts and add different colors to each part. Then, you can mix them together to create a cool swirled effect.
Pro Tip: If you want to make your slime glow in the dark, consider using fluorescent food coloring. This can make your slime stand out even more in low light conditions.
Tip 2: Use Glitter
Adding glitter to your crunchy slime can make it even more fun and visually appealing. Here are some tips to consider when using glitter in your slime recipe:
| Tip | Description |
|---|---|
| Tip 1: | Choose fine glitter to avoid lumps in your slime. |
| Tip 2: | Mix the glitter into the shampoo before adding it to the Borax and cornstarch mixture to ensure even distribution. |
| Tip 3: | Experiment with different colors of glitter to create a unique and personalized slime experience. |
| Tip 4: | Consider using a glitter glue as one of your ingredients to add both texture and sparkle to your slime. |
Remember that while glitter can add an extra touch of fun to your crunchy slime, it’s important to use it in moderation. Too much glitter can make the slime less stretchy and harder to knead. Experiment a little and find the right amount that works for you and your slime recipe.
Tip 3: Add Scented Oil
Adding scented oil to your crunchy slime mixture is a great way to take your sensory experience to a whole new level. Not only will it make your slime smell amazing, but it will also help you relax and reduce stress. Here are some tips to keep in mind when using scented oil:
- Choose the Right Scent: When adding scented oil to slime, it’s important to choose a fragrance that you love. Consider using essential oils, as they are made from natural plant extracts and come in a wide variety of scents. Popular options include lavender, peppermint, and lemon.
- Use a Dropper: Scented oils are very concentrated, so you only need a few drops to add fragrance to your slime. To avoid adding too much oil, use a dropper to control the amount you add to your mixture.
- Stir Carefully: When you add the scented oil to your slime mixture, be sure to stir it thoroughly to distribute the scent evenly. If you don’t mix it well, the scent may end up clumping in one part of the slime, making it difficult to smell.
- Store Properly: Once you’ve added scented oil to your slime, store it in an airtight container. This will help preserve the fragrance and prevent it from evaporating too quickly. Keep in mind that scented oils can stain fabric or other surfaces, so be careful when handling your slime.
Adding scented oil is a simple and fun way to customize your crunchy slime recipe and create a truly unique sensory experience. Just be sure to choose the right scent, use a dropper, stir carefully, and store your slime properly to get the most out of your scented slime.
Precautions to Take
When making crunchy slime without glue, there are some precautions that you should take to ensure that you and your workspace remain safe and clean. As with any craft project, it’s essential to take the necessary safety measures to avoid accidents and adverse reactions. Keep in mind that the materials used to make crunchy slime may cause skin or eye irritation if not handled correctly, which is why it’s crucial to take precautions to minimize risks. Let’s take a closer look at some of the precautions you should consider when making crunchy slime.
Precaution 1: Wash Your Hands and Workspace
It’s important to take some necessary precautions to ensure safe and hygienic slime-making. One of the first things to do is to wash your hands and your workspace. This will help to prevent any contamination and make sure that your slime is safe to handle and play with.
To properly wash your hands and workspace, take the following steps:
| Step | Description |
|---|---|
| 1 | Gather cleaning supplies: Before you begin, make sure you have all the necessary cleaning supplies, such as soap, water, and surface cleaner. |
| 2 | Wash your hands: Use soap and warm water to wash your hands thoroughly before you begin. Scrub your hands for at least 20 seconds, making sure to clean in between your fingers and under your nails. |
| 3 | Clean your workspace: Use a surface cleaner and a clean cloth or paper towel to wipe down your workspace thoroughly. This includes any countertops, tables, or other surfaces you’ll be using to make the slime. |
| 4 | Dry your hands and workspace: Use a clean towel or paper towel to dry your hands and your workspace. Make sure there’s no moisture left on either before you begin making the slime. |
Remember that proper hand washing and cleaning of your workspace is crucial for preventing any contamination or health risks. Take the time to do it right before you start making your crunchy slime without glue.
Precaution 2: Watch for Adverse Reactions.
It is important to watch out for any adverse reactions that may occur when making crunchy slime without glue. While this recipe is generally safe, some people may have an allergic reaction to certain ingredients.
To prevent any negative reactions, it is recommended to test the slime on a small area of skin before playing with it. This will allow you to see if any redness or irritation occurs.
It is important to keep the slime away from your mouth and avoid ingesting it. While the ingredients used to make crunchy slime without glue are non-toxic, it is not meant to be eaten and can be harmful if swallowed.
If you or anyone playing with the slime experiences any difficulty breathing, swelling, or hives, seek medical attention immediately. This could be a sign of a serious allergic reaction.
To avoid any potential issues, it is best to use the recipe as directed and carefully follow all precautions. By taking these measures, you can safely enjoy making and playing with your very own crunchy slime without glue!
To summarise all precautions in one html table:
| Precautions | Measures |
|---|---|
| Test on small area of skin before playing | Apply a small amount of slime to a small area of skin to check for adverse reactions. |
| Avoid ingesting slime | Keep slime away from the mouth and avoid ingesting it. Harmful if swallowed. |
| Watch out for any difficulty breathing, swelling, or hives | Seek medical attention immediately, if anyone playing with the slime experiences difficulty breathing, swelling, or hives. |
Clean Up Procedure
Now that you’ve successfully made your own batch of crunchy slime without glue, it’s important to know how to clean up properly after your fun DIY activity. As exciting as it is to play with slime, cleaning it up can be a daunting task. But worry not, as we’ve got you covered with our comprehensive clean up procedure guide. With the following steps, you’ll be able to keep your workspace tidy and make sure that your slime is properly stored or disposed of. So let’s get started!
Clean Up Procedure 1: Store the Slime
Once you have finished playing with your crunchy slime, it is important to properly clean up the slime and store it appropriately for future use. If you want to save your slime for later, follow these steps to store it:
Step 1: Remove the slime from your hands and any surface where it may have been dropped. Use a moist paper towel to wipe any residue on the surface.
Step 2: Put the slime in an airtight container or zip-lock bag. Make sure to get as much air out as possible. This will prevent the slime from getting dry and hard.
Step 3: Label the container with the type of slime and the date it was made. This way, you can easily keep track of how long you have had the slime and ensure that it is still safe to play with.
Step 4: Store the slime in a cool and dry place. A closet or a drawer is a good option. Make sure the slime is not exposed to direct sunlight or heat. Exposing the slime to warm temperatures or sunlight can cause it to melt and lose its consistency.
By following these steps, you can store your crunchy slime and ensure that it will be available to play with for several weeks. Always remember to make sure that the slime is not exposed to environmental factors that might affect its consistency or texture. If you notice any hardening or mold growth in the slime, it is better to discard it and make a fresh batch.
Clean Up Procedure 2: Discard the Slime
Once you’re done playing with your crunchy slime, it’s important to properly discard it. Discarding slime can be tricky, as it’s not something you can just throw in the trash. Here are some steps to properly discard your slime:
- Gather all of the slime: Make sure you collect all of the slime in one spot, and avoid leaving any slime on carpets or upholstery.
- Dispose of the slime: Once you’ve gathered all of the slime, it’s time to dispose of it. The best way to do this is to wrap the slime in a plastic bag and seal it shut. Then, put the bag in the trash. If you have a compost bin, you can also dispose of the slime there, as it’s made from natural ingredients.
- Clean your hands: After disposing of the slime, make sure to thoroughly wash your hands with soap and water. This will help prevent any lingering residue from the slime.
- Clean your workspace: Once you’ve disposed of the slime and washed your hands, it’s important to clean your workspace. Use a damp cloth or paper towel to wipe up any leftover slime or residue. Then, disinfect your workspace with an all-purpose cleaner.
It’s important to properly discard slime to avoid any issues with pests or lingering residue. By following these steps, you can ensure a safe and clean slime-making experience.
Conclusion
As our guide on how to make crunchy slime without glue comes to a close, it’s time to reflect on all that we’ve learned. From the ingredients to the step-by-step process, creating this fun and satisfying slime has never been easier. However, before you dive into your new slime-making hobby, it’s important to keep in mind some precautions that will ensure your safety while working with the ingredients. Let’s take a closer look at some final thoughts and tips to help you make the most out of your slime-making experience.
Final Thoughts
After following these steps, you should have a fun and crunchy slime that is sure to provide endless hours of entertainment. Remember to take precautions and clean up properly after playing with slime to avoid any issues.
Final Thoughts: Making crunchy slime without glue is a fun and easy project that can be done with just a few key ingredients. By using borax, cornstarch, shampoo, and foam beads, you can create a satisfyingly crunchy slime that is perfect for playing with and even for stress relief.
As with any project involving chemicals, it is important to exercise caution and follow proper safety procedures to avoid accidents or adverse reactions. Make sure to wash your hands and workspace, and keep an eye out for any signs of discomfort or allergies.
Once you have finished playing with your slime, there are a few different options for cleaning up. You can store the slime in an airtight container to keep it fresh and ready to play with again, or you can discard it in the trash.
Making crunchy slime without glue is a great activity for kids and adults alike. Get creative with your slime by adding food coloring, glitter, or scented oils. Enjoy the satisfying crunch of your new slime creation and have fun experimenting with different textures and colors.
Frequently Asked Questions
Can I substitute borax with something else?
Yes, you can substitute borax with liquid starch, contact lens solution, or baking soda. However, the measurements and consistency may slightly vary.
What kind of shampoo should I use?
Any kind of shampoo will work, but clear shampoo is recommended as it helps achieve a more transparent slime.
Do I need to use foam beads?
No, foam beads are optional. You can add other things such as glitter, sequins, or even small toys to achieve a crunchy effect.
Can I add food coloring to the slime?
Yes, adding food coloring is a great way to customize the color of your slime. Use drops sparingly and mix well until your desired color is achieved.
Is crunchy slime safe for kids to play with?
Yes, crunchy slime is safe for kids to play with when made correctly and used under adult supervision. It is important to teach kids not to put the slime in their mouth or near their eyes.
How do I store the slime?
Store the slime in an airtight container in a cool, dry place. It can last for a few weeks if properly stored.
Is it normal for the slime to be sticky at first?
Yes, it is normal for the slime to be sticky at first. Keep kneading the slime until it becomes less sticky and achieves the desired consistency.
What should I do if the slime gets stuck to my clothes?
If the slime gets stuck to your clothes, try using a stain remover or rubbing alcohol and wash the clothes in warm water.
Is there a way to make the slime less messy?
Yes, you can add less shampoo or cornstarch to achieve a less messy consistency. However, this may also affect the overall texture of the slime.
Can I make crunchy slime without shampoo?
Yes, you can make crunchy slime without shampoo by using other alternatives such as dish soap or body wash.