Introduction
As a DIY enthusiast or a professional woodworker, you are always looking for ways to improve your craft. Mixing sawdust and glue is an old technique that can be used for various applications in woodworking, from repairing cracks to creating new objects. But how to mix sawdust and glue for perfect results? In this guide, we will explore the different mixing techniques, tools, safety precautions, and the right type of glue to use. You will also learn how to apply and finish the sawdust and glue mixture and some tips and tricks to enhance your projects’ quality. So, let’s dive in!
What is Sawdust and Glue Mixture?
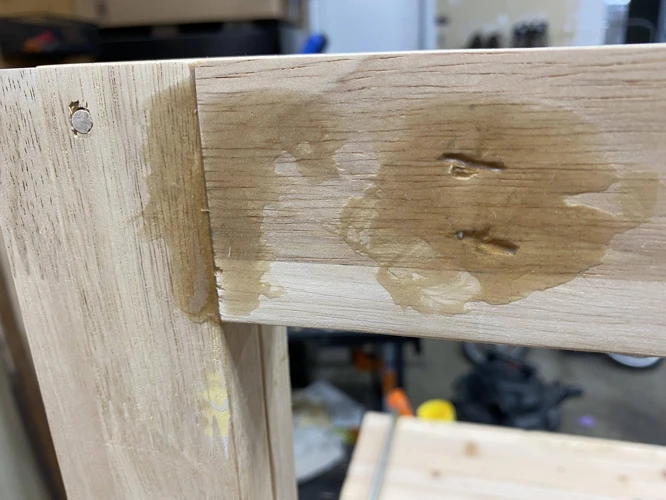
A sawdust and glue mixture is a combination of sawdust and glue that can be used for various woodworking projects. This mixture is often used to fill gaps in wood or create decorative effects on the surface of wood. It can also be used to create intricate patterns or designs on furniture.
To make a sawdust and glue mixture, sawdust is combined with glue until it forms a thick, paste-like consistency. The mixture is then applied to the wood surface and allowed to dry. Once the mixture has dried, it can be sanded and stained to achieve the desired finish.
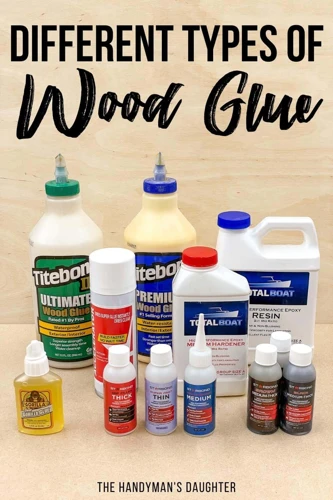
There are different types of glue that can be used to make the sawdust and glue mixture, such as PVA glue, aliphatic resin glue, hide glue, and epoxy resin. Each type of glue has different properties and is suitable for different types of woodworking projects. The ratio of sawdust to glue can also vary depending on the project and the desired outcome.
A sawdust and glue mixture is a versatile and affordable way to enhance the beauty of wood projects. With the right tools and techniques, anyone can create unique and stunning designs on wood surfaces.
Why You Want to Mix Sawdust and Glue?
Mixing sawdust and glue is a popular technique used in woodworking and DIY projects. It offers a range of benefits that cannot be achieved by using either component separately. The mixture of sawdust and glue can be used as a filler, an adhesive, or even a decorative element.
Benefits of using sawdust and glue mixture:
| Benefit | Description |
| Cost-effective | The sawdust and glue mixture can be made using leftover sawdust and inexpensive glue. This makes it an affordable alternative to other fillers and adhesives. |
| Environmentally friendly | By using sawdust that would otherwise be discarded, the mixture helps reduce waste and environmental impact. |
| Customizable | The mixture can be easily customized by choosing different types of sawdust, glue, and additives such as dyes and pigments. This allows for greater creativity and personalization in projects. |
| Strong and durable | The sawdust and glue mixture creates a strong and durable bond that can withstand wear and tear. |
Whether you want to use it as a filler or adhesive, the sawdust and glue mixture is an effective and versatile option for any craftsman or DIY enthusiast. It is also an excellent way to repurpose otherwise discarded sawdust and reduce environmental impact.
If you’re interested in learning more about glue and its applications, check out our article on how to draw a glue stick.
Mixing Techniques and Tools

Before you start mixing sawdust and glue, it’s important to understand the various tools and techniques you’ll need to achieve the perfect mixture. This step is crucial as it sets the foundation for the final outcome of your project. Mixing sawdust and glue combines two very different materials, so getting the correct consistency requires a bit of skill and knowledge. In this section, we’ll cover all the necessary tools and techniques you’ll need, as well as important safety precautions to keep in mind.
What You’ll Need
To mix sawdust and glue perfectly, there are certain tools and materials that you’ll need for the job. This includes:
| Materials | Description |
|---|---|
| Sawdust | The type of sawdust you use will depend on the project you’re working on. Pick sawdust that matches the type of wood you’re using. |
| Glue | Choose from PVA, aliphatic resin, hide glue, or epoxy resin glue depending on the desired project outcome. |
| Measuring cup | For precise measurement of the sawdust and glue ratio. |
| Mixing bowl | Choose a bowl with enough room to mix the sawdust and glue together without spilling out. |
| Paintbrush | For applying the mixed sawdust and glue to the project surface. |
| Sandpaper | For smoothing the surface after the sawdust and glue mixture has dried. |
In addition to the materials, it’s also important to have safety equipment such as gloves, a respirator mask, and safety goggles to protect yourself from any harmful particles or fumes. Now that you have all the necessary materials, let’s move on to the techniques for mixing sawdust and glue.
Techniques To Mix Sawdust and Glue
Mixing sawdust and glue may seem simple, but it does require proper techniques to achieve perfect results. Follow these techniques for best outcome:
- Use the right tool: The best tool to use for mixing sawdust and glue is a putty knife or a scraper. It will ensure uniform mixing and reduce the chances of lumps.
- Add sawdust gradually: Don’t pour all the sawdust in the glue at once. Instead, add in small amounts and stir thoroughly each time before adding more. This will prevent the mixture from becoming clumpy and inconsistent.
- Check the consistency: The mixture should have a thick paste-like consistency. If it’s too thick, add more glue. If it’s too runny, add more sawdust.
- Stir thoroughly: Mix the sawdust and glue until the mixture is even, and there are no visible lumps. Be sure to scrape the sides and bottom of the container to make sure it’s well blended.
- Adjust the mixture: If the mixture is too dry or clumpy, you can add more glue. If it’s too wet, you can add more sawdust. Be patient and adjust as needed to get the desired consistency.
- Work with small amounts: It’s better to mix small amounts of sawdust and glue rather than large batches. This will make it easier to work with and reduce the chances of the mixture drying out or becoming clumpy.
By following these techniques, you will be able to mix sawdust and glue like a professional. It’s important to note that safety precautions must also be taken when mixing sawdust and glue such as wearing gloves and a face mask to prevent any irritations or allergies.
If you’re interested in other projects that involve glue, such as making plaster of Paris with glue or how to paper mache with PVA glue, be sure to check out our articles on those topics.
Safety Precautions
When mixing sawdust and glue, it is important to take some safety precautions. Sawdust can cause respiratory problems if inhaled, and some glues can be harmful to the skin and eyes. Here are some ways to keep yourself safe while working with this mixture:
| Wear protective gear | Wear a mask to prevent inhaling dust particles, safety glasses to protect your eyes from sawdust and gloves to protect your skin from glue. |
| Avoid skin contact with glue | Some types of glue can cause skin irritation, so it’s important to avoid direct skin contact while working with them. If you do get glue on your skin, wash it off immediately with soap and water. |
| Work in a well-ventilated area | Mixing sawdust and glue can produce a lot of dust, so it’s important to work in a well-ventilated area to avoid respiratory problems. Open windows or use a fan to improve air circulation. |
| Dispose of materials properly | Dispose of any unused sawdust and glue mixture and other materials properly. Sawdust and glue can be flammable, so it’s important to dispose of them safely. |
By taking safety precautions while working on your project, you can avoid accidents and injuries. Remember to keep your work area clean and organized to prevent spills or accidents. If you’re looking for other adhesive-related projects, check out how to paper mache with PVA glue or what glue to use on wall.
Choosing the Right Type of Glue
When it comes to the sawdust and glue mixture, the type of glue you choose is crucial. Not all glues are created equal, and some may be better suited for certain applications than others. So, how do you know which glue to use? Let’s explore some of the common types of glue and their characteristics to help you make an informed decision. But before we dive in, make sure you have all the tools and materials you need, as outlined in the previous section. If you’re looking for other glue-related tips, check out our article on how to spread wood glue.
PVA Glue
PVA Glue: PVA (polyvinyl acetate) glue is a type of glue that is commonly used for mixing with sawdust. It is an emulsion of polymer particles in water and is known for its strong bonding properties and ease of use. PVA glue is also very affordable and widely available in hardware stores.
When mixing sawdust with PVA glue, it is important to keep in mind the ratio of sawdust to glue. The ideal ratio is generally considered to be one part sawdust to one part glue. This will result in a mixture that is easy to work with and has good bonding properties.
PVA glue can also be tinted with wood stains or food coloring to match the color of the wood being repaired or to create a unique look.
Here is a table summarizing the properties of PVA glue:
| Property | Details |
|---|---|
| Bonding strength | Strong |
| Drying time | 24 hours |
| Clean-up | With water |
| Application | Brush, roller, or squeeze bottle |
Using PVA glue and sawdust mixture is suitable for repairing and filling gaps and cracks on wooden surfaces such as furniture, flooring, and molding. It is also great for craft and DIY projects that involve working with wood.
Tip: If you’re looking to make the mixture more smooth and consistent, you can blend the sawdust in a food processor or coffee grinder before mixing it with the glue.
Learn how to make plaster of Paris with glue.
Aliphatic Resin Glue
Aliphatic Resin Glue is a type of adhesive that is made of resin and is widely used in woodworking and other applications. It is also known as “carpenter’s glue” and is a popular choice because of its strong bonding capabilities and water resistance. This type of glue sets quickly and has a longer shelf life compared to other types of adhesives.
Advantages of Aliphatic Resin Glue:
- Water-resistant
- Dries clear
- Strong bonding capabilities
- Longer shelf life than other adhesives
- Quick drying time
One of the unique features of this type of glue is that it dries clear, which makes it perfect for use in woodworking projects where the glue residue needs to be invisible. It is also water-resistant, which means that it can be used in areas that are exposed to moisture without losing its bonding capabilities.
Aliphatic Resin Glue is also a high-strength adhesive that provides a strong and durable bond. This type of glue is especially suitable for bonding wood and is widely used by carpenters and woodworkers. It has a quick drying time which allows for fast assembly and reduces the wait time between assembling and finishing.
How to use Aliphatic Resin Glue:
- Apply the glue to one of the surfaces that you wish to join.
- Spread the glue evenly using a brush or roller.
- Press the two surfaces together.
- Hold the surfaces together for a few minutes until the glue sets, then clamp them in place for a stronger bond.
It is important to note that Aliphatic Resin Glue should be used in a well-ventilated area and that protective gear like gloves and goggles should be worn when applying the glue. Additionally, the glue should not be ingested, and in case of exposure, medical attention should be sought. The weight of the glue stick is also a factor to consider when working with Aliphatic Resin Glue.
Aliphatic Resin Glue is a top choice for woodworking projects, and its features make it a versatile adhesive for other applications as well. It is efficient, easy to use, and long-lasting, making it a wise investment for anyone looking for a reliable bonding agent.
Hide Glue
Hide glue, also known as animal glue or protein glue, is made from the connective tissue and bones of animals. It is one of the oldest types of adhesives and has been used for centuries in woodworking and furniture making. If you’re looking for a strong and durable adhesive, then hide glue might be the right choice for you.
Advantages of Hide Glue
One of the advantages of hide glue is its strength. It forms a strong bond that can withstand stress and strain. It is also reversible, which means that if you make a mistake and need to disassemble a piece, you can do so without damaging the wood. Another advantage is that it has a long open time, meaning that it takes a while to dry, allowing you to make adjustments and reposition the pieces before the glue sets.
Disadvantages of Hide Glue
One disadvantage of hide glue is its sensitivity to moisture. It can become brittle and lose its strength when exposed to moisture. It also requires heat to activate, which means you will need to use a glue pot or heat gun to warm it up before using it. This can be a bit more time-consuming than other types of glue.
| Advantages | Disadvantages |
|---|---|
| Forms a strong bond that can withstand stress and strain | Sensitive to moisture |
| Reversible | Requires heat to activate |
| Long open time |
How to Use Hide Glue
Using hide glue requires a bit of preparation, as you will need to warm it up before use. You can either use a glue pot or a heat gun to warm up the glue. Once it’s warm, you can apply it to the wood using a brush or glue roller. It’s important to work quickly, as the glue will begin to set once it cools down.
Once you have applied the glue, you will need to clamp the pieces together and let the glue dry. This can take several hours, so be patient. Once the glue is dry, you can sand the surface to create a smooth and even finish.
Conclusion
Hide glue is a strong and durable adhesive that has been used for centuries in woodworking and furniture making. While it does require a bit of preparation and is sensitive to moisture, it can provide a strong and long-lasting bond for your projects. If you’re interested in learning more about different types of glue, check out our article on what is the mass of a glue stick.
Epoxy Resin
Epoxy Resin is one of the most popular types of glue for mixing with sawdust. It is a two-part glue consisting of a resin and a hardener. When combined, these two parts create a strong and durable bond that is resistant to moisture and heat. Epoxy Resin is perfect for creating wood fillets, repairing cracks, and bonding wood in applications where moisture is present.
Advantages of Epoxy Resin:
| Advantages | Description |
|---|---|
| Strong Bonding Strength | Epoxy Resin has a very strong bonding strength and can bond a variety of materials together. |
| Waterproof | Epoxy Resin is waterproof and can be used in applications where water is present. |
| Dries Clear | Once cured, Epoxy Resin dries clear, making it perfect for applications where a clean finish is desired. |
| Cures Quickly | Epoxy Resin cures quickly, allowing for less downtime and quicker results. |
How to Mix Epoxy Resin and Sawdust:
When mixing sawdust and Epoxy Resin, it is important to follow the manufacturer’s instructions carefully to ensure a proper mix. Here are some general guidelines to follow:
1. Begin by mixing equal parts of the two components – the resin and hardener.
2. Mix the two components together until they are fully combined. This should take about two minutes.
3. Add sawdust to the mix until you have the desired consistency. You want the mixture to be thick but still spreadable.
4. Apply the mixture to the area you want to bond or repair.
5. Use a putty knife or other tool to smooth out the surface of the mixture.
6. Allow the mixture to cure according to the manufacturer’s instructions.
Safety Precautions:
When working with Epoxy Resin, it is important to take proper safety precautions to avoid injury or harm. Here are some safety tips to keep in mind:
1. Always wear gloves and eye protection when working with Epoxy Resin.
2. Work in a well-ventilated area to avoid inhaling fumes from the glue.
3. Avoid getting the glue on your skin as it can cause chemical burns.
4. Clean up any spills or drips immediately to avoid slips or falls.
Epoxy Resin is an excellent choice for mixing with sawdust due to its strong bonding strength, waterproof properties, and quick cure time. Interested in learning more about AWS Glue? Check out this guide on how to pass parameters to Glue Job.
Using Sawdust and Glue Mixture
Now that you have successfully mixed sawdust and glue, it’s time to put it to use. The sawdust and glue mixture can be used in a variety of applications such as repairing wooden boards, filling in gaps in wood flooring, and creating wooden molds. In this section, we will discuss the proper techniques for using the sawdust and glue mixture in your projects. From applying the mixture to sanding and staining, we have got everything covered. Let’s dive in and explore the different ways you can utilize this powerful mixture.
For other great tips on making the most of your woodworking, check out how to schedule glue jobs. If you’re looking for a completely different type of craft project, try making crunchy slime without glue.
Applying the Mixture
Once you have mixed your sawdust and glue together, it’s time to apply the mixture to your project. Here are some steps to follow for a successful application:
| Clean the Surface | Before applying the sawdust and glue mixture, make sure the surface is clean and free of dust or debris. Wipe away any sawdust or residue from sanding to make sure the glue adheres well. |
| Apply the Mixture | Using a putty knife or spatula, spread the sawdust and glue mixture onto the surface. Make sure the entire area is covered evenly. If you need to fill a larger gap, apply the mixture in layers to prevent shrinking or cracking. |
| Smooth the Mixture | To achieve a smooth finish, gently press the mixture down with a putty knife or your fingers. You can also use a damp cloth or sponge to smooth the surface. Be careful not to overwork the mixture, as this can cause it to become lumpy or uneven. |
| Let it Dry | Allow the sawdust and glue mixture to dry completely. This can take several hours or overnight, depending on the type and amount of glue you used. Check the instructions on your specific glue for drying times. |
It’s important to note that the mixture may shrink slightly as it dries, so you may need to apply a second layer to fill any remaining gaps. Once the mixture is completely dry, you can sand and finish your project as desired.
Sand the Mixture
Once you have applied the sawdust and glue mixture to your project and allowed it to dry completely, the next step is to sand it. Sanding the mixture will help to achieve a smooth and even surface. Here are some tips for sanding the mixture effectively:
Firstly, use a fine grit sandpaper for sanding. It is recommended to start with 220-grit sandpaper and gradually move up to 400-grit sandpaper until you achieve the desired smoothness.
Tip: Use a sanding block or a sanding sponge to apply more even pressure on the surface and avoid damaging the surrounding areas.
Secondly, sand in the direction of the grain. This will help to prevent the mixture from becoming fuzzy or rough, especially if you are working with wood surfaces.
Tip: Always use light pressure when sanding to avoid removing too much of the mixture and creating uneven spots.
Thirdly, clean the surface thoroughly after sanding. Use a dry brush or a cloth to remove the sawdust and any debris left from sanding.
Tip: Wipe the surface with a damp cloth to remove any residue that has accumulated on the surface without damaging the wood.
Finally, inspect the surface to ensure that it is smooth and even. If there are any rough spots or inconsistencies, repeat the sanding process until you achieve the desired result.
Tip: If you are working with an intricate or detailed surface, you may want to consider using a small brush or even a toothbrush to get into hard-to-reach areas.
Taking the time to sand the sawdust and glue mixture properly will ensure a smooth and professional finish to your project. With these tips and techniques, you can achieve perfect results every time.
Stain and Finish
Once you have applied the sawdust and glue mixture to your project and sanded it down, it’s time to add some color and protection through staining and finishing. Here are the steps to follow:
1. Choose Your Stain: There are many different types of stains available, including water-based, oil-based, gel, and more. Consider the wood species you are working with, as well as the desired color and finish.
2. Apply the Stain: Use a clean cloth or brush to apply the stain evenly across the project. Let it sit for the recommended amount of time (typically 15-30 minutes), then wipe away any excess with a clean cloth.
Tip: You can test the stain on a small, inconspicuous area before applying it to the entire project to ensure you like the color.
3. Let it Dry: Allow the stain to fully dry, which may take anywhere from a few hours to overnight.
CAUTION: Make sure the project is in a well-ventilated area, as some stains can produce harmful fumes.
4. Apply Finish: Choose a protective finish, such as polyurethane or lacquer, to add shine to your project and protect it from wear and tear. Use a paintbrush or foam brush to apply the finish in thin, even coats. Allow each coat to dry fully before applying the next one.
Tip: Sand lightly between each coat of finish for a smoother, more professional-looking result.
5. Final Sanding: Once the final coat of finish has dried, sand the project lightly with fine-grit sandpaper to smooth out any rough spots or imperfections. Wipe the project with a clean cloth to remove any dust.
Congratulations! Now your sawdust and glue project is complete and ready to be used or displayed.
Tips and Tricks
When it comes to mixing sawdust and glue, there are a few tips and tricks that can help you achieve perfect results. Whether you’re working on a woodworking project, repairing furniture, or creating a DIY masterpiece, using the right techniques and tools can make a big difference in the final outcome. In this section, we’ll explore some insider secrets for mixing sawdust and glue, including tips for the right ratio, coloring options, storage techniques, and different applications to try. So, let’s dive right in and discover how to take your projects to a whole new level!
Ratio of Sawdust and Glue
The ratio of sawdust and glue is one of the most important factors when it comes to getting perfect results. It is crucial to get the ratio right to avoid a mixture that is either too thick or too runny. Different types of sawdust will require different ratios, but as a general rule, the amount of sawdust should always be greater than the amount of glue.
Here is a table that outlines the recommended ratios for different types of sawdust and glue:
| Type of Sawdust | Type of Glue | Ratio |
|---|---|---|
| Softwood | PVA Glue | 1:1 |
| Hardwood | PVA Glue | 1:2 |
| Any type | Aliphatic Resin Glue | 2:1 |
| Any type | Hide Glue | 1:2 |
| Any type | Epoxy Resin | 1:1 |
It’s worth noting that these ratios are just a guide and the exact ratio will depend on the consistency of the glue used and the absorbency of the sawdust. In general, it’s better to start with a slightly thicker mixture and adjust as necessary by adding more glue or sawdust.
Remember, the key to getting perfect results is to experiment and find the right ratio through trial and error.
Coloring the Mixture
Customizing the color of your sawdust and glue mixture is a great way to add a personal touch to your project. Here are some ways to achieve the desired color:
| Method | Materials Needed | Procedure |
|---|---|---|
| Commercial Stains | – Stain – Paintbrush |
Apply the stain to the mixture with a paintbrush, following the instructions on the label. |
| Food Coloring | – Food coloring – Water – Bowl – Mixing Spoon |
Add a few drops of food coloring to the mixture and mix well. Adjust the amount of food coloring until the desired shade is achieved. |
| Natural Dyes | – Coffee grounds – Tea bags – Turmeric – Other natural dyes – Water – Bowl – Mixing Spoon |
Steep the natural dye material in hot water for several minutes until the desired color is achieved. Strain the liquid and mix it with the sawdust and glue mixture until the desired shade is achieved. |
| Pigment Powders | – Pigment powder – Water – Bowl – Mixing Spoon |
Add small amount of pigment powder to the sawdust and glue mixture and blend well until the desired shade is reached. |
Keep in mind that the type and amount of pigment used will affect the consistency and overall appearance of the mixture. Always practice on a small, inconspicuous area of the project before applying the colored mixture to the entire surface.
Storing the Mixture
After mixing sawdust and glue together, it’s likely that you may have some leftover mixture. Properly storing this mixture will ensure that it stays fresh and can be used again in future projects.
The right container: When it comes to storing sawdust and glue, the container you choose is important. It’s best to use an airtight container that will prevent air from getting in, which can cause the mixture to dry out. A plastic container with a tight-fitting lid is a good option, as it will not allow any air to penetrate. You can also use glass jars with rubber-sealed lids or metal cans.
Temperature and humidity: Sawdust and glue mixture should be stored in a cool, dry place. If the mixture is exposed to high temperatures or humidity, it can cause the glue to break down and the sawdust to become damp and clumpy. This will make it difficult to use when you’re ready to use it again.
Shelf life: The shelf life of sawdust and glue mixture depends on the type of glue that you use. PVA glue has the longest shelf life and can last up to several years if properly stored. Aliphatic resin glue can last up to a year, while hide glue has a shorter shelf life of a few months. Epoxy resin is typically used in smaller, one-time quantities, so storage is less of a concern.
Label the container: It’s important to label the container with the date that the mixture was created. This will help you keep track of how long it’s been stored and when it’s time to throw it away.
To summarize, properly storing sawdust and glue mixture involves using an airtight container, storing it in a cool, dry place, and labeling the container with the creation date. Using these steps will help you ensure that your mixture stays fresh and can be used for future projects.
| Storage Tips | |
|---|---|
| Use an airtight container | Prevents air from getting in and drying out the mixture |
| Store in a cool, dry place | Prevents breakdown of glue and clumping of sawdust |
| Label the container | Keeps track of creation date and shelf life |
Different Applications
When it comes to the different applications of sawdust and glue mixture, there are a plethora of uses that you should consider. Below is a table outlining some of those applications along with specific tips and tricks for each use.
| Application | Tips and Tricks |
|---|---|
| Woodworking | Tip: Use fine sawdust for a smoother finish. Trick: Mix in wood stain to color the mixture. |
| Crafts | Tip: Use colored sawdust for a unique look. Trick: Create a mold of your desired shape and fill it with the sawdust and glue mixture. |
| Repairing Furniture | Tip: Use sawdust from the same type of wood as the furniture. Trick: Use a syringe to apply the mixture into tight spots. |
| Art | Tip: Use a variety of sawdust colors to create a unique design. Trick: Pour the mixture onto a canvas and use a tool to create a texture. |
| Garden | Tip: Use sawdust from rot-resistant woods. Trick: Mix in water and use the mixture as a natural weed deterrent. |
As you can see, the sawdust and glue mixture can be used for a variety of purposes. Whether you’re a woodworker, artist, or gardener, there is a unique application for this versatile mixture. By following the tips and tricks outlined in the table, you can create a perfect sawdust and glue mixture for your specific use case.
Conclusion
In conclusion, mixing sawdust and glue can be a great way to create economical and effective filler for woodworking projects. By using the right type of glue and a proper mixing technique, you can achieve perfect results every time. Remember to take the necessary safety precautions, such as wearing gloves and using a dust mask.
When it comes to choosing the right glue, the options include PVA glue, aliphatic resin glue, hide glue, and epoxy resin. Each has its own pros and cons, so consider the specific needs of your project before making a decision.
Once you have mixed the sawdust and glue together, it’s important to use the mixture properly. This involves applying it evenly, sanding it down, and staining and finishing it as desired. It’s also possible to add coloring to the mixture for a specific effect.
In terms of storage, it’s best to keep unused portions of the mixture in an airtight container in a cool, dry place.
Overall, the key to success with sawdust and glue mixture is to experiment and find what works best for your project. With these tips and tricks in mind, you’ll be able to create a reliable and cost-effective solution for filling gaps and holes in your woodwork. Happy crafting!
Frequently Asked Questions
What types of sawdust can I use?
You can use any type of untreated sawdust, whether it is hardwood or softwood. However, hardwood sawdust is typically more durable and is recommended for projects that require a stronger bond.
Can I mix different types of sawdust?
Yes, you can mix different types of sawdust to achieve different colors and textures in your mixture.
What are the safety precautions I need to take when mixing sawdust and glue?
You should always wear gloves and a dust mask when mixing sawdust and glue to protect your skin and lungs. Make sure to mix the mixture in a well-ventilated area.
Can I use sawdust and glue mixture on outdoor projects?
Yes, you can use sawdust and glue mixture on outdoor projects. However, it is recommended to use a waterproof glue and finish to protect the mixture from moisture.
What type of glue should I use for fine woodworking projects?
For fine woodworking projects, aliphatic resin glue is recommended because it dries clear and has a longer working time than other types of glue.
Can I tint the sawdust and glue mixture?
Yes, you can tint the sawdust and glue mixture with wood stain or pigment to achieve the desired color. Just make sure to adjust the ratio of sawdust and glue accordingly.
What is the recommended ratio of sawdust to glue?
The recommended ratio of sawdust to glue is 1:1, but you can adjust the ratio to achieve different textures and consistencies in your mixture.
Can I store the sawdust and glue mixture for later use?
Yes, you can store the sawdust and glue mixture in an airtight container for later use. Just make sure to mix it thoroughly before using it again.
How long does the sawdust and glue mixture take to dry?
The sawdust and glue mixture typically takes 24-48 hours to fully dry, depending on the type of glue used and the thickness of the mixture.
What are some alternative uses for sawdust and glue mixture?
Sawdust and glue mixture can be used as a filler for gaps in wood, as a texture paste for art projects, and even as a fire starter when mixed with wax.