Woodworking can be a rewarding and creative hobby, but it requires attention to detail and a focus on the fundamentals. One of the basic skills every woodworker should have is proper glue application. Knowing how to spread wood glue is essential for creating strong, lasting bonds between your pieces. However, achieving the perfect spread can be a tricky process. With the right techniques, preparation, and a willingness to learn, you can master the art of spreading wood glue. In this article, we’ll explore the different types of wood glue, prepare for glue application, delve into effective methods for spreading glue, common mistakes to avoid, and tips for achieving the best results. Get ready to take your woodworking to the next level by becoming a glue spreading pro!
Why Spreading Glue is Important
Understanding the importance of properly spreading glue is crucial when it comes to achieving a strong and secure bond between wood pieces. Whether you’re working on a DIY project at home or a professional woodworking job, the steps you take to spread glue and adhere your wood pieces together can make all the difference in the finished product. In this section, we’ll explore the key reasons why spreading glue is important and how it can impact the overall quality of your woodwork. So, let’s dive in!
Creates Stronger Bond
When spreading glue on wood surfaces, creating a stronger bond is one of the main benefits. This ensures that the pieces being joined together will hold firmly and not separate over time. To achieve the strongest bond possible, it’s important to follow proper spreading techniques and use the right type of glue.
Table: Types of Glue and Their Strengths on Wood Surfaces
| Type of Glue | Strength on Wood Surfaces |
|—————————–|——————————————————————–|
| PVA Glue | Strong, but can be weakened by heat or moisture |
| Polyurethane Glue | Very strong and moisture-resistant |
| Cyanoacrylate Glue (CA Glue)| Strong, but not ideal for larger surfaces due to quick-drying nature |
| Epoxy Glue | Very strong and long-lasting, can fill gaps in surfaces |
| Hide Glue | Strong and bonds well with wood fibers, but requires longer drying time |
As shown in the table, some types of glue like polyurethane and epoxy are known for their high strength and durability on wood surfaces. On the other hand, PVA glue is commonly used but can weaken over time due to heat or moisture exposure.
To ensure the strongest bond possible, it’s important to choose the right type of glue for your specific project. For larger surfaces, polyurethane or epoxy glue are great options. For smaller surfaces or intricate details, cyanoacrylate (CA glue) or hide glue can provide a strong hold. By choosing the right glue and following proper spreading techniques, you can achieve a strong and reliable bond that will last for years to come.
If you want to learn more about how to stick something without glue, check out our article here.
Improves Adhesion
When spreading wood glue, improving adhesion is a crucial benefit. This means that glue is less likely to fail and the project will stay intact. Properly spreading glue ensures that it goes into any pores or gaps in the wood, creating a stronger hold. When glue is spread evenly, it can also decrease the chances of air pockets forming, which may cause the glue to loosen over time due to drying and shrinking. For these reasons, improving adhesion is essential for any woodworking project.
To achieve optimal adhesion, start by selecting the right type of glue for your project. Popular choices include PVA, polyurethane, cyanoacrylate, epoxy, and hide glue. Each glue type has unique advantages and disadvantages, so be sure to do your research and choose the glue that is best suited for your specific project. Once you have selected the right glue, preparing the surface by cleaning it thoroughly and pre-fitting the pieces together will ensure that the glue is applied to a clean and well-fitting surface.
When spreading the glue, use techniques such as a brush or roller, glue spreader, finger, or dowel. Regardless of the method used, make sure to apply a thin, even coat of glue, without applying too much excess. Applying too much glue may lead to bonding failure and cause the project to fall apart. Additionally, choose a well-ventilated area to work in and allow the glue to fully dry before adding sanding or any other finish.
Appropriate application of wood glue improves adhesion, making the bond between the wood stronger, and reducing the chances of structural failure. It is important to read and follow the instructions, work patiently using proper techniques, and choose the appropriate glue for your project. Performing these correctly will guarantee the long-lasting effects of the project.
Seals Joints For Better Finish
When working on a woodworking project, sealing joints with glue is an essential step to achieving a better finish. Sealing joints not only helps keep the pieces securely bonded together, but it also helps create a smooth and even surface for sanding and finishing. Without properly sealed joints, glue can seep out and create unsightly bumps and roughness on the surface of the wood.
To ensure a better finish, it’s important to choose the right type of glue for the project and to apply it properly. Different types of glue may have different drying times and consistencies, so it’s important to read the product instructions before starting. PVA glue, for example, is known for being easy to sand and for creating a strong bond that hardens over time, making it a popular choice for woodworking projects.
Before spreading the glue, take the time to pre-fit the pieces and clamp them together. This will help ensure that the joints are tight and that excess glue is squeezed out. Using clamp padding can also help prevent clamp marks and damage to the wood surface, giving a better overall finish.
When spreading the glue, be sure to apply it evenly and avoid applying too much. Using a brush or roller, glue spreader, finger, or dowel can help create a smooth and even coverage. For greater control of the glue flow and to avoid excess seepage, applying masking tape to the surface can help manage the glue spread.
After the glue has been applied to all appropriate surfaces, clamp the pieces together and let the glue dry completely before sanding or finishing. Any excess glue that has seeped out of the joints should be cleaned up to avoid ruining the final finish.
Keeping these tips and techniques in mind can help ensure that the joints are properly sealed for a better finish. For more information about different types of glue and their uses, check out our article on what glue to use for basing miniatures.
Prevents Future Damage
Preventing Future Damage
Using proper techniques for spreading wood glue on your projects can help prevent future damage. When wood pieces are joined together with glue, the bond is only as strong as the glue itself. If the glue has been applied improperly, the joint may eventually fail and cause damage to the piece.
One common problem that can occur when applying glue is over-application. If too much glue is applied to the joint, it can seep out and create a mess that is difficult to clean up. Not only does this make the piece look unsightly, but it can also cause the glue to interfere with the finishing process. Eventually, excess glue can even attract dirt and debris, which can weaken the bond between the pieces and compromise the integrity of the project as a whole.
Another common mistake that people make when using wood glue is not allowing adequate drying time. If the glue is not given enough time to dry, it can weaken the joint and cause the pieces to pull apart. This can be especially problematic in areas where the piece will be exposed to moisture or stress, such as in outdoor furniture or items that will be frequently handled.
By taking the time to prepare your surfaces properly, using the right type of glue, and applying the glue with care, you can create strong, long-lasting joints that will help prevent future damage to your projects. Remember to avoid common mistakes like over-application, inadequate drying time, and improper clamping, and always read and follow the manufacturer’s instructions for best results.
For more information on PVA glue, check out our article on who sells PVA glue to find the best brand for your needs.
Types of Wood Glue
When it comes to woodworking, choosing the right type of wood glue is crucial for achieving a strong, durable bond. With a variety of options available on the market, it can be challenging to determine which glue is the best fit for your project. In this section, we will explore the different types of wood glue available and their unique characteristics. From PVA glue to hide glue, we will help you choose the right adhesive for your project.
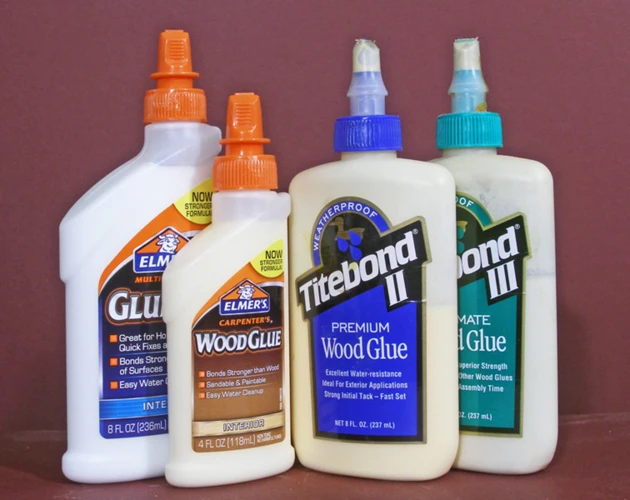
PVA Glue
PVA glue, or polyvinyl acetate glue, is the most commonly used wood glue. It is popular because of its strong bonding capabilities, quick-drying time, and easy clean-up. PVA glue also has the advantage of being water-resistant, making it a good choice for projects that may be exposed to moisture.
Advantages of PVA glue:
- Strong bonding capabilities
- Quick-drying time
- Easy clean-up
- Water-resistant
PVA glue is perfect for woodworking projects where a tight bond is necessary. It works well with softwoods, such as pine or cedar, as well as hardwoods, such as maple or oak. However, PVA glue is not recommended for use with oily woods, such as teak.
When using PVA glue, it is important to keep in mind that it can dry out over time. This can lead to weakened bonds and a less effective hold. It is best to purchase PVA glue in smaller quantities to avoid it drying out before it can be used up.
Anchor text: If you are looking for information on what glue to use for basing miniatures, check out our article “What Glue to Use for Basing Miniatures?”
Polyurethane Glue
Polyurethane glue is a popular adhesive for woodworkers because of its versatility and strength. This type of glue is moisture-resistant, making it ideal for outdoor projects or applications where exposure to water is a concern. It also creates a foaming action when it cures, which helps fill in gaps and spaces for a stronger bond.
Polyurethane glue is applied in the same way as other wood glues, but it has some unique characteristics to keep in mind. Firstly, it is important to note that this glue expands as it dries, so do not apply too much. It is advisable to apply thin layers of glue to avoid overexpansion, which may cause separation between the pieces of wood.
Additionally, polyurethane glue requires moisture to cure properly, so it is important to dampen the wood surfaces before applying the adhesive. This moisture can also be used to slow down the curing time if more working time is needed.
Polyurethane Glue Pros:
- Excellent bonding strength
- Can be used on a wide range of materials besides wood
- Water-resistant and ideal for outdoor use
- Foaming action fills gaps and spaces for a stronger bond
Polyurethane Glue Cons:
- Expands as it dries, which can cause separation if too much is applied
- Longer curing time than other glues
- Can be messy to work with due to foaming action
- Requires moisture to cure properly
If you decide to use polyurethane glue for your project, be sure to follow the manufacturer’s instructions carefully. And if you need to remove any excess glue that has foamed up and dried, you can use a chisel or scraper to carefully trim it away.
Tip: If you need to slow down the curing time of the polyurethane glue, try dampening the wood surfaces with water or an isopropyl alcohol solution.
For more information on different types of wood glues and their uses, check out our article on what kind of glue to use on decals.
Cyanoacrylate Glue
Cyanoacrylate glue, also known as super glue, is a fast-drying adhesive that is great for bonding small objects with tight-fitting joints. This glue is available in liquid, gel, and spray forms, and can bond quickly to a variety of materials, including wood, plastic, metal, and ceramic.
Pros of Cyanoacrylate Glue:
- Fast-drying: Cyanoacrylate glue sets in seconds, making it great for quick repairs and projects.
- Strong bond: This glue creates a strong, long-lasting bond that can withstand wear and tear.
- Easy to use: The convenient applicator nozzle and quick-drying formula make cyanoacrylate glue easy to use.
Cons of Cyanoacrylate Glue:
- Brittle: While cyanoacrylate glue is strong, it can also be brittle and prone to cracking under stress.
- Not suitable for porous materials: This glue may not work very well on porous materials like fabric, paper, or cardboard.
- Fumes: The fumes of cyanoacrylate glue can be irritating to the eyes and lungs, so it’s important to work in a well-ventilated area.
If you decide to use cyanoacrylate glue for your project, be sure to follow the manufacturer’s instructions carefully. It’s also important to note that cyanoacrylate glue can be difficult to remove once it has dried, so take care to avoid getting it on any surfaces you don’t want to be permanently bonded.
If you are looking for an alternative to cyanoacrylate glue, you may want to consider homemade putty without glue which can be made easily with ingredients you probably already have at home. Check out our article on how to make putty without glue for more information.
Epoxy Glue
Epoxy glue is a two-part adhesive that is known for its incredible strength and resistance to water and chemicals. This type of glue is often used for bonding wood to other types of materials, or for filling gaps in wood joints. Epoxy glue is also ideal for situations where a permanent bond is required.
When working with epoxy glue, it’s essential to follow the instructions carefully. The two parts of the epoxy must be mixed together in the correct ratio and thoroughly combined to ensure a strong bond. Once mixed, epoxy glue can be a bit tricky to work with due to its thick consistency and relatively short working time.
Below is a table summarizing the key features of epoxy glue:
| Drying Time | Strength | Water Resistance | Temperature Resistance | Best For |
|---|---|---|---|---|
| 24-48 hours | Very strong | Excellent | Good | Permanent bonding and gap filling |
It’s worth noting that some epoxy glues are designed for specific applications, such as marine use or high-temperature environments. Always make sure to select the right type of epoxy glue for your project to ensure the best results.
Epoxy glue is an excellent choice for wood projects where you need a strong and reliable bond. With proper preparation and careful application, it can provide long-lasting results. Don’t forget to read the instructions thoroughly before using epoxy glue to achieve the best results.
Hide Glue
Hide glue, also known as animal glue, is a natural adhesive made from the connective tissues of animals. This type of glue has been used for centuries, with evidence of its use dating back to ancient Egypt. Hide glue is available in liquid, granular, and pellet forms and requires mixing with water before use. It has a relatively fast setting time of about 30 minutes and is heat reversible, meaning it can be softened and reactivated with the application of heat.
| Pros | Cons |
|---|---|
| Dries clear: Hide glue dries clear, making it a great choice for projects where the glue may be visible. | Not waterproof: Hide glue is not waterproof, so it is not suitable for use in projects that will be exposed to moisture. |
| Easy to sand: Once dry, hide glue is easy to sand, allowing for a smoother finish. | Short shelf life: Hide glue has a short shelf life of about a year, so it must be purchased fresh and used quickly. |
| Reversible: Hide glue is reversible with the application of heat, allowing for easy disassembly if needed. | Sensitive to temperature and humidity: Hide glue is sensitive to temperature and humidity, so it may not be the best choice for use in areas with high moisture or extreme temperature fluctuations. |
| Natural: Hide glue is a natural adhesive, making it a good choice for those who prefer to use eco-friendly products. | May require multiple applications: Depending on the project, hide glue may require multiple applications to achieve a strong bond. |
When using hide glue, it is important to keep in mind its sensitivity to temperature and humidity. It is best to work in a controlled environment with stable temperature and humidity levels to ensure proper adhesion. Additionally, hide glue may require some experimentation to find the right consistency for the project, as it can be affected by various factors such as water temperature and mixing ratios.
Tip: If you are new to using hide glue or are working on a particularly important project, it may be a good idea to do a test run on scrap wood to ensure you have the right consistency and technique before beginning your project.
Hide glue can be an excellent choice for those who prioritize natural and reversible adhesives, as long as their project does not require waterproofing. Its natural and eco-friendly properties make it a popular choice among woodworkers, furniture makers, and musical instrument builders.
If you want to learn more about other types of adhesives, check out our article on how to thicken super glue.
Choose the Right Glue for Your Project
Choosing the Right Glue for Your Project
It is important to choose the correct type of glue for your specific woodworking project to ensure a strong and lasting bond. Different glues have different properties and are better suited to specific materials and applications. Here are some of the most common types of wood glue:
| Type of Glue | Properties | Best Used for |
|---|---|---|
| PVA Glue | Water-resistant, fast-drying, strong bond | General woodworking |
| Polyurethane Glue | Waterproof, strong bond, fills gaps, expands as it dries | Outdoor projects, laminating, filling gaps |
| Cyanoacrylate Glue | Quick-drying, strong bond, bonds to difficult surfaces | Small projects, bonding difficult materials such as metal or plastic |
| Epoxy Glue | Waterproof, strong bond, fills gaps, sets slowly | Marine applications, filling gaps, bonding dissimilar materials |
| Hide Glue | Reversible, strong bond, sets quickly, easy to clean up | Antique furniture restoration |
Note: Make sure to read the label and instructions for each type of glue before use. Some glues may not be suitable for certain woods or materials.
Consider using a low-cost homemade glue for a small project or for gluing paper. For those trying to avoid chemical adhesives, try making a flour-based slime like this recipe. Organic glues like fondant serve as edible glues for cake decorations as shown in this article here.
Preparation
Before you start spreading glue, it’s important to properly prepare the surface and gather all necessary tools. Taking the time to prepare will ensure a stronger bond and better finish. Here are some steps to follow to prepare your workspace and materials for gluing.
Clean the Surface
Before applying wood glue, you need to make sure the surface of the wood is free of any dirt, dust, grease, or oil. Any foreign material on the wood surface can weaken the glue’s bond and result in a subpar end product. Here are some steps you can take to ensure a clean surface:
- Remove any existing finish: If you’re gluing two pieces of wood that have been previously finished, you’ll need to sand off the finish layer so the glue can adhere to the bare wood.
- Use a scraper or sandpaper: Next, use a scraper or sandpaper to remove any dirt, dust, or other debris from the wood surface. Make sure to sand enough to create a rough surface that the glue can grip onto.
- Wipe down the surface: Once you’ve scraped or sanded the wood, use a clean, lint-free cloth to wipe the surface. You can also use a tack cloth to remove any remaining dust or debris.
It’s important to note that the cleaner the surface, the better the glue will adhere. The effort you put into cleaning the surface before gluing will pay off in the end result. Taking the time to properly prepare the wood surface is a crucial step in spreading wood glue successfully.
Pre-Fit the Pieces
Before spreading glue, it’s important to ensure that the pieces to be joined fit together properly. This process is called pre-fitting and it helps to prevent any gaps in the final project. Pre-fitting involves checking the edges of the pieces for any irregularities or imperfections that may prevent them from fitting together tightly.
One method of pre-fitting involves using a pair of calipers, which allow you to measure the thickness of each piece and ensure that they match. Another technique is to use a dry run, where you place the pieces together without any glue or clamps to check the fit and make any necessary adjustments.
When pre-fitting, it’s also important to consider any movements or expansion that may occur over time due to changes in temperature or humidity. To account for this, leave a small gap between the pieces when pre-fitting them. This will help to ensure a tight fit even as the wood expands and contracts.
To summarize, pre-fitting is an important step in ensuring a successful glue-up. By using tools such as calipers and performing a dry run, you can make sure the pieces fit together tightly and account for any expansions or movements that may occur in the future.
| Tools needed for pre-fitting: | Techniques for Pre-Fitting: |
|---|---|
| Calipers | Measure the thickness of each piece to ensure they match |
| Dry Run | Place the pieces together without glue or clamps to check the fit |
Apply Clamp Padding
When spreading wood glue, it’s important to ensure that the pieces being bonded are held tightly together during the curing process. While clamping is the most effective way to achieve this, it’s important to take precautions to prevent the clamp from damaging the surface of the wood. This is where clamp padding comes in.
Before clamping, it is recommended to cover the surface of the wood with a thin layer of padding material. This can be achieved using a number of materials such as felt, cork, or even old newspaper. The padding material will help to distribute the pressure from the clamp, helping to prevent any dents or marks on the surface of the wood.
Here is a table summarizing the benefits and drawbacks of using different materials for clamp padding:
| Material | Benefits | Drawbacks |
|---|---|---|
| Felt | Soft and pliable, conforms well to irregular shapes | May absorb excess glue and become stained |
| Cork | Resistant to moisture and heat, easy to clean | May be too stiff for smaller pieces, difficult to conform to irregular shapes |
| Old newspaper | Cheap and readily available, can be easily replaced | May leave ink stains on the wood, not as effective at distributing pressure evenly |
No matter what material you choose for clamp padding, it’s important to ensure that it covers the entire surface of the wood that will be in contact with the clamp. It’s also a good idea to add a layer of wax paper over the clamp padding to prevent the glue from sticking to the padding material.
By taking the time to apply clamp padding, you can ensure that your project is held tightly together during the glue curing process without causing any damage to the surface of the wood.
Gather Necessary Tools
Successful spreading of wood glue requires having the right tools. Before beginning the process, it’s essential to gather all the necessary tools. With the right tools, achieving an even glue spread becomes easier and faster, and the result is often better. Here is a list of some of the most commonly needed tools for successful wood glue spreading:
| Carpenter’s Glue | – | This is a must-have tool for spreading wood glue. It comes in various sizes and is a great tool for applying glue to small or tight spaces. |
| Glue Brush | – | A high-quality glue brush is a must-have tool that helps in applying an even and thin layer of glue to the surface. It ensures equal distribution of glue and reduces the chances of excess glue seeping out. |
| Clamp | – | Clamps are necessary for holding the wood pieces together, ensuring that the glue dries in the right position. Pick the appropriate size clamp according to the size of the project. |
| Sanding Pad | – | A sanding pad is necessary for smoothing out the surface of the wood after the glue dries. It prevents the appearance of bumps and lumps and makes it easier to create a consistent finish. |
| Plastic Spatula | – | A plastic spatula is a useful tool for mixing the glue and applying it to the wood. It creates an even layer of glue and reduces the mess associated with the spreading process. |
| Masking Tape | – | Masking tape is used to control the flow of glue and prevent excess glue from seeping out of the joint. It also protects the surrounding surface from glue marks or stains. |
Other useful tools include a clean and damp cloth to wipe away excess glue, a mixing cup for mixing the glue, and a dowel rod for spreading glue into tight spaces. Having all the necessary tools before starting ensures an efficient and effective spreading process, leading to better results.
Apply Masking Tape to Control Flow
A common issue when spreading wood glue is controlling the flow of the glue. This is especially critical when you are trying to glue intricate pieces together. The glue can easily drip and spread outside of the area you want it to bond, causing a messy and hard-to-clean-up situation.
One simple solution to this problem is to apply masking tape to the edges of the surfaces that will be glued. By doing this, you can create a barrier that will contain the glue to the desired area. It will also help prevent any glue from seeping through the tiny splits and gaps between the pieces of wood.
To use this technique, you’ll need to follow a few easy steps:
- Cut a long piece of masking tape that is slightly wider than the area where the glue will be applied.
- Place the tape along the edge of the wood, next to the joint you’ll be gluing.
- Gently press down on the edge of the tape to ensure it adheres well to the wood.
- Repeat the process on the other side of the joint. Make sure that the two pieces of tape meet and overlap slightly at the joint.
- Use a sharp knife to cut away any excess tape.
Once the masking tape is in place, you can apply the glue without worrying about it spreading. The tape will guide the glue to the intended area and keep it in place after you’ve clamped the pieces together.
It’s important to note that you should remove the masking tape as soon as you’ve finished clamping the joint together. If you leave the tape on for too long, it may dry and become hard to remove, or even damage the wood surface.
Using masking tape to control the flow of glue is a simple yet effective technique. Experiment with it on your next project and you’ll see the advantages it offers in terms of cleaner joints and less mess to clean up.
Techniques for Spreading Glue

When it comes to applying wood glue, using the right technique is just as important as using the right glue for your project. There are various ways to spread glue, each with its own benefits and drawbacks. From using a brush or roller to a finger or dowel, it’s important to select the best method for your specific project. In this section, we’ll explore some of the most effective techniques for spreading glue and discuss how to determine which one is right for you.
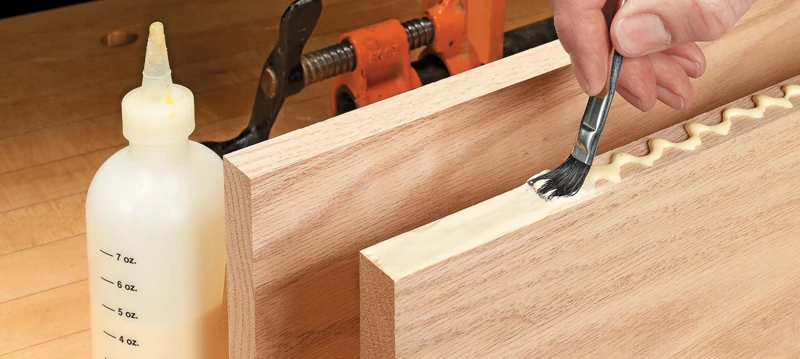
Using a Brush or Roller
To spread wood glue using a brush or roller, there are a few steps you should follow for optimal results. Here are some tips to keep in mind:
- Choose the right brush or roller: Use a brush or roller appropriate for the size of the project. For small areas, a small brush or roller is sufficient, while larger areas require bigger tools.
- Apply an even coat of glue: The key is to spread an even coat of glue on both surfaces that will be bonded. This ensures a strong hold and prevents any uneven pressure from causing the pieces to shift.
- Use overlapping strokes: When applying the glue, use long, overlapping strokes to ensure an even coating.
- Blend in brush or roller marks: If using a brush, try to blend in any brush marks with the surrounding wood grain by using light, circular strokes. If using a roller, be mindful of rolling in the direction of the wood grain.
- Clean up excess glue: Immediately wipe away any excess glue with a damp rag before it dries. Remember, excess glue can interfere with staining or finishing later on.
By following these tips, you can ensure that your glue is spread evenly using a brush or roller for a strong and long-lasting bond.
Using a Glue Spreader
A glue spreader is a great tool to use for applying wood glue. It allows for an even application of glue and can help prevent excess glue buildup. Here are steps for using a glue spreader:
| Step | Description |
|---|---|
| 1 | Apply glue to the wood surface using the glue spreader. |
| 2 | Spread the glue evenly over the surface, applying light pressure. |
| 3 | Work quickly to spread the glue before it starts to dry. |
| 4 | Remove any excess glue with a scraper or putty knife. |
| 5 | Let the glue dry fully before sanding or finishing the wood. |
When using a glue spreader, it’s important to choose the right size for your project. Too large of a spreader can lead to excess glue buildup, while too small of a spreader can make the process longer. Also, be sure to clean your glue spreader after each use to prevent any dried glue from interfering with future projects.
Using a glue spreader can result in a professional-looking finish and a strong bond between your pieces of wood. Remember to work quickly, evenly, and with the appropriate pressure to achieve the best result.
Using a Finger
When it comes to spreading wood glue, using your finger can be a useful technique. However, it’s important to do it correctly to achieve the best results. Here are some steps to follow when using your finger to apply wood glue:
- Wear gloves: Before beginning, it’s important to wear disposable gloves to protect your hands from the glue.
- Squeeze glue onto surface: Squeeze a small amount of glue onto the surface, either directly or with a glue bottle.
- Spread glue with finger: Use your finger to evenly spread the glue over the entire surface. Use a circular motion while applying the glue to make sure it covers the surface.
- Apply pressure: Apply enough pressure to push the glue into the seams, cracks and areas requiring glue.
- Check for excess glue: Check the surface to make sure no excess glue is pooling or clumping in areas. Remove any excess glue with a damp cloth or paper towel.
- Clean up: Clean up any remaining residue with a damp cloth or paper towel. Dispose of the gloves and cleaning materials properly.
- Wait for glue to dry: Wait for the glue to completely dry and cure before continuing with your project.
Using your finger to apply glue can be a quick and effective technique, but always remember to wear gloves to protect your hands and to check for excess glue to ensure a strong bond.
Using a Dowel
One method for spreading glue is using a dowel. This technique is particularly useful for narrow or hard-to-reach areas. Here are the steps to using a dowel to spread glue:
1. Choose a dowel that is slightly smaller than the width of the glue line. A wooden skewer or chopstick will also work.
2. Apply the glue to one surface, ensuring that the entire surface is covered with a thin, even coat of glue.
3. Use the dowel to spread the glue over the surface, using a back-and-forth motion.
4. Apply pressure as you spread the glue to ensure that it is fully distributed.
5. Once the glue is spread, use a new dowel or a clean area of the dowel to remove any excess glue. Be sure to remove all excess glue, as it will interfere with the bonding process.
6. Finally, join the two surfaces together and apply clamps to hold them in place while the glue dries.
Tip: You can also use a small brush or roller to apply glue to the surface before using the dowel to spread it. This will help ensure that the glue is evenly distributed and no areas are missed. It’s also a good idea to practice on a scrap piece of wood before attempting this technique on your actual project.
Common Mistakes to Avoid
As with any DIY project, it’s easy to make mistakes when spreading wood glue. However, these mistakes can compromise the strength of the bond and the overall quality of your finished project. To ensure success, it’s important to be aware of common mistakes and know how to avoid them. In this section, we’ll highlight some pitfalls to watch out for and provide tips on how to prevent these mistakes from happening in the first place.
Applying Too Much Glue
When it comes to spreading wood glue, it’s important to avoid applying too much glue. Excess glue can cause a number of problems that can negatively affect the strength and appearance of your project. Here are some issues that can arise from applying too much glue:
- Weakens Bond: Applying too much glue can weaken the bond between the pieces of wood, as the excess glue can prevent the two surfaces from making a secure connection.
- Bulging: Too much glue can cause the wood to bulge, creating unsightly and uneven surfaces.
- Drying Time: Applying an excessive amount of glue can lead to a longer drying time. In some cases, the glue may not fully dry, which can compromise the strength of the bond.
- Difficulty Sanding: Sanding excess glue can be a difficult and time-consuming process, which can lead to delays in your project.
To avoid these issues, it’s important to apply a thin, even coat of glue to the surfaces of the wood you intend to join. Remember that less is often more when it comes to wood glue. Make sure to use the appropriate amount of pressure when clamping your project together to ensure a secure bond without using too much glue. By following these tips, you can achieve a successful and professional-looking bond for your wood project.
Not Clamping Properly
Proper clamping is crucial for ensuring a strong and lasting bond between the glued pieces. Clamping helps to hold the pieces in place while the glue dries, applying pressure for a tighter fit and minimizing gaps. However, not clamping properly can lead to weak joints and a failed project.
Here are some common mistakes to avoid when clamping:
- Using too much pressure: While applying pressure is important, using too much can cause the joints to shift and glue to squeeze out. This can weaken the bond and create a mess that’s difficult to clean up.
- Not using enough pressure: On the other hand, not applying enough pressure can result in gaps between the pieces, allowing air to enter and the glue to dry improperly, creating a weak bond. It’s important to apply enough pressure to get a tight fit between the pieces.
- Ignoring clamp placement: It’s essential to place your clamps in the right spots to ensure that you apply pressure to the areas where the glue has been applied. This is especially important if your project is large and requires multiple clamps. Proper clamp placement will help you achieve an even pressure across the joint.
To avoid these mistakes, make sure you have the proper equipment and that you take your time when applying clamps. Using the right type and size of clamps, as well as using the right number of clamps, will help you to distribute the pressure evenly and avoid shifting. Be patient and allow enough time for the glue to fully dry before removing your clamps. This will ensure a stronger bond between the pieces.
Lack of Patience
It’s no secret that woodworking requires patience. And when it comes to spreading wood glue, patience is crucial for achieving a strong and long-lasting bond between pieces of wood.
Lack of patience is one of the most common mistakes that woodworkers make when spreading glue. Rushing the process may lead to a weak bond or the pieces shifting out of place before the glue has a chance to set.
To avoid this mistake, take your time when applying the glue and fitting the pieces together. Double-check the alignment and make any necessary adjustments before clamping. Don’t rush through the clamping process either – make sure that the clamps are securely in place and that the pieces are held firmly together.
Patience is also important when it comes to drying time. Allowing the glue to fully dry before sanding or finishing is crucial for achieving the strongest bond possible. Rushing the process and sanding or finishing too soon can weaken the bond and cause the pieces to separate over time.
A lack of patience can lead to weak bonds and mistakes when spreading wood glue. Take your time during the process and don’t rush the drying time for the best results.
| Common mistake: | Lack of patience when spreading wood glue |
| Why it’s a problem: | May lead to a weak bond or the pieces shifting out of place before the glue has a chance to set. Rushing the drying process can weaken the bond and cause the pieces to separate over time. |
| How to avoid it: | Take your time when applying the glue and fitting the pieces together. Double-check the alignment and make any necessary adjustments before clamping. Don’t rush the clamping process either, and allow the glue to fully dry before sanding or finishing. |
Not Removing Excess Glue
Leaving excess glue on a project can harm its overall appearance and weaken its structure. It’s essential to remove it properly to achieve a smooth and seamless finish. Here are some common consequences of not removing excess glue:
| Consequence | Explanation |
| Messy Appearance | The dried excess glue will create an uneven and rough surface that may be visible even after painting or staining. |
| Difficulty Sanding | The dried glue can clog sandpaper, making it less effective and may even ruin the sandpaper, costing you time and money. |
| Poor Adhesion | Excess glue can prevent proper adhesion between the pieces, resulting in a weak bond that may break over time. |
| Damage Over Time | Excess glue can also absorb moisture over time, causing the wood to expand and contract unevenly, leading to possible warping or cracking. |
To avoid these problems, it’s important to remove excess glue immediately after applying it. The simplest and most effective way to do this is by using a damp cloth or paper towel to wipe it off before it dries. Be sure to check all joints and corners to make sure no glue is left behind.
It’s advised to use a plastic scraper if there’s a large amount. Care should be taken to avoid scratching the surface of the wood. Once the excess glue is removed, allow ample drying time before sanding or applying finishes. Sanding too soon can cause clogging of sandpapers while finishing can lead to blotches and color differences. Taking a few extra minutes to remove this excess glue can make a world of difference in the final quality and appearance of your project.
Not Cleaning Up Glue Residue
One of the most common mistakes when spreading wood glue is not cleaning up glue residue. Even the most careful and precise application can be ruined if glue residue is left behind. Glue residue can interfere with a smooth finish and can also cause problems with staining and painting. Not cleaning up glue residue can also negatively affect the bond between the wood pieces.
To avoid this mistake, always keep a damp cloth or sponge nearby. After clamping the wood pieces together, wipe away any excess glue that has squeezed out from the joint. Be sure to get into the corners and crevices in order to remove any hidden glue. Don’t forget to also wipe away any glue on the clamps, especially if they are not made of non-stick material.
If the glue has already dried, it can be more difficult to remove. In this case, a scraper or chisel can be used to carefully remove any hardened glue. It’s important to be cautious when using these tools to avoid damaging the wood surface.
Another way to prevent glue residue is by using a release agent. A release agent is a substance that is applied to a surface before applying the glue. This prevents the glue from sticking to the surface, making cleanup easier. Common release agents include petroleum jelly, wax paper, and even cooking spray. However, be sure to test the release agent on a scrap piece of wood first to make sure it doesn’t negatively affect the final finish.
By taking the extra step to properly clean up glue residue, you can ensure a smoother finish and a better bond between wood pieces. Don’t skip this important step in your woodworking projects.
- Common Mistake: Not cleaning up glue residue
- Consequence: Interference with smooth finish and bond between wood pieces
- Solution: Wipe away excess glue with a damp cloth or sponge; use a release agent to prevent glue from sticking to surface
Tips for Best Results
Now that you know the techniques for spreading glue, it’s time to focus on achieving the best possible results. These tips will help ensure that your project turns out perfectly, with a strong and lasting bond between your wood pieces. Paying attention to the details can make all the difference, so let’s take a look at how to get the best results possible when using wood glue.
Work in a Well-Ventilated Area
When working with wood glue, it’s important to remember to work in a well-ventilated area to avoid inhalation of harmful fumes. Here are some tips to ensure proper ventilation:
- Open windows and doors: Make sure the area you’re working in has windows or doors that can be opened to allow for air flow. This will help disperse any fumes and prevent them from accumulating in one area.
- Wear a mask: If you’re working in a small space or unable to open windows or doors, it’s important to wear a mask to avoid inhaling fumes. There are different types of masks available, so make sure to choose one that is appropriate for the type of glue you’re using.
- Use a fan: If you’re working in an area with limited ventilation, use a fan to help circulate the air. This will help move any fumes that are present out of the area.
- Avoid working in enclosed spaces: If possible, avoid working in enclosed spaces such as closets or small rooms. These spaces can quickly fill up with fumes and become hazardous.
By following these tips and working in a well-ventilated area, you can protect yourself from harmful fumes and ensure a safe and successful project.
Apply Thin, Even Coats of Glue
When it comes to spreading wood glue, applying thin, even coats is crucial for achieving a strong bond between the pieces of wood. Not only does this help ensure that the glue doesn’t seep out of the joints and create a mess, but it also allows the glue to fully penetrate the wood fibers for maximum adhesion.
To apply glue evenly, you can use a brush, roller, glue spreader, or finger. Whichever method you choose, be sure to keep the glue layer uniform in thickness. If the glue is too thick, it may not fully dry, leaving a sticky residue that can spoil the finish or even prevent the bond from forming properly.
Additionally, applying too much glue may cause it to seep out of the joints, creating a mess that can be difficult to clean up. On the other hand, applying too little glue may not provide enough coverage for a strong bond.
To make sure you are applying an even layer of glue, you can use the bead method. Simply apply a thin, continuous bead of glue along one of the surfaces to be joined, then spread it evenly with a brush, roller, or spreader. This method ensures that the glue covers the surface evenly without any gaps or missed spots.
Remember to spread the glue quickly and evenly to avoid the glue drying out or changing consistency before you have a chance to properly apply it. It is essential to work with pace and precision to ensure the successful spreading of the glue.
When it comes to spreading wood glue, remember to apply thin, even coats to achieve maximum adhesion and a clean finish. Use the bead method or another preferred technique to apply the glue quickly and evenly. By doing so, you’ll be sure to create a strong, long-lasting bond between the pieces of wood in your project.
Match the Color of the Glue to the Wood
Matching the color of the glue to the wood can help ensure a seamless finished product. Here are some tips to help with this:
- Identify the color of the wood: Different woods have different natural colors and hues, so it’s important to know what you’re working with. Some woods may have a warm, reddish tone, while others may be more yellow or brown.
- Choose the right glue: Some glue brands offer different varieties of glue that are specifically designed to match the natural color of certain woods. It’s important to select the right glue color to achieve a cohesive look.
- Test the glue first: Before applying the glue to the wood, it’s a good idea to test it on a scrap piece of the same wood. This will give you a better idea of how the glue will look once it dries and will also help you adjust your technique if needed.
- Apply glue sparingly: When applying glue to the wood, it’s important to do so sparingly to avoid altering the color of the wood itself. A little bit can go a long way, so apply thin, even coats.
- Clean up excess glue: If you do happen to apply too much glue and it alters the color of the wood, be sure to clean it up right away with a damp cloth. Once the glue dries, it can be very difficult to remove.
By following these tips, you can ensure that the color of your glue will match the wood, resulting in a beautiful finished product that looks seamless and professional.
Let the Glue Fully Dry Before Sanding or Finishing
When applying wood glue to a project, it is important to wait for the glue to fully dry before sanding or finishing. Rushing this step can lead to a weaker bond and a less polished finish. Patience is key!
Different types of wood glue will have varying drying times, so be sure to read the product instructions carefully. As a general rule, it is recommended to wait at least 24 hours before sanding or finishing the glued joints. However, it’s best to wait until the glue is completely dried and hardened.
One way to check if the glue is dry is to lightly touch it with your finger. If it feels hard and no longer tacky, then it’s ready for sanding or finishing. Another method is to use a moisture meter, which can detect the level of moisture in the wood. If the reading is below the recommended level for your specific project, then you can move on to the sanding and finishing stages.
Don’t rush this step! Waiting for the glue to fully dry will ensure a stronger bond and a better overall finish for your project. Keep in mind that humidity and temperature can impact drying times, so it’s important to work in a well-ventilated area at room temperature for the best results.
Table illustrating different drying times for common types of wood glue:
| Glue Type | Drying Time |
|---|---|
| PVA Glue | 24 hours |
| Polyurethane Glue | 6-8 hours |
| Cyanoacrylate Glue | 10-30 seconds |
| Epoxy Glue | 5-20 minutes |
| Hide Glue | 10-12 hours |
As seen in the table above, different types of wood glue have varying drying times. It’s important to take note of these differences and adjust your project timeline accordingly. Waiting for the glue to fully dry before sanding or finishing will ensure a stronger and more polished final product.
Always Read and Follow Product Instructions
When it comes to using wood glue, it’s important to always read and follow the product instructions. Not all wood glues are created equal, and each type may have its own specific instructions for use.
To ensure the success of your project, remember these tips:
| Tip | Description |
|---|---|
| Read the label | Make sure to read the label before use to understand the recommended drying time, application method, and any safety precautions. |
| Apply the right amount | Most wood glues require a thin, even coat. Applying too much can weaken the bond and take longer to dry. |
| Check compatibility | Not all glues are compatible with all types of wood and finishes. Check to make sure the glue you are using is compatible with your project. |
| Store properly | Store your wood glue in a dry, cool place. Excessive heat or cold can affect the glue’s performance. |
| Use gloves | Some types of wood glue may contain chemicals that can irritate skin. Wear gloves to protect your hands. |
By following these tips and the manufacturer’s instructions, you can ensure that your wood glue application is successful and your project turns out as planned.
Conclusion
After reading this article, you should be equipped with the knowledge and techniques necessary for successfully spreading wood glue. Remember that the way you spread glue can have a significant impact on the strength and durability of your final product.
Start by choosing the right type of glue for your project. Consider the properties of each type of glue and select the one that is best suited for the job.
Preparation is key to successful glue spreading. Make sure the surfaces are clean, the pieces are pre-fitted, and you have all the necessary tools on hand. Consider using masking tape to help control the flow of the glue and protect surrounding areas.
When it comes to techniques for spreading glue, you have several options. The method you choose will depend on personal preference and the specifics of your project. Be sure to apply thin, even coats of glue and avoid common mistakes such as applying too much glue or not removing excess glue.
For the best results, follow the tips outlined in this article. Work in a well-ventilated area, use the appropriate amount of glue, match the color of the glue to the wood, and let the glue fully dry before sanding or finishing. Always read and follow the product instructions carefully.
By following these tips and techniques, you can ensure that your woodworking projects are strong, durable, and beautiful. Happy woodworking!
Frequently Asked Questions
What is wood glue?
Wood glue is an adhesive used in carpentry and woodworking to bond pieces of wood together.
What are the benefits of spreading wood glue?
Spreading wood glue helps create a stronger bond, improves adhesion, seals joints for better finish, and prevents future damage.
What are the different types of wood glue?
The different types of wood glue include PVA glue, polyurethane glue, cyanoacrylate glue, epoxy glue, and hide glue.
How do I choose the right wood glue for my project?
You choose your wood glue for your project by considering the type of wood you are working with, the application method, and the drying time.
What is the best way to prepare before spreading wood glue?
Preparing before spreading wood glue involves cleaning the surface, pre-fitting the pieces, applying clamp padding, gathering necessary tools, and applying masking tape to control flow.
What technique can I use to spread wood glue?
Techniques for spreading wood glue include using a brush or roller, using a glue spreader, using a finger, and using a dowel.
What are some common mistakes to avoid while spreading wood glue?
Common mistakes to avoid while spreading wood glue include applying too much glue, not clamping properly, lacking patience, not removing excess glue, and missing cleaning glue residue.
How can I achieve the best results while spreading wood glue?
You can achieve the best results while spreading wood glue by working in a well-ventilated area, applying thin, even coats of glue, matching the color of the glue to the wood, letting the glue fully dry before sanding or finishing, and always reading and following product instructions.
How long should I let the wood glue dry?
The time it takes for wood glue to dry varies based on the type of glue and the drying conditions. However, it is best practice to let the glue dry for at least 24 hours before handling the glued pieces.
Can I use wood glue on surfaces other than wood?
Although wood glue is specifically designed for use on wood, there are instances where it can be used on other surfaces such as ceramics, plastic, and metal.