Introduction
Painting a room may seem like a daunting task, especially if this is your first time. But fear not, with a little planning and the right tools, you can achieve a professional-looking finish that will leave you feeling proud of your DIY skills. In this step-by-step guide, we will walk you through the process of how to paint a room like a pro. From selecting the perfect color to adding the finishing touches, we’ve got you covered. So roll up your sleeves and let’s get started!
Choose the Perfect Color
One of the most important decisions when painting a room is choosing the perfect color. The color you select will set the tone for the space and can significantly impact the overall feel of the room.
So how do you choose the perfect color? Consider the purpose of the room and who will be using it. For example, a bedroom may want a calming and relaxing color, while a child’s playroom may benefit from a brighter, more energetic color. Look for inspiration in magazines, online, or even from nature. You can also consider the latest color trends to stay up-to-date. However, ultimately you should select a color that you love and feel comfortable with.
Don’t forget the finish! The finish will impact how the color appears on the walls and how durable it is. A flat or matte finish gives a softer look, while a glossier finish is easier to clean. Check out our article on choosing the right paint finish for your interior walls to help you decide.
Once you have selected your color and finish, it’s time to gather your painting supplies. Check out our article on 10 painting tools for DIYers to make sure you have everything you need. And before you start painting, make sure to properly prep the room by following our 5 tips for prepping interior walls for painting.
Remember, a little planning and preparation can go a long way in ensuring a successful paint job. And if you need additional guidance, check out our article on proper painting techniques or learn about the benefits of hiring a professional painter in our article on DIY vs Professional Interior Painting.
Gather the Right Tools and Materials
To achieve a professional-looking paint job, you will need to gather the right tools and materials. Let’s take a look at what you’ll need:
| Tools | Materials |
|---|---|
| Paint brushes | Painter’s tape |
| Paint rollers (with covers) | Paint |
| Paint roller extension pole | Drop cloths or plastic sheeting |
| Paint tray | Sandpaper |
| Putty knife | Primer (if needed) |
| Cleaners (e.g. soap and water, TSP) |
Before you start painting, make sure you have all of the necessary tools and materials in place. Running out of paint or forgetting to buy painter’s tape can slow down your painting process or even ruin your work. If you’re unsure about what specific tools and materials you’ll need or want to learn more about avoiding interior painting mistakes, check out our FAQ page. And if you want to learn more about choosing the perfect color scheme or using accent walls in your interior design, visit our color scheme page and accent walls page. If you’re looking for eco-friendly paint options, don’t forget to check out our guide.
Prepare the Room
Before starting to paint a room, it is important to properly prepare the room to ensure a smooth and even paint job. Preparing the room before painting can help prevent any unwanted drips, spills, or other mishaps that can damage your floors or furniture. Here is a step-by-step guide to properly prepare a room before painting:
| Step 1: Clear the Room |
| Start by removing all the furniture, pictures, and decorations from the room. If there are any items that cannot be removed, cover them with plastic sheets or drop cloths to protect them from any paint splatters or drips. |
| Step 2: Clean the Surfaces |
| Next, thoroughly clean the walls, ceilings, and trim to ensure that the paint adheres properly. Use a mild detergent and water solution to remove dirt, dust, and any other debris. Use a sponge or a rag to wipe down all surfaces, and allow them to dry completely before moving on to the next step. |
| Step 3: Repair Any Damage |
| If there are any holes, dents, or other damage to the walls or ceilings, it is important to repair them before painting. Use spackling compound to fill in any holes or cracks, and sand the surface smooth. For larger repairs, use drywall tape and joint compound to create a seamless finish. |
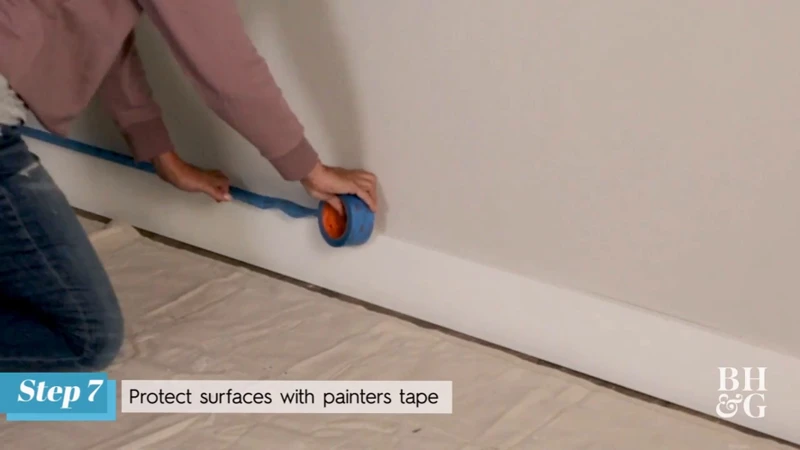
| Step 4: Tape and Cover |
| Use painter’s tape to cover any areas that you do not want to paint, such as door frames, window frames, and baseboards. Apply the tape carefully, making sure it is straight and flush against the surface. For the floor, use drop cloths or old sheets to protect it from any paint drips or spills. |
By following these steps to properly prepare the room, you can ensure a smooth and even paint job that will last for years to come.
Step 1: Start with the Ceiling
As you stand in the center of the room with paint and brush in hand, the blank ceiling above may seem like a daunting task. But fear not, for this step-by-step guide will walk you through the process of painting your room’s ceiling like a pro. Get ready to flex those painting muscles and watch your room come to life with a fresh coat of paint. So grab your supplies and let’s conquer that intimidating ceiling!
Cut in Around the Edges
When it comes to painting any room, it’s important to first cut in around the edges before using a roller for the rest of the surface. This can be a tricky task, but with the right technique and tools, it can be done like a pro. Here’s how to cut in around the edges like a pro:
- Use an angled brush: A high-quality angled brush is essential for cutting in around the edges. This type of brush will help you make clean and precise lines, even in tight spaces.
- Load your brush: Dip your brush into the paint, tapping off any excess, and then drag it along the inner edge of the paint can to remove any drips. Your brush should hold enough paint to cover a small section of wall.
- Start in the corners: Begin by painting a straight line along the top corner where the wall meets the ceiling. Repeat this process for each corner in the room, making sure to maintain a steady hand for accuracy.
- Work in small sections: Paint a small section of wall in front of you and then move on to the next section. This will help ensure that the paint stays wet and doesn’t dry out too quickly, which can lead to visible brush strokes.
- Use long strokes: Once you’ve loaded your brush, use long and steady strokes to create a straight line along the edge of the wall. This will help prevent drips and ensure a consistent finish.
- Practice: Cutting in around the edges can take some practice to perfect, so don’t be discouraged if your first attempts don’t turn out as well as you’d hoped. Keep practicing and soon you’ll be cutting in like a pro!
By following these steps, you’ll be able to cut in around the edges like a pro and achieve a beautiful finish for your painted room.
Use a Roller for the Rest
When it comes to painting a room, using a roller can save you a lot of time and effort. Here are the steps to follow when using a roller to paint the walls:
| Step 1: | Apply paint to the roller. Dip the roller in the paint tray, and roll it back and forth until it is fully coated in paint. |
| Step 2: | Begin painting the wall. Start at the top corner of the wall and use the roller to apply the paint in a W pattern. Fill in the pattern with horizontal strokes. |
| Step 3: | Keep a wet edge. When using a roller, it’s important to keep a wet edge. This means you should work quickly and not let the paint dry as you go. If you need to take a break, make sure you stop at a natural break point, such as a corner or the end of a wall. |
| Step 4: | Reload the roller as necessary. You may need to reload the roller with paint more than once per wall, especially if you are painting a large area. |
| Step 5: | Apply a second coat. Once the first coat has dried, you’ll need to apply a second coat of paint. Follow the same steps as before, but make sure you allow enough time for the first coat to dry completely before applying the second coat. |
Using a roller can be a bit tricky, but with a little practice, you’ll soon be painting like a pro. Just remember to keep a wet edge and reload your roller as necessary.
Step 2: Paint the Walls
Now that the ceiling is finished, it’s time to move on to the walls. This is where you get to see the real transformation take place. It can be a daunting task, but with the right tools and techniques, you can paint your walls like a professional. In this step, we’ll guide you through the process of painting your walls in a way that ensures a smooth and even finish. Whether you’re working with newly installed drywall or an old painted surface, these tips will help you achieve a stunning result. So roll up your sleeves and let’s get started!
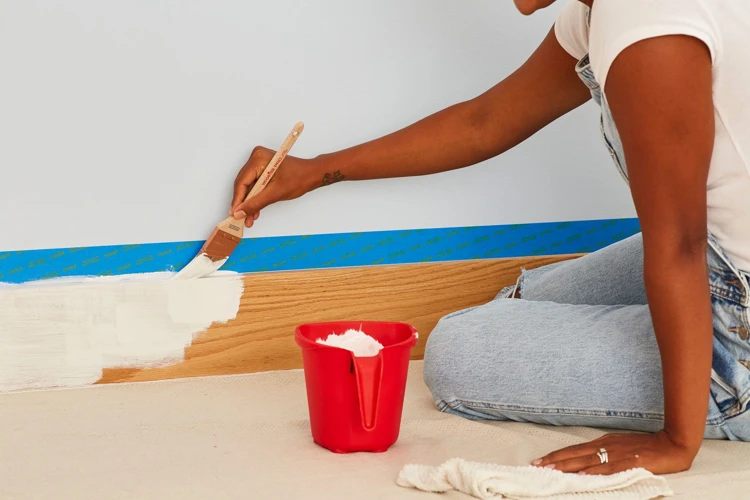
Cut in Around the Edges
Cutting in is the process of painting the edges and corners of the room with a brush before moving on to the larger areas with a roller. This helps create a clean straight line when you start painting with the roller. Here are the steps:
Step 1: Dip the brush about a third of the way into the paint, then tap it against the side of the can to remove any excess.
Step 2: Start with the ceiling, by painting a 2-inch-wide strip around the perimeter of the ceiling where it meets the wall. Hold the brush at a 45-degree angle and gently draw the brush along the edge of the ceiling.
Step 3: Once you’ve completed the ceiling, move on to the walls. Paint a 2-inch-wide strip around the edges where the wall meets the ceiling, floor, and corners.
Step 4: Dip your brush in the paint again, tap off the excess, and continue to paint around the edges until you have a strip that’s about 3 inches wide. This helps blend the brushed area with the rolled areas.
Step 5: Apply paint to the rest of the wall using a roller. Make sure to blend the edges with the rolled area for a smooth finish.
By following these steps, you can achieve a professional-looking finish, with sharp edges and smooth surfaces. Don’t rush the process of cutting in, take your time to ensure that your work is neat and tidy.
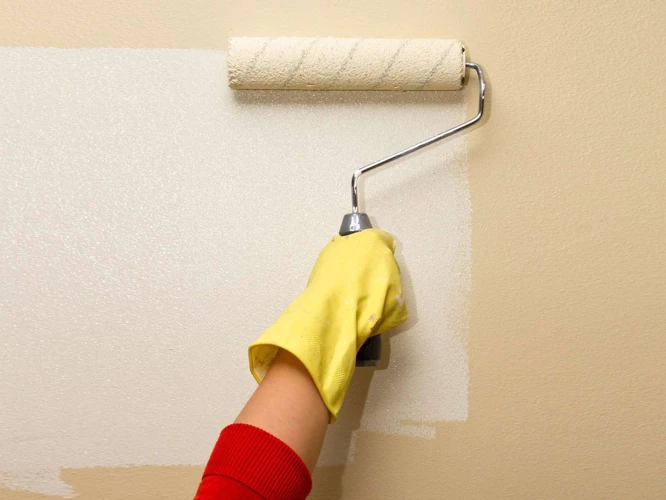
Use a Roller for the Rest
After using a paintbrush to cut-in around the edges of the ceiling, it’s time to use a roller to paint the rest of it. The same process applies when painting walls. Here’s how to use a roller like a pro:
- Load the roller: Dip the roller into the paint tray and roll it back and forth to evenly distribute the paint. Avoid overloading the roller to prevent drips and splatters.
- Start rolling: Begin rolling the paint onto the ceiling or wall in a “W” pattern, applying medium pressure. Then, spread the paint in a “V” pattern to fill in any gaps. This technique ensures that there are no lines or streaks left behind.
- Blend the paint: Once you’ve spread the paint onto the surface, go over it again in a light, vertical stroke to blend the paint and eliminate roller marks.
- Overlap each pass: To ensure that there are no gaps or missed spots, overlap each pass of the roller by a few inches.
- Work in sections: Divide the ceiling or wall into manageable sections, such as a 3 by 3 feet area, and focus on painting one section at a time. This technique prevents the paint from drying before you have a chance to blend it.
- Let it dry: Once you’ve finished painting the ceiling or wall, let it dry completely before adding a second coat. Check the paint can for recommended drying times.
By using these roller techniques, you’ll be able to achieve a smooth and even finish without any noticeable brush or roller marks. Remember to load the roller properly, blend the paint, and work in sections for the best results.
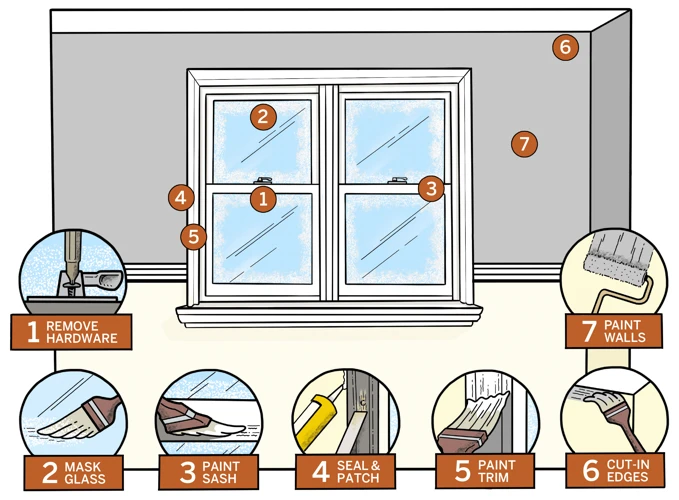
Step 3: Paint the Trim
Now that the walls and ceiling are complete, it’s time to focus on the smaller details that can really make a room pop – the trim. This includes baseboards, crown molding, window and door frames, and any other decorative elements that add character to a space. Painting the trim requires precision and attention to detail, but with the right tools and techniques, you can achieve a flawless finish that elevates the entire room. Let’s dive into the next step of our guide on how to paint a room like a pro.
Prepare the Surface
Before you start painting the trim in your room, it’s important to prepare the surface properly to ensure a smooth and professional finish. Below are the steps you should follow to prepare the surface:
| Step 1: | Start by cleaning the trim with a damp cloth to remove any dust or dirt that may be on the surface. This will help the paint adhere better to the surface. |
| Step 2: | Next, sand the trim lightly with sandpaper to create a surface that the paint can bond to. Be sure to use a fine-grit sandpaper, as a rough grit can leave marks on the trim. |
| Step 3: | Fill in any holes, cracks or gaps with wood filler. Allow the filler to dry completely and then sand it smooth with sandpaper. Use a putty knife to scrape off any excess filler to ensure an even surface. |
| Step 4: | Use painter’s tape to mask off any areas adjacent to the trim that you don’t want painted. This will ensure sharp, clean lines. |
| Step 5: | Finally, wipe down the trim with a tack cloth or a lint-free cloth to remove any remaining dust particles. |
By following these steps and properly preparing the surface, you’ll be ensuring that your trim looks neat and professional once you’ve finished painting it.
Apply Paint Evenly
When it comes to painting the trim, it is important to apply the paint evenly to ensure a smooth and professional finish. In order to achieve this, there are a few tips and tricks to keep in mind:
One of the most important steps is to properly prepare the surface before applying the paint. This includes sanding down any rough spots and filling in any gaps or holes with wood filler. Once the surface is smooth and even, use a damp cloth to remove any dust or debris.
Next, it’s important to choose the right type of brush for the job. A high-quality angled brush is recommended for painting the trim, as it allows for more precise application and can reach tight spaces easily.
When it comes to actually applying the paint, dip the brush into the paint and tap off any excess before starting. Apply the paint in thin, even strokes, working in the direction of the grain of the wood. Avoid overloading the brush with paint, as this can lead to drips and a less-than-smooth finish.
It’s also a good idea to work in small sections, rather than trying to paint the entire trim at once. This allows you to focus on one area at a time, ensuring that each section receives thorough coverage and a smooth finish.
Finally, take your time and be patient. Rushing through the job can lead to mistakes and an uneven finish. It’s better to take your time and go over the trim a few times to ensure that it looks perfect.
| Tips for Applying Paint Evenly to Trim |
|---|
| Properly prepare the surface by sanding and filling in gaps. |
| Use a high-quality angled brush for precise application. |
| Dip the brush in paint and tap off excess before applying in thin strokes. |
| Work in the direction of the grain of the wood and in small sections. |
| Take your time and avoid rushing to ensure a smooth finish. |
Step 4: Finishing Touches
As your painting project nears its end, it’s time to add those final, finishing touches that will really make the room shine. Don’t rush through this last step – take the time to carefully inspect your work and make any necessary touch-ups. Once you’re satisfied that everything looks perfect, it’s time to clean up the room and sit back to admire your completed project.
Clean Up the Room
After completing the painting process, it is important to clean up the room properly. Follow these steps to ensure a spotless finish:
- Remove all painter’s tape: Slowly peel off the painter’s tape from the trim and edges of the room. Be careful not to damage the paint as you go.
- Put away tools and materials: Gather all the tools and materials used for the painting job and put them away in their proper places.
- Wash out paint brushes and rollers: Use warm water and soap to thoroughly wash out all paint brushes and rollers. Do this as soon as possible to avoid the paint drying on the bristles.
- Clean the paint tray: Scrape any excess paint from the paint tray and wash it out with warm, soapy water. Dry it with a clean rag before storing it away.
- Sweep and vacuum: Sweep the floor to remove any dust, paint chips, or debris. Use a vacuum to get any remaining debris in hard-to-reach areas.
- Wipe down surfaces: Use a damp cloth to wipe down any surfaces that may have gotten paint on them, such as windowsills, switch plates, or door handles.
By following these steps, you can ensure that your room is clean and ready to use once the paint has dried completely. With a little bit of extra effort, you can make your painting project a success from start to finish!
Inspect for Touch-Ups
After you have finished painting the room, it is important to take a step back and carefully examine your work to ensure that it meets the desired quality. Check for any spots that may have been missed or areas where the paint may have dripped or clumped together.
One way to carry out a thorough inspection is by creating a checklist. This can also serve as a reference for any touch-ups or additional painting that might need to be done. Here are some points to consider while inspecting the room:
- Check for evenness: Look closely at the walls and ceiling to ensure that the paint has been applied evenly. A good technique is to move a light source (like a lamp or flashlight) across the painted surface. This will highlight any bumps or rough areas that may have been missed during the painting process.
- Examine the edging: Check the edges where the walls meet the ceiling, trim, and corners. Make sure that the lines are straight and crisp, without any bleeding or smudges.
- Inspect for drips: Drips and runs are common during the painting process. Check for any drips or sags in the paint, especially around the corners, edges, and trim. Use a small brush or roller to touch up these areas.
- Look for missed spots: Sometimes it is easy to miss small spots, especially when painting a large area. Look for missed spots in places like corners or around outlets and light switches.
- Check for paint lines: Look for any areas where the paint may have created visible lines or strokes. This may happen when the paint brush or roller is not applied evenly to the surface. Use a light touch to blend these areas in with the surrounding paint.
Once you have identified any areas that need touch-ups, use a small brush or roller to carefully apply an additional coat of paint. Be patient and take your time to ensure that the touch-ups match the surrounding paint.
By inspecting for touch-ups, you can ensure that the finished project looks professional and polished. It may take some time and effort, but the final result will be worth it.
Conclusion
As you put the finishing touches on your freshly painted room, take a moment to breathe deeply and revel in your accomplishment. You’ve completed a major home project and transformed your space! Now it’s time to take a step back and appreciate your hard work. Share your results with friends and family, and enjoy your newly painted oasis. You deserve it.
Step Back and Admire Your Work
After putting in the time and effort to paint a room like a pro, it’s important to take a step back and admire your work. Seeing the transformation of a dull and boring room into a bright and vibrant space is incredibly rewarding. Here are some things to keep in mind when admiring your freshly painted room:
| Take in the room as a whole | – Stand in the center of the room and take a few steps back to get a good view of the entire space. Notice how the color of the walls, ceiling, and trim work together to create a cohesive look. |
| Check for any imperfections | – Inspect the walls, ceiling, and trim for any missed spots or areas that need touch-ups. Use a small brush or roller to fix any imperfections before moving on to the final step. |
| Appreciate the details | – Take a closer look at the trim and notice how the fresh coat of paint has brought out the intricate details. Admire the smooth and even lines of the painted edges and corners. |
By taking the time to appreciate your hard work, you can feel a sense of pride in the accomplishment of completing a professional-looking paint job in your own home. Now is also a great time to share your results with friends and family, and bask in the compliments of a job well done.
Share Your Results
Once you’ve finished your room painting project, it’s time to share your results and show off your hard work. Sharing your painting success with friends and family can be a satisfying experience and can even inspire others to tackle their own DIY projects. Here are some ways to share your results:
| Social Media: | Share pictures of your freshly painted room on social media platforms like Facebook, Instagram, or Twitter. Use relevant hashtags like #paintingproject, #DIYpainting, or #roommakeover to help your posts reach a wider audience. |
| Home Decor Communities: | Join online communities like HomeTalk, Houzz or Reddit where you can find like-minded enthusiasts to share your home decor project results with. You might even get feedback and appreciation from fellow members. |
| Personal Blog: | If you maintain your own blog, sharing your painting experience can make for an interesting and informative post. Add pictures, tips, and tricks, and you might even inspire others to take up their own DIY projects. |
| In-Person: | Invite friends and family over to see your newly painted room in-person. They may be impressed by your hard work and you might even inspire them to take on their own home decor project. |
No matter how you choose to share your results, be proud of your painting project and remember to celebrate your hard work.
Frequently Asked Questions
What type of paint is best for a room?
Eggshell and satin finishes are the best options for a room as they’re easy to clean and have a subtle sheen.
How do I choose the right paint color?
Consider the lighting and furnishings in the room, and test out sample swatches on the wall before committing to a color.
What tools do I need to paint a room?
You’ll need a paint roller, brushes, painter’s tape, drop cloths, a paint tray, and a ladder.
Do I need to prime the walls before painting?
Priming the walls is recommended, especially if you’re painting over a darker color or have new drywall.
How do I prepare the room before painting?
Remove all furniture and cover any remaining items with drop cloths. Clean the walls and patch any holes or imperfections.
How do I cut in around the edges?
Use a paint brush to carefully paint a straight line along the edges where the wall meets the ceiling, corners, and trim.
What’s the best way to clean up after painting?
Clean brushes and rollers with warm soapy water and dispose of any leftover paint properly. Remove tape and drop cloths once the walls are dry.
How long does it take to paint a room?
This depends on the size of the room and number of coats needed, but typically it takes a day or two to complete.
Can I use a roller for trim?
While a roller is not recommended for the finer details of trim work, it can be used for larger areas such as baseboards or window frames.
What should I do if I need to do touch-ups?
Wait for the paint to fully dry and then use a small brush to carefully touch up any missed spots or areas that need improvement.