You have a wooden project in mind, and you’re ready to take it on. But before you dive in, you need to know the best way to attach the wood pieces together. Enter the trusty glue gun. This versatile tool is a staple in any DIYer’s toolkit, offering a quick and easy way to bond wood pieces together. But with so many types of glue guns and adhesives available, how do you know which ones to use? And how do you use them properly to get the best results? In this comprehensive guide, we’ll walk you through everything you need to know about using a glue gun on wood – from choosing the right glue and preparing the surface to applying glue and using alternative methods. So grab your glue gun and let’s get started!
Types of Glue Guns
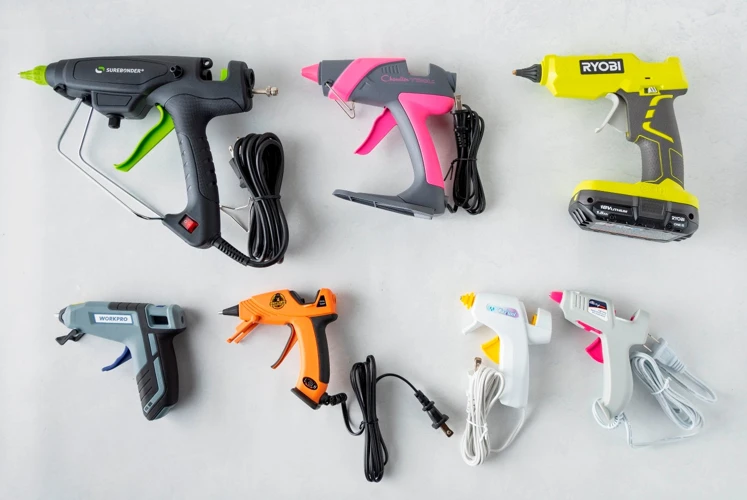
When it comes to using a glue gun on wood, choosing the right type of glue gun can make all the difference in the success of your project. There are several different types of glue guns to choose from, each with their own unique features and benefits. From low-temp to high-temp options, corded to cordless models, understanding the different types of glue guns available can help you make an informed decision. Let’s dive into the details.
Low-Temperature Glue Guns
For those who are just starting with woodworking, a low-temperature glue gun can be an excellent choice. These types of glue guns operate at a lower temperature than other models, making them a safer option for beginners. Rather than reaching temperatures of 380°F or higher, low-temperature glue guns generally have a maximum operating temperature of around 250°F.
Some benefits of using a low-temperature glue gun include:
- Reduced risk of burns: With lower temperatures, the glue that emerges from the gun isn’t as hot and dangerous, reducing the risk of burns to the skin and clothing.
- Suitable for delicate materials: The lower temperature doesn’t damage delicate materials that are prone to melting or warping when exposed to high heat.
- Reduced mess and waste: The glue that’s produced is less likely to drip or run, making it more precise and reducing the amount of waste.
However, using a low-temperature glue gun does have some limitations. The glue tends to be less strong and durable than the glue produced by a high-temperature gun. It’s also not suitable for woodworking projects that require a strong bond that can withstand high levels of stress or weight.
PVA glue is frequently used with low-temperature glue guns due to its compatibility with the lower temperature. PVA glue is water-based and easy to work with, making it ideal for beginners. It’s also effective for bonding porous surfaces, such as wood.
If you’re working on a project that requires a stronger bond, such as furniture or structural elements, a low-temperature glue gun may not be sufficient. In this case, a high-temperature glue gun or a different type of adhesive may be needed.
Internal link: How to Glue Photos to Wood
High-Temperature Glue Guns
High-Temperature Glue Guns: These glue guns heat the adhesive to a higher temperature compared to low-temperature ones. They do not take long to heat up and the glue dries quickly. High-temperature glue guns are ideal for bonding materials that require a strong adhesive such as wood, metal, and plastic. The adhesive from high-temperature glue guns is also resistant to temperature changes and can hold up in high-heat environments.
When using a high-temperature glue gun, it is important to be cautious as the glue can get extremely hot and can cause burns if it comes into contact with the skin. This type of glue gun is not recommended for delicate materials such as silk or lace as the high temperature can damage them. To avoid accidents, make sure to handle the glue gun with care, and keep it away from children and pets.
While high-temperature glue guns offer excellent bond strength, they may not be suitable for all projects. Before choosing a high-temperature glue gun, consider the materials being used and the purpose of the final product. It is also important to note that high-temperature glue guns require higher wattage and may consume more electricity. This can cause the glue gun to become hot faster compared to low-temperature ones and can be less energy-efficient.
Some tips on using high-temperature glue guns:
- Always wear protective gloves and use in a well-ventilated area
- Use a temperature-appropriate glue stick for your specific project
- Avoid touching the nozzle of the glue gun as it can get extremely hot
- Use a heat-resistant surface when laying down the glue gun between uses
- Consider using a thermostatically controlled glue gun which will maintain the temperature at a constant level
If you want to know how long hot glue lasts, click here. Otherwise, continue reading to learn about preparing wood surfaces for gluing.
Dual-Temperature Glue Guns
Dual-temperature glue guns are an excellent tool for those who want to work with both low and high-temperature adhesives. These guns come with a switch that lets you choose between the settings. This versatility makes them a popular choice among DIY enthusiasts and professionals alike. The low setting is perfect for delicate materials like foam, plastics, and fabrics, while the high setting is suitable for more robust materials like metals and thick pieces of wood.
Here’s a comparison table for dual-temperature glue guns:
<
| Low-Temperature Setting | High-Temperature Setting | |
|---|---|---|
| Temperature Range | Between 170 to 250°F (76 to 121°C) | Between 380 to 420°F (193 to 215°C) |
| Glue Sticks | Use low-temperature glue sticks (sometimes called cool melt) | Use high-temperature glue sticks (sometimes called hot melt) |
| Usage | Great for attaching foam, fabrics, and other delicate materials. | Ideal for woodworking and other heavy-duty applications. |
It’s important to note that not all dual-temperature glue guns are created equal. Some models may have a narrower or wider temperature range than others. Similarly, the quality of the glue gun will also impact its efficiency and longevity.
If you’re looking for a dual-temperature glue gun, consider investing in a high-quality model. Look for features like durable construction, a comfortable grip, and a quick heating time. With the right tool, you can tackle a wide variety of projects with ease and confidence.
Corded vs. Cordless Glue Guns
When it comes to glue guns, one of the biggest considerations you’ll need to make is whether to go corded or cordless. Corded glue guns need to be plugged into an electrical outlet to work. They are typically more powerful and consistent in terms of heat than cordless glue guns. They are also less expensive than their cordless counterparts.
Cordless glue guns are battery-operated and allow for greater mobility and convenience. They are perfect for DIY projects, crafts, and other small home repairs. Cordless glue guns tend to be less powerful than their corded counterparts, but still get the job done. However, they must be charged regularly to be functional.
When deciding which glue gun to choose, it ultimately comes down to your needs and preferences. For those who value consistency in their work and do not mind being tethered to an outlet, corded glue guns will be the best option. For people who are always on the go and want something more portable, cordless glue guns are the way to go.
It’s worth noting that there are now also dual-power glue guns that can operate on both corded and cordless modes, combining the best of both worlds. They come with rechargeable batteries and give you the flexibility to choose between corded and cordless modes depending on your needs.
Whether you choose a corded or cordless glue gun, always make sure to read the manufacturer’s instructions and take necessary precautions to prevent accidents. For more information on using a glue gun without making a mess, check out our article on how to use a glue gun without making a mess.
Choosing the Right Glue
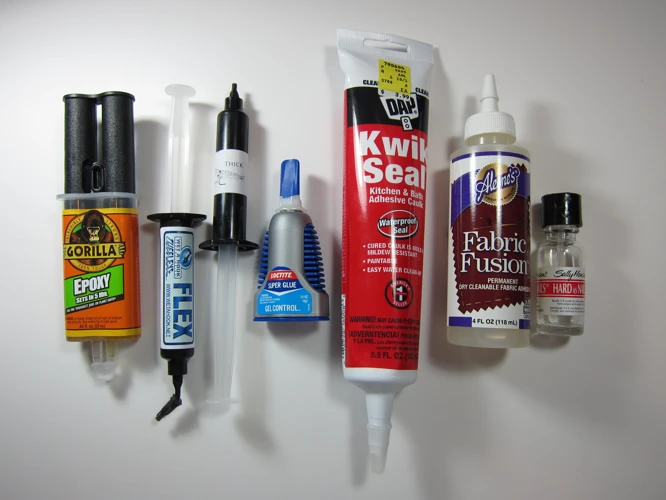
When it comes to woodworking with a glue gun, choosing the right glue is crucial for the durability and strength of your project. There are various types of glues that work well with wood, and each has its own set of advantages and disadvantages. Understanding the differences between them will help you make an informed decision and ensure your project stands the test of time. Let’s take a closer look at some of the most popular types of glue to use with wood.
PVA Glue
PVA Glue, also known as white glue or school glue, is a popular choice for woodworking projects. This water-based glue dries clear, making it ideal for staining or painting over. It is also easy to clean up with water while wet. PVA glue has a strong initial tack and bonds well with porous surfaces like wood.
However, it is important to note that PVA glue is not suitable for projects that will be exposed to water or moisture as it can degrade over time. It is also not recommended for use on non-porous surfaces.
Here are some examples of projects in which PVA glue can be used:
| Project | Description |
|---|---|
| Wooden Toys | PVA glue is strong enough to hold together small wooden pieces, making it great for toy-making. |
| Wooden Picture Frames | As PVA glue dries clear, it won’t affect the appearance of the finished product. PVA glue provides a strong bond that will keep the frame together. |
| Wooden Furniture | PVA glue can be used to bond wooden pieces together, but should be used in combination with other types of mechanical jointery for added strength. |
If you are looking for an even stronger bond, try using a tuck or hot glue in combination with PVA glue.
Epoxy Glue
Epoxy glue is a two-part adhesive that is known for its strong and durable bond. It is a popular choice for woodworking projects because it can fill gaps and create a waterproof seal. The two parts – the resin and the hardener – must be mixed together in equal parts and applied quickly as the glue dries very fast.
Here is a table summarizing the pros and cons of using epoxy glue on wood:
| Pros | Cons |
|---|---|
| Durable: Epoxy creates a very strong bond that can withstand heavy weights and stress. | Difficult to remove: Once it dries, epoxy glue is very difficult to remove. |
| Waterproof: Epoxy glue creates a waterproof seal, making it a great choice for outdoor projects. | Strong smell: Epoxy glue has a strong odor that can be unpleasant to work with. Proper ventilation is essential when using it. |
| Long cure time: Epoxy glue takes a long time to fully cure, which can be inconvenient when working on time-sensitive projects. | Expensive: Epoxy glue is more expensive than many other types of glue. |
When using epoxy glue on wood, it is important to follow the manufacturer’s instructions carefully and ensure that the two parts are mixed together in the correct proportions. It’s also important to note that because epoxy glue has a long cure time, clamping is often necessary to ensure a strong bond.
Pro Tip: If you need to remove epoxy glue from wood, a heat gun can be used to soften the glue, making it easier to scrape away. However, be sure to wear gloves and eye protection, and use the heat gun carefully to avoid damaging the wood.
If you’re interested in learning more about using a glue gun, check out our article on How to Use a Glue Gun. Or, if you’re feeling crafty, learn how to make hair bows using a glue gun in our article on How to Make Hair Bows with a Glue Gun. And if you’re a chocolate lover, you might enjoy our guide on How to Glue Chocolate Together!
Cyanoacrylate Glue
Cyanoacrylate glue, also known as super glue, is a fast-drying adhesive that can be used to bond wood together. It’s a popular choice for small woodworking projects due to its rapid setting time.
Advantages: The main advantage of cyanoacrylate glue is its quick drying time, making it ideal for projects with tight deadlines. Additionally, it forms a strong bond, is water-resistant, and can be easily sanded or painted over once dry.
Disadvantages: However, cyanoacrylate glue does have some disadvantages. It can be brittle and may not be suitable for projects that require flexibility. Additionally, it doesn’t work well on surfaces that are rough or porous.
Application: To use cyanoacrylate glue on wood, first make sure the surface is clean and dry. Apply a small amount of glue to one of the wood surfaces and then press the pieces together firmly. Hold the pieces in place for a few seconds to allow the glue to set.
Caution: It’s important to use caution when working with cyanoacrylate glue, as it can bond skin to surfaces almost instantly. Wear gloves and work in a ventilated area to avoid inhaling fumes. If any glue gets on your skin, use acetone or nail polish remover to dissolve it.
Comparison: When compared to other types of glue, cyanoacrylate glue sets faster than most and forms a very strong bond. However, it’s not as versatile as PVA or epoxy glue, which work well on a wider variety of surfaces and are more suitable for larger woodworking projects.
Cyanoacrylate glue is a fast-drying adhesive that can be used to bond wood together quickly and effectively. While it does have some limitations, its advantages make it a popular choice for small woodworking projects. Always use caution and follow safety guidelines when working with any type of glue.
| Advantages | Disadvantages |
|---|---|
| Quick drying time | Can be brittle |
| Water-resistant | Not suitable for rough or porous surfaces |
| Strong bond |
Polyurethane Glue
Polyurethane glue is a type of adhesive that is perfect for bonding wood. It works by chemically reacting with moisture in the wood, which makes it more effective than PVA glue. Additionally, polyurethane glue can be sanded and painted over once it has cured. However, it does have a longer cure time than other types of glue, so it may not be the best option for projects that require quick completion.
Advantages of Polyurethane Glue
| Advantages | Details |
| — | — |
| Strong bond | Polyurethane glue creates a very strong bond, even stronger than some wood itself. |
| Water-resistant | Polyurethane glue is water-resistant, making it a great choice for outdoor projects. |
| Can fill gaps | Due to its expanding properties, polyurethane glue can fill gaps and create a tight bond. |
| Sandable and paintable | Once cured, polyurethane glue can be sanded and painted over for a seamless finish. |
Disadvantages of Polyurethane Glue
| Disadvantages | Details |
| — | — |
| Longer drying time | Polyurethane glue takes longer to dry than other types of glue, which can be a disadvantage for projects that require quick completion. |
| Foaming during curing | As polyurethane glue cures, it can foam and expand which may not be ideal for some types of projects. |
| Messy application | Polyurethane glue can be messy to apply, and it may require some cleanup after use. |
Tips for Using Polyurethane Glue
– Apply a small amount of glue to one surface and spread it evenly before pressing the two surfaces together.
– Use clamps or weights to keep the surfaces together while the glue dries.
– Wipe away any excess glue before it dries, as it may be difficult to remove after it has cured.
– Allow enough time for the glue to cure completely before sanding or painting over it. This can take up to 24 hours depending on the humidity and temperature in your workspace.
Polyurethane glue is a strong and reliable adhesive option for bonding wood. While it does have a longer drying time, its water-resistant properties and ability to fill gaps make it a versatile choice for a variety of projects. By following the tips for using it, you can ensure a successful and seamless bond.
Preparing the Surface
Before applying the glue to the wood, it’s crucial to prepare the surface properly. This step helps to ensure a secure and long-lasting bond. Cleaning the Wood is the first part of this process, and it involves removing any dirt, dust, or debris from the surface. This allows the glue to adhere correctly to the wood. Sanding the Wood is also essential, as it helps to create a rough surface that the glue can stick to more easily. In this section, we’ll cover both of these crucial steps in detail to ensure your woodwork projects are successful and sturdy.
Cleaning the Wood
Before using a glue gun on wood, it is important to clean the surface properly to ensure good adherence. A dirty or oily surface will prevent the glue from sticking properly. Here are some steps to clean the wood:
- Remove any loose debris: Use a soft brush or a vacuum cleaner to sweep away any sawdust, dirt, or debris from the surface of the wood.
- Wipe the wood with a damp cloth: Moisten a soft cloth with water and wring out any excess water. Gently wipe the surface of the wood with the damp cloth. This will remove any dust or dirt that was not removed by the brush or vacuum cleaner. Be careful not to saturate the wood with too much water as this can cause the wood to warp or swell.
- Use a wood cleaner: If the wood is particularly dirty or greasy, you can use a wood cleaner to remove the grime. There are many commercially available wood cleaners that are specifically designed to remove dirt and grease from wood surfaces. Follow the instructions on the label of the cleaner carefully as some cleaners may require dilution with water.
- Dry the wood: After cleaning the wood, it is important to let it dry completely before applying the glue. Moisture can weaken the strength of the glue and can also cause the wood to warp or buckle. Allow the wood to air dry or use a dry cloth to remove any excess moisture.
By following these steps, you can ensure that the wood surface is properly cleaned and ready for gluing. This will help ensure that the glue adheres to the wood properly and that your finished project is strong and durable.
Sanding the Wood
Before you start gluing, it’s important to prepare the surface of the wood properly. Sanding the wood is an essential step in this process as it helps the glue stick better and creates a smoother surface for bonding. Here are some tips on how to sand the wood effectively:
| Step 1: | Choose the right sandpaper grit. The grit you choose will depend on the condition of the wood you’re working on. For rough surfaces, start with a coarse grit sandpaper, such as 60 or 80. For smoother surfaces, use a finer grit sandpaper, such as 120 or 150. |
| Step 2: | Attach the sandpaper to a sanding block or an orbital sander. Using a sanding block will help to maintain a consistent pressure and angle while sanding, while an orbital sander can save you time on larger surfaces. |
| Step 3: | Sand in the direction of the wood grain. Sanding against the grain can create scratches in the wood which will show up after you apply the glue. |
| Step 4: | Start with the coarsest grit and work your way up to the finer grit. This will gradually smooth out the wood and remove any imperfections. Be sure to wipe away any sawdust between grit changes to avoid scratches. |
| Step 5: | Finish with a light sanding using a fine grit sandpaper to create a smooth surface. This will help the glue adhere properly to the wood. |
Remember to wear protective equipment, such as a dust mask and safety goggles, when sanding to avoid inhalation of dust and debris. With properly sanded wood, your glue will bond stronger and achieve a more professional finish.
Applying Glue to the Wood
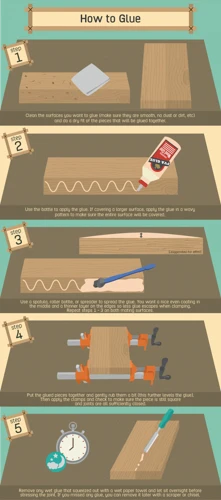
When it comes to applying glue to wood, it’s important to take your time and follow proper techniques to ensure a strong and lasting bond. One of the most popular tools for this task is a glue gun, which provides a precise and controlled application of adhesive. In this section, we’ll take a closer look at the steps involved in applying glue to wood with a glue gun, from loading the gun to applying the glue and ensuring a secure bond. So grab your glue gun and let’s get started!
Loading the Glue Gun
Before you can start using a glue gun on wood, you need to properly load it with the right glue stick. Here are the steps to follow when loading a glue gun:
- Choose the right glue stick: Depending on the type of glue gun you have, you’ll need to use either low-temperature or high-temperature glue sticks. Make sure you have the right kind of glue stick before you start loading your glue gun.
- Insert the glue stick: Heat up your glue gun by plugging it in or turning it on. Once it’s heated enough, you can then insert the glue stick into the designated hole on the gun. Push it all the way in until it stops.
- Wait for the glue to melt: Once the glue stick is inserted, it will start melting. Wait for a few minutes until there’s enough melted glue in the gun for you to start using it.
- Check the consistency: Before you start using the glue gun, make sure the consistency of the melted glue is just right. It should be smooth and easy to apply. If it’s too thick, wait a little longer for the glue to melt completely. If it’s too thin, the glue gun might not be hot enough.
Remember to always handle the glue gun with care, as the melted glue can be extremely hot and cause serious burns. Always wear protective gloves when handling the glue gun and melted glue, and be sure to unplug the gun once you’re done using it.
Applying the Glue to the Wood
When applying hot glue to wood, it’s important to work quickly to prevent the glue from drying before you’ve had a chance to properly place and bond the surfaces. Here are some tips for applying glue to wood:
- Start with a small amount: Apply a small amount of glue to one surface at a time to prevent the glue from drying out before you’ve had a chance to apply pressure and bond the surfaces together. You can always add more glue if necessary.
- Apply the glue evenly: Use a steady hand to apply the glue evenly across the entire surface. This will help ensure that the bond is strong and uniform.
- Press the surfaces together: Once you’ve applied the glue, immediately press the surfaces together and hold them firmly in place until the glue has cooled and hardened. You may want to use clamps or a heavy object to help hold the surfaces together while the glue sets.
- Be careful not to burn yourself: Hot glue can cause severe burns if it comes into contact with your skin. Use caution when applying the glue and wear protective gloves to prevent burns.
- Clean up any excess glue: Once the glue has cooled and hardened, check for any excess glue that may have oozed out from the edges. Use a crafting knife or sandpaper to carefully remove any excess glue without damaging the wood.
By following these tips, you’ll be able to successfully apply hot glue to wood and create a strong bond that will last for years to come. Remember to work carefully and use caution when using a hot glue gun, and always follow the manufacturer’s instructions for best results.
Alternative Methods for Using a Glue Gun on Wood
When it comes to using a glue gun on wood, there are various alternative methods to consider. These approaches allow you to enhance the versatility of a glue gun and expand its functionality beyond just bonding wood together. So, if you’ve been wondering how else you can use your trusty glue gun on wood, keep reading. In this segment, we’ll explore some alternative ideas and techniques that can help you make the most out of your glue gun and elevate your woodworking skills to the next level. From using glue sticks with other adhesives to incorporating a glue gun into your woodworking toolbox, you’re sure to find some helpful tips and tricks here.
Using Glue Sticks with Other Adhesives
When it comes to using glue sticks with other adhesives on wood, it is important to remember that not all adhesives are compatible with each other. However, there are some combinations that can work well together and provide strong bonds for your woodworking projects.
1. Hot Glue and Epoxy
One combination that works well is using hot glue to hold pieces of wood in place while the epoxy sets. Hot glue dries quickly, allowing you to move onto the next step in your project sooner, while the epoxy provides a long-lasting bond. Simply apply a small amount of hot glue where you want the wood to be, hold the wood piece in place, and then apply the epoxy to the joint once the hot glue has cooled.
2. PVA Glue and Hot Glue
Another combination that can be effective is using PVA glue to prepare your wood joint and then reinforcing it with hot glue. PVA glue will provide a strong initial bond, while the hot glue can help secure the joint further. Apply the PVA glue to the joint and clamp the wood pieces together until the glue dries. Then, add a small amount of hot glue to the joint and let it cool before removing the clamps.
3. Polyurethane Glue and Hot Glue
Polyurethane glue can also be used with hot glue to create a strong bond. Polyurethane glue expands as it cures, filling any gaps in the joint and creating a strong hold. Apply the polyurethane glue to the joint and clamp the wood pieces together until it dries. Then, add a small amount of hot glue to the joint and let it cool before removing the clamps.
4. Cyanoacrylate Glue and Hot Glue
Finally, cyanoacrylate glue, also known as super glue, can be used in combination with hot glue for a secure bond. Apply a small amount of cyanoacrylate glue to the joint and hold the wood pieces together until it sets. Then, add a small amount of hot glue to the joint and let it cool before removing the clamps.
It is important to note that while these combinations can work well, it is important to test them on scrap pieces of wood before using them on your actual project. This will ensure that the combination of adhesives will provide the strength and durability you need for your woodworking project.
Using a Glue Gun as a Woodworking Tool
Using a glue gun as a woodworking tool is a great way to make quick repairs and customizations to your furniture and decorative pieces. The hot glue from a glue gun can be used to attach small pieces of wood together, secure loose joints, and create intricate designs. Here are some useful tips for using a glue gun as a woodworking tool:
| Tip | Description |
|---|---|
| 1. Use high-temperature glue sticks | When using a glue gun as a woodworking tool, it’s important to use high-temperature glue sticks to ensure a strong hold. Low-temperature glue sticks may not be strong enough to hold pieces of wood together permanently. |
| 2. Hold the pieces firmly together | Apply the hot glue to one piece of wood, and then press the other piece firmly against it. Hold the pieces together for several minutes until the glue cools and solidifies. |
| 3. Use the glue sparingly | When using a glue gun as a woodworking tool, it’s important to use the glue sparingly. Too much glue can cause the joint to become weak and brittle over time, and can also create unsightly overflow. |
| 4. Avoid using hot glue on large, load-bearing joints | While hot glue can be great for small repairs and decorative touches, it’s not suitable for large, load-bearing joints. For these types of repairs, use a stronger adhesive such as wood glue or epoxy glue. |
| 5. Experiment with different nozzle sizes | Different glue guns come with different nozzle sizes, and experimenting with these can help you achieve different effects. For example, a smaller nozzle may be useful for intricate designs, while a larger nozzle is better for larger pieces of wood. |
| 6. Be careful with delicate pieces | When using a glue gun as a woodworking tool, be careful when attaching delicate pieces of wood. The heat from the glue gun can warp or damage thin pieces of wood, so it’s important to use a low heat setting and apply the glue carefully. |
Using a glue gun as a woodworking tool can be a fun and easy way to add custom decorative elements to your furniture or to make small repairs. However, it’s important to use the glue gun correctly and to use it sparingly to avoid creating weak or unsightly joints. With these tips and some practice, you can become a skilled craftsperson and create beautiful, one-of-a-kind pieces of woodwork.
Tips and Tricks
Looking to take your woodworking projects to the next level? These tips and tricks will help you get the most out of your glue gun and create a stronger bond between your wood pieces. Whether you’re a novice or a seasoned woodworker, these expert insights will help you perfect your technique and make your projects shine. So, let’s dive in and discover some of the best ways to use a glue gun on wood!
Removing Excess Glue
When using a glue gun on wood, it’s common to have excess glue that needs to be removed. To avoid a messy finished product, it’s essential to remove this excess glue properly. Here are some ways to remove excess glue:
- Wait for the Glue to Dry: If you can wait, it’s best to let the glue dry first. Once it’s dry, you can usually just peel it off with your fingers or a sharp tool.
- Sand the Glue: If the glue is in an area that won’t be seen, you can sand it down. Sanding will remove the excess glue and smooth out the surface of the wood. Just be careful not to sand too hard or too long as it can damage the wood.
- Use a Scraper: A scraper is a useful tool for removing excess glue. You can use a plastic scraper or putty knife to remove glue that’s already hardened. Just be sure to use a light hand to avoid scratching the wood.
- Use a Damp Cloth: If the glue is still wet, using a damp cloth can help remove it. Be careful not to use too much water as it can damage the wood.
It’s important to always be gentle when removing excess glue to avoid damaging the wood surface. Applying too much pressure or using the wrong tool can result in scratches or dents. By using the methods listed above, you’ll be able to remove excess glue safely and leave your finished product looking clean and professional.
Using Clamps
When using a glue gun on wood, clamps can be incredibly useful for holding the wood pieces in place while the glue dries. Here are some tips for using clamps effectively:
- Choose the right type of clamp: There are a variety of clamps available for woodworking, but some common types include spring clamps, bar clamps, and pipe clamps. Consider the size and shape of the wood pieces you’ll be gluing together, as well as the pressure needed to hold them in place.
- Apply even pressure: When using clamps, it’s important to apply pressure evenly across the wood pieces. This will help ensure that the glue sets properly and that the pieces stay in place while drying.
- Protect your wood: Clamps can leave marks on wood surfaces, so it’s important to protect your workpiece before using them. You can use strips of scrap wood or soft foam pads between the clamp and the wood to prevent damage.
- Use the right number of clamps: You don’t want to use too few clamps and risk the wood shifting while the glue is drying. On the other hand, using too many clamps can put too much pressure on the wood and cause it to warp or bend. A good rule of thumb is to use one clamp for every 6-8 inches of wood.
- Be patient: Depending on the type of glue you’re using, it may take several hours or even overnight for the glue to fully dry. Don’t remove the clamps too early, as this can cause the wood pieces to shift or come apart.
By following these tips for using clamps, you can ensure a successful glue gun project on wood. Just remember to choose the right type of clamp, apply even pressure, protect your wood, use the right number of clamps, and be patient while the glue dries.
Gluing Small Pieces of Wood
When it comes to gluing small pieces of wood together, it’s important to have the right technique to ensure a strong bond. Here are a few tips to consider:
1. Use a Fine-Tip Nozzle
When using a glue gun on small pieces of wood, using a fine-tip nozzle is essential. This will allow you to easily apply a thin, even layer of glue without spreading it too much. A fine-tip nozzle will also help you avoid making a mess and getting glue all over your hands.
2. Use a Small Amount of Glue
When gluing small pieces of wood, less is often more. Using too much glue can cause the wood to warp or bend, which can weaken the bond. Instead, apply a small amount of glue to one surface and gently press the pieces together.
3. Consider Using Clamps
Clamps can be useful when gluing small pieces of wood, as they can help keep the pieces in place while the glue dries. Just be sure to use clamps that won’t damage the wood and tighten them just enough to hold the pieces in place without causing any damage.
4. Pre-fit the Pieces
Before applying any glue, it’s a good idea to pre-fit the pieces to ensure a proper fit. This can help you avoid any gaps or uneven surfaces, which can weaken the bond between the pieces.
5. Let the Glue Dry completely
Once the pieces have been glued together, it’s important to let the glue dry completely before handling the wood. This can take anywhere from a few minutes to a few hours, depending on the type of glue and the size of the pieces. Resist the urge to handle the wood too soon, as this can cause the bond to weaken.
To summarize, gluing small pieces of wood requires attention to detail and a gentle hand. By using a fine-tip nozzle, a small amount of glue, and pre-fitting the pieces, you can create a strong and durable bond between the pieces. Don’t forget to use clamps if needed and let the glue dry completely for the best results.
Safety Precautions
When working with a glue gun on wood, it is important to take proper safety precautions to prevent any accidents or injuries. The high temperature of the glue and the potential for burns, along with the risk of fire, means that working with a glue gun requires caution and care. In this section, we will discuss some essential safety measures that you should take while using a glue gun on wood. By following these guidelines, you can ensure that your woodworking projects are successful and safe. Remember, safety should always come first!
Protecting Your Skin
When using a glue gun on wood, it’s important to take necessary precautions to protect your skin. Here are some tips to keep in mind:
- Wear Protective Gloves: Before using a glue gun, make sure to wear protective gloves to keep your hands safe from hot glue. Opt for heat-resistant gloves that can handle high temperatures.
- Use a Silicone Mat: Protect your work surface with a silicone mat or another non-stick surface. This will not only prevent any glue from sticking to the surface, but it can also protect your skin from hot glue drips.
- Be Cautious: When applying glue to the wood, be careful not to get too close to your skin. Hot glue can cause severe burns, so be sure to work slowly and deliberately to avoid any accidents.
- Have First Aid Supplies Available: In case of any accidents, keep a first aid kit nearby. If you do accidentally get hot glue on your skin, immediately run it under cool water and seek medical attention if necessary.
Remember that prevention is key when it comes to using a glue gun on wood. By taking the necessary precautions and being careful while working, you can avoid any potential injuries to your skin.
Protecting Your Eyes
When using a glue gun on wood, it is important to protect your eyes from any potential hazards. The high temperature of the glue and the force of the glue coming out of the gun can cause splatters and drips. It is necessary to take precautionary measures to keep your eyes safe.
Wear Protective Glasses: Before using a glue gun, put on a pair of protective glasses. Safety glasses or goggles are the best options to protect your eyes from any glue drips. These glasses should be certified by the American National Standards Institute (ANSI) to make sure that they are safe for use.
Position Yourself Correctly: When using a glue gun on wood, make sure to position yourself at a reasonable distance from the wood surface. This will help prevent glue from splattering or flying into your eyes.
Work in a Well-Lit Area: To avoid any accidents while using a glue gun, make sure that you are working in a well-lit area. This will help you to see your work more clearly and avoid any mistakes that could lead to glue getting in your eyes.
Have Eye Drops on Hand: Accidents can happen even if you take all the necessary precautions. It is always a good idea to keep eye drops on hand in case glue accidentally gets in your eyes. Rinse your eyes with water immediately and use the eye drops to help wash out any remaining glue particles.
Using a glue gun on wood can be a safe and enjoyable experience as long as you take the necessary safety precautions. Protecting your eyes should be a top priority, and by following the above tips, you can reduce the risk of injury and enjoy your woodworking projects.
| Protective Measures | Description |
|---|---|
| Wear Protective Glasses | Put on a pair of safety glasses or goggles that are certified by the American National Standards Institute (ANSI) to protect your eyes from any potentially harmful glue drips. |
| Position Yourself Correctly | Ensure that you are at a safe distance from the wood surface to avoid any glue splatters. |
| Work in a Well-Lit Area | Make sure your work area is well-lit to avoid glue mistakes that can harm your eyes. |
| Have Eye Drops on Hand | Keep eye drops on hand in case glue accidentally gets in your eyes, rinse your eyes with water and then use eye drops to help wash out any remaining glue particles. |
Preventing Fires
When using a glue gun on wood, it’s essential to take certain precautions to prevent fires. As the glue gun heats up, it can reach high temperatures, making the risk of fires a real possibility. It is vital to follow safety precautions to ensure that you don’t start a fire while using a glue gun on wood. Below are some essential tips to prevent fires while using a glue gun on wood.
| Tip 1: | Make sure to use a heat-resistant work surface such as metal or ceramic to prevent fires. Avoid using plastic or other flammable surfaces. |
| Tip 2: | Keep the glue gun away from flammable objects, such as fabric, paper, or chemicals that could easily ignite when exposed to heat. |
| Tip 3: | When not in use, always unplug the glue gun from the electrical outlet and allow it to cool down before storing it. Avoid leaving the gun plugged in and unattended. |
| Tip 4: | Use a glue gun with an automatic shut-off feature when it reaches a specific temperature to prevent overheating. This feature will ensure that the gun turns off if left unattended for an extended period. |
| Tip 5: | In case of any fire outbreak, have a fire extinguisher handy, or keep a container of water nearby to put it out in case of small fires. |
By following these tips, you can prevent fire outbreaks and ensure that you use the glue gun safely on wood. Remember not to take any chances and always prioritize safety when using a glue gun on wood.
Conclusion
In conclusion, using a glue gun on wood can be a simple and effective method for joining pieces of wood together. However, it is important to choose the appropriate type of glue gun and glue for the job, prepare the surface of the wood properly, apply the glue correctly, and take safety precautions.
Overall, the type of glue gun chosen will depend on the project’s requirements and the user’s personal preferences. Low-temperature glue guns are suitable for delicate or heat-sensitive materials, while high-temperature glue guns are ideal for heavier materials and woodworking projects. Dual-temperature glue guns offer versatility, as they can switch between high and low temperatures.
When it comes to selecting the right type of glue, it is essential to consider the type of wood being used and the level of strength required. PVA glue is a popular choice for its ease of use, while epoxy glue is more durable and can withstand heavy loads. Cyanoacrylate glue sets quickly and is suitable for small projects, while polyurethane glue is waterproof and ideal for outdoor use.
Before applying glue to the wood, it is important to prepare the surface by cleaning it thoroughly and sanding it to provide a rough surface for the glue to grip onto. When applying the glue, it is best to load the glue gun properly and apply it in a steady, controlled manner to prevent excess glue from seeping out.
Alternative methods for using a glue gun on wood include using glue sticks with other adhesives or using the glue gun itself as a tool for woodworking. These methods can offer unique and creative ways to use a glue gun beyond its traditional purpose.
To ensure a successful project and protect oneself from harm, it is essential to follow appropriate safety precautions. This includes protecting skin and eyes from potential burns, as well as taking measures to prevent fires.
In essence, using a glue gun on wood is an accessible and versatile method for joining, crafting, and DIY woodworking projects. However, it is imperative to choose the right tools and materials, prepare the surface, apply the glue correctly, and stay safe while doing so. With these considerations in mind, anyone can successfully use a glue gun on wood to bring their projects to life.
Frequently Asked Questions
Can I use any glue stick with my glue gun?
No, make sure to check your glue gun’s manual for the correct size and type of glue stick to use.
Can I use a low-temperature glue gun on wood?
Yes, but it may not bond as effectively as a high-temperature glue gun.
How long does it take for glue from a glue gun to dry?
It depends on the type of glue and the environmental conditions, but typically it takes a few minutes to an hour for the glue to fully dry.
Can I use a glue gun on wet or damp wood?
No, the moisture can interfere with the bonding process. Make sure the wood is completely dry before applying glue.
Can I use a glue gun for outdoor woodworking projects?
It depends on the type of glue you use. Some glues are water-resistant and can work for short-term outdoor projects, but for long-term outdoor projects, use a waterproof adhesive specifically for outdoor use.
Can I use a glue gun for woodturning projects?
Yes, a glue gun can be a useful tool for woodturning to glue small pieces together before carving or turning.
How can I remove excess glue from wood?
You can use a scraper or sandpaper to remove excess glue after it dries. For wet glue, use a damp cloth to wipe it away before it dries.
Why is sanding the wood important before applying glue with a glue gun?
Sanding the wood creates a rough surface which allows the glue to adhere better to the surface. It also removes any debris or contaminants that may interfere with bonding.
Should I wear gloves when using a glue gun?
It is recommended to wear heat-resistant gloves to protect your hands from the hot glue and prevent burns.
What should I do if the glue gun starts smoking?
Immediately unplug the glue gun and allow it to cool down before attempting to use it again. Smoking can indicate a malfunction or a risk of fire. Contact the manufacturer for assistance if necessary.