Picture this: you have just purchased some beautiful tongue and groove flooring, but you’re unsure how to install it with glue. You might be feeling overwhelmed or intimidated by the thought of embarking on such a project. However, fear not! With a bit of preparation and some guidance, you can install tongue and groove flooring with glue yourself. In this article, we will provide you with a step-by-step guide and all the information you need to successfully complete the installation process. Let’s dive in and transform your space with stunning new flooring.
What is Tongue and Groove Flooring?
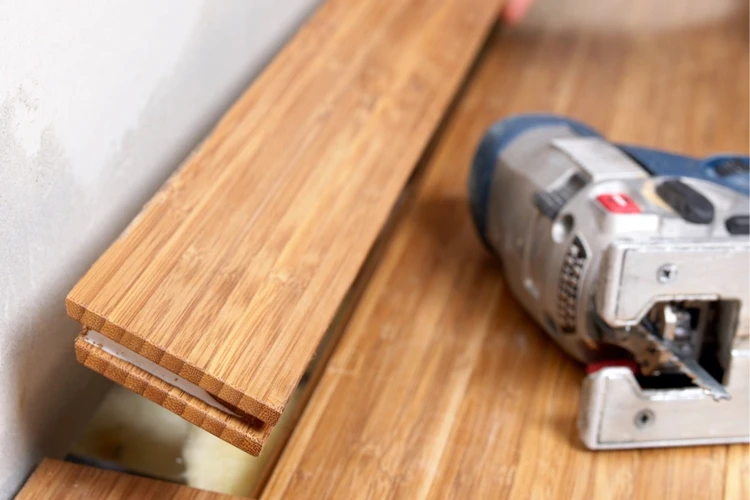
Tongue and groove flooring is a type of hardwood flooring that features a locking system on either side of the board. The “tongue” refers to a small extension on one side of the board that fits into a corresponding groove on the other side of the board. This creates a tight, interlocking fit between the boards, which helps to create a stable and sturdy floor.
Tongue and groove flooring is a popular choice for homeowners because it is relatively easy to install, and it creates a seamless and polished look. Additionally, because the boards are joined tightly together, there is less chance of dirt and debris getting trapped between the boards.
If you’re considering installing tongue and groove flooring in your home, it’s important to note that there are different types of tongue and groove flooring available. Some types require nailing or stapling, while others use glue to secure the boards in place. In this article, we will focus specifically on how to install tongue and groove flooring with glue.
Now that we know what tongue and groove flooring is let’s move on to the question of why to use glue for installation.
Why Use Glue?
Why Use Glue?
Gluing tongue and groove flooring during installation is a popular choice because it creates a stable and long-lasting floor. The glue creates a bond between each board, leaving little room for movement or shifting. This helps to reduce the amount of squeaking that can occur with the flooring over time. Additionally, the glue acts as a sealant, reducing the chances of moisture getting in between the boards and warping the flooring.
Using glue also provides a more professional finish, as there are no visible nails or screws that can detract from the overall appearance of the floor. It creates a seamless look that is easy to clean and maintain. In fact, using glue in flooring installation has been widely practiced for various types of flooring such as hardwood, carpet, mosaic tiles, vinyl, and even artificial grass.
Of course, not all flooring installations require glue, and it is important to consider the specific type of flooring being installed and the subfloor before deciding on whether to use glue or not. Nevertheless, gluing tongue and groove flooring is a great choice for a durable, long-lasting, and seamless finish that enhances the appearance of any room.
Tools and Materials Needed
Before you start installing the tongue and groove flooring with glue, make sure you have all the necessary tools and materials for the job. Here is a list of what you’ll need to complete the project:
Tools:
– Chop saw or miter saw to cut the flooring boards
– Table saw to rip the first and last rows of flooring
– Pry bar to remove baseboards and shoe molding
– Tape measure, pencil, and chalk line for marking and measuring
– Straight edge for checking the boards’ alignment
– Rubber mallet for tapping the boards in place
– Broom and dustpan for cleaning up debris
Materials:
– Tongue and groove flooring boards
– Flooring adhesive (make sure it’s compatible with your flooring type)
– Vapor barrier paper or underlayment
– Shoe molding and baseboards to cover the edges of the flooring
– Wood filler and sandpaper for any gaps or imperfections in the flooring
Make sure to have all the tools and materials ready before you start installing the flooring, this will save you time and make the installation process smoother. If you’re unsure about which type of glue to use for your flooring, check with the manufacturer’s recommendations. You can also consult HowToHome guides for more information on gluing different materials together, like how to glue vinyl siding, how to install bamboo flooring with glue, or how to glue tongue and groove boards.
Pre-Installation Preparations

Pre-Installation Preparations: Before starting the installation of tongue and groove flooring with glue, there are several important preparations that need to be made. These preparations are essential to ensure that the installation goes smoothly and the final result is both attractive and durable.
Acclimation: First and foremost, it is crucial to acclimate the flooring before installation. This means letting the flooring sit in the room where it will be installed for a few days to adjust to the temperature and humidity. This step is essential to prevent the wood from expanding or contracting after installation.
Clean the Subfloor: The next step is to clean the subfloor thoroughly. Any debris, dust, or dirt on the subfloor can cause problems during installation and prevent the glue from bonding properly. Use a broom, vacuum, or damp cloth to clean the subfloor, and let it dry completely before proceeding.
Check the Subfloor: It is also important to check the subfloor for any issues that could affect the installation. Make sure the subfloor is level, dry, and free of cracks or dents. If there are any problems with the subfloor, they should be addressed before installation.
Plan the Layout: Planning the layout of the flooring is another important preparation step. Measure the length and width of the room, and calculate the square footage to determine how much flooring will be needed. Decide on the direction of the boards and plan the layout accordingly. It is also a good idea to lay out a dry run of the boards before installation to ensure that everything fits properly.
By following these pre-installation preparations, you can ensure that the installation process goes smoothly and that the final result is both attractive and durable. If you need more information about how to glue other types of flooring, such as tiles or carpet, you can check out our articles on how to glue ceiling tiles or how to glue carpet to wood.
Acclimation
Acclimation
Before installing tongue and groove flooring, it is important to let the flooring acclimate to the environment where it will be installed. This means allowing the flooring to adjust to the temperature and humidity of the room. Failure to acclimate the flooring can lead to gaps or buckling in the future. Acclimation is especially important for solid wood flooring.
To properly acclimate the flooring, it should be left in the room for at least 48 hours prior to installation. The temperature and humidity of the room should also be set to the normal living conditions of the space. This will allow the flooring to adjust to any potential changes in the environment after it is installed.
During the acclimation process, it is important to keep the flooring off the ground and to avoid stacking the flooring on top of each other. Instead, the flooring should be laid flat with spacers between the planks, allowing for proper air flow. This will help ensure that the moisture content is consistent throughout the flooring.
Pro tip: It’s best to measure the room to double-check that you’ve bought enough flooring before beginning the acclimation process. This is also a good time to inspect the wood planks, check for any damages and discard those that cannot be used.
Following the proper acclimation protocol will help ensure a smooth and successful installation process, resulting in a beautiful, long-lasting floor.
If you want to learn more about gluing different types of flooring, check out our guide on gluing down laminate flooring, guide on gluing mosaic tiles to wood, guide on gluing artificial grass, guide on what tile glue is called, and guide on gluing vinyl baseboard.
Clean the Subfloor
Before installing tongue and groove flooring with glue, it is essential to clean the subfloor thoroughly. A dirty subfloor can lead to uneven installation and cause problems later on. Neglecting this step can cause the adhesive to fail, affecting the longevity and durability of the floorboards.
The first step in cleaning the subfloor is to remove any debris, such as dust, dirt, or loose particles, from the surface. Use a broom or vacuum to gather any loose material and dispose of it properly. Once you finish sweeping, you can use a damp mop or cloth to wipe away any remaining residue or dust that you may have missed.
Next, check the subfloor for any cracks, holes, or other damage. Repairing them before installation prevents future problems. If you find any significant damage, consider consulting a professional to assess and repair the subfloor to ensure your new flooring has a solid foundation.
It’s essential to ensure that the subfloor is flat and level before installing the tongue and groove boards. Uneven spots can cause problems in tightly fitting the boards or cause a noisy and unstable floor once installed. Use a straight edge or level tool to check that the floor is flat and level. If there are any high spots, use a sander to level them.
Finally, ensure that the subfloor is dry and moisture-free before proceeding with the installation. Any excessive moisture in the subfloor can damage the adhesive bond and cause the boards to warp and cup. Check with a moisture meter to ensure the subfloor is dry enough to proceed with the installation.
By taking the necessary time and effort to clean the subfloor thoroughly, check for damage, level it, and ensure it is dry, you are setting the stage for a successful and long-lasting installation of your new tongue and groove flooring with glue.
Check the Subfloor
Before installing the tongue and groove flooring, it’s essential to check the subfloor for any damage or unevenness that could affect the final result. A damaged subfloor can cause the floor to squeak, and an uneven subfloor can cause gaps or buckling in the flooring over time.
To check the subfloor, begin by inspecting for any large cracks or dips in the surface. Use a straight edge, like a long level or a board, to check for any high or low spots that may need to be filled or sanded down. If you find any major issues, you will need to address them before continuing with the installation.
Next, check for any moisture or water damage. Use a moisture meter to test the subfloor’s moisture levels, particularly if you are installing over concrete. If the moisture levels are too high, you will need to wait for the subfloor to dry out or install a moisture barrier.
Additionally, check for any loose or squeaky areas. Walk around the subfloor, listening and feeling for any areas that feel unstable. If you find any issues, secure loose boards or add additional fasteners to eliminate any squeaks.
Taking the time to check the subfloor thoroughly before installation may seem like an extra step, but it can save you from headaches down the road. A well-prepared subfloor will ensure a stable and long-lasting tongue and groove flooring installation.
Plan the Layout
Before starting the installation process, it’s essential to plan the layout for your tongue and groove flooring. This step will help you estimate how much material you need and avoid wasting resources, time, and money.
First, measure the length and width of the room and determine the square footage you need to cover. Measure in inches, feet, or meters, and convert the units to make them consistent.
The next step is to decide on the orientation of your floorboards. There are two options here: you can either install them parallel to the longest wall in your room or perpendicular to it. Each option has its advantages, depending on your specific circumstances and preferences.
If you choose to install the boards parallel to the longest wall, it can make your room look more significant and spacious. On the other hand, installing the boards perpendicular to the wall can make the room appear wider.
Another crucial factor when planning your layout is to consider the light sources and the direction in which natural light enters your room. You might want to install your boards in a way that follows the flow of light, creating a cozy and homely feel.
You should also take into account any transitions in your room, such as doorways, steps, or changes in height. You’ll need to determine the height difference between the floorboards and the adjacent surfaces to ensure a smooth transition and avoid any tripping hazards. You might need to install a flooring transition or reducer to achieve a seamless look.
When planning your layout, be sure to account for any imperfections in your subfloor. It’s crucial to check the subfloor beforehand and address any issues, such as dips or bumps, before starting the installation process.
By taking into account all these factors, you can create a layout that is not only functional but also aesthetically pleasing and durable. It’s always a good idea to sketch your layout on paper or use a digital floor-planning tool to visualize the result beforehand. This way, you can make any necessary adjustments before making any cuts and gluing the flooring planks.
Installing the Tongue and Groove Flooring
Applying the Glue
Before you begin installing the tongue and groove flooring, it’s important to have the right type of glue. You’ll want to use a high-quality adhesive that is specifically designed for tongue and groove flooring. Some good options are Titebond Tongue and Groove Flooring Glue or Roberts 1406 tongue and groove adhesive.
Once you’ve selected your adhesive, it’s time to start applying it. Begin by spreading a small amount of glue onto the subfloor with a trowel or notched spreader. Be sure to work in small sections at a time, as the glue will dry quickly.
Working in Sections
After you’ve applied the glue, it’s time to start laying down your first few boards. Work in small sections, typically three to five rows at a time. This will allow you to ensure that each board fits snugly into its place and is properly aligned before you move on to the next section.
Tapping the Boards Together
As you’re laying down your tongue and groove flooring, you will need to tap each board tightly together. Use a rubber mallet to gently tap the tongue of one board into the corresponding groove of the adjacent board. This will create a tight, secure fit that will prevent any gaps from forming between the boards.
Using a Spacer
As you move from one section to another, it’s important to use spacers to maintain a consistent gap between the boards. These spacers can be purchased at any home improvement store and will ensure that your flooring stays level and straight.
Trimming the Last Row
Once you’ve reached the end of your installation, you’ll likely need to trim the last row of boards to fit into the remaining space. Measure the distance between the last row of boards and the wall to determine the width of the final row. Use a saw to cut each board to the appropriate size.
Now that you’ve finished laying your tongue and groove flooring, it’s important to allow the glue to dry thoroughly before you start walking on it. This can take anywhere from 24 to 48 hours, depending on the type of adhesive you used. Once the glue has dried completely, you can start enjoying your beautiful new flooring!
Apply the Glue
Before applying the glue, make sure to read the manufacturer’s instructions carefully and choose a high-quality adhesive appropriate for your specific flooring material. You can use a trowel or a specialized adhesive applicator to spread the glue evenly. Begin by spreading a thin layer of adhesive along the first few inches of the subfloor, using a notched trowel.
Tip: Be careful not to apply too much glue. Excess glue can seep up through the joints between the boards, leaving a sticky residue on the surface and interfering with the locking mechanism.
When laying the first row of flooring, work from the wall towards the center of the room. Apply glue to the tongue portion of each plank and gently wiggle it into place. Be sure to leave a 1/4 inch expansion gap between the wall and the flooring. You can use spacers or shims to help maintain the gap.
Warning: Do not apply glue to the subfloor as it will create a mess and may affect the adhesive’s strength.
As you proceed with the installation, continue applying glue to the tongue portion of each plank, working in small sections. Apply enough glue to ensure a strong bond, but not so much that the excess oozes out of the joints when you connect the boards.
Caution: Never connect two boards that have glue on the ends until you get the glue on both tongues.
Once you have installed the first few rows of planks, use blue painter’s tape to hold the boards in place while the glue sets. Continue working in rows, and apply weight evenly over the entire surface to help the planks bond securely to the subfloor.
Tip: If there is any adhesive on the surface of the boards, wipe it off immediately with a damp cloth or paper towel.
Be patient and work carefully while applying the glue, taking care to follow the manufacturer’s instructions. By doing so, you will ensure a secure, long-lasting bond between your tongue and groove flooring and the subfloor.
Work in Sections
When installing tongue and groove flooring with glue, it’s important to work in small sections to ensure the glue remains wet and workable. This means dividing the room into manageable sections based on the layout plan you created earlier.
Start by applying glue to the subfloor within the first section. Don’t rush the process and make sure you evenly apply the glue with a trowel. A too-thin application can cause gaps between the planks, while a too-thick application can cause the boards to buckle and deform.
Next, start laying your first row of flooring planks. Be sure to place the groove side facing the starter wall. First, you need to align the end of the first plank with the chalk line to ensure it’s straight. Then, press the first plank firmly into the glue.
Continue adding planks until you reach the end of the first section. Be sure to leave enough space at the end of the row to place the spacer. It’s essential to keep these gaps consistently throughout the process as it allows for the expansion of the material.
Repeat the same process for the next sections. Work in sections to ensure that the glue doesn’t dry out before you have time to lay the next boards. This will ensure that the glue remains workable, and planks stay secure.
It’s important to check for and fix any unevenness as you progress. After laying each plank, use a level tool to check if the surface is even. Use a rubber mallet to tap the planks gently into place if necessary to make sure the surface is even and smooth.
By working in sections, you can ensure that the glue remains wet and workable, which is crucial for ensuring the planks stay secure and even. Take your time, work manually, and be patient, and you’ll achieve a stunning and durable tongue and groove floor.
Tap the Boards Together
Once you have applied the glue to the subfloor and to the first board, it’s time to lay the second board and connect the tongue and groove. To do this, use a tapping block made of a scrap piece of hardwood. Place the tapping block against the tongue of the board and using a hammer, gently tap the board until it locks tightly to the previously installed board.
It’s important to ensure the boards are properly aligned before tapping them together. Use your hands to adjust and align the boards, making sure there are no visible gaps or unevenness.
Continue installing the boards section by section, tapping them together as you go. Remember to leave an expansion gap of about 1/4″ between the boards and the wall.
If you encounter a board that is difficult to fit, try applying more glue to the area around the tongue and groove. This should help it slide into place more easily.
It’s also important to periodically check the installed boards with a spirit level to ensure they are level and flat. If needed, adjust the boards by tapping them into place or using a pry bar to lift and reposition them.
Be careful not to over-tap the boards together, as this can damage the tongue and groove. Use a manual flooring nailer or a pneumatic flooring stapler for the final few rows. Finally, remove any excess glue with a damp cloth before it dries.
Use a Spacer
When it comes to installing tongue and groove flooring with glue, using a spacer is essential. A spacer is a small piece of material that is used to create a gap between the wall and the first row of flooring, as well as between each row of flooring. This small gap is necessary because the wood of the tongue and groove will expand and contract with changes in temperature and humidity. If there is no gap left during installation, the planks will eventually become tightly pressed together, putting pressure on each other and causing warping and buckling.
There are several types of spacers available on the market that you can use for the installation. Some of the most popular options include foam spacers, plastic wedge spacers, and regular wood shims. Depending on your personal preference, you can choose the one that best suits your needs.
To use the spacer, align it between the wall and the edge of the first row of flooring before gluing it into place. Then, as you install each subsequent row of planks, use the spacer to ensure that they remain evenly spaced. Be sure to check the instructions provided with your chosen spacer to see if there are any specific guidelines you need to follow.
It’s important to note that spacers can sometimes get trapped between the flooring and the wall, making them difficult to remove. To avoid this, try to use a spacer that is flexible or pliable, and remember to check that your spacers are flush with the wall before continuing to install the next row of planks.
Using a spacer may seem like an extra step in the installation process, but it is absolutely essential if you want to protect your new flooring from warping or buckling over time. With a little extra care and attention during installation, you can enjoy your beautiful new tongue and groove flooring for years to come.
Trim the Last Row
Once you’ve installed the tongue and groove flooring, you’ll need to trim the last row to fit against the wall. This step is crucial to ensure that the flooring fits properly and looks neat.
Measure Twice
Before cutting the last row of flooring, measure the distance between the wall and the previous row of flooring. Measure the distance in several places along the row to ensure that it is consistent. Once you have the measurements, subtract ¼ inch to allow for expansion and contraction.
Mitring or Jigsawing
To make the cut, you can either mitre the boards or use a jigsaw. A mitre saw will create a clean, straight cut, while a jigsaw can cut curves around obstacles like radiators or pipes. Whichever tool you choose, be sure to take your time and make accurate cuts.
Dry Fit
Once you’ve made the cut, dry fit the board to ensure that it fits properly against the wall and the previous row of flooring. If the board doesn’t fit, make any necessary adjustments until it does.
Glue and Install
After you’ve checked the fit, apply glue to the back of the board and install it in place. Use a mallet and tapping block to ensure that the board is snugly fitted against the previous row of flooring. Wipe away any excess glue with a damp cloth.
Repeat
Repeat the process for any remaining boards in the last row of flooring. When you’re finished, allow the glue to dry for at least 24 hours before walking on the floor. This will ensure that the flooring is properly set and won’t move or shift.
Post-Installation Steps
Now that the tongue and groove flooring has been successfully installed using glue, it’s time to move on to the post-installation steps. These steps are important to ensure that the newly installed flooring remains in good condition and looks its best.
Clean the Floor: The first step is to clean the floor thoroughly. Use a vacuum to remove any sawdust, loose dirt and debris that may have accumulated during the installation process. A damp mop can then be used to go over the entire floor to remove any remaining dust or dirt. Be sure not to use too much water or harsh chemicals that may damage the flooring.
Finishing Touches: Once the floor is clean and dry, it’s time to add the finishing touches. This may include adding baseboards or trim to the edges of the flooring, which will give it a more polished look. The trim can be either matched to the flooring or painted to complement the overall decor. Be sure to use a high-quality paint and brushes for a professional finish.
In addition to trim, you may also want to add rugs or furniture to complete the look of the room. Be sure to place felt pads under furniture legs to prevent scratching or damage to the newly installed flooring.
Maintenance: It’s important to remember that proper maintenance is key to keeping the flooring in good condition for years to come. Routine cleaning is important to remove dirt and debris that can cause scratches and damage. Avoid using harsh chemicals or abrasive cleaners that can damage the surface of the flooring.
If scratches or damage do occur, it may be possible to repair the flooring rather than replace it. This will depend on the severity of the damage and the type of flooring. Consult with a flooring professional for the best course of action.
With the right tools and preparation, installing tongue and groove flooring with glue can be a rewarding and cost-effective DIY project. By following the post-installation steps and properly maintaining the flooring, it will continue to look great for years to come.
Clean the Floor
After installing the tongue and groove flooring, it’s important to clean the entire floor thoroughly. This will ensure that there are no leftover glue or debris on the surface that can damage the flooring or affect its overall appearance.
The first step is to remove any excess glue that may have seeped through the gaps between the boards. Do this quickly before it dries using a damp cloth or sponge. Be careful not to get the cloth or sponge too wet as it may cause damage to the flooring or the subfloor.
Next, use a hardwood flooring cleaner that is specially designed for use on this type of flooring. Avoid using any harsh or abrasive cleaners as they can scratch and damage the surface of the flooring.
When cleaning, work in small sections and use a soft-bristled brush or microfiber mop to gently scrub the surface. Be sure to follow the manufacturer’s instructions carefully to achieve the best results.
After cleaning the entire floor, go over it again with a clean, damp mop or cloth to remove any remaining cleaning solution. It’s important to dry the floor thoroughly to prevent any water damage, so use a clean, dry cloth or mop to remove any excess moisture.
Finally, inspect the flooring carefully for any scratches or damage that may have occurred during installation. Any damage, no matter how small, should be repaired immediately to avoid further problems down the line. A professional flooring installer can assist with any necessary repairs.
By following these steps, your tongue and groove flooring will look clean and beautiful for years to come.
Finishing Touches
After completing the installation of your tongue and groove flooring with glue, it’s time to focus on the finishing touches that will give it the wow factor you’re looking for.
Clean the Floor
Before you start with the finishing touches, it’s important to thoroughly clean the floor. Use a vacuum cleaner to remove any debris or dust particles that have settled on the floor. A microfiber mop can be used to remove any stubborn dirt or dust. Use a damp cloth to wipe down the surface and ensure that it is completely free of any dirt or debris.
Trim the Baseboards
Once the floor is clean, it’s time to work on the baseboards. Check to see if they require any maintenance or if they need to be replaced. Trim the baseboards if necessary, so that they are flush with the new floor. You can use a coping saw or a jigsaw to make the necessary cuts.
Add Transitions
To give your floor a professional finish, you can add transitions where your new flooring meets other materials. Transitions could include a T-molding or a reducer strip, which can be installed using the glue or by nailing them into place. This will ensure that the floor has a defined and smooth edge.
Maintain the Floor
Now that your tongue and groove flooring is installed and finished, it’s important to maintain it regularly. This will ensure that it stays looking new for years to come. Avoid using harsh chemicals, abrasive cleaners, or steam mops to clean the floor, as they can damage its finish. Instead, use a pH-neutral cleaner and a microfiber mop to maintain the shine and clean the surface periodically.
Finishing touches are an essential part of the tongue and groove flooring installation process. They give the floor a refined and polished appearance and make all the difference in a room’s overall aesthetic. Don’t forget to take your time when working on the finishing touches and maintain the floor properly to ensure it stays looking great for years to come.
Conclusion
After following the step-by-step guide on how to install tongue and groove flooring with glue, you should have a beautiful and durable new floor in your home. Proper preparation and installation are key to ensuring that your flooring lasts for many years to come. Remember to acclimate your flooring to your home’s environment before installation and to thoroughly clean and check your subfloor.
When it comes to installation, working in sections and carefully tapping the boards together is crucial. Using spacers will help ensure the right amount of expansion and contraction space. And don’t forget to trim the last row for a perfect fit.
Once your flooring is in place, take the time to clean and add finishing touches, such as baseboards and trim. This will not only enhance the look of your flooring but also protect it from dirt and debris.
Overall, installing tongue and groove flooring with glue is a satisfying and rewarding DIY project that can add significant value to your home. With the right tools, materials, and preparation, you can achieve a professional-looking finish that will withstand the test of time. So roll up your sleeves, get to work and enjoy your new flooring!
Frequently Asked Questions
1. Can tongue and groove flooring be installed without glue?
Yes, tongue and groove flooring can be installed without glue. It can be installed using a floating method, where the boards click together without being secured to the subfloor.
2. How long does the glue take to dry?
The drying time of the glue depends on the type of glue used. Typically, it takes anywhere between 12 to 24 hours for the glue to fully dry.
3. Can I install tongue and groove flooring over existing flooring?
Yes, you can install tongue and groove flooring over existing flooring, but it’s important to ensure that the existing flooring is level and in good condition.
4. How do I determine the amount of flooring needed for my space?
You can determine the amount of flooring needed for your space by measuring the length and width of the area and multiplying them to get the total square footage. Then, add 10% extra for any waste or mistakes.
5. Do I need to acclimate the flooring before installing?
Yes, it’s important to acclimate the flooring before installing to ensure it adjusts to the humidity and temperature of the room. It’s recommended to acclimate the flooring for at least 48 hours.
6. Can tongue and groove flooring be installed over concrete subfloors?
Yes, tongue and groove flooring can be installed over concrete subfloors, but a moisture barrier and adhesive designed for concrete must be used.
7. How wide should the expansion gap be?
The expansion gap should be between 1/4 to 1/2 inch wide depending on the manufacturer’s recommendations.
8. Can I install tongue and groove flooring on stairs?
Yes, tongue and groove flooring can be installed on stairs, but a special tongue and groove stair nose must be used to finish the edges.
9. How do I clean and maintain tongue and groove flooring?
You can clean and maintain tongue and groove flooring by regularly sweeping or vacuuming the floor and cleaning it with a floor cleaner recommended by the manufacturer.
10. Can I install tongue and groove flooring myself or should I hire a professional?
Tongue and groove flooring can be installed by a skilled DIYer, but if you’re not comfortable with the process, it’s recommended to hire a professional to ensure a proper installation.