Mosaic art on wood combines the rustic charm of natural timber with the intricate beauty of tiled patterns. By gluing mosaic tiles to wood, you can create stunning pieces of art or functional home decor that stand the test of time and add a personalized touch to any space.
Understanding the Basics of Mosaic Tile Wood Bonding
The process of applying mosaic to wood requires an understanding of the materials and techniques involved. Mosaic tile wood bonding is not just about sticking tiles onto a wooden surface; it’s about ensuring a durable and lasting bond that can handle the stress of temperature changes and use.
The Appeal of DIY Mosaic Wood Art
DIY mosaic wood art has gained popularity for its accessibility and the satisfaction that comes with creating something by hand. It’s a way to express creativity, while also producing a functional piece of art. Whether you’re looking to adorn furniture, make wall hangings or design a focal point in your garden, the possibilities are endless.
Choosing the Best Glue for Mosaic
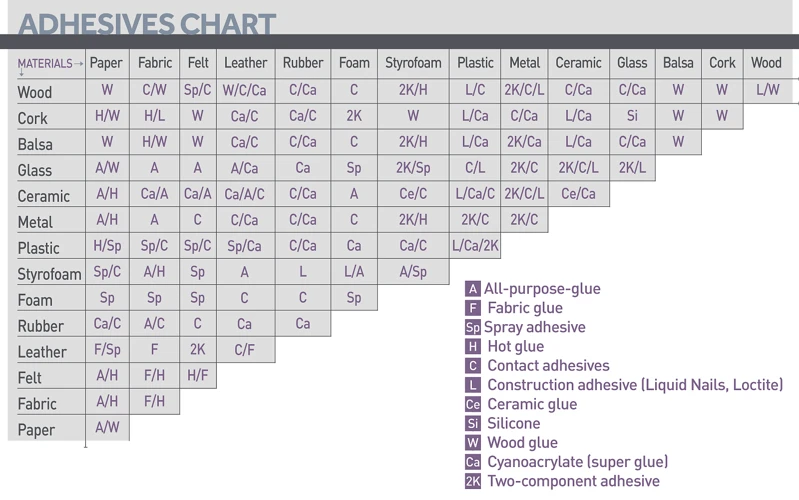
Selecting the best glue for mosaic is crucial for the longevity and durability of your wood mosaic project. The right adhesive ensures that the tiles stay fixed and the artwork remains intact over time.
Types of Mosaic Tile Adhesive
There are several options when it comes to mosaic tile adhesive. PVA glues, epoxy resins, and silicone-based adhesives are among the most common. Each type has its own set of properties that make it suitable for different aspects of mosaic work.
Factors to Consider for Outdoor Mosaic on Wood
If your mosaic tile wood surface is meant for outdoor use, consider factors like weather resistance and flexibility. The adhesive should withstand temperature fluctuations, moisture, and UV rays without losing its grip.
Preparations for Applying Mosaic to Wood
Proper preparations lay the groundwork for a successful wood mosaic project. Skipping this step can lead to problems with adhesion and the overall quality of the finished piece.
Materials and Tools Needed
- Mosaic tiles
- Wood surface (cleaned and sanded)
- Mosaic tile adhesive
- Notched trowel or adhesive spreader
- Sponge and water for cleanup
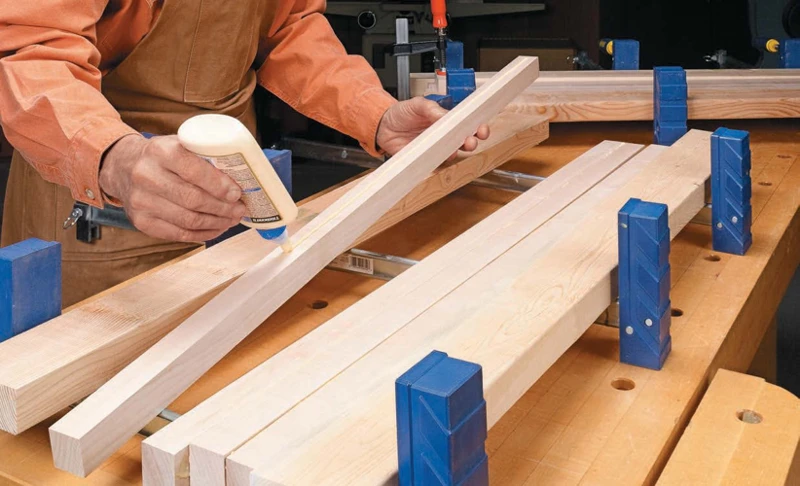
Preparing the Wood Surface for Mosaic Application
Begin by cleaning the wood to remove any dirt or grease. Sanding the surface provides a rougher texture for better adhesive grip. Ensure the wood is dry before proceeding with the glue mosaic tiles to wood.
Step-by-Step Guide to Glue Mosaic Tiles to Wood

Turning your vision into reality requires patience and precision. Follow these steps to ensure a beautiful and enduring mosaic tile wood surface.
Arranging Your Design
Before you start, lay out your mosaic tiles in the desired pattern. This step helps you visualize the end result and make any necessary adjustments before the glue is applied.
Applying the Adhesive
Spread an even layer of mosaic tile adhesive onto the wood using the notched trowel. Work in small sections to prevent the glue from drying out before you can set the tiles.
Setting the Mosaic Tiles
Press the tiles firmly into the adhesive, following the design you laid out earlier. Make sure each tile is level and evenly spaced. Adjustments should be made while the glue is still wet.
Drying and Curing Time
Allow the adhesive to dry according to the manufacturer’s instructions. Curing time can vary, but it’s typically between 24 to 48 hours. Proper curing is essential for strong mosaic tile wood bonding.
Finishing Touches for Your Wood Mosaic Project
After the tiles are securely in place and the adhesive is dry, it’s time to add the finishing touches to your wood mosaic project.
Grouting the Mosaic
Grout fills the gaps between tiles and adds to the overall strength of the mosaic. Apply grout across the surface, pressing it into the spaces between tiles, and then clean off any excess with a damp sponge.
Sealing and Protecting Your Mosaic Tile Wood Surface
To protect your work, apply a sealant over the grouted mosaic tile wood surface. This step is especially important for outdoor mosaic on wood to guard against the elements.
Troubleshooting Common Issues

Even with careful preparation and execution, you may encounter issues. Knowing how to address them can save your project from disaster.
Dealing with Adhesive Failures
If tiles begin to fall off, it’s likely due to an adhesive failure. Remove the loose tiles, clean the area, and reapply the adhesive. Ensure the surface is free from dust and debris before attempting to reattach the tiles.
Repairing Loose Tiles
For tiles that are loose but still intact, carefully lift them and apply a fresh layer of adhesive. Press the tile back into place and allow it to dry.
Maintenance Tips for Mosaic Art on Wood
Maintenance is key to preserving the integrity and appearance of your mosaic art on wood. Regularly wipe the surface with a damp cloth to remove dust and debris. Avoid using harsh chemicals that can damage the sealant or the tiles.
Are you embarking on a creative project and need to know the best way to attach mosaic tiles to a wooden surface? Gluing materials together can be tricky, especially when you’re dealing with different textures and substrates. To help you with your DIY projects, we have a series of guides tailored to various materials. For instance, if you’re working with cork or ceramic, our article on how to glue cork to ceramic tile might provide useful insights. If you’re looking to attach carpet to metal surfaces, such as aluminum, check out our tips on how to glue carpet to aluminum. And for those dealing with plastic surfaces, our guide on how to glue tile to plastic can help ensure your tiles stay put. Each guide is designed to assist you in achieving a strong bond for your specific project needs.
Inspiration for Your Next Mosaic Tile Wood Project
Ready to embark on another creative adventure? Look for inspiration in nature, architecture, or even geometric patterns. Personalize your next wood mosaic project by experimenting with different tile materials and colors. Remember, the only limit is your imagination.