Picture this: you’ve got a bunch of beautiful tongue and groove boards waiting to be installed. You know they’ll make a stunning addition to your home, but you’re not quite sure how to glue them together. Don’t worry, we’ve got you covered! In this step-by-step guide, we’ll walk you through the process of gluing tongue and groove boards together, so you can create a seamless and beautiful finish for your walls or ceiling. From the materials needed to the clean-up process, we’ll cover everything you need to know to get the job done right. Let’s dive in and get started!
Materials Needed
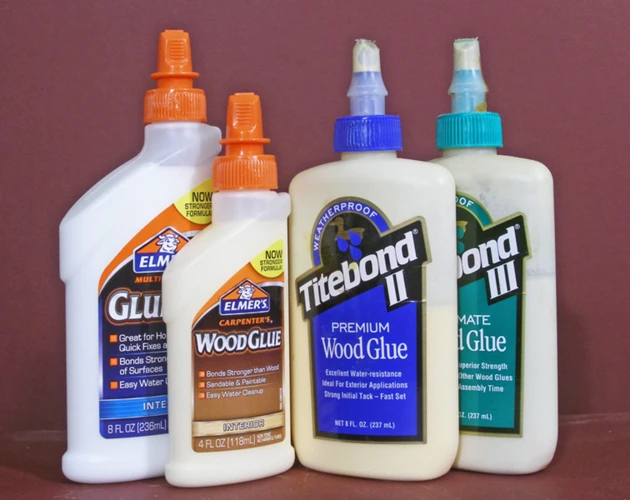
Before diving into the steps of gluing tongue and groove boards, it’s important to gather the necessary materials. Having the right tools and supplies can ensure a smooth and successful installation. Here are the materials that you will need for this project: glue, clamps, wooden wedges, and a damp cloth. Each of these materials plays a crucial role in the process of gluing tongue and groove boards together. If you’re looking for more information about gluing different types of materials, check out our article How to Glue Laminate to Wood.
Glue
When it comes to gluing tongue and groove boards, choosing the right glue is crucial to ensure a strong and lasting bond. There are many types of glue available on the market, but not all are suitable for this job.
PVA glue: also known as white glue, is a popular choice for gluing tongue and groove boards. It is affordable, easy to use, and dries clear. PVA glue is water-based, making it easy to clean up with a damp cloth. However, it may not be strong enough for heavy-duty applications.
Polyurethane glue: also known as Gorilla Glue, is a powerful adhesive that expands as it dries, filling any gaps in the boards. It is waterproof and can bond a variety of materials. However, it is difficult to clean up and can be messy to work with.
Epoxy glue: is a two-part adhesive that creates a strong and durable bond. It is waterproof and heat-resistant, making it suitable for outdoor use or high-temperature applications. However, it can be challenging to work with and requires careful mixing.
When selecting the glue for your project, consider the type of wood you are using, the conditions in which it will be installed, and the level of durability required. It’s always best to follow the glue manufacturer’s instructions for the specific product you are using.
Remember that it is essential to apply the glue properly and evenly to ensure a strong bond. For a step-by-step guide on how to glue tongue and groove boards, refer to the rest of this article.
If you’re interested in learning how to glue carpet to stairs, check out our article on how to glue carpet to stairs.
Clamps
Using clamps is an absolute necessity when gluing tongue and groove boards together. Clamps are used to firmly hold the boards in place while the glue dries. When selecting clamps, it is important to choose sturdy ones that will provide enough pressure to ensure proper adhesion of the boards.
| Type of Clamp | Usage |
|---|---|
| C-Clamp | A type of clamp that is shaped like the letter C, and is often used in woodworking for various tasks such as gluing, drilling, and sanding. |
| F-Clamp | A type of clamp that is shaped like the letter F, and is often used in woodworking to hold materials together when they are being glued or screwed. |
| Bar Clamp | A type of clamp that uses a long bar to apply even clamping pressure over a wide area. Bar clamps are ideal for larger projects where a lot of pressure is needed. |
| Spring Clamp | A type of clamp that uses a spring to apply pressure, and is often used in woodworking for delicate projects where too much pressure could be harmful. However, spring clamps are not recommended for gluing tongue and groove boards together as they do not provide enough pressure. |
The type of clamp you use will depend on the size of the project as well as personal preference. Generally, C-clamps and F-clamps are the most commonly used for gluing tongue and groove boards together as they provide enough pressure without being too bulky.
It is also important to make sure the clamps are positioned properly so that they apply even pressure across the entire joint. This will ensure that the boards are properly secured and the glue dries evenly.
In addition to clamps, wooden wedges can be used to apply added pressure to the joint. This can further enhance the bond between the boards and ensure that there are no gaps between them.
Using the appropriate clamps for gluing tongue and groove boards is crucial to achieving a strong and durable joint. Check out what to use to glue down vinyl flooring for more information on using adhesives in DIY projects.
Wooden Wedges
Wooden wedges are a crucial tool that will help you insert the tongue and groove boards seamlessly. Wooden wedges will provide a gap between the boards, and they will help you prevent the boards from closing on each other while you place them in the right position. Without the wedges, you might experience more difficulty getting the boards right. You can find wooden wedges at a hardware store or make them yourself by cutting a narrow wood strip at an angle. Insert the wedges on the opposite side of the clamps and use them to keep the boards level.
Using wooden wedges can be especially helpful if you’re dealing with uneven boards. They will ensure that all boards are on the same level. You can also use wedges to ensure the right angle between the two boards. When inserting the tongue and groove, the wooden wedges should not be too tight, as this may affect the pressure applied, but they should be snug enough to hold the boards in place.
Pro tip: While wooden wedges are useful when gluing tongue and groove boards, avoid leaving them in place for an extended period as they can affect the final finish of the project. Remove them as soon as the glue dries out, usually after a few hours. Using a damp cloth can help you get rid of any residual glue. If you’re looking for more information on gluing wood, check out our guide on how to glue cedar boards together.
Damp Cloth
One crucial item you’ll need during the tongue and groove board installation process is a damp cloth. This may seem like a small detail, but it can make a significant difference in the outcome of your project. A damp cloth can be used to quickly remove excess glue that may seep out during the gluing process. It’s essential to keep the work area clean and tidy as even a small amount of dried glue can ruin the overall finish of your project.
Additionally, a damp cloth can be used to remove any dust or debris from the surface of the boards before applying the glue. This will ensure that the glue adheres well, and the joints are tight, preventing any gaps from forming. The damp cloth should be slightly moist, but not dripping wet, as excessive moisture can cause the boards to warp or expand.
A damp cloth is a simple but essential tool to have on hand during the tongue and groove board installation process. It can help ensure a clean and professional-looking finish. So, make sure to have a damp cloth ready before you start gluing your boards together.
If you’re interested in other gluing methods for different projects, check out these related articles:
- How to Glue Plywood to Concrete: A Comprehensive Guide
- What Glue to Use for Backsplash: The Ultimate Guide
- How to Glue Ceiling Tiles: A Step-by-Step Guide
- How to Install Glue Down Cork Flooring: A Beginner’s Guide
- How to Glue LVT Flooring: A Detailed Guide
- How to Glue Carpet to Wood: A Comprehensive Guide
Preparing the Boards
Before starting the gluing process, it’s important to ensure that the tongue and groove boards are properly prepared to achieve the best results. Assembling boards that haven’t been inspected or aren’t in the right condition can lead to weak joints and a sub-par final product. Take the time to carefully inspect and prepare your boards before applying glue. Here’s what you need to know:
Inspecting the Boards
Before gluing tongue and groove boards, it is necessary to inspect them for any noticeable defects. Defects can impact the quality of the finished product and make it difficult to achieve a seamless fit. It is important to inspect each board individually to ensure they are in the best condition possible.
One of the most common defects to look for is warping or bowing. A warped or bowed board will not sit flush with the adjoining board, creating gaps between the surfaces. To identify warping, lay each board on a flat surface and examine it from end to end. It is also important to check for large knots, cracks or splits. These can weaken the board and may cause it to break during installation.
Here is a table outlining some common defects to look for when inspecting tongue and groove boards:
| Defect | Description | Impact |
|---|---|---|
| Warping or bowing | Board is not straight, but instead has a curve along its length | Creates gaps between boards, and the curve may be noticeable in the finished project |
| Large knots | Dark, circular areas where branches grew out of the tree | May weaken the board, and the knot may fall out during installation or later use |
| Cracks or splits | Breaks in the wood that run along the length of the board | May weaken the board, and the splits could grow over time, causing the board to break |
By taking the time to inspect each board, you can identify any defects and address them before beginning the installation process. This will help ensure a smooth and seamless finish, and that your tongue and groove boards last for years to come.
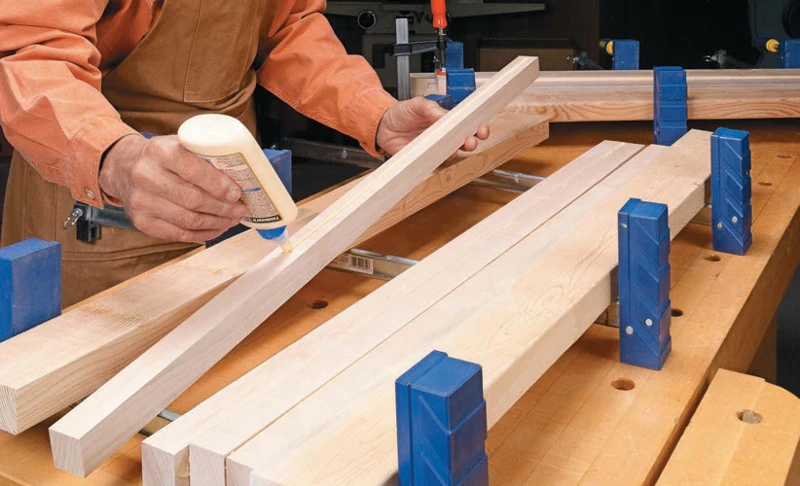
Applying the Glue
Before applying the glue, it is essential to choose the right type of adhesive suitable for tongue and groove boards. Polyurethane glue and PVA (polyvinyl acetate) glue are the two most commonly used types of adhesives for this purpose.
Once you have chosen the type of glue, it’s time to start applying it to the boards. The process is simple, but there are a few key things to keep in mind to ensure proper bonding.
Step 1: Apply the Glue Evenly
Start by applying a thin layer of glue to the top of the groove on one board and the bottom of the tongue on the other board. It is important to apply the glue evenly to avoid gaps and ensure a strong bond between the two boards.
Step 2: Avoid Over-Gluing
While it is important to apply enough glue for a strong bond, over-gluing can create a mess and weaken the bond. A good rule of thumb is to apply a thin layer of glue, spreading it as evenly as possible.
Step 3: Don’t Rush the Gluing Process
Take your time while applying the glue, ensuring that you have applied it to all the necessary areas. Rushing through this step can lead to mistakes, which can compromise the quality of the bond. Take your time to spread it evenly.
Step 4: Wipe Away Excess Glue
After applying glue, use a damp cloth to wipe away any excess glue that may have seeped out of the joint. Be careful not to wipe away too much of the glue as it may weaken the bond.
Table with Materials Needed for This Step:
| Materials | Description |
|---|---|
| Polyurethane Glue or PVA Glue | Choose one type of glue for tongue and groove boards. |
| Brush or Roller | To apply the glue. |
| Applicator Bottle (Optional) | For more precise application of glue. |
| Damp Cloth | To wipe away excess glue. |
Inserting the Tongue and Groove
Before inserting the tongue and groove boards, it is important to ensure that they fit together snugly and are free of any debris or dirt that could interfere with the bonding process. To insert the boards, follow these steps:
- Apply a thin layer of glue to the tongue of the first board. Use a small brush to ensure an even coating.
- Insert the tongue of the first board into the groove of the second board at an angle, making sure the tongue is fully seated in the groove. Press down firmly on the first board to ensure a tight fit.
- Repeat this process, working your way down the length of the boards. Check to make sure each board is fully seated and level with the previous one.
- If you come across any tough spots when inserting the boards, use a rubber mallet to gently tap the boards into place.
It is important not to use too much force when inserting the boards, as this can cause them to warp or buckle. And always be sure to wipe away any excess glue with a damp cloth as you go, as it can be difficult to clean up once it dries. Once the tongue and groove boards are fully inserted, clamp them together securely to allow the glue to dry.
Clamping the Boards
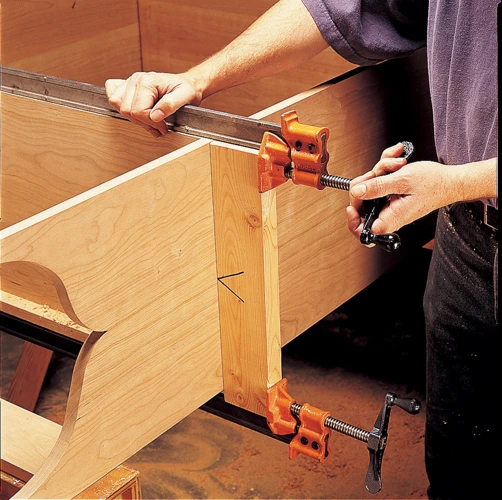
With your tongue and groove boards glued and inserted snugly together, it’s time to secure them in place. This next step is crucial to ensuring your finished project looks neat and professional. Clamping the boards will ensure they dry in the correct position, preventing any unsightly gaps or buckles. In this section, we’ll take a closer look at how to clamp your boards correctly. So grab your clamps and let’s get started!
Applying Pressure Evenly
To ensure a strong bond between your tongue and groove boards, it’s important to apply clamping pressure evenly. Uneven pressure can cause the boards to warp or create gaps in the joints. Here are some steps to follow to apply pressure evenly:
First, place the clamps over the boards, making sure to position them in a way that distributes the pressure across the entire surface of the joint. Avoid placing the clamps too close to the edges as this can cause the wood to split.
Next, use a damp cloth to wipe away any excess glue that may have squeezed out during the clamping process. It’s important to do this quickly before the glue has a chance to dry.
Now, check to make sure that the boards are flat and level. If they’re not, adjust the clamps accordingly to fix any issues.
Note: It’s important to monitor the clamping pressure throughout the bonding process, periodically checking to ensure that everything remains level and in place.
To help make sure that the clamping pressure is distributed more evenly, try using wooden wedges. Place them between the clamps and the wood, near the edges of the board to help distribute the force.
Table: Applying Pressure Evenly
| Step | Description |
|---|---|
| 1 | Position clamps over boards |
| 2 | Wipe away excess glue with a damp cloth |
| 3 | Check to make sure boards are flat and level |
| 4 | Adjust clamps as necessary |
| 5 | Use wooden wedges to distribute clamping force evenly |
| 6 | Monitor clamping pressure as necessary |
By following these steps and using the right tools, you can ensure that the pressure is applied evenly, creating a strong, long-lasting bond between your tongue and groove boards.
Using Wooden Wedges
Once the tongue and groove boards are glued together, it is important to ensure that they are held in place with clamps for a tight fit. At this point, wooden wedges can also be used to further secure the joint. These wedges work by pushing the boards tightly together, ensuring a strong bond.
To use wooden wedges, follow these steps:
| Step 1: | Prepare wooden wedges by cutting small triangles out of scrap wood or purchasing pre-made wedges from a hardware store. |
| Step 2: | Insert the wedges into the gap between the boards, closer to the joint line as possible. |
| Step 3: | Tap the wedges gently with a hammer until they fit tightly into place. |
| Step 4: | Check for any gaps or openings that may have been created with the addition of the wedges. If any gaps are present, gently tap the wedges further until they close the gaps completely. |
It is essential to remember to apply enough pressure while using wooden wedges. If the wedges do not fit tightly enough, the joint may not be secure, resulting in a weak bond. Similarly, too much pressure can damage the wood or cause the boards to split. It is crucial to take your time and make sure the wedges fit tightly enough to keep the tongue and groove boards firmly together.
Clean Up
After successfully gluing the tongue and groove boards and allowing them time to dry in the clamps, it’s time to clean up any excess glue and prepare the boards for their final use. Proper clean-up is crucial to ensure a seamless finish for your project. In this section, we will go over the tools and techniques needed to achieve a clean and professional look. So, roll up your sleeves and let’s get started!
Removing Excess Glue
Once the tongue and groove boards are clamped together, it’s time to clean up the excess glue. To achieve a professional finish, it’s important to remove all excess glue completely. Here are the steps you need to follow:
| Step 1: | Wait for the glue to dry completely before proceeding with cleaning up excess glue. |
| Step 2: | Using a damp cloth, gently wipe away any excess glue. Make sure to remove all glue from both sides of the board, so that the boards don’t stick to the clamps. |
| Step 3: | If you find any stubborn glue spots that won’t come off, use a scraper or sandpaper to carefully remove them. Be cautious not to damage the surface of the boards. |
Once you’ve cleaned the boards, set them aside to dry. It’s best to let them dry for at least 24 hours before sanding or finishing, to make sure the glue is completely dry. Now you’re ready to enjoy your newly glued tongue and groove boards!
Letting the Glue Dry
Once you’ve finished gluing and clamping your tongue and groove boards, it’s time to let the glue dry. It’s important to not rush this step as a strong bond is critical to the overall success of your project.
Step 1: Check the Glue Drying Time
Different glue brands and types have varying drying times, so make sure to read the label of your chosen glue. In general, most woodworking glues take about 24 hours to dry completely.
Step 2: Temperature is Important
Temperature also plays a crucial role in the drying process. Ensure that the room you’re working in is not too hot or too cold, aim for a temperature between 65 and 75 degrees Fahrenheit.
Step 3: Resist the Urge to Touch
Resist the urge to touch or move the boards as the glue dries, as this could cause the bond to weaken. If possible, keep the clamps in place until the glue is fully cured.
Step 4: Clean Up
While the glue dries, use a damp cloth to wipe away any excess glue that has seeped out of the joints. This will make for easier cleanup once the glue has fully cured.
| Step | Instructions |
|---|---|
| Step 1 | Read the label of your chosen glue to check drying time. |
| Step 2 | Aim for a temperature between 65 and 75 degrees Fahrenheit, avoiding too hot or too cold environments. |
| Step 3 | Do not touch or move the boards as the glue dries. |
| Step 4 | Use a damp cloth to wipe away any excess glue during drying time. |
Once the glue has fully cured, you can remove the clamps and admire your handiwork. The process of gluing tongue and groove boards is a simple and effective way to create a strong, stable joint that will last for years to come. Remember to take your time and follow the steps carefully, and you’ll be well on your way to creating beautifully crafted pieces.
Conclusion
In conclusion, gluing tongue and groove boards is a simple and straightforward process that can be accomplished with just a few materials. By following the step-by-step guide outlined in this article, you can achieve a secure and professional-looking bond between your boards. Remember to choose a strong adhesive, use proper clamping techniques, and clean up any excess glue promptly. With a little patience and attention to detail, you can successfully glue tongue and groove boards for a wide variety of woodworking projects. Whether you’re building a new floor, creating custom furniture, or undertaking any other type of woodworking challenge, this technique will help you achieve the results you desire. Happy woodworking!
Frequently Asked Questions
1. Can I glue tongue and groove boards without clamping?
While it is recommended to use clamps when gluing tongue and groove boards, it is possible to use other methods such as nailing or screwing the boards together. However, clamping ensures a stronger bond and better alignment.
2. Should I use waterproof glue for outdoor tongue and groove projects?
Yes, it is important to use waterproof glue for outdoor tongue and groove projects to prevent the glue from breaking down due to exposure to moisture.
3. Can I glue tongue and groove boards to concrete?
Yes, it is possible to glue tongue and groove boards to concrete using a strong adhesive that is designed for this purpose. However, it is recommended to consult with a professional to ensure proper installation.
4. Do I need to sand the tongue and groove boards before gluing?
It is not necessary to sand the tongue and groove boards before gluing, but it can help to ensure a smoother finished surface.
5. How long does it take for the glue to dry?
The drying time for the glue will vary depending on the type of glue used and the humidity and temperature of the working area. It is recommended to let the glue dry for at least 24 hours before removing the clamps.
6. Can I glue tongue and groove boards to drywall?
No, it is not recommended to glue tongue and groove boards to drywall as it will not provide a strong enough hold. It is best to attach the boards to a solid surface such as wood or concrete.
7. What is the best type of clamp to use for gluing tongue and groove boards?
The best type of clamp to use for gluing tongue and groove boards is a bar clamp or pipe clamp as they provide even pressure across the surface.
8. How much glue should I apply?
You should apply enough glue to cover the entire surface of the tongue and groove pieces, but not so much that excess glue drips out when clamping. A dime-sized amount for each inch of board length is a good rule of thumb.
9. Can I use wood glue for tongue and groove projects?
Yes, wood glue is a common adhesive used for tongue and groove projects as it provides a strong bond and is easy to work with.
10. How do I remove excess glue?
To remove excess glue, use a damp cloth to wipe away as much as possible before it dries. Once the glue dries, it can be sanded away using a sanding block or scraper.