As we walk by a sandstone structure, it is hard not to notice the stunning texture and color of this natural stone. However, accidents happen and sometimes, a sandstone surface can get damaged. Luckily, there is a solution – gluing the broken sandstone back together. But how do we do it correctly? Gluing sandstone can be a challenging task, and without proper guidance, it may result in an unsightly repair. In this article, we will guide you through the steps and tips to glue broken sandstone. Let’s get started!
Materials Needed
Before you can begin gluing the broken pieces of sandstone back together, you need to gather all of the necessary materials. Having the right materials on hand will make the process smoother and ensure that you achieve the best possible results. Here are some of the materials that you will need:
- Gloves: It is important to protect your hands during the gluing process. Gloves will keep the glue off of your skin and protect you from any sharp edges on the broken sandstone pieces.
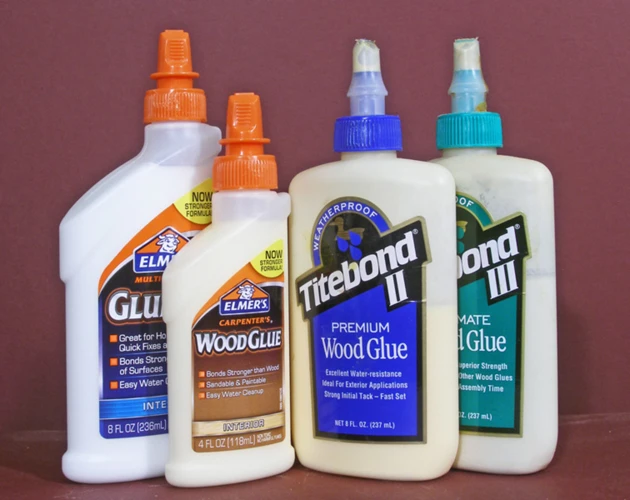
- Glue: You will need a strong adhesive that is capable of bonding the sandstone back together. There are many different types of glue that you can choose from, including super glue, epoxy glue, and mastic glue. Use the type of glue that is best suited to your particular situation.
- Clamp or Tape: Once you apply the glue, you will need to hold the broken pieces of sandstone together until the glue dries. A clamp or tape can be used to apply pressure to the pieces and hold them in place while the glue cures.
Be sure to gather all of these materials before you start the process of gluing the broken sandstone. If you’re not sure which type of glue to use, take a look at our guide on the best super glue for plastic.
Gloves
Gloves are an essential part of any crafting or DIY project. When working with glue and broken sandstone, it’s important to protect your hands from the potentially harmful chemicals in the glue, as well as from any sharp edges on the stone. It’s highly recommended to wear gloves throughout the entire process.
There are different types of gloves that can be used. Latex gloves provide an excellent barrier against most solvents and chemicals found in different types of glue, while leather gloves add another layer of protection against sharp edges. However, allergic reactions to latex are possible, so be sure to choose the gloves that best suit your needs.
In addition to protecting your hands, gloves can also prevent any oils or dirt on your fingers from contaminating the broken sandstone or glue. This can potentially affect the bonding process and lead to a weaker bond.
Tip: If you’re new to DIY projects or working with glue, it’s a good idea to wear gloves that are brightly colored or have patterns. This will help you easily spot any leftover glue on your gloves, which can be difficult to see on plain-colored gloves.
Internal link: If you’re working with ceramic tile, you might find our article on how to glue cork to ceramic tile helpful.
Glue
Choosing the right glue for broken sandstone is crucial in achieving a successful repair. There are different types of glue available in hardware stores or online, but not all of them are appropriate for sandstone. Here are some glue options that are suitable for repairing broken sandstone:
- Epoxy glue is a two-part adhesive that comes in a syringe with separate resin and hardener. It is a durable and impact-resistant glue that can bond different materials and withstand extreme temperatures. Check out our article on How to Use Epoxy Glue for more information.
- Mastic glue is a versatile glue commonly used in construction and stonemasonry. It is a water-resistant adhesive that can bond porous surfaces like sandstone. However, it requires a longer curing time compared to other glues. Learn more about mastic glue on our article about What is Mastic Glue?
- UV glue is a transparent adhesive that can bond glass, plastic, and other materials. It cures quickly when exposed to UV light, making it an ideal glue for small and intricate repairs. Learn more about UV glue on our article What is UV Glue?
It is important to follow the manufacturer’s instructions when using the glue, especially regarding the amount and mixing ratio. Always wear gloves when handling the glue to avoid skin contact.
Clamp or Tape
When gluing broken sandstone back together, it’s important to hold the pieces in place until the glue sets. This is where a clamp or tape comes in handy. A clamp can provide a secure hold, ensuring that the broken pieces stay in place while the glue dries. On the other hand, tape can be used to wrap around the sandstone and hold it together tightly until the glue dries.
When using a clamp, follow these steps:
- Apply glue to the broken edges of the sandstone.
- Position the broken pieces together.
- Place the clamp over the pieces and tighten it until the pieces are firmly held together.
- Wipe away any excess glue that squeezes out from the edges.
- Allow the glue to dry completely according to the manufacturer’s instructions.
When using tape, follow these steps:
- Apply glue to the broken edges of the sandstone.
- Position the broken pieces together.
- Wrap tape around the sandstone, making sure to hold the pieces tightly together.
- Place the sandstone on a flat surface to keep it stable.
- Wipe away any excess glue that squeezes out from the edges.
- Allow the glue to dry completely according to the manufacturer’s instructions.
It’s important to note that the type of glue used will determine how long the clamp or tape will need to be applied. Some glues will require longer curing times than others. Additionally, the amount of pressure applied by the clamp or tape should not be too tight, as it can cause the sandstone to crack or break again.
Whether you choose to use a clamp or tape, make sure to apply it carefully and hold the broken pieces together tightly until the glue dries completely. If you’re having trouble with broken seashells or plastic, check out our other articles for tips and tricks on how to repair them using glue.
Preparing the Broken Sandstone
When dealing with broken sandstone, it’s important to properly prepare the pieces before applying any glue. The preparation process will ensure that the glue adheres to the sandstone and that the final result is sturdy and long-lasting. This step requires some attention to detail and patience, but it is essential for achieving a successful repair. So, grab your gloves and get ready to learn how to prepare your broken sandstone for gluing. No relevant anchor for linking to other articles in the text.
Clean the Area
Before applying any glue to the broken sandstone, it is important to clean the area where the pieces will be attached. Dirt, dust, and debris can affect the bonding ability of the glue, so it is important to remove them as thoroughly as possible. Here are some steps that you can follow to clean the area properly:
- Use a soft-bristled brush or a clean, dry cloth to brush away any loose dirt or debris from the broken pieces of sandstone.
- For more stubborn dirt or stains, use a solution of warm water and mild detergent to gently scrub the area. Avoid using any harsh chemicals or abrasive cleaners that could damage the sandstone surface.
- Rinse the area thoroughly with clean water to remove any soap residue or remaining dirt.
- Allow the area to dry completely before proceeding with the gluing process.
By following these cleaning steps, you can ensure that the broken sandstone pieces are free from any particles that could prevent the glue from properly bonding the pieces back together. This will ultimately help ensure a stronger and more durable repair.
For more information on how to make strong glue for plastic, check out our guide on making homemade plastic glue.
Positioning the Pieces
Before applying the glue, it is important to properly position the broken pieces of sandstone. This step is crucial as it determines how well the pieces will fit together after the glue is applied.
Step 1: Lay out the broken pieces of sandstone on a flat surface.
Step 2: Examine each piece to determine its proper position. Take note of any cracks or missing fragments.
Step 3: Begin by piecing together the largest fragment of sandstone. It is important to get this piece in the correct position before adding the smaller pieces.
Step 4: Use a toothbrush or a soft-bristled brush to carefully remove any loose debris, dirt, or debris from the surface of the broken pieces.
Step 5: Once the largest fragment is in place, add the smaller pieces one at a time. Piece together the fragments like a puzzle, ensuring that each piece fits perfectly before moving on to the next one.
Step 6: Use your fingers to gently press the broken pieces into place. Be careful not to apply too much force as this can cause further damage to the sandstone.
When the pieces are positioned correctly, they should fit together snugly without any noticeable gaps. If there are any gaps, you may need to adjust the position of the pieces or sand some of them down to ensure a tight fit.
By following these steps, you can properly position the broken pieces of sandstone before applying glue. Once the pieces are in place, you can move on to the next step in the process. If you need additional help with gluing, check out our article on how to glue wax together or how to glue seashells to wood.
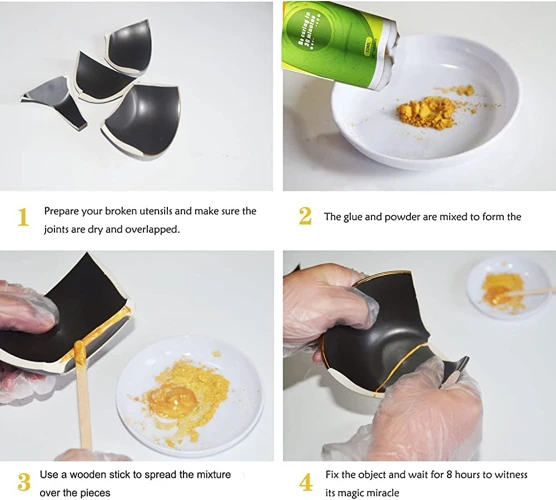
Applying the Glue
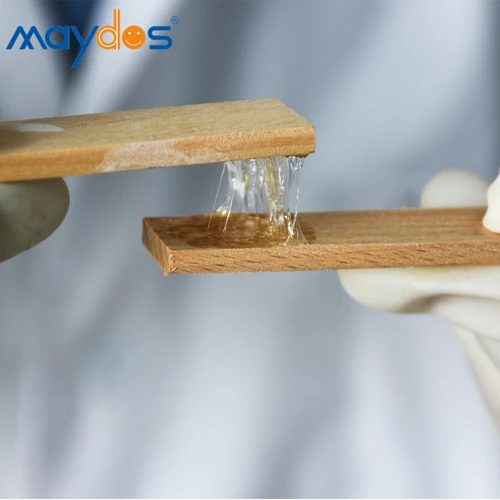
With the broken sandstone pieces properly positioned, it’s time to start applying the glue that will join them back together. Choosing the right glue is crucial in ensuring that the bond is strong, durable and able to withstand environmental factors such as temperature changes, moisture and shifting. In this section, we’ll go over the different types of glues you can use, how to apply them correctly and the best way to clamp or tape the sandstone while the glue sets. If you’re not sure which glue to use, be sure to check out our guide on which Loctite glue is the strongest.
Choosing the Right Glue
Choosing the right glue for sandstone is crucial to ensure a strong and permanent bond. There are different types of glue available in the market that can be used for repairing sandstone. Here are some of the most commonly used glues for sandstone along with their features and benefits:
| Glue | Features | Benefits |
|---|---|---|
| Epoxy Glue | Epoxy glue is a two-part adhesive that consists of resin and hardener. It creates a strong and durable bond that is resistant to water, heat, and chemicals. | Epoxy glue is perfect for repairing sandstone as it can fill gaps and cracks. It also dries clear, making it ideal for use on colored or patterned sandstone. |
| Polyurethane Glue | Polyurethane glue is a waterproof adhesive that expands as it dries. It is ideal for bonding porous materials like sandstone. | Polyurethane glue creates a strong and flexible bond that can withstand extreme temperatures and weather conditions. |
| Cyanoacrylate Glue | Cyanoacrylate glue, also known as Super Glue, is a fast-drying adhesive that bonds quickly and strongly. | Cyanoacrylate glue is perfect for small repairs and cracks as it sets in seconds. It is also resistant to water and most chemicals. |
| Polyester Glue | Polyester glue is a two-part adhesive that consists of resin and hardener. It is ideal for filling gaps and cracks in sandstone. | Polyester glue dries quickly and can be sanded and painted over to match the color and texture of the sandstone. |
When choosing a glue, it is important to consider the type of damage to the sandstone and the location of the repair. Epoxy glue is ideal for larger repairs and gaps, while cyanoacrylate glue is perfect for smaller repairs and cracks. Polyurethane glue is perfect for bonding porous materials like sandstone, while polyester glue is ideal for filling gaps and cracks. By choosing the right glue for your sandstone repair, you can ensure a strong and permanent bond.
Applying the Glue
When it comes to applying glue to the broken sandstone, there are a few things to keep in mind to ensure a successful repair. Firstly, it’s important to choose the right type of glue for sandstone. Epoxy and cyanoacrylate (also known as super glue) are both excellent choices, as they can bond to a variety of surfaces and are waterproof. Avoid using regular household glue as it may not bond well with the porous surface of sandstone.
Once you have chosen the appropriate glue, it’s time to apply it to the broken surfaces of the sandstone. Here are some tips to keep in mind:
| Step | Instructions |
|---|---|
| 1. | Using a small brush or toothpick, apply a thin layer of glue to one of the broken surfaces. |
| 2. | Press the broken pieces together firmly, making sure they align properly. Hold them together for a few minutes to allow the glue to start bonding. |
| 3. | If the break is large or there are multiple pieces, apply glue to the other broken surfaces and press them together, one by one, until the entire piece is whole again. |
| 4. | Wipe away any excess glue with a damp cloth before it dries. |
Remember not to apply too much glue as this can cause a messy and uneven repair. It’s better to apply several thin layers and build up the bond gradually. Once you have glued all the pieces together, it’s time to clamp or tape them in place to secure the bond while it dries.
Clamping or Taping the Sandstone
After applying the glue to the broken sandstone pieces, it’s essential to clamp or tape them together. This step is crucial to ensure the broken pieces stick together correctly.
Clamping: Clamping is the most effective method to glue the broken sandstone, especially for larger pieces. You can use clamps to hold the broken pieces together while they dry. First, apply the glue to both sides and align the pieces. Then, use the clamps to hold them in place. It’s essential to tighten the clamps enough to create pressure but not too much to break the sandstone further.
Taping: If clamping is not possible, or the broken sandstone pieces are small, you can use tape to hold them together. First, apply glue to both sides of the broken sandstone. Second, position the broken pieces in place and wrap tape around them tightly to hold them together. Ensure that the tape is tight enough to hold the broken pieces together, but not too tight to cause further damage to the sandstone.
Important tip: Make sure that the glue isn’t squeezed out of the joint too much. Excess glue can cause a mess and create a weak joint. It’s essential to follow the manufacturer’s recommendation for the glue application to ensure the proper amount of adhesive applied.
After clamping or taping the broken sandstone pieces, leave them to dry and cure completely. It’s important not to disturb the broken pieces while they cure to achieve the best results.
Curing and Finishing
After successfully gluing the broken sandstone back together, there are important steps to take in order to ensure a strong and long-lasting bond. The curing and finishing process is crucial in achieving optimal results. This stage requires patience and attention to detail in order to achieve a seamless repair. Let’s dive into the necessary steps for curing and finishing your broken sandstone.
Curing Time
Once you have applied the glue to the broken sandstone and have clamped or taped it together, you need to wait for the glue to dry and cure properly. The curing time will vary depending on the type of glue you choose.
It is essential to follow the manufacturer’s instructions for curing time for the glue you have selected to achieve the best results. Using the wrong curing time may cause the glue to crack or not bond properly. It is also important to note that extreme temperatures and humidity levels can affect the curing time.
Here is a table summarizing the curing times for some common types of glue used for sandstone repairs:
| Type of Glue | Curing Time |
|---|---|
| Epoxy | 24 hours to 48 hours |
| Polyurethane | 3 hours to 6 hours |
| Silicone | 24 hours to 48 hours |
| Cyanoacrylate (Super Glue) | A few seconds to a minute |
It is important to remember that the curing time is the minimum amount of time needed for the glue to become strong and secure. For best results, it is recommended to wait for an additional 24 hours or more before using or applying pressure to the repaired sandstone.
During the curing process, it is also crucial to avoid touching or moving the sandstone to prevent any unintentional damage. Be patient and wait for the glue to dry and cure completely before moving forward with the next steps of the repair process.
Sanding and Cleaning
Now that your glued sandstone has cured, it is time for the final touches. One of the most important steps is sanding and cleaning.
Sanding:
Sanding is important to smooth out any rough edges or excess glue that may have dried during the curing process. It is best to use sandpaper with a fine grit between 120-220. Use a folded piece of sandpaper to sand along the glued edges, making sure to smooth them out as much as possible. Be careful not to over-sand and cause any further damage to the sandstone.
Cleaning:
Once sanding is complete, it is important to clean the sandstone thoroughly. Use a damp cloth to wipe away any sanding dust or debris. Use a gentle soap solution to remove any additional dirt or grime. Rinse the soap away with clean water and let the sandstone dry completely.
To ensure the best finished product, it might be helpful to repeat the sanding and cleaning process one or two more times until the surface is completely smooth and clean.
| Sanding | Cleaning |
|---|---|
| Use sandpaper with a fine grit | Wipe away sanding dust or debris with a damp cloth |
| Sand along the glued edges to smooth them out | Use a gentle soap solution to remove dirt or grime |
| Be careful not to over-sand and cause further damage | Rinse soap away with clean water |
| Repeat sanding process one or two more times if necessary | Let the sandstone dry completely |
By taking the time to sand and clean your broken sandstone, you can ensure that the finished product looks seamless and professional. Don’t rush through this important step, as it can make a huge difference in the final appearance of your project.
Conclusion
After following the steps and tips provided in this article, you should now have successfully glued your broken sandstone. It is important to remember that the key to a successful repair is proper preparation, application, and curing. Always wear gloves when handling the glue and sandstone, as well as make sure to choose the right type of glue for the job.
When applying the glue, take your time and make sure to cover the broken surfaces evenly. This will ensure a strong bond and prevent any future breakage. Once you have applied the glue, using a clamp or tape to hold the sandstone in place will also help to create a stronger bond.
After the glue has cured, it is important to sand and clean the repaired area to ensure a seamless finish. This will also help to blend in the repaired area with the surrounding sandstone, making it appear as if it was never broken.
Remember, patience and attention to detail are key when repairing broken sandstone. By taking your time and following the steps outlined in this article, you can restore the beauty and function of your sandstone to its former glory.
Frequently Asked Questions
Can I glue broken sandstone without professional help?
Yes, it is possible to glue broken sandstone on your own by following the steps outlined in this article.
What type of glue should I use to repair sandstone?
You should use an epoxy-based glue specifically designed for stonework. This will provide a strong and durable hold.
What if I cannot find the exact piece that broke off my sandstone?
If the missing piece is small, you can use a filler to replace it. If the missing piece is large, consider creating a new piece using a mold and a mixture of sandstone dust and epoxy.
Can I use regular super glue to repair sandstone?
No, regular super glue will not hold well on sandstone and is not recommended.
Do I need to wear gloves when applying the glue?
Yes, it is important to wear gloves to protect your skin from the chemicals in the glue.
How long do I need to wait for the glue to dry?
The drying time will depend on the type of glue you use. Follow the manufacturer’s instructions, but expect to wait at least 24 hours for the glue to fully cure.
What should I do if the sandstone pieces do not fit together perfectly?
You can use a sandpaper to smooth out any rough edges and to create a better fit. Do not sand the sandstone too much, as this can weaken the structure.
What should I do if the sandstone is particularly dirty or stained?
You should clean the area with a mild detergent solution and a soft-bristled brush before beginning the repair process.
Can I use tape instead of a clamp to hold the sandstone in place while the glue dries?
Yes, tape can be used as a clamp replacement. However, make sure to use a strong and durable tape.
Is it possible to make the repaired area blend in with the rest of the sandstone?
Yes, after the glue has fully cured, you can sand the area to smooth out any rough spots and use a dye to match the color of the sandstone.