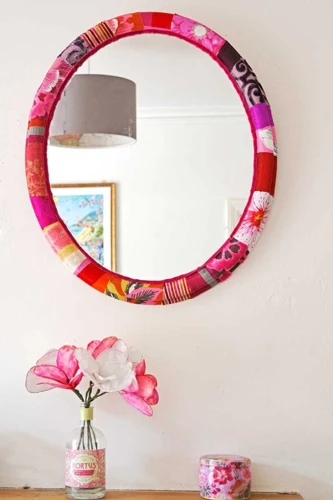
Placing a frame onto a mirror is a great way to add a touch of elegance to your home decor. However, the process of gluing a frame to a mirror can be somewhat tricky. With so many different adhesive options available, it can be tough to know which one to choose. In this step-by-step guide, we will explore the materials needed to complete the process, go through the prep work necessary to ensure a solid bond, and finish with the proper way to dry and finish the project. By the end of this guide, you will have a beautiful, framed mirror that will impress all who see it. So, let’s get started!
Materials Needed

When it comes to gluing a frame to a mirror, using the right materials is essential for a successful outcome. Before beginning, gather the necessary materials: glue, painter’s tape, a clean, soft cloth, and a well-ventilated workspace. It’s also important to choose the right type of glue for the job; some popular options include E6000 glue, 502 glue, and silicone adhesive. The type of glue used will depend on the materials being joined together and the project’s specific needs. For more information on the best type of glue for your project, check out our guide on what is the best glue for bamboo.
Selecting the Right Glue
When it comes to selecting the right glue for the job, it can be confusing and overwhelming. However, choosing the right glue is important to ensure the frame is securely attached to the mirror. To select the right glue, consider a few factors like the materials of the frame and mirror, the environment where the mirror will be placed, and how strong the holding power should be.
Here is a list of some popular types of glue:
- Epoxy glue: This is a strong adhesive that creates a permanent bond. It’s great for use on most types of materials, but it requires mixing two components to activate the glue.
- Polyurethane glue: This glue expands as it dries, which creates a strong bond, but can be messy to work with and difficult to clean up.
- Cyanoacrylate glue: Also known as super glue, this adhesive dries quickly and is perfect for small frames or mirrors. However, it may not be ideal for larger, heavier frames.
Considering the factors mentioned above, E6000 glue is an excellent choice for gluing a frame to a mirror. It creates a strong, permanent bond, dries clear, and is waterproof, making it ideal for use in bathrooms and other damp environments. Additionally, it can be used on a variety of materials like wood, plastic, and glass. It is wise to check the manufacturer’s instructions regarding the drying time and amount to ensure that the desired results are achieved.
Preparing the Frame and Mirror
Before you start gluing the frame to the mirror, it is important to properly prepare both surfaces to ensure a strong and lasting bond. This step is crucial to the success of the project, so take your time and pay attention to detail. Proper preparation will prevent any issues with the glue adhering to the surfaces, resulting in a beautiful and secure final product.
Removing Dust and Dirt
Before you begin to glue the frame to the mirror, it is important to make sure both the frame and the mirror are clean. Removing dust and dirt from the surfaces that will be glued is essential for a strong bond. Follow these simple steps to ensure both the frame and mirror are free of any debris:
- Wipe down the frame and mirror with a clean, dry cloth to remove any loose dust or dirt.
- For any stubborn dirt or residue on the frame, use a damp cloth with a mild detergent to gently clean the surface. Be sure to dry it thoroughly before moving on to the next step.
- It’s important to note that some mirrors have protective coatings on the back, which should be left intact to ensure longevity. If you’re unsure whether your mirror has a coating or not, check the manufacturer’s instructions or contact a professional to advise you accordingly.
- Finally, use a lint-free cloth to wipe down both the frame and mirror to ensure there is no remaining dust or dirt. This will ensure that the glue adheres to a clean surface for a durable bond.
Following these steps will ensure that the frame is properly adhered to the mirror, and will guarantee a long-lasting bond. Now that the surfaces are clean, it’s time to move on to the next step: applying tape to protect the mirror’s edges.
Applying Tape
When it comes to applying the glue to the frame and mirror, one important step is to apply tape to the mirror surface around the edges. This will help to prevent any overflow of glue onto the mirror itself, which can be difficult to remove without causing damage. There are a few different types of tape that can be used for this step, including painter’s tape or masking tape.
Before applying the tape, make sure that the surface of the mirror is clean and free of any dust or debris. It’s also a good idea to measure the edge of the mirror and mark off the area where the frame will be attached, so that you can apply the tape with precision.
| Step | Action |
|---|---|
| 1 | Clean the surface of the mirror |
| 2 | Measure the edge of the mirror and mark off the area where the frame will be attached |
| 3 | Apply painter’s tape or masking tape around the edge of the mirror, making sure to overlap the tape slightly onto the back of the mirror |
| 4 | Press the tape down firmly to ensure that it adheres to the surface of the mirror |
Once the tape is in place, you can proceed with applying the glue mixture to the back of the frame. Make sure to use an appropriate amount of glue, as too much can cause it to overflow onto the tape and potentially damage the mirror. With the tape in place, you can rest assured that your mirror will be protected throughout the entire gluing process.
If you’re interested in other gluing projects, such as how to build a stitch and glue kayak or how to glue seashells to a picture frame, be sure to check out our other articles for more information.
Applying the Glue
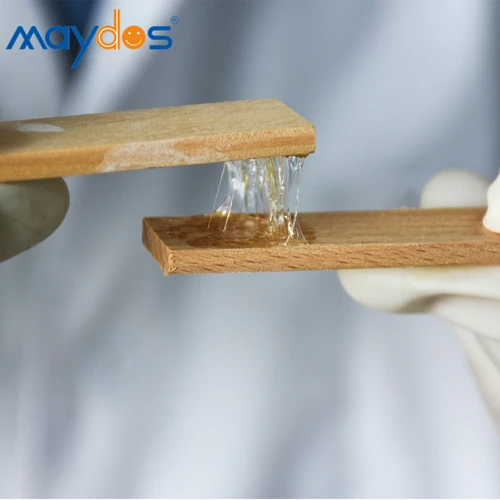
When it comes to applying the glue, it is important to be precise and methodical. Choosing the right glue is crucial, as it will affect the durability of the bond between the mirror and the frame. As we discussed earlier, epoxy, gorilla glue, or construction adhesive are all excellent choices for this project. In this stage, we will go over the step-by-step guide on applying the glue mixture properly, in order to ensure a strong and long-lasting bond between the mirror and the frame. So grab your chosen glue and let’s get started! If you are interested in more projects that involve glue, check out this comprehensive guide on how to build a stitch and glue kayak.
Applying the Glue Mixture
Once you have decided on the right glue mixture and have followed the mixing instructions as per the manufacturer’s guidelines, it’s time to apply the glue to the frame. The best way to do this is to use a brush or a small foam roller. Be sure to apply the glue mixture evenly. Start from the edges of the frame and move towards the center. It’s important to not overapply the glue, as excess glue can seep out when you press the frame onto the mirror.
To apply the glue mixture to the back of the frame, place it on a flat surface with the back facing upwards. Use the brush or roller to apply the glue mixture, ensuring it covers the entire surface that will be in contact with the mirror. It’s best to wear disposable gloves to avoid getting the glue mixture on your skin and to protect the frame from any oils or dirt on your fingers.
Be cautious not to apply too much pressure when putting on the glue, as you don’t want to accidentally break the frame. Once you have applied the glue mixture evenly, let it sit for a few minutes to get tacky. This will help the frame stick to the mirror more efficiently.
Before applying the frame to the mirror, double-check that the glue on the frame is tacky enough and evenly applied. Now, it’s time to carefully affix the frame to the mirror. Remember to work with precision and a steady hand. The more precise you are, the less likely you are to make a mistake in the process.
If you want to learn more about attaching objects to surfaces, such as seashells to a picture frame, stainless steel sheets to the wall, or 2×4 pieces of lumber together, check out our related articles linked above.
Using the Correct Amount
When it comes to gluing a frame to a mirror, using the correct amount of glue is crucial. Too much glue can cause excess glue to seep out, which can ruin the appearance of your mirror and frame. On the other hand, using too little glue might not be enough to hold the frame securely in place. It is important to use the right amount of glue for each project.
One way to ensure you use the correct amount of glue is to create a mixture of glue and water. This diluted solution will make it easier to apply the glue and prevent any excess from seeping out. A good ratio is to mix one-part glue to two parts water. Mix the solution well before applying it to the frame.
Table: Measuring the Correct Amount of Glue
| Size of Frame | Amount of Glue |
|---|---|
| Small, under 8 inches | 1 teaspoon |
| Medium, 8-16 inches | 2 teaspoons |
| Large, over 16 inches | 1 tablespoon |
Of course, the amount of glue you use will also depend on the size of your frame. Use the table above to help you measure the correct amount of glue for your project. Remember to apply the glue mixture evenly around the edges of the frame, leaving a small gap between the frame and the mirror to allow for any expansion.
If you’re using a strong adhesive like E6000 glue or 502 glue, it is best to follow the manufacturer’s instructions on how much to use. These types of glues are known for their high bonding strength and require only a small amount to hold the frame securely in place.
Using the correct amount of glue is important for achieving a professional-looking finish. Make sure to measure and mix the glue correctly for the size of your project, and apply it evenly to avoid any unsightly excess. With a little bit of care and attention, your mirror and frame will be securely glued together and ready to hang up in no time.
Placing the Frame onto the Mirror
Placing the Frame onto the Mirror
Once the glue mixture has been applied to the frame and the tape has been placed onto the mirror, it’s time to attach the frame to the mirror. This may seem like a simple task, but it’s crucial to take care so that you don’t damage the frame or the mirror.
Start by carefully picking up the frame and positioning it over the mirror. Take your time to make sure it’s aligned correctly. If the frame has hanging hardware, make sure that it’s situated in the right position and that it’s level. Once everything looks good, slowly lower the frame onto the mirror.
Be sure that you don’t move the frame once it’s in place, as this could cause the glue to smear or the tape to shift. Press down firmly on all areas of the frame to ensure that there is good contact between the frame and the mirror.
If the frame is large or heavy, it’s a good idea to use clamps to hold it in place until the glue dries. Place the clamps onto the frame and tighten them gently until the frame is held securely in place. Make sure that the clamps aren’t too tight, as this could cause the frame to warp or bend.
Once you’ve placed the frame onto the mirror and secured it with clamps, take a step back and review your work. Double-check that everything is level and aligned the way you want it. Then, allow the glue to dry completely before removing the clamps.
Congratulations, you’ve successfully glued a frame to a mirror! With this technique, you can transform any plain mirror into a beautiful and custom piece that reflects your personal style. If you’d like to learn more about gluing different materials, check out our guides on how to glue silicone rubber or how to glue broken plastic.
Drying and Finishing
At this stage, it’s important to exercise patience and allow the glue to dry completely. Rushing the process may lead to a poorly attached frame that could easily fall off the mirror. Once the glue has set, you can remove any tape and add some finishing touches to the frame. These final steps may seem small, but they can make a significant difference in the overall appearance of your mirror. Let’s dive in and explore the drying and finishing process in detail.
Allowing the Glue to Dry
After successfully placing the frame onto the mirror with glue, it’s time to let it dry. It is important to carefully follow the instructions on the glue you have selected to use. The drying time can vary depending on the type of glue you have chosen. In most cases, it usually takes around 24 hours for the glue to dry completely. To avoid any accidental movements, it’s important not to touch the frame or the mirror surface while the glue is drying.
During this time, it’s best to keep the frame in a safe, secure and dry area. For example, you can place the frame on a flat surface like a table, and cover it with a clean cloth to prevent dust or debris from sticking to it. If you don’t have an area where you can leave the frame undisturbed for 24 hours, you may consider using clamps to hold the frame firmly in place.
Another important thing to keep in mind is the temperature and humidity of the room in which the frame is drying. Excessive moisture or temperature can affect the adhesive properties of the glue, which can result in the frame becoming loose or unstable. To ensure the best results, make sure the room is adequately ventilated and maintains a consistent temperature.
Once the glue has completely dried, you can remove any excess adhesive with a razor blade or a sharp object. Be sure to use caution during this process to avoid damaging the mirror or the frame. Finally, you can enjoy your newly framed mirror for years to come.
Finishing Touches
After the glue has completely dried, you can remove the tape and make some final touches to your newly framed mirror to ensure that it looks as good as new. Here are some finishing touches you can add to your frame:
| Finishing Touch | Explanation |
|---|---|
| Painting | If your frame is made of wood or any other material that can be painted, then you may want to add some color to your frame. You can paint it according to the color scheme of the room or any other color of your choice. |
| Sanding | If your frame has any rough edges or splinters, you can sand them down to make the frame smoother and more polished. |
| Cleaning | After the glue has dried, wipe down your mirror and frame to remove any excess glue residue. You can also give it a deeper clean using a glass cleaner to remove any smudges or dirt. |
| Hanging | If you haven’t already, you can now hang your mirror. Make sure to use the appropriate hardware and screws to support the weight of the mirror and frame. |
Adding these finishing touches can give your mirror a professional and polished look. Take your time and enjoy your newly framed mirror.
Conclusion
In conclusion, gluing a frame to a mirror is a simple and affordable way to upgrade the look of your home decor. It’s important to choose the right type of glue for your project, and to make sure that both the frame and mirror are properly cleaned and prepped before beginning. Taking the time to apply the glue mixture evenly and using the correct amount will ensure a successful project.
Remember to allow ample time for the glue to dry thoroughly before removing any tape or repositioning the mirror. Once the glue is dry, you can put the finishing touches on the project by adding any additional decor or touch-ups needed.
By following the step-by-step guide outlined in this article and using the proper materials and techniques, you can easily glue a frame to a mirror and create a beautiful and unique statement piece for your home. Get creative with your choice of frame and mirror and enjoy the satisfaction of completing your own DIY project.
Frequently Asked Questions
1. Can all types of glue be used to attach a frame to a mirror?
No. Only specific glues designed for bonding glass and wood should be used.
2. How much tape should be applied to the mirror?
Enough to cover the edges where the glue will be applied, typically 1/4 inch thick.
3. How long does the glue take to dry?
The drying time depends on the type of glue used. It can range from a few hours to 24 hours.
4. Will the glue leave any marks on the mirror?
If used correctly, the glue should not leave any marks on the mirror.
5. Can the glue be removed if the frame needs to be repositioned?
It may be possible to remove the glue, but it could damage the mirror. It’s best to position the frame correctly the first time.
6. Can this method be used for hanging a heavy mirror?
No. This method is suitable for lightweight mirrors. Heavy mirrors should be hung using special brackets designed for the weight and size of the mirror.
7. Is it necessary to clean the frame before attaching it?
Yes. The frame should be cleaned thoroughly to ensure the glue adheres properly.
8. Can this method be used for attaching a frame to a different type of surface, such as a tile?
No. This method is specifically designed for glass surfaces. Other types of surfaces require different types of glue and techniques.
9. Will the glue hold in humid environments?
Yes. The glue is designed for a strong, long-lasting bond even in humid environments.
10. Can this method be used to attach a frame to the front of a mirror?
No. This method is designed for attaching the frame to the back of the mirror. Attaching a frame to the front of a mirror requires a different method and specialized materials.