Wood is a versatile, warm, and timeless material used in furniture, flooring, and various crafts. However, it is susceptible to damage, including unsightly cracks. Whether you are a seasoned woodworker or a DIY enthusiast, learning how to repair hairline crack in wood is invaluable. This post will guide you through the process of seamlessly repairing these fractures, restoring the wood’s integrity and aesthetics.
Understanding Hairline Cracks in Wood
The Causes of Hairline Wood Fractures
Hairline cracks in wood can originate from various sources, such as environmental changes, improper drying, or physical stress. Understanding the root cause is critical for effective repair and prevention. Fluctuations in humidity and temperature cause wood to expand and contract, which often leads to cracking. Additionally, if wood is not adequately dried before use, the resulting shrinkage can create fractures.
Assessing the Severity of Wood Cracks
Before attempting a fix hairline crack in wood, it’s essential to assess the crack’s severity. Minor, hairline cracks are often cosmetic and can be easily addressed, while larger cracks may indicate structural issues requiring more extensive repair. Inspecting the crack carefully will help you determine the appropriate course of action.
Preparation for Repairing Hairline Cracks in Wood

Gathering the Necessary Supplies
Successful woodworking crack repair starts with having the right supplies on hand. You’ll need:
- Quality wood glue for cracks
- Fine-grit sandpaper
- Clean cloths
- Clamps
- Putty knife or similar applicator
Cleaning and Prepping the Wood Surface
Before you glue hairline wood crack, ensure the area is clean and free from dust or debris. Use a soft brush to clear out the crack and wipe the surrounding wood with a damp cloth. Allow the wood to dry completely before proceeding to ensure the glue adheres properly.
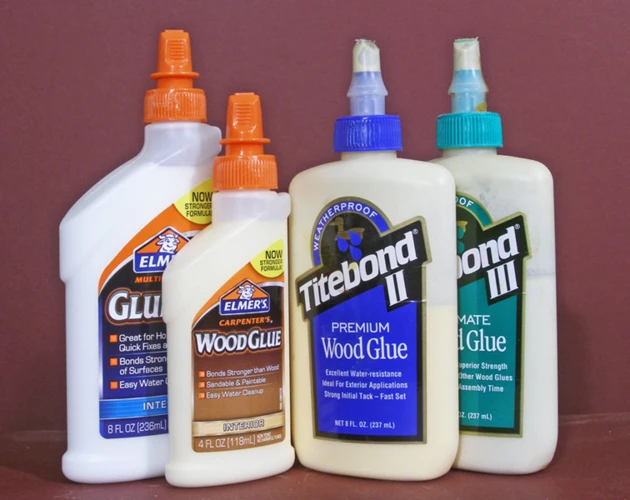
Choosing the Right Adhesive for Wood Cracks

Types of Wood Glue for Cracks
There are various types of adhesive for wood cracks, each designed for specific repair needs. PVA glue is a common choice for its strong bond and ease of use. Epoxy resin is another option, well-suited for larger cracks due to its gap-filling properties. Cyanoacrylate, or super glue, can be ideal for very fine cracks.
Benefits of Using Specialized Wood Crack Repair Adhesive
Using a specialized wood crack repair adhesive provides several benefits, including a stronger bond, reduced visibility of the repair, and compatibility with wood finishes. Specialized glues are formulated to penetrate the wood fibers deeply, creating a more durable repair.
Step-by-Step Guide to Glue Hairline Wood Crack
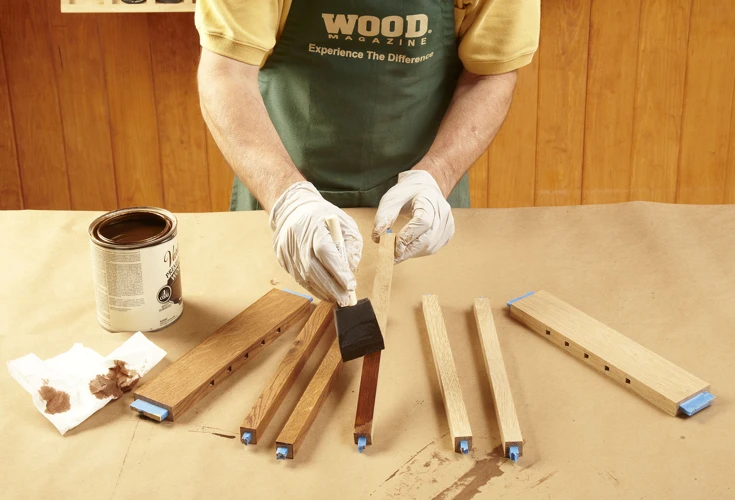
Applying the Wood Glue
Begin the repair by carefully applying the wood glue into the crack. Use a putty knife to press the glue down, ensuring it reaches the full depth of the crack. Be generous but avoid excessive overflow, which can be difficult to remove once dried.
Clamping and Curing
After applying the glue, align the wood pieces if necessary, and use clamps to hold them in place. Ensure the pressure is even to avoid further cracking. Leave the clamps on for the glue manufacturer’s recommended time to allow for proper curing. Typically, 24 hours is sufficient for a full bond to form.
DIY Wood Crack Repair Techniques
Mending Small Wood Cracks with DIY Solutions
For those who prefer to mend small wood cracks using readily available materials, DIY solutions can be effective. A mixture of sawdust and wood glue can create a paste that matches the wood’s color, making the repair less noticeable. Apply this mixture into the crack and sand it smooth once dry.
Sealing Hairline Wood Cracks for Longevity
After the initial repair, sealing hairline wood cracks can extend the life of the fix. A clear wood sealant applied over the area will protect against moisture and wear, ensuring the crack does not reopen or worsen over time.
Finishing After the Repair
Sanding and Smoothing the Repaired Area
Once the glue has cured, the next step is to sand and smooth the repaired area. Using fine-grit sandpaper, gently sand the surface until it is flush with the surrounding wood. Be careful not to sand too aggressively, which could damage the wood further.
Staining or Painting to Conceal the Repair
If the repaired wood will be visible, staining or painting can help conceal the repair. Choose a finish that closely matches the original wood, and apply it according to the manufacturer’s instructions. This will blend the repair with the rest of the wood, making it nearly invisible.
Maintenance Tips to Prevent Future Wood Cracks
Maintaining proper humidity levels in your home and handling wood items with care can prevent future cracks. Regular inspections and immediate action when cracks are first detected can also help mitigate more severe damage. Always store wood furniture and items away from direct heat sources to minimize the risk of cracking.
When working with delicate repairs such as fixing a hairline crack in wood, precision and the right technique are vital. For guidance on this intricate process, you can read our article on how to glue a hairline crack in wood. If you’re looking to tackle other unique gluing projects, don’t miss our tutorials on how to glue hair on a cap, how to glue cane webbing, and how to glue rhinestones on hair. Each guide is designed to help you achieve the best results with your DIY endeavors.
Conclusion: Achieving a Professional Hairline Wood Fracture Fix
With the right tools, adhesives, and techniques, even novices can achieve a professional hairline wood fracture fix. By following the steps outlined in this guide, you can repair unsightly cracks and enjoy your wood items for years to come. Remember that patience and attention to detail are key to a successful repair.