As we glance towards the exterior of our house, one thing that immediately draws our attention are the walls covered in peeling paint. The sight is not only an eyesore, but the peeling paint also signals that there are underlying issues that need to be addressed. It’s perplexing to think about the causes, the tools and materials needed, and how to go about the steps to fix the peeling paint. In this article, we will guide you through the process of fixing peeling paint on the outside of your house step-by-step, and provide tips to help with paint repair and maintenance.
Causes of Peeling Paint
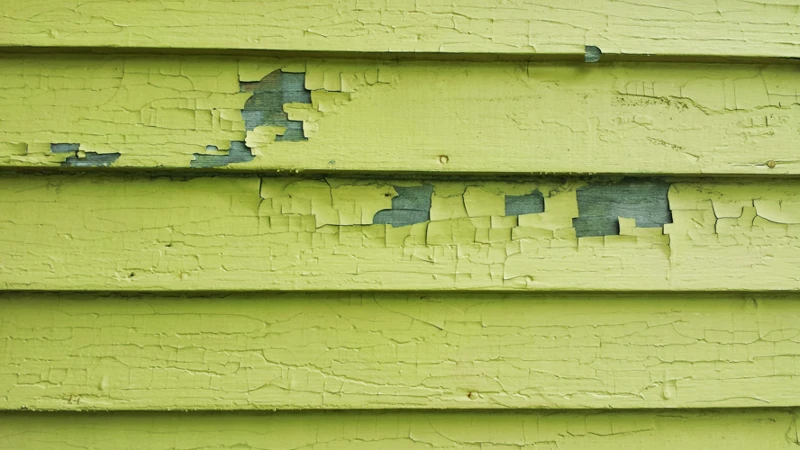
The exterior of your home is constantly exposed to changing weather conditions which can cause the paint to peel or fade. It can be frustrating to see your beautiful home deteriorate, especially when you’ve invested so much money and time on the paint job. There are many factors that contribute to peeling paint and it’s important to identify them so that you can effectively fix the problem. Some common causes of peeling paint include moisture, temperature changes, and the use of low-quality paint. Understanding the reasons why your home’s paint is peeling is the first step in finding a solution.
Moisture
One of the main causes of peeling paint on the outside of your house is moisture. Moisture can infiltrate the walls of your home from a variety of sources, including rain, humidity, and leaks in your roof or plumbing. Once moisture gets into the walls, it can cause the paint to lose its grip on the surface, leading to flaking and peeling. This is particularly problematic in areas with high humidity or frequent rainfall.
To prevent moisture from causing paint peeling, it’s important to ensure that your home’s exterior is properly sealed and maintained. This may include regularly checking and repairing any leaks in your roof and plumbing, as well as installing proper ventilation to prevent moisture buildup in your home.
In addition to preventing moisture from entering your home, you can also take steps to help your painted surfaces resist its effects. For example, you can choose high-quality exterior paint that includes waterproofing agents or apply a sealant after painting to help lock out moisture.
Regular maintenance of your home’s exterior can also help to prevent issues with moisture-related paint peeling. This may include washing the exterior of your home regularly to remove dirt and grime that can hold moisture against the surface, as well as trimming back any trees or bushes that may be blocking airflow and contributing to moisture buildup.
By taking these steps to prevent and mitigate issues with moisture, you can help to keep your home’s exterior looking great for years to come. For more tips on maintaining the paint on the outside of your house, see our article on how to keep painted exteriors fresh.
Temperature Changes
One of the causes of peeling paint on the outside of your house is temperature changes. The expansion and contraction of the paint due to temperature changes, particularly from hot to cold conditions or vice versa, can cause the paint to lose its adhesion to the surface.
To prevent temperature-related peeling, it’s important to use paint that’s specifically formulated for the climate in which you live. Additionally, it’s best to apply paint during ideal weather conditions, which typically means temperatures between 50 and 70 degrees Fahrenheit.
Proper surface preparation before painting is essential to ensure a smooth and long-lasting finish. This includes cleaning the surface of any dirt, grime or debris, and allowing it to completely dry before painting.
Regular maintenance is also important to help prevent temperature-related peeling. Check the painted surfaces of your home periodically, and touch up any areas that show signs of wear and tear. A small touch-up can prevent a larger project down the road.
Proper maintenance of the exterior of your home can help prevent not only peeling paint but also other issues such as fading paint and mold growth. For more tips on maintaining the exterior of your home, check out our article on the importance of home exterior maintenance and how to keep your walls mold-free.
Low-Quality Paint
One of the causes of peeling paint on the outside of your house is the use of low-quality paint. When it comes to exterior paint, it’s important to invest in a high-quality product to ensure that it adheres well and lasts for a long time. Using cheap or low-quality paint can cause it to peel or flake off over time, leaving your home vulnerable to the elements.
In order to avoid using low-quality paint, it’s important to do your research and choose a brand that is known for its durability and long-lasting finish. Look for paint that is specifically designed for exterior use, and be sure to choose a color that is fade-resistant to prevent the paint from becoming dull or discolored over time.
Additionally, it may be necessary to invest in more paint than you initially anticipated in order to achieve a good finish. Sometimes, it takes several coats of high-quality paint to achieve the desired look and level of protection.
Ultimately, using low-quality paint is a common mistake that can lead to peeling and flaking. By investing in a good product and taking the time to properly prepare and paint your home’s exterior, you can help ensure that the paint will last for years to come.
For more tips on maintaining the exterior of your home, check out our article on preventing fading paint or our guide to the best tools for exterior painting touch-ups. And if you need to touch up the exterior paint of your home, check out our tips on how to do it effectively. Finally, consider repainting your home’s exterior every 5-10 years, which we discuss in our article on how often to repaint your home’s exterior.
Tools and Materials Needed
To properly fix peeling paint on the outside of your house, you will need a few tools and materials. Here is a list of items you should have on hand before starting your project:
1. Scraper: You will need a scraper to remove the loose, peeling paint from the surface of your house. A sharp scraper with a comfortable grip will make the job easier.
2. Sandpaper: Once the loose paint is removed, sandpaper will be needed to create a smooth surface for the new paint. It is recommended to use a sandpaper with a grit of at least 80 to ensure a good surface for the new paint to adhere to.
3. Cleaning solution: Before you can apply the new paint, the surface of your house needs to be cleaned thoroughly. There are a variety of cleaning solutions available, and you should choose one based on the type of surface you will be painting over.
4. Painter’s tape: Use painter’s tape to protect areas around the peeling paint that you do not want to paint over. This will help ensure clean lines and prevent the new paint from bleeding onto other surfaces.
5. Primer: A good-quality primer is essential to creating a strong bond between the old and new paint layers. You should choose a primer that is compatible with the type of paint you will be using.
6. Paint: Finally, you will need to choose a high-quality paint to apply over the primed surface. Choose a paint that is designed for exterior use, and select a color that complements your home’s exterior design.
By having these tools and materials ready, you can ensure a successful and long-lasting paint repair project for your home’s exterior.
Steps to Fix Peeling Paint
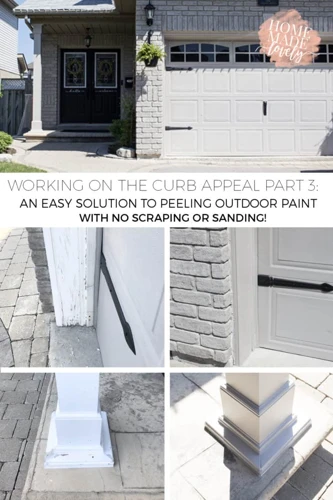
After identifying and understanding the reasons behind peeling paint, it’s time to roll up your sleeves and fix the issue. While it might seem like a daunting task, fixing peeling paint on the outside of your house can be done by following a few simple steps. With the right tools and a little patience, you’ll have your home looking as good as new in no time. So let’s dive into the process of repairing peeling paint on your home’s exterior.
1. Remove Loose Paint
One of the first steps in fixing peeling paint on the outside of your house is to remove any loose or peeling paint from the affected area. This is an important step because leaving loose paint on the surface can lead to further peeling and create an uneven surface for the new paint to adhere to.
To remove the loose paint, you will need the following tools and materials:
- Paint scraper: This tool will help you to scrape off the peeling paint from the surface. You can use a handheld scraper or an electric paint scraper.
- Safety gear: Wear gloves, safety glasses, and a dust mask to protect yourself from paint dust and debris.
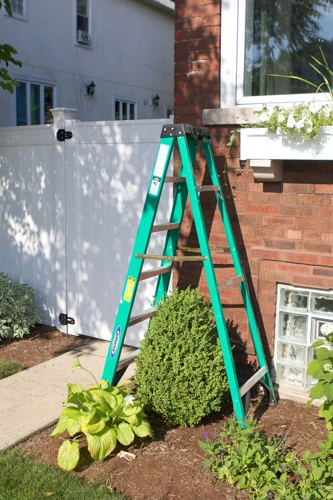
- Ladder or scaffolding: If the peeling paint is on a high surface, you will need a ladder or scaffolding to reach the affected area safely.
Once you have gathered your tools and materials, follow these steps to remove the loose paint:
- Prepare the surface: Before starting, cover the surrounding area with a drop cloth to catch any debris that falls during the scraping process.
- Start scraping: Hold the scraper at a 45-degree angle to the surface and work in a back-and-forth motion to scrape off the loose paint. Be careful not to scrape too hard and damage the surface underneath the paint.
- Continue scraping: Move on to the next section of peeling paint and repeat the scraping process until all loose paint has been removed.
- Clean the surface: Use a brush or a vacuum to remove any paint dust and debris from the surface.
By following these steps, you can effectively remove the loose paint from the surface and prepare it for the next steps in the process of fixing peeling paint on the outside of your house.
2. Sand the Surface
After removing loose and peeling paint, the next step is to sand the surface to create a smooth and even base for the new paint to adhere to. Sanding also helps to remove any roughness or bumps on the surface, ensuring that the new paint job will look flawless. This step is crucial in ensuring that the new paint will adhere well and last for a long time.
To sand the surface, you will need a few tools and materials as listed in the table below:
| Tools | Materials |
|---|---|
| Electric sander or sandpaper | Sandpaper, medium-grit and fine-grit |
| Masking tape | Tack cloth or damp sponge |
| Dust mask and safety goggles |
Electric sander or sandpaper: Depending on the size of the area you are working on, you can use either an electric sander or sandpaper. An electric sander would be ideal for larger areas, while sandpaper is more suitable for smaller sections. Choose a medium-grit sandpaper to start and a fine-grit sandpaper to finish.
Masking tape: You will need masking tape to cover any areas that you don’t want to sand or get paint on. This could include windows, doors, or trim.
Sandpaper: As mentioned earlier, you will need medium-grit and fine-grit sandpaper to ensure that the surface is smooth and even.
Tack cloth or damp sponge: Once you’re done sanding, you’ll need to remove any dust or debris from the surface. A tack cloth or damp sponge is perfect for this task.
Dust mask and safety goggles: Sanding can produce a lot of dust, so it’s important to wear a dust mask and safety goggles to protect your lungs and eyes.
When you have acquired all the necessary tools and materials, you can begin sanding the surface. Start by using the medium-grit sandpaper to remove any rough patches or bumps on the surface. Be sure to sand in the direction of the wood grain. Once you’ve finished sanding with the medium-grit paper, switch to the fine-grit sandpaper and sand the surface again to create a smooth finish.
After sanding, use a tack cloth or damp sponge to remove any dust or debris from the surface. Avoid using a wet cloth or excessive amounts of water as this can damage the wood.
Sanding may seem like a tedious task, but taking the time to do it properly will ensure that the new paint job looks professional and lasts for a long time.
3. Clean the Surface
To ensure the longevity of the newly applied paint, it is crucial to clean the surface thoroughly. Before cleaning, put on suitable protective gear to keep yourself safe from harmful chemicals.
Tools and materials needed:
| Tools | Materials |
|---|---|
| Scrub brush | Detergent |
| Bucket | Water |
| Sponge | Rags |
| Pressure washer(optional) | Gloves |
| Protective eyewear | Face mask |
Begin by removing any loose debris or dirt from the surface. With the use of a scrub brush, remove all remaining paint flakes and chips. If you notice any mold, mildew, or other organic material, mix one part bleach with four parts water in a bucket and scrub the surface.
Next, mix warm water with detergent and wash the surface thoroughly. Use a sponge to apply the solution to the surface in a circular motion, scrubbing any remaining dirt or debris. If the surface is too difficult to clean with a sponge, use a pressure washer to remove stubborn dirt and grime.
After you have finished cleaning, rinse the surface thoroughly with water to remove any soap residue. Use old rags to wipe the surface dry, and let it dry completely before moving on to the next step.
By thoroughly cleaning the surface, you will create a clean and smooth surface where new paint can adhere properly. This will ensure the longevity of the new paint and ultimately save you time and money in the long run.
4. Prime the Surface
Before applying the new coat of paint, it is important to prime the surface to ensure an even and long-lasting finish. Here are the steps to properly prime the surface:
- Cover areas not to be primed: Use painter’s tape to cover any areas, such as windows or doors, that you do not want to be primed.
- Select the right primer: Choose the correct primer for the type of paint you will be using. If using an oil-based paint, use an oil-based primer, and if using a latex paint, use a latex-based primer.
- Apply the primer: Using a paintbrush or roller, apply the primer to the surface in smooth, even strokes, covering the entire area to be painted. Be sure to follow any specific instructions provided by the manufacturer.
- Let the primer dry: Allow the primer to dry completely, which typically takes several hours. Refer to the manufacturer’s instructions for the recommended drying time.
- Sand the primed surface: Lightly sand the primed surface with fine-grit sandpaper to remove any brush marks or imperfections. Be sure to clean up any dust or debris left by the sanding process.
Remember, using a primer is an essential step in creating a smooth and even paint finish that will withstand the elements. Skipping this step could result in peeling or premature deterioration of the new coat of paint.
5. Apply New Paint
After the surface has been properly primed and has dried completely, it is time to apply the new paint using a quality paintbrush or roller.
- Choose the Right Paint: Select a high-quality exterior paint that is designed for your specific type of surface. Pay attention to the paint’s labels and specifications to ensure that it is appropriate for the climate and weather conditions in your area.
- Start with a Base Coat: Apply a base coat of paint to the entire surface, using long, even strokes. Be careful not to apply the paint too thickly, as this can cause it to peel in the future.
- Apply a Second Coat: Once the first coat has dried completely, apply a second coat of paint in the same way. This will help to ensure a consistent and even finish.
- Allow the Paint to Dry: Allow the paint to dry completely according to the manufacturer’s instructions before touching or handling the surface. This will help to ensure that the paint adheres properly and does not peel or flake in the future.
Remember to properly clean your tools and brushes after use, and store them in a dry place to ensure that they remain in good condition for future use. Following these steps will help to ensure that your newly painted surface looks great and lasts for years to come.
Tips for Paint Repair and Maintenance
Tips for Maintaining Paint on Your House
Keeping your house’s paint job looking fresh and new takes some effort, but with a few simple maintenance steps, you can extend the life of your paint job significantly. Here are some tips:
1. Regularly Inspect Your Paint Job
One of the best ways to keep your house’s paint job looking good is to inspect it regularly. Walk around the outside of your house and look for areas of peeling, cracking, or chipping paint. Catching these problems early can save you time and money in the long run.
2. Clean Your House’s Exterior
Dirt, grime, and pollution can all take a toll on your house’s paint job. To keep your paint looking great, you should clean your house’s exterior periodically. This can be done with a power washer or by hand with a scrub brush and water. Be sure to use a cleaning solution that is appropriate for the type of paint you have.
3. Trim Your Landscape
Trees, plants, and shrubs that are too close to your house can cause damage to your paint job. Overhanging branches, for example, can scrape against your house in the wind, leading to scratches and scuffs. Keep your landscape trimmed and away from your house to avoid damage to your paint job.
4. Touch Up Your Paint Job
Over time, your house’s paint job will inevitably begin to fade and wear. When this happens, you should touch up problem areas to keep your paint looking fresh. This can be done by painting small areas that have begun to peel or fade instead of repainting the entire surface.
5. Choose Quality Paint
One of the best ways to ensure that your house’s paint job lasts a long time is to choose high-quality paint. Good quality paints are more resistant to weather conditions and will last longer than low-quality paints. Additionally, high-quality paints are easier to clean and maintain than cheaper, lower-quality varieties.
By following these tips, you can keep your house’s paint job looking great for years to come. With some regular maintenance, your exterior paint can last longer and continue to protect your home from the elements.
Conclusion
In conclusion, fixing peeling paint on the outside of your house is an important task to maintain its appearance and protect it from outdoor elements such as moisture, temperature changes, and sunlight. To fix this issue, you need to remove the loose paint, sand the surface, clean it thoroughly, prime it, and apply new paint. It is essential to use high-quality paint and tools to ensure a long-lasting result.
However, prevention is always better than cure. Regular maintenance of your home’s exterior, including checking for signs of peeling paint, is crucial. It is better to address the problem immediately once noticed to prevent further damage that may lead to more costly repairs. Moreover, knowing the underlying causes of peeling paint can help you take the necessary steps to avoid it in the future.
In summary, fixing peeling paint requires effort and attention to detail, but it is worth it to maintain your home’s beautiful appearance and protect it from damage. Remember to follow the steps carefully and use high-quality materials. With proper maintenance, your home’s exterior will stand the test of time.
Frequently Asked Questions
What causes peeling paint on the outside of the house?
Peeling paint is often caused by moisture, temperature changes, and low-quality paint.
Can I just paint over peeling paint?
No, you need to remove the loose paint and prepare the surface before applying new paint.
What tools do I need to fix peeling paint?
You will need a paint scraper, sandpaper, a cleaning solution, primer, and paint.
How do I remove loose paint?
You can use a paint scraper to remove the loose paint from the surface.
Do I need to sand the surface before painting?
Yes, sanding the surface will help to smooth out any rough areas and improve adhesion.
What should I use to clean the surface?
You can use a mild detergent solution or a specialized cleaning solution designed for paint prep.
Should I use a primer before painting?
Yes, using a primer will help to improve adhesion and ensure that the paint goes on smoothly.
Can I use any type of paint for the repainting?
No, it’s important to use a high-quality, exterior-grade paint that is designed for the specific surface you are painting.
How long does it take to fix peeling paint on the outside of the house?
The time it takes to fix peeling paint will vary depending on the size of the surface and the extent of the damage. Generally, it can take a few days to complete the job.
How can I prevent peeling paint in the future?
You can prevent peeling paint by properly preparing the surface before painting, using high-quality paint and materials, and regularly maintaining and inspecting the paint job for any signs of damage or wear.