As a cannabis grower, one of the most critical decisions you have to make is when to harvest your plants. For Gorilla Glue Auto strain, it’s even more crucial since it affects the potency, yield, and overall quality of the harvest. However, with so many factors to consider, it can be perplexing to determine the exact time to start trimming. In this comprehensive guide, we’ll take a closer look at the essential factors and techniques to determine the best time to harvest your Gorilla Glue Auto strain to achieve optimal results. So, let’s dive in and explore the world of harvesting cannabis!
What is Gorilla Glue Auto?
Gorilla Glue Auto is a popular cannabis strain that has attracted a lot of attention from both growers and users alike. This strain is a hybrid version of the Gorilla Glue #4 and Ruderalis strains, which means it is an autoflowering variety. Gorilla Glue Auto has gained a reputation for being a potent strain that delivers a euphoric and relaxing high. But what exactly is Gorilla Glue Auto and why is it considered one of the best strains in the cannabis community? To learn more about this strain, check out our articles on who invented Gorilla Glue, the stickiest glue in the world, or how to use Gorilla Wood Glue.
Description and THC content
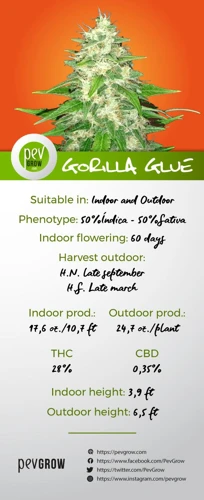
Gorilla Glue Auto is a popular strain known for its potency and high THC content, which can range anywhere from 18% to 25%. This strain is a hybrid cross of three strains: Sour Dubb, Chem Sister, and Chocolate Diesel. It is classified as a hybrid strain with a slightly Indica-dominant profile.
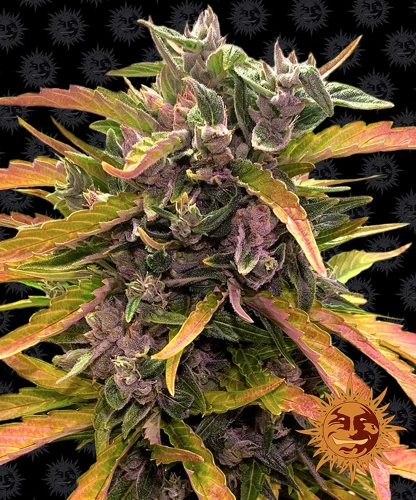
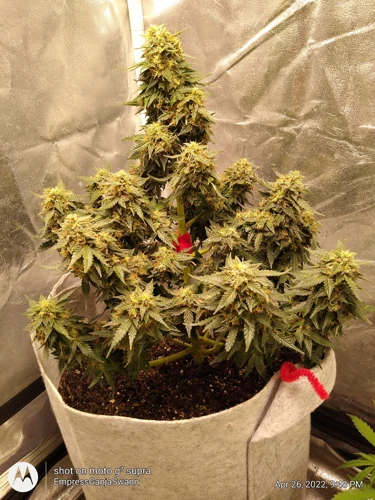
Gorilla Glue Auto’s appearance is characterized by dense buds that are covered in sugary trichomes, which produce a sticky, resinous texture. The plant has broad leaves and a bushy appearance, which makes it easy to identify. This strain is particularly suitable for indoor growing due to its compact size.
THC content is one of the most important factors for any cannabis strain, and Gorilla Glue Auto doesn’t disappoint. With a THC content that can reach up to 25%, it is known for producing a strong, long-lasting high. However, first-time users should be cautious when trying this strain, as its effects can be intense.
Note that it is important to handle Gorilla Glue Auto with care. This strain is extremely sticky and can be difficult to work with, so be sure to use tools and gloves when handling the plant to avoid getting resin all over your hands. Additionally, it is important to properly store your Gorilla Glue Auto to maintain its potency.
For those looking to learn more about the origins of this popular strain, you can read about how Gorilla Glue Girl tragically passed away after using an adhesive containing the same name. However, it’s important to keep in mind that the strain itself is not a harmful adhesive, and it’s a great choice for cannabis enthusiasts looking for a high-quality and potent strain.
When to Start Checking for Harvest Readiness
As a grower, it’s important to know when to start checking for harvest readiness when growing Gorilla Glue Auto. Typically, it takes around 8-10 weeks for Gorilla Glue Auto to mature, but this can vary based on a variety of factors such as growing conditions, genetics, and more.
One good indicator that it’s time to start checking for harvest readiness is when your plants begin to produce buds. At this point, you can start to examine the buds to see if they’re ready to be harvested.
Another important factor to consider is the trichomes on your buds. Trichomes are small, hair-like structures that cover the buds and contain the majority of the plant’s cannabinoids and terpenes. When the trichomes start to turn cloudy, this is usually a sign that it’s time to start checking for harvest readiness. The pistils on the buds can also be a good indicator of harvest readiness. When they begin to turn brown and curl inwards, it’s usually time to start checking for harvest readiness.
There are several factors to consider when determining when to start checking for harvest readiness. It’s important to pay attention to the appearance of the buds, as well as the trichome and pistil colors, to determine if your plants are ready to be harvested.
Note: If you are interested in thinning Gorilla Glue for a specific application, make sure to check out our guide on how to thin Gorilla Glue.
Factors that Affect Harvest Timing
As a cannabis grower, it’s important to understand the different factors that can impact the timing of your Gorilla Glue Auto harvest process. These various factors can affect the quality, flavor, and potency of your buds, which is what makes getting them just right so critical. Factors such as trichome color and cloudiness, pistil color and curling, plant appearance and maturity all help determine the best time for harvesting Gorilla Glue Auto buds. By keeping a close eye on these factors and paying attention to the needs of your individual plants, you can ensure a successful harvest. If you are new to growing cannabis, you might want to check out some of our other articles on this topic such as how to melt Gorilla glue or how to open Gorilla super glue to familiarize yourself with the Gorilla brand.
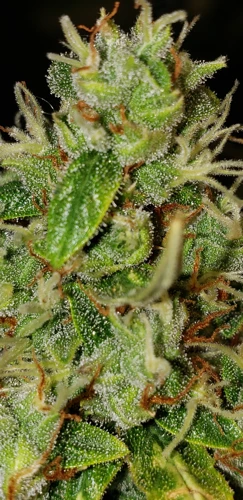
Trichome color and cloudiness
One of the most important factors to consider when harvesting Gorilla Glue Auto cannabis plants is the color and cloudiness of their trichomes. Trichomes are the small, hair-like structures that cover the buds and leaves of the cannabis plant, and they are responsible for producing and storing the plant’s cannabinoids, including THC and CBD.
To determine if your Gorilla Glue Auto plants are ready for harvest, you should inspect the trichomes using a magnifying glass or microscope. The trichomes will change color over time, starting out clear, then turning milky white, and finally becoming amber. The ideal time to harvest your plants will depend on the effects you’re looking for, as well as the desired THC content. Here is a breakdown of what trichome color means in terms of harvest timing:
| Trichome Color | Harvest Timing | Effect |
|---|---|---|
| Clear | Too early, not ready for harvest | Mild, less potent effects |
| Milky White | Harvest ready | Strong, balanced effects |
| Amber | Harvested late | More sedative, calming effects |
It is important to note that the timing of the harvest can significantly influence the content of your Gorilla Glue Auto’s cannabinoids. If you harvest too early when trichomes are still clear, the THC content will be lower, which will result in less potent buds. If you wait until the trichomes are mostly amber in color, you will get sedative effects and a more relaxing experience. It is essential to choose the right timing to ensure that you achieve the desired outcome.
It is also important to mention that different strains react differently to trichome color, and you should always consider specific guidelines for each individual strain.
The trichome color and cloudiness are crucial factors to consider when determining the timing of your Gorilla Glue Auto harvest. By examining the color and cloudiness of the trichomes, you can ensure that you achieve the desired effects and potency levels. Make sure to take your time and observe your plants closely to ensure the best possible results.
Pistil color and curling
One of the factors that greatly affect the perfect timing for harvesting your Gorilla Glue Auto is by checking the color and curling of the pistils. Pistils are the hair-like strands that grow out from the buds, and they are one of the best indicators of the plant’s maturity.
The following are some of the things you need to consider when checking for the pistil color and curling:
- During the early flowering stage, the pistils are white and straight. As the plant matures, the pistils will start changing color.
- Check to see if the pistils have turned orange or brown. This is a good indication that the buds are almost ready for harvest.
- Some strains, like Gorilla Glue Auto, have pistils that change color to a darker shade of orange or even red when they are ready for harvest.
- Another indicator for the readiness of harvest is the curling of the pistils. If the majority of the pistils have curled in towards the buds, then it is a sign that the plant is ready for harvesting.
- However, if the pistils are still sticking out straight, then the buds probably need a bit more time to mature.
Checking the pistil color and curling should be done in conjunction with checking the trichomes using a magnifying glass or jeweler’s loupe. By combining all the factors, you can determine the best time to harvest your Gorilla Glue Auto.
For further reading: Which is better: Gorilla Glue or Loctite?
Plant appearance and maturity
The appearance and maturity of a Gorilla Glue Auto plant are also important factors to consider when determining the best time to harvest. As autos mature more quickly than regular plants, they require close attention to detail.
Here are some signs to look for when assessing your plant’s appearance and maturity:
- Yellowing leaves: As the plant approaches maturity, you may notice some yellowing of the leaves. This is normal and nothing to worry about.
- Buds: The buds should be dense and hard with visible trichome development.
- Calyxes: You may notice that the calyxes, which are part of the female reproductive structure, have started to swell and become more prominent.
Additionally, you may consider the size and height of the plant. Autos often grow to be smaller than regular plants and tend to finish quicker. As a result, you may notice that your Gorilla Glue Auto plant is not as tall or bushy as you expected.
Assessing your plant’s appearance and maturity should be done in conjunction with other factors like trichome color and pistil curling, to ensure the best time for harvest.
If you’re a beginner grower or want to learn more growing techniques, please read our article What is Stronger: Gorilla Glue or Superglue?. Additionally, if you are interested in using Gorilla Glue on metal, you can find explanatory instructions in our article How to Use Gorilla Glue on Metal?.
How to Determine the Best Time to Harvest
Determining the ideal time to harvest your Gorilla Glue Auto crop is crucial to achieving the desired potency and flavor of your buds. But how do you know when they are ready for harvest? Fortunately, there are several methods for determining the best time to harvest your plants, and each one offers unique advantages. From using a magnifying glass or microscope to inspect trichomes to utilizing a jeweler’s loupe to examine the pistils, there are several techniques that can help you determine your harvest window. So, let’s explore these methods and discover the optimal time to harvest your Gorilla Glue Auto plants for the best results.
Using a magnifying glass or microscope
When checking for harvest readiness of Gorilla Glue Auto, using a magnifying glass or a microscope can be incredibly useful. Here are the steps for using these tools effectively:
- Step 1: Choose a representative area of the plant to inspect. This can be a small bud or a few leaves with trichomes.
- Step 2: Use a magnifying glass or a microscope to inspect the trichomes. Trichomes are small structures on the plant that produce resin.
- Step 3: Look for the trichomes to change from clear to cloudy. This change is an indication that the THC content of the plant is reaching its peak.
- Step 4: Use a magnifying glass or microscope to inspect the pistils. Check to see if they have changed from white to a reddish brown color. If so, this is another indication that the plant is reaching maturity.
It is important to be aware that the optimal time for harvest is when the trichomes are at their peak and the pistils have changed color. Waiting too long can cause a decrease in the potency of the plant. Additionally, it is important to avoid stressing the plant during harvest, as this can negatively impact the end product.
By using a magnifying glass or microscope to check when Gorilla Glue Auto is ready to harvest, growers can ensure that the plants reach their full potential.
Using a jeweler’s loupe
One of the most effective ways to determine the ideal time for harvesting your Gorilla Glue Auto cannabis is through the use of a jeweler’s loupe. This simple and affordable tool is an invaluable resource for any cannabis grower looking to improve their harvests.
What is a jeweler’s loupe?
A jeweler’s loupe is a small magnifying glass that is typically used to inspect jewelry and other small objects. It is a powerful tool for growers because it allows them to get an up-close look at their plant’s trichomes, which are the tiny, hair-like structures on the surface of the buds that produce the plant’s resin.
How to use a jeweler’s loupe to determine harvest readiness
To use a jeweler’s loupe, simply hold it up to one of your plant’s buds and examine the trichomes located on the surface of the bud. Ideally, you want to see the trichomes change color from clear to cloudy, and eventually to a milky white color. When the trichomes have turned white, it is a sign that the plant is ready to be harvested.
Using an html table to illustrate the trichome colors
To help you better understand what you’re looking for, here is an html table illustrating the different trichome colors and what they mean for harvest readiness:
| Trichome Color | Harvest Readiness |
|---|---|
| Clear | Too early for harvest, wait another week or two |
| Cloudy | Ready for harvest, buds will produce a more uplifting high |
| Milky White | Ideal harvest time for most growers, buds will produce a more relaxing high |
| A Few Amber | Starting to go past ideal harvest time, buds will produce a more couch-lock effect |
| Mostly Amber | Too late for harvest, buds may have a sedative effect and may not be as potent |
Using a jeweler’s loupe is an effective way to ensure that you are harvesting your Gorilla Glue Auto cannabis at the peak of its maturity. By paying attention to the color of the trichomes on your plant’s buds and using this table as a guide, you can be confident that your harvest will be of the highest quality.
Harvesting Techniques and Tips
Harvesting your Gorilla Glue Auto plants is an exciting time for every grower, as it marks the culmination of months of hard work. But harvesting is only the beginning of the process, as it’s essential to know the proper techniques and tips to ensure you get the best product possible. You’ll want to make sure you have the right tools, a clean workspace, and a good plan in place before you begin. Here are some helpful harvesting techniques and tips to help you get the most out of your Gorilla Glue Auto plants.
Drying and curing
After harvesting your Gorilla Glue Auto, the drying and curing process is one of the most critical steps for ensuring a high-quality final product. Proper drying ensures that the flowers do not have too much residual moisture, which could cause mold or mildew to grow. At the same time, curing helps to break down any remaining chlorophyll and produce a mellow, smooth taste.
To get started, you’ll want to trim off any excess leaves and hang the buds upside down in a cool, dry place such as a grow tent or closet. If possible, maintain a temperature between 60-70°F and relative humidity between 45-55% to facilitate a slow-drying process. It’s essential to avoid exposing the buds to direct sunlight or excessive heat, which can cause the terpenes and cannabinoids to break down.
During the first few days of drying, you can check on the buds and give them a gentle squeeze. If they still feel spongy or soft, they need more time to dry. As the flowers lose moisture, they should gradually become denser and more brittle to the touch. This process can take anywhere from 7-14 days, depending on the size and density of your buds.
Once your buds are dry, it’s time to move onto the curing process to allow the flowers to continue to mature and develop their flavor profile. To start the curing process, place your buds in an airtight container, such as a mason jar. Make sure the container is free from any residual moisture or contaminants that could cause mold or mildew to grow. You can also add a humidity pack to maintain a consistent relative humidity of 58-62%. Keep the jars in a dark, cool place and burp them once or twice a day for the first week.
Pro Tip: Be patient during the curing process – it can take up to 4-8 weeks for your buds to reach their full flavor potential. After the first week, you can reduce the frequency of burping and continue to monitor the relative humidity levels using a hygrometer. Over time, the buds should become increasingly smooth and flavorful, with a pleasant aroma and a balanced high.
To summarize, the drying and curing process is a critical step in maximizing the quality and potency of your Gorilla Glue Auto buds. Take your time, pay attention to the details, and be patient in allowing the buds to mature and develop their unique flavor profile. With care and attention, you can cultivate a potent, flavorful batch of Gorilla Glue Auto cannabis that will be the envy of all your friends.
Trimming and cleaning
After harvesting your Gorilla Glue Auto, you need to trim and clean the buds to prepare them for drying and curing. Proper trimming and cleaning will remove any excess leaves and stems and ensure that your buds are of the highest quality. Here are some tips for trimming and cleaning your Gorilla Glue Auto:
Tools needed for trimming:
| Tool | Purpose |
|---|---|
| Sharp scissors or trimming shears | To trim excess leaves and stems |
| Buckets or bowls | To hold trimmed buds |
| Rubber gloves | To prevent trichome damage |
| Clean work surface | To prevent contamination |
Steps for trimming and cleaning:
- Start by cutting off the large fan leaves
- Use sharp scissors or trimming shears to trim away any small leaves that are coming out of the buds
- Remove any stems that are still attached to the buds
- Be careful not to damage the trichomes, as this can affect the potency of the final product
- Place the trimmed buds in a clean, dry bucket or bowl
- Repeat the process for all harvested buds until they are all trimmed and cleaned
Drying and curing:
Once your buds are trimmed and cleaned, you can begin the drying and curing process. Hang the buds upside down in a cool, dry, and dark place for a few days until they are dry to the touch. Then, transfer them to an airtight jar and store them in a cool, dry place for a few weeks to a few months to allow for proper curing.
Benefits of proper trimming and cleaning:
Proper trimming and cleaning can help improve the quality of your buds and ensure that they are free from excess leaves and stems that can affect the flavor and potency. With the right tools and techniques, you can ensure that your Gorilla Glue Auto buds are of the highest quality and ready for consumption.
Common Harvesting Problems and How to Avoid Them
As a grower, you may have encountered some common harvesting problems, which can be frustrating and impact the quality of your yield. However, with careful attention and the right techniques, these issues can be avoided. In this section, we will cover some of the most common harvesting problems and provide tips on how to prevent them, ensuring that your Gorilla Glue Auto plants reach their full potential. Let’s dive in and explore the steps you can take to avoid these potential pitfalls and achieve a successful harvest.
Over-drying or under-drying
One of the most common problems that can arise during the harvesting process is over-drying or under-drying your Gorilla Glue Auto buds. Both of these issues can have a negative impact on the taste, aroma, and potency of your final product.
Over-drying: This can happen if you leave your buds out to dry for too long, causing them to become brittle and lose their flavor. Over-drying can also cause your buds to crumble when you touch them, making them difficult to handle during the trimming process.
Under-drying: On the other hand, if you don’t dry your buds for long enough, they may not fully cure. This can lead to a harsh, unpleasant taste when smoking or vaping. Additionally, under-drying can cause mold and mildew to develop, which can ruin your entire crop.
To avoid over-drying or under-drying your Gorilla Glue Auto buds, it’s important to keep a close eye on the drying process. You can use a hygrometer to monitor the humidity levels in your drying room and ensure that they remain between 45-55%. You can also occasionally check on your buds and gently squeeze them to see if they are still moist inside.
If you do find that your buds are over-dried, you can try rehydrating them by placing them in an airtight container with a humidifying pack. On the other hand, if you discover that they are under-dried, you may need to return them to the drying room for a bit longer.
Proper drying and curing techniques are crucial for ensuring that your Gorilla Glue Auto buds are flavorful, potent, and long-lasting. By avoiding over-drying or under-drying, you can enjoy the full benefits of your harvest without any unpleasant side effects.
| Problem | Cause | Effect | Solution |
|---|---|---|---|
| Over-drying | Leaving buds to dry for too long | Buds become brittle and lose flavor; difficult to handle during trimming | Hygrometer monitoring; rehydrate buds in airtight container with humidifying pack if necessary |
| Under-drying | Not drying buds for long enough | Harsh, unpleasant taste; mold and mildew development | Hygrometer monitoring; return buds to drying room if necessary |
Trimming too much or too little
When it comes to trimming your Gorilla Glue Auto plants, it’s important to strike a delicate balance between trimming too much and too little. Both of these issues can lead to problems down the line. Here’s what you need to know to avoid them:
| Trimming Too Much | Trimming Too Little |
|---|---|
Pros:
Cons:
|
Pros:
Cons:
|
Ultimately, the key to successful trimming is to find the right balance for your specific plants and growing conditions. Consider factors such as the density of the buds, the size of the leaves, and the overall health of the plant when making your decision. Take your time and be patient as you work, and you’ll be rewarded with beautiful, potent buds that are sure to be the envy of all your friends.
Stressing the plants during harvest
During the harvest, it is essential to handle the plants with care and avoid stressing them. Stressing the plants during harvest can negatively impact the final product’s quality, taste, and potency. Here are some tips to avoid stressing the plants during harvest:
- Avoid excessive handling: Touching the buds too much during harvest can damage the trichomes, which contain the valuable cannabinoids and terpenes. It is essential to handle the plants gently and minimize contact with the buds as much as possible.
- Use the right tools: Using sharp and precise tools like scissors or pruning shears can reduce stress on the plants during harvest. Blunt tools can damage the buds and cause unnecessary stress.
- Harvest at the right time: Harvesting too early or too late can also stress the plants. Make sure to check the trichomes and pistils to determine the best time for harvest.
- Protect the plants from the elements: During the harvest, the plants are vulnerable to damage from the sun, wind, and rain. It is essential to protect the plants from these elements by covering them or bringing them indoors if necessary.
- Be aware of temperature and humidity: The temperature and humidity levels can also affect the plants during harvest. High temperatures or low humidity can cause the buds to dry out too quickly, while low temperatures or high humidity can cause mold and rot.
By avoiding stress on the plants during harvest and following these tips, you can ensure that your Gorilla Glue Auto harvest is of the highest quality and potency.
Conclusion
When it comes to properly harvesting Gorilla Glue Auto, timing is everything. By carefully monitoring various factors, such as trichome color and pistil curling, growers can ensure that their plants are harvested at the perfect time to maximize potency, yield, and overall quality.
While harvesting may seem like a simple process, there are several potential pitfalls to watch out for. Over-drying or under-drying can significantly impact the overall quality of the final product, while improper trimming techniques can lead to the loss of valuable cannabinoids and terpenes.
Despite these challenges, with the right approach and a bit of patience, growers can successfully harvest top-quality Gorilla Glue Auto every time. By taking the time to properly dry, cure, and trim their buds, they can ensure that they achieve the best possible flavor and aroma, while also preserving the cannabinoids and terpenes that give this strain its famous high.
Overall, harvesting Gorilla Glue Auto is an exciting and rewarding process that requires careful attention to detail, as well as a deep understanding of the plant’s growth patterns and development. With the tips and techniques outlined in this guide, growers of all skill levels can take their harvests to the next level, producing some of the highest-quality buds around.
Frequently Asked Questions
1. How long does Gorilla Glue Auto take to grow?
Gorilla Glue Auto typically takes around 8-10 weeks to grow from seed to harvest.
2. What kind of climate does Gorilla Glue Auto prefer?
Gorilla Glue Auto prefers warm, dry climates with temperatures between 70-85°F (21-29°C).
3. What is the optimal humidity level for harvesting Gorilla Glue Auto?
The optimal humidity level for harvesting Gorilla Glue Auto is between 45-55%. This helps to prevent mold formation.
4. How do I know if my Gorilla Glue Auto is ready for harvest?
You can determine whether your Gorilla Glue Auto is ready for harvest by checking the trichome color and cloudiness, pistil color and curling, and plant appearance and maturity.
5. What is the easiest way to dry Gorilla Glue Auto?
The easiest way to dry Gorilla Glue Auto is to hang the branches upside down in a cool, dark, and well-ventilated area for 7-14 days. You can also use a drying rack or paper bag method.
6. How long does curing Gorilla Glue Auto take?
Curing Gorilla Glue Auto typically takes between 2-6 weeks. The longer the curing process, the smoother and more flavorful the final product will be.
7. Is it okay to harvest my Gorilla Glue Auto early?
Harvesting Gorilla Glue Auto early can result in a lower THC content and less potent buds. It’s best to wait until the trichomes are fully developed.
8. Can I trim my Gorilla Glue Auto buds before drying?
It’s recommended to trim your Gorilla Glue Auto buds after they’ve been dried. This makes it easier to remove the leaves and excess plant material.
9. How can I prevent over-drying my Gorilla Glue Auto?
To prevent over-drying your Gorilla Glue Auto, monitor the humidity levels regularly and remove the buds from the drying area once they’re crispy on the outside but still slightly moist on the inside.
10. What should I do if my Gorilla Glue Auto develops mold during drying?
If your Gorilla Glue Auto develops mold during drying, remove the affected buds immediately and discard them. You can also increase ventilation and reduce humidity levels to prevent mold formation.