Introduction
When our laptops face damage, it can be frustrating and stressful. One way to repair your laptop when it has damage is by using glue. However, it’s important to choose the right type of glue to ensure that the repair is effective and long-lasting. In this article, we will explore the different types of glue that can be used on laptops, the considerations to keep in mind before choosing a glue, how to apply glue properly to your laptop, and tips for successful laptop repairs. Let’s get started on this complete guide to choosing the right glue for your laptop repair needs.
Why it’s important to choose the right glue
Choosing the right glue is crucial when it comes to repairing a laptop. Using the wrong type of glue can lead to damage, data loss and additional costly repairs. That is why it is important to know the different types of glue available and which one works best for your specific laptop issue. In this article, we will cover the four main types of glue that can be used for laptop repairs: cyanoacrylate glue, epoxy, polyurethane, and silicone adhesive.
While it may be tempting to use any glue available to fix a laptop, it is important to keep in mind that not all glues are created equal. Different types of glue have varying compositions and are designed to work with specific materials. For example, cyanoacrylate glue is great for plastic and metal, while polyurethane is better for rubber and leather.
One of the key factors in choosing the right glue is its bonding strength. Some glues have a stronger hold than others, which is important when it comes to repairing sensitive electronic equipment like laptops. Another factor to consider is the drying time of the glue. Quick-drying glue may be convenient, but slow-drying glue can offer better adhesion and durability.
With so many types of glues available, choosing the right one can be overwhelming. This is why it is crucial to consider the type of damage and the compatibility of the materials before selecting the appropriate glue for your laptop repair. In the following sections, we will go into more detail on the different types of glue available and the factors to consider when choosing which one to use.
Table: Types of Glue for Laptop Repairs
| Glue Type | Bonding Strength | Drying Time | Compatibility |
|———–|—————–|————-|—————|
| Cyanoacrylate | Strong | Quick | Plastic, Metal |
| Epoxy | Very strong | Slow | Metal, Glass |
| Polyurethane | Strong | Slow | Rubber, Leather |
| Silicone Adhesive | Moderate | Moderate | Plastic, Glass |
Source: How to do glue
Types of Glue
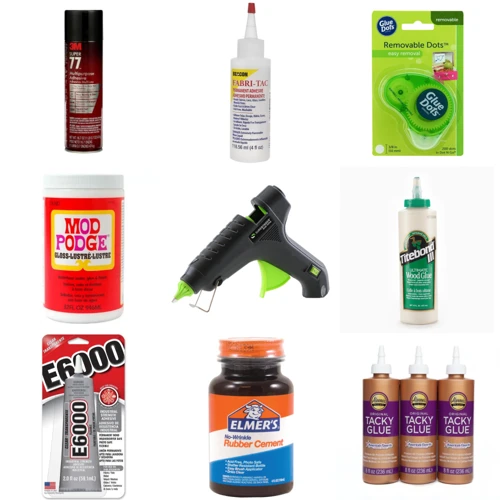
When fixing your laptop, using the right type of glue is crucial to ensure a successful repair. There are several types of glue to choose from, each with its own unique qualities and applications. Some of the most commonly used glues for laptop repair include cyanoacrylate glue, epoxy, polyurethane, and silicone adhesive. In this guide, we’ll delve into the different types of glue and help you determine which one will work best for your specific repair needs. Don’t forget to also consider factors like type of damage and compatibility with materials before selecting a glue. Let’s get started!
Cyanoacrylate Glue
Cyanoacrylate glue, also known as super glue, is a popular adhesive used to fix a variety of materials, including laptops. This type of glue is known for its fast-setting time and strong hold. However, it’s important to note that not all types of cyanoacrylate glues are suitable for laptop repair. Some of them may contain strong chemicals that can damage the delicate components of a laptop.
Pros
- Fast-setting time: Cyanoacrylate glue sets in just a few seconds, which makes it perfect for small laptop repairs that require fast fixes.
- Strong bond: When used correctly, cyanoacrylate glue can create an incredibly strong bond between surfaces. It dries clear, which makes it perfect for laptop repairs that require aesthetic appeal.
- Easy to use: Cyanoacrylate glue is very easy to apply, and it comes with precision applicators that allow you to apply it to small areas without making a mess.
Cons
- Brittleness: One of the main disadvantages of cyanoacrylate glue is that it can become brittle over time, which makes it unsuitable for repairs that require flexibility.
- Toxic fumes: Cyanoacrylate glue releases toxic fumes when it dries, which can be harmful if inhaled in large quantities. Make sure to use it in a well-ventilated area and avoid getting it on your skin or eyes.
- Not suitable for all materials: Cyanoacrylate glue may not be suitable for certain materials, such as rubber or silicone, as it may not create a strong bond.
Before using any cyanoacrylate glue on your laptop, make sure to test it on a small, inconspicuous area first to ensure it doesn’t damage the surface. If you’re not sure which product to use, seek the advice of a professional.
Non-toxic cyanoacrylate glues are available, which are safe to use and create a durable bond. It’s also important to choose a product that comes with precision applicators, which will allow you to apply the glue precisely and avoid making a mess.
Cyanoacrylate glue can be a useful tool for repairing laptops, but it’s important to use it carefully and follow the manufacturer’s instructions for best results.
Epoxy
Epoxy is a popular choice for laptop repairs because it creates a very strong bond that can withstand stress and heat. Epoxy is a two-part adhesive consisting of a resin and a hardener that must be mixed together before application. Once mixed, the adhesive sets quickly and forms a very strong and durable bond.
Advantages of Epoxy:
- Epoxy is very strong and can withstand stress and heat
- The bond created by epoxy is very durable and long-lasting
- Epoxy can be used on a variety of materials, including metal, plastic, and ceramic
- Once cured, epoxy can be sanded, painted, or drilled if necessary
Disadvantages of Epoxy:
- Applying epoxy can be tricky and messy because it requires mixing
- Epoxy can take several hours to cure completely
- Epoxy can be difficult to remove if it gets on surfaces where it’s not needed
- Epoxy can be toxic and it’s important to follow manufacturers’ instructions carefully
When using epoxy for laptop repairs, it’s important to choose a high-quality product from a reputable manufacturer. Before applying epoxy, make sure to clean and dry the damaged area thoroughly. It’s also important to wear gloves and use a well-ventilated area due to the potentially toxic fumes.
If you’re new to using epoxy, practice mixing and applying it on a small, inconspicuous area before working on the actual repair. This way, you can ensure that you’re using the correct proportions of resin and hardener and that the epoxy cures properly.
Epoxy is an excellent choice for laptop repairs that require a strong, durable bond. It’s important to use it carefully and follow manufacturers’ instructions to ensure a successful repair.
If you’re interested in learning more about DIY projects, check out our article on how to make slime without glue or liquid starch.
Polyurethane
Polyurethane is a popular type of adhesive that is known for its strong bonding properties. This type of glue creates a strong, durable and waterproof bond. Due to its high resistance to water, it is ideal for those who want to use their laptop in soggy or humid conditions.
Polyurethane glue can bond almost anything, including metal, rubber, plastic, wood, and even glass. Polyurethane glue can also fill gaps and has a foaming nature that helps it create a tight bond while still filling any voids.
It is important to note that polyurethane glue requires moisture or water to activate. It is necessary to dampen the surface before applying polyurethane glue. After application, the glue will expand slightly to fill any gaps or crevices.
However, one thing to keep in mind is that Polyurethane glue takes a long time to dry, usually between 24-48 hours. It requires patience and a clear work area. Avoid moving the laptop until the glue is completely dry to ensure a tight and effective bond.
When applying polyurethane glue, always remember to be precise and avoid getting it on any other parts of the laptop. It’s best to apply it in small amounts and clean up any excess glue immediately, otherwise, it may cause a mess.
It’s also important to make sure that the materials being bonded are compatible with the polyurethane adhesive. Avoid using this adhesive on polystyrene foam or any surface that is sensitive to solvents.
Follow these guidelines for successful bonding with polyurethane glue:
- Protect your workspace with newspaper or plastic wrap to prevent any mess.
- Prepare the surface by cleaning it with rubbing alcohol to get rid of any dirt or debris.
- Apply a small amount of polyurethane glue to one of the surfaces and spread it evenly with a brush or applicator.
- Press the two surfaces together and clamp them for at least 24 hours.
Polyurethane glue can be an excellent choice for laptop repairs, but it does require some extra attention and care. Its strong and waterproof qualities make it highly suitable for fixing any damage on laptops that come in contact with humidity or water. By following the given instructions, you can successfully use polyurethane glue for your laptop repairs.
Silicone Adhesive
Silicone adhesive is a popular type of glue used in laptop repairs due to its flexibility, durability, and resistance to moisture. This adhesive is most commonly used to attach rubber feet or pads to the bottom of the laptop. It can also be used to seal cracks or gaps in the laptop casing.
One important consideration when using silicone adhesive is that it is not suitable for all materials. It works best on non-porous surfaces such as metal, glass, or plastic. However, it may not adhere well to porous surfaces such as fabric or wood. It’s important to make sure that the material you are repairing is compatible with silicone adhesive before using it.
Another benefit of silicone adhesive is how easy it is to apply. It typically comes in a tube that can be squeezed to apply the glue. Once applied, it can be spread with a brush or finger to ensure even coverage. Before applying, make sure the surface is clean and free of any debris or grease to ensure proper adhesion.
Tip: To remove excess silicone adhesive, use a plastic scraper or credit card to avoid damaging the laptop surface.
Silicone adhesive typically takes around 24-48 hours to fully cure, so it’s important to be patient and avoid using the laptop during this time. Once cured, the adhesive will create a flexible, waterproof bond between the surfaces it was applied to.
Important note: If you need to remove silicone adhesive from your laptop, do not use harsh chemicals or abrasives. Instead, use a silicone sealant remover or rubbing alcohol to dissolve the adhesive.
Silicone adhesive is a versatile and effective option for laptop repairs that require a strong, flexible bond. Just make sure to check compatibility with your laptop’s materials and take proper precautions when applying and removing the adhesive.
If you want to learn more about other glue types, check out our article on “What Glue to Use on Wax Candle,” or if you are interested in making crafts without glue, take a look at our guide on “How to Make Paper Bag without Glue.”
Considerations Before Choosing Glue
When it comes to repairing your laptop, using the right glue is crucial to ensuring that the repair is successful and long-lasting. However, with so many different types of glue on the market, it can be difficult to know which one is the best fit for your specific needs. Before you choose a glue for your laptop repair, there are a few important considerations to keep in mind. From the type of damage to the compatibility with materials, taking the time to consider these factors can help you make an informed decision about which glue to use.
Type of Damage
When considering the type of glue to use on your laptop, it’s important to take into account the type of damage that needs to be repaired. Using the wrong type of glue can potentially cause even more damage and may result in the need for a costly repair or replacement. Here are some common types of damage and the recommended type of glue to use for each:
- Cracks or Chips: If your laptop has cracks or chips in the casing or screen, cyanoacrylate or epoxy glue would be a good choice. Cyanoacrylate, also known as super glue, is ideal for small cracks and chips. Epoxy is a bit stronger and can be used for slightly larger areas of damage.
- Loose Parts: If your laptop has any loose parts that need to be re-attached, such as a loose keyboard key or trackpad button, cyanoacrylate glue would work well in this situation as well. However, be very careful when applying glue to small, delicate parts.
- Water Damage: In the event of water damage, use polyurethane glue. This type of glue is water-resistant and can help prevent further damage to your laptop.
- Heat Damage: If your laptop has sustained heat damage, silicone adhesive would be the best choice. This glue is heat-resistant and can withstand a wide range of temperatures.
Remember, the type of glue you choose depends on the specific type of damage your laptop has sustained. Be sure to assess the damage thoroughly before choosing a glue. And, if you’re unsure, it’s always best to seek professional help or consult a tech-savvy friend.
Note: If you’re interested in learning more about how to use glue in creative ways, check out this guide on how to glue clay to cardboard.
Compatibility with Materials
Before choosing a glue to fix your laptop, it’s important to consider its compatibility with the materials of your device. Using the wrong type of glue could cause further damage to your laptop. Different types of glue interact with different materials in unique ways, and you want to make sure the glue you’re choosing will not only fix the damage but also properly adhere to the surface.
To determine which glue is compatible with your laptop, check the material of both the laptop and the glue. Typically, laptops are made of plastic, metal, glass, or a combination of those materials. Take a look at the label or documentation of the glue to see which materials it is compatible with.
To make it easier, here’s a simple table to show which materials are commonly used for laptops and which type of glue is compatible:
| Laptop Material | Compatible Glue Types |
|---|---|
| Plastic | Cyanoacrylate, Epoxy, Polyurethane |
| Metal | Epoxy, Polyurethane |
| Glass | Silicone Adhesive |
| Plastic/Metal Combination | Cyanoacrylate, Epoxy, Polyurethane |
Keep in mind that this is just a general guide and not a definitive list. Always make sure to follow the manufacturer’s instructions and test the glue on a small, inconspicuous area first before applying it to the damaged part of your laptop.
It’s important to note that using the wrong type of glue can cause more harm than good and can even lead to permanent damage, which could result in costly repairs or replacements. So, take the time to research and choose the right glue for the job to ensure a successful and long-lasting repair.
If you’re interested in learning more about glue, check out our article on how to draw glue.
How to Apply Glue to Your Laptop
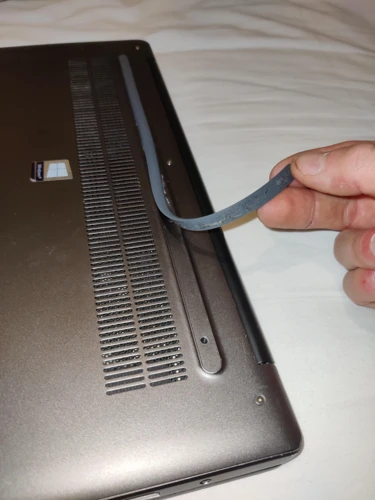
When it comes to fixing your laptop, choosing the right glue is only half the battle. Knowing how to apply it correctly is just as important. Applying glue improperly can do more harm than good and lead to further damage. In this section, we will guide you through the steps of applying glue to your laptop to ensure a successful repair. But first, let’s make sure you have everything you need. For a fun and slightly unusual way to practice applying glue, check out how to make satisfying slime without glue.
Preparation
Preparing your laptop before applying glue is crucial to ensuring a successful repair. Before beginning, gather all necessary tools and materials, which may include the chosen glue, a small brush or toothpick for application, and any necessary cleaning supplies. Proper preparation includes the following steps:
| Step 1: | Turn off the laptop and unplug it from any power source. |
| Step 2: | Remove the battery, if possible, to prevent any accidental electrical discharge. |
| Step 3: | Clean the area around the damage using a soft cloth and a mild cleaning solution. Be sure to remove any dust, dirt, or debris from the surface to ensure the glue adheres properly. |
| Step 4: | Use a small amount of rubbing alcohol or acetone to further clean and degrease the area for a stronger bond. |
| Step 5: | Mask off any surrounding areas with tape or a protective cover to prevent accidental spills or excess glue from spreading. |
By following these preparation steps, you can ensure that the glue will adhere properly and create a strong bond. Remember to take your time and be patient throughout the process. If you need further guidance, there are many online resources available such as YouTube tutorials or forums where you can ask for advice. And always remember to stay safe during any repairs with electronics.
If you’re curious about other creative uses for glue, check out our article on how to make glue in Graveyard Keeper or learn how to reseal an envelope without glue with our step-by-step guide.
Application Technique
When you’re applying glue to your laptop, it’s important to follow the right technique to ensure that you achieve a strong bond without damaging your device. Here are the steps to follow for a successful laptop repair:
1. Clean the Surface: The first step to applying glue to your laptop is to clean the surface that you want to bond. Use a clean, dry cloth to wipe away any dirt, dust, or debris that may be present.
2. Apply the Glue: Once the surface is clean, you can apply the glue. The amount of glue you should use depends on the size of the area that you need to bond. Be careful not to use too much glue, as it could seep into other areas of your laptop and cause damage. Use a small brush or applicator to apply the glue precisely where you need it.
3. Clamp the Parts: After applying the glue, you should clamp the parts together for the recommended amount of time. This will allow the glue to dry and create a strong bond. Follow the instructions on the glue packaging to determine the appropriate amount of time to clamp the parts together.
4. Wipe Away Excess: Once the glue has dried, use a clean, dry cloth to wipe away any excess glue that may be present. This will ensure that your laptop looks clean and professional.
Remember to take your time and follow the instructions carefully to achieve the best results for your laptop repair. If you’re not comfortable with DIY repairs, it may be best to seek the assistance of a professional.
Pro tip: If you’re in a bind and need to reseal an envelope without glue, check out our guide for tips on how to do it quickly and easily!
Drying Time
When it comes to applying glue to your laptop, it’s important to consider the drying time of the product you choose. Different types of glue have different drying times, so it’s important to know how long you’ll need to wait before using your laptop again.
Here are some general guidelines for drying times of popular laptop glues:
- Cyanoacrylate glue: This type of glue dries very quickly, usually within seconds to a few minutes. However, it’s important to note that it’s not a very strong adhesive and may need to be reapplied over time.
- Epoxy: Epoxy is a two-part adhesive that typically takes anywhere from 5-60 minutes to dry, depending on the brand and type you use. It’s important to follow the manufacturer’s instructions when using epoxy, as the drying time can vary significantly.
- Polyurethane: Polyurethane glue has a longer drying time, usually taking several hours to dry completely. However, it’s known to be a very strong adhesive that can bond a variety of materials.
- Silicone adhesive: Like polyurethane, silicone adhesive also has a longer drying time, typically taking several hours to dry completely. However, it’s waterproof and flexible, making it a good choice for repairs that may need to withstand some movement or exposure to moisture.
It’s important to note that drying times can be affected by several factors, including:
- The brand and type of glue you choose
- The temperature and humidity of the environment in which you apply the glue
- The thickness of the glue application
- The materials you’re bonding
Before using your laptop again, make sure the glue is completely dry and has had enough time to fully bond the materials together. Rushing the drying time can result in a weak bond that may break easily.
Here are a few tips for ensuring successful drying of your laptop glue:
- Allow the laptop to sit in a cool, dry location while the glue dries
- Avoid touching or manipulating the glued area until the glue is fully dry
- Consider using a clamp or other tool to hold the materials in place while the glue dries
- Monitor the drying process closely to ensure the glue is fully dry before using the laptop again
Following these tips can help you achieve a successful laptop repair and ensure the glue dries completely, creating a strong bond that will last for years to come.
Tips for Successful Laptop Repairs
Completing a laptop repair can be a challenging and rewarding experience, but it’s important to ensure that the repair is successful to avoid any further damage to your device. To help guide you towards success, we have compiled a list of useful tips that will make your laptop repairs effective and efficient. By incorporating these tips into your repair process, you can ensure that your laptop is functioning properly again in no time. So, let’s dive into some of the most important tips to consider when repairing your laptop.
Be Patient
When it comes to repairing a laptop, patience is key to success. Rushing through the process can result in mistakes and further damage to the device. Here are some tips to help you stay patient during the repair process:
| Tip | Description |
|---|---|
| Take your time | Don’t try to rush through the repair process. Take your time and make sure you understand every step. |
| Double-check your work | Before moving on to the next step, double-check your work to make sure everything is in place and secure. |
| Don’t force anything | If something doesn’t seem to fit or work correctly, don’t force it. Take a step back and try to identify the problem. |
| Follow instructions | Be sure to carefully follow the instructions for the glue you are working with, as well as any other repair instructions you have. |
Remember, repairing a laptop can be a delicate process that requires precision and patience. Don’t let frustration get the best of you – take your time and approach the repair process with a calm and careful mindset. With the right attitude, you can successfully repair your laptop and get it back up and running in no time.
Be Precise
One of the most important tips for a successful laptop repair is to be precise in your actions. One mistake can cause irreparable damage, so it’s crucial to be careful.
Here are some ways to be precise when repairing your laptop:
| 1. Use Small Amounts of Glue: | Using too much glue can lead to a messy repair job and can even damage the delicate internal components of your laptop. Use small amounts of glue to ensure that you’re only applying it where it’s needed. |
| 2. Use Precision Tools: | Using the right precision tools such as a pair of tweezers or a precision screwdriver can make a big difference. These tools allow you to work with small components and make precise repairs. |
| 3. Align Components Accurately: | When repairing your laptop, always ensure the components are aligned accurately. Misaligned components can cause further damage or may not function correctly. Take your time to ensure everything is in the right place before applying glue to the surface. |
| 4. Clean Surface: | Before applying glue, clean the surface you want to bond with a high-quality cleaning agent. Dirt or dust left on the surface can prevent the glue from bonding correctly or weaken the bond over time. |
| 5. Allow Time to Dry: | When applying glue, allow it to dry fully before using the device. Applying pressure or using the device before the glue is entirely dry can cause misalignments and prevent the components from bonding correctly. |
By being precise during the repair process, you can ensure that your laptop is repaired correctly and functions correctly. Remember always to take your time and not rush the repair process to avoid causing any further damage to your device.
Be Safe
When repairing a laptop, it’s important to prioritize safety. Here are some safety tips to keep in mind during the repair process:
| Tip | Description |
| Wear protective gear | It’s important to wear gloves and eye protection to prevent any potential harm from the glue or other tools you might be using. |
| Work in a well-ventilated area | Some types of glue may emit fumes that can be harmful when inhaled. Be sure to work in an area that is well-ventilated, or consider wearing a mask to protect yourself. |
| Keep glue away from electronics | When applying glue, be sure to keep it away from the internal electronics of the laptop. Glue can cause damage to these delicate components and potentially ruin your repair. |
| Be careful when using sharp tools | Some repairs may require the use of sharp tools, such as a screwdriver or scalpel. Take your time and use caution when handling these tools to avoid injury. |
| Read labels and instructions | Before using any type of glue or tool, be sure to read the labels and instructions carefully. This will help you understand any potential risks and how to use the product safely. |
By following these safety tips, you can help ensure a successful and injury-free laptop repair. Take your time, be cautious, and always prioritize safety above all else.
Conclusion
After going through this complete guide, it should be clear that choosing the right type of glue for your laptop is crucial in maintaining its longevity. Using the wrong type of glue can not only lead to further damage, but it can also be hazardous to your health.
Remember to always consider the type of damage when choosing your glue – whether it’s a cracked screen, a broken hinge, or a loose keyboard key. Additionally, be sure to check the compatibility of the glue with your laptop’s materials, such as plastic, metal, or glass.
When it comes to applying the glue, take your time and be precise. Make sure to prepare the surface properly and follow the instructions for the specific type of glue you are using. It’s also important to allow for adequate drying time to ensure a strong bond.
Lastly, always put safety first when attempting any repairs on your laptop. Wear gloves and eye protection if necessary and work in a well-ventilated area.
By considering these tips and following the steps outlined in this guide, you can successfully repair your laptop and extend its lifespan. Remember, if you’re unsure about anything, it’s always best to seek the help of a professional to avoid causing further damage.
Frequently Asked Questions
What is the best type of glue to use on a laptop?
The best type of glue to use on a laptop depends on the type of damage and the materials involved. Cyanoacrylate glue, epoxy, polyurethane, and silicone adhesive are all options to consider.
Can I use super glue on my laptop?
Cyanoacrylate glue, also known as super glue, can be used on some types of laptop damage, such as small cracks or chips. However, it may not be strong enough for larger repairs.
Is epoxy safe to use on a laptop?
Epoxy is safe to use on a laptop as long as it is applied correctly and allowed to dry completely before the laptop is used again. It is important to avoid getting epoxy on any electrical components.
Can I use Gorilla Glue on my laptop?
Gorilla Glue is not recommended for use on a laptop because it expands as it dries, which could cause damage to the laptop’s components. It is also difficult to remove if applied incorrectly.
How do I know if the glue I am using is compatible with my laptop’s materials?
You can check the manufacturer’s instructions for the glue you are using to see if it is compatible with the materials in your laptop. It is also a good idea to test a small amount of the glue on a hidden area of the laptop to see if it causes any damage or discoloration.
Can I use rubbing alcohol to clean the area before applying glue?
Yes, rubbing alcohol can be used to clean the area before applying glue. It will remove any dirt, grease, or residue that could interfere with the glue’s adhesion.
How long does it take for glue to dry on a laptop?
The drying time for glue on a laptop can vary depending on the type of glue and the amount used. Generally, it is best to allow the glue to dry overnight before using the laptop again.
What should I do if I accidentally get glue on my laptop’s keyboard?
If you accidentally get glue on your laptop’s keyboard, turn off the laptop immediately and unplug it. Use a soft cloth dampened with rubbing alcohol to gently clean the affected area. Do not attempt to remove keys or clean under the keyboard.
Can I still use my laptop while the glue is drying?
No, it is not recommended to use your laptop while the glue is drying. This could cause the glue to shift or interfere with the repair.
Is it better to take my laptop to a professional for repairs?
If you are unsure about how to repair your laptop, or if the damage is extensive, it is recommended to take it to a professional for repairs. They will have the tools and expertise to properly repair your laptop without causing further damage.