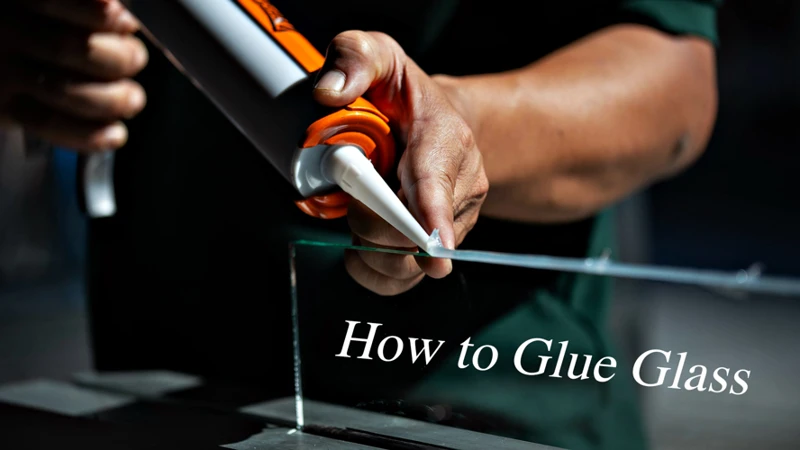
You’ve just bought a brand new plastic item, but unfortunately it’s already broken. You don’t have to worry about throwing it out just yet, because Gorilla Glue is here to save the day! Gorilla Glue is a versatile adhesive that can bond almost anything – including plastic. In this ultimate guide, we will go through each step of using Gorilla Glue on plastic, from preparing the surfaces to securing the bond. We’ll also cover how to remove Gorilla Glue from plastic, just in case. So, let’s dive into the world of using Gorilla Glue on plastic and get ready to fix those broken items!
Why Use Gorilla Glue for Plastic?

When it comes to repairing or bonding plastics, it is important to choose the right adhesive that will create a strong and lasting bond. One popular choice among DIY enthusiasts and professionals alike is Gorilla Glue. But why use Gorilla Glue for plastic? What makes it different from other types of glue? In this section, we will explore the characteristics and advantages of Gorilla Glue, as well as its compatibility with plastic surfaces. If you want to learn more about other aspects of Gorilla Glue, such as its strength or color, check out our articles on how strong is glue and what color does Gorilla Glue dry.
What is Gorilla Glue and Why it Works?
Gorilla Glue is an incredibly strong and versatile adhesive that can be used on various materials like wood, metal, ceramics, and most plastics. This multipurpose glue is designed to create a strong bond within seconds, making it a popular choice among DIYers and professionals alike.
What makes Gorilla Glue so effective?
- Gorilla Glue is a polyurethane-based adhesive that reacts with moisture to cure.
- It forms a strong bond by expanding while it sets, which allows it to fill any gaps and create a strong, tight bond.
- It is waterproof, making it ideal for outdoor projects.
- It dries to a light brown color that can be sanded, painted, or stained, so you can achieve a professional finish.
- It is temperature-resistant, meaning it can withstand extreme heat or cold.
- It is incredibly strong, with a holding capacity of up to 1000 pounds per square inch (psi).
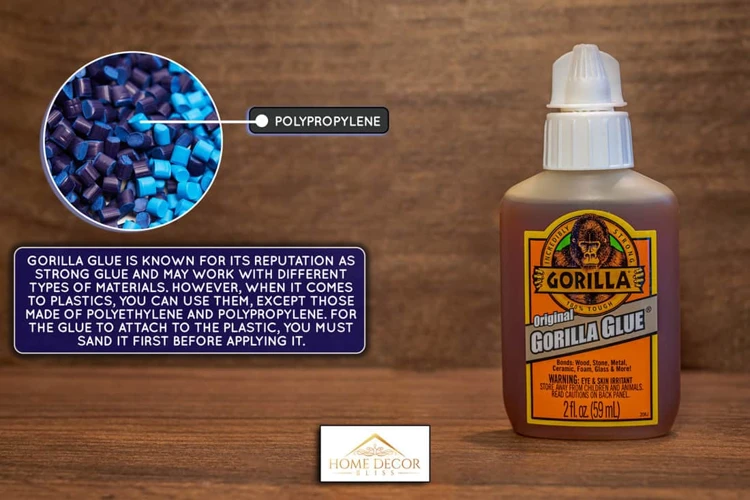
It’s important to note that gorilla glue is not recommended for use on polyethylene (PE), polypropylene (PP), and other similar plastics, as these materials have low surface energy and do not allow the glue to form a strong bond. However, gorilla glue can be used on high-density polyethylene (HDPE) and high-impact polystyrene (HIPS) plastics since they have slightly higher surface energy.
If you’re looking for an easy-to-use Gorilla Glue product for plastic, try the Gorilla Super Glue Gel. This gel adhesive is ideal for bonding plastic to plastic, as well as a range of other materials. Also, learning how to use gorilla glue pen or how to use gorilla glue on metal can also be helpful in your projects.
Gorilla Glue is a reliable and long-lasting adhesive that can help you complete your projects with confidence.
Advantages of Using Gorilla Glue on Plastic.
Gorilla Glue is a well-known brand recognized for its high-quality adhesives that can bond various materials, including plastic. It is a polyurethane-based adhesive that has a unique foaming ability to fill gaps and create a strong bond. Here are some advantages of using Gorilla Glue on plastic:
| Advantages | Explanation |
|---|---|
| Waterproof | Gorilla Glue is water-resistant, making it ideal for bonding plastic surfaces exposed to water or high humidity. |
| Strong bond | Gorilla Glue creates a strong and durable bond that can withstand pressure and tension. This feature makes it appropriate for bonding plastic items used regularly or exposed to wear and tear. |
| Expands and fills gaps | Gorilla Glue expands when curing, filling the gap between plastic surfaces to create a solid bond. This attribute is known as its foaming ability, which makes it perfect for repairing cracks and gaps in plastic items. |
| Easy to apply | Gorilla Glue comes in various applicator forms, including tubes, pens, and syringes, making it easy to apply. This ease of use ensures the correct amount of glue is applied and reduces the mess and waste associated with poor application. |
| Multi-functional | Gorilla Glue can bond various materials, including plastic, wood, metal, and ceramic. This multi-functional attribute makes it ideal for DIY projects that involve bonding different materials. |
By utilizing Gorilla Glue for plastic in your DIY projects, you ensure that the final product will be sturdy, durable, and reliable. However, it is essential to understand the preparation and application process to achieve the best results. You can find more information on how to use Gorilla Glue on plastic in the sections below.
How good is Gorilla Glue? Learn more about the quality of Gorilla Glue and its various applications in our informative article.
Preparing the Surfaces
Before applying Gorilla Glue on plastic, it is important to prepare the surfaces to ensure a strong bond. Proper preparation significantly increases the chances of success, and a poorly prepared surface can result in a weak bond. In this section, we will discuss two crucial steps to prepare the surfaces for gluing plastic with Gorilla Glue. These steps include cleaning the plastic surface and sanding the plastic surface. It is essential to follow all steps carefully to achieve the best results from the bonding process. Let’s dive into the details.
For additional information on the strength of Gorilla Glue, click here.
Cleaning the Plastic Surface.
Cleaning the plastic surface is a crucial step in ensuring a strong bond between the plastic and Gorilla Glue. Any traces of dust, oil, dirt, or other contaminants can weaken or prevent the bond altogether. Follow these simple steps to clean the plastic surface properly:
- Wipe the surface: Use a dry, clean cloth or paper towel to wipe the plastic surface and remove any dust or loose particles. Make sure that the cloth or towel does not leave any lint or fibers on the surface.
- Moisten the surface: Dampen another clean and dry cloth or towel with water or rubbing alcohol. Make sure to wring out any excess moisture before wiping the plastic surface.
- Wipe the surface again: Use the dampened cloth or towel to thoroughly wipe the plastic surface, removing any stubborn dirt, grease, or grime.
- Let the surface dry: Allow the plastic surface to air-dry completely before proceeding to the next step. Any residual moisture can weaken the bond or prevent the glue from adhering altogether.
Remember to follow any manufacturer’s instructions or safety guidelines when using cleaning agents such as rubbing alcohol. Additionally, take care not to scratch or damage the plastic surface while cleaning it.
Tip: If the plastic surface is heavily soiled or greasy, consider using a gentle detergent or degreaser to clean it thoroughly. However, make sure to rinse and dry the surface completely before applying the Gorilla Glue.
For more information on Gorilla Glue, check out our article on “How good is Gorilla Glue?” to learn about its features and applications.
Sanding the Plastic Surface.
When using Gorilla Glue on plastic surfaces, sanding is an important step to ensure a strong bond. It helps to create a rough surface that allows the glue to grip onto the plastic. Sanding the plastic surface is a pretty simple process that requires a few basic tools. Here are the steps you need to follow:
| Step | Description |
|---|---|
| Step 1 | Clean the surface: Start by wiping down the plastic surface with a clean, damp cloth. Remove any dust, debris, or grease that may be present on the surface. Allow the surface to dry completely before proceeding. |
| Step 2 | Select the sandpaper: For sanding the plastic surface, use a fine grit sandpaper. A 220-grit sandpaper should work well. |
| Step 3 | Sand the surface: Use the sandpaper to lightly sand the plastic surface. Keep the sandpaper moving in a circular motion to avoid creating any scratches or uneven spots on the surface. Sand the entire surface evenly. |
| Step 4 | Wipe the surface: After sanding, wipe the surface down with a clean, dry cloth to remove any debris or dust left behind. |
It’s important to note that sanding too much can create a smoother surface, which can make it difficult for the glue to grip properly. So, sand sparingly and only enough to create a rough surface. With these steps, you’re ready to move on to the next stage of using Gorilla Glue.
Remember: If you want to know how to make Gorilla Glue soft again, follow the link to our article on /how-to-make-gorilla-glue-soft-again/.
Cleaning the Second Surface.
Before applying Gorilla Glue on any surface, it is important to make sure that both the surfaces are clean and free of any debris. Once the first surface is cleaned and sanded (if necessary), you need to clean the second surface using a dry, clean cloth or a paper towel. Ensure the surface is dry before applying any glue, or else it will affect the bonding process.
For cleaning the second surface, follow the steps mentioned below:
- Take a clean cloth or paper towel.
- Use some warm water to dampen the cloth or towel.
- Wipe the surface thoroughly to remove any dust or debris.
- If the surface is oily or greasy, use a mild detergent or dish soap to remove it.
- Rinse the surface thoroughly with water and dry it using a clean, dry cloth or towel.
Once the surface is cleaned, it is important to ensure that it is completely dry before applying the Gorilla Glue. Any moisture on the surface can affect the bonding process and result in a weak bond. You can wait for the surface to air dry or use a clean, dry cloth to wipe away any moisture.
Now that both surfaces are clean and dry, you can move on to the next step of applying Gorilla Glue to the plastic. But first, let’s discuss why Gorilla Glue is such an effective adhesive for plastic. To learn more about Gorilla Glue, you can check out what is the stickiest glue in the world.
Applying the Gorilla Glue on Plastic
As you prepare to apply Gorilla Glue on Plastic, there are few key details that you need to be mindful of. It’s important that you choose the right amount of glue, apply it properly, and align the surfaces together correctly. Additionally, you’ll need to take measures to secure the bond between the plastic surfaces until the glue sets. Let’s take a look at the step-by-step process for applying Gorilla Glue on Plastic. And, if you’re wondering when Gorilla Glue came out or how to melt Gorilla Glue, check out our other articles on those topics.
Choosing the Right Amount of Glue.
To ensure a strong and lasting bond, choosing the right amount of Gorilla Glue is crucial. Using too little glue will result in a weak bond while using too much glue can cause the glue to expand and create unwanted mess. It is important to use the right amount of glue.
Here are some tips to help you choose the right amount of glue for your plastic project:
- Read the label: Gorilla Glue comes with clear instructions on how much glue to use for different surfaces. Be sure to follow the instructions on the label.
- Consider the size: How much glue you need also depends on the size of the surfaces to be bonded. A large surface area requires more glue than a smaller one.
- Don’t overdo it: It’s better to apply too little glue than too much. A little bit goes a long way with Gorilla Glue. Using excessive amounts of glue can cause the glue to expand, leading to a messy and weak bond.
By choosing the right amount of Gorilla Glue, you can ensure a strong and long-lasting bond between your plastic surfaces. Remember to always follow the instructions on the label and consider the size of the surfaces you’re bonding.
Note: If you’re unsure about the amount of glue to use, start with a small amount and work your way up if needed. It’s always easier to apply more glue than to remove excess glue.
For more information about Gorilla Glue, including its history and melting point, check out our articles on when Gorilla Glue came out and melting Gorilla Glue.
Applying the Glue on Plastic.
When applying Gorilla Glue on plastic, it is important to use gloves to avoid skin contact with the glue. Follow these steps to apply the glue properly:
| Step | Description |
|---|---|
| 1 | Shake the Gorilla Glue bottle well. |
| 2 | Apply a small amount of Gorilla Glue on one surface of the plastic. Gorilla Glue is an expanding adhesive, so avoid over-applying the glue as it may expand and squeeze out of the bond area. |
| 3 | Spread the glue evenly on the plastic surface using a disposable brush or a toothpick. |
| 4 | Assemble the plastic parts quickly and firmly press them together. |
| 5 | Wipe off any excess glue with a damp cloth. |
| 6 | Clean the brush or toothpick with acetone before the glue dries up and hardens. |
Remember, Gorilla Glue works best when applied on clean and dry surfaces. Make sure to follow the preparation steps before applying the glue for a secure and long-lasting bond.
Aligning the Surfaces.
Properly aligning the surfaces is crucial for a strong and durable bond. Here are the steps to follow for aligning the plastic surfaces:
- Apply the glue – First, apply Gorilla Glue on one of the surfaces. Be careful not to apply too much glue as it can expand during the drying process.
- Align the surfaces – Carefully align the surfaces that need to be glued together. Ensure that they are in the correct position and that the glue will be evenly distributed.
- Check the alignment – Check if the alignment is perfect before the glue starts drying. Make any necessary adjustments now.
- Secure the alignment – Once you are satisfied with the alignment, gently press the surfaces together. Be careful not to move or shift the surfaces once they are pressed together.
| Tip: | How to achieve perfect alignment? |
|---|---|
| 1. | Carefully mark the positions of the surfaces before applying the glue. This will ensure that you can place them back in the correct position once the glue is applied. |
| 2. | Use a jig or a fixture to help align the surfaces. This is especially useful if you need to align multiple surfaces or complex shapes. |
| 3. | If you are gluing two flat surfaces, you can use a straight edge or a ruler to ensure perfect alignment. |
Proper alignment of the surfaces will ensure that the bond is strong and durable. Take your time with this step and make sure that you are satisfied with the alignment before moving on to the next step.
Secure the Bond
Now that you have applied Gorilla Glue on the plastic surface and aligned it properly, the next vital step is to secure the bond. This is crucial to ensure that the two surfaces adhere correctly and create a solid bond that is long-lasting. Without securing the bond, the glue might not work effectively, and the bond might break too soon. In this section, we will discuss the two main techniques for securing the bond which are clamping the surfaces and applying weight on top. These techniques will help ensure that the bond created by Gorilla Glue on plastic is strong and reliable. So, let’s dive in and explore the best practices for securing the bond between plastic surfaces using Gorilla Glue.
Clamping the Surfaces.
Once you have applied the Gorilla Glue on the plastic surfaces and aligned them properly, it’s time to secure the bond using clamps. Clamping the surfaces is crucial for a strong and long-lasting bond.
To clamp the plastic surfaces, you will need a few materials such as clamps, a flat surface, and a protective layer like wax paper or a plastic sheet to avoid glue sticking to the surface.
Here are the step-by-step procedures on how to clamp the surfaces:
| Step 1: | Apply even pressure: | Use clamps to apply even pressure to both surfaces. Make sure the clamps are not too tight that they will squeeze out excess glue or cause the surfaces to slide. |
| Step 2: | Use the right number of clamps: | Use the right number of clamps depending on the size of the surfaces you are bonding. For small surfaces, one clamp may be enough. For larger surfaces, use multiple clamps, at least one clamp for every six square inches of surface. |
| Step 3: | Protect the surface: | Place a protective layer like wax paper or a plastic sheet over the clamped surfaces to avoid the glue from sticking to the surface. |
| Step 4: | Leave it to dry: | After clamping, leave the surfaces untouched to dry completely. The drying time varies depending on the amount of glue used and the environmental conditions, follow the instructions on the glue packaging. |
Remember, do not disturb the clamped surfaces while the glue dries as it can weaken the bond.
By properly clamping the surfaces, you increase the strength of the bond and ensure that the Gorilla Glue is distributed evenly. The result is a strong and durable bond that will last for a long time.
Applying Weight on the Surfaces.
Once the Gorilla Glue has been applied and the surfaces have been aligned, it’s important to apply weight or pressure to create a secure bond. There are several ways to accomplish this. One way is to use a clamp to hold the surfaces together while the glue dries. Another way is to use a weight or heavy object to press down on the surfaces. Here are some recommended steps for applying weight on the surfaces:
| Step 1: | Choose a weight or heavy object that is flat and will not damage the plastic surfaces. |
| Step 2: | Carefully lift the surfaces and apply the weight or heavy object on top of the surfaces. |
| Step 3: | Make sure the weight or heavy object is evenly distributed on the surfaces to ensure a secure bond. |
| Step 4: | Leave the weight or heavy object on top of the surfaces for at least an hour or until the glue has completely dried. |
| Step 5: | Remove the weight or heavy object and check the bond between the surfaces. If it’s not strong enough, reapply weight and wait until the glue dries completely. |
Applying weight on the surfaces will help to ensure that a strong bond is created between the plastic surfaces. It’s important to be patient and allow ample time for the glue to dry completely before removing the weight or heavy object.
Important Note
As much as we appreciate the bonding power of Gorilla Glue on plastic surfaces, it’s important to remember that it can be quite potent. It’s therefore necessary for you to take the proper precautions while using it. In this section, we highlight some essential notes to keep in mind when using Gorilla Glue on plastic. Remember, prevention is always better than cure, so read on to stay safe.
Precautions While Using Gorilla Glue.
It is important to take certain precautions while using Gorilla Glue on plastic to ensure your safety. Here is a comprehensive list of precautions that you should keep in mind:
| Precaution | Description |
| Wear Gloves | Gorilla Glue can stick to skin and can be difficult to remove. Always wear gloves to avoid any contact with your skin. |
| Work in a Well-Ventilated Area | Gorilla Glue releases fumes that can be harmful if inhaled. It is important to work in a well-ventilated area to ensure that you are not inhaling any fumes. |
| Keep Children and Pets Away | Store Gorilla Glue in a safe place out of reach of children and pets. The glue can be harmful if ingested. |
| Do Not Overapply | Overapplying Gorilla Glue can result in the glue expanding and overflowing. Use only a small amount of glue to avoid any overflow or wastage. |
| Do Not Touch Wet Glue | Gorilla Glue takes only a few seconds to set and harden. Do not touch the glue while it is still wet as it can stick to your skin and clothing. |
| Store in a Cool and Dry Place | Gorilla Glue can be affected by temperature and humidity. Always store the glue in a cool and dry place to ensure its longevity. |
| Avoid Eye Contact | Gorilla Glue can cause eye irritation if it comes in contact with the eyes. Wear protective eyewear while using the glue and avoid any eye contact. |
Remember to follow these precautions to ensure that you can use Gorilla Glue on plastic safely and without any accidents or mishaps.
Removing Gorilla Glue from Plastic
After successfully bonding plastic using Gorilla Glue, it’s important to know how to remove any excess or unwanted residue that may have been left behind. While Gorilla Glue is known for its strong and durable bonding properties, it can also be challenging to remove once it has cured. In this section, we will explore two effective methods for removing Gorilla Glue from plastic surfaces. These methods involve using acetone or sandpaper, so it’s important to follow the instructions carefully to prevent any damage to the plastic surface. Let’s dive in and learn how to safely remove Gorilla Glue from plastic.
Method 1 – Using Acetone.
Using acetone to remove Gorilla Glue from plastic can be an effective method, but it should be done with caution. Acetone is a strong solvent that can cause damage to certain types of plastic, so it’s important to test a small, inconspicuous area of the plastic before attempting to remove the glue. Here are the steps for using acetone to remove Gorilla Glue from plastic:
- Put on gloves. Acetone can be harsh on skin, so it’s important to protect your hands with gloves.
- Apply acetone. Apply a small amount of acetone to the glue using a cotton swab or a soft cloth. Be careful not to get acetone on any other parts of the plastic, as it could cause damage.
- Let it sit. Allow the acetone to sit on the glue for several minutes to break down the adhesive.
- Scrape off the glue. Use a plastic scraper or a credit card to gently scrape off the softened glue. Be careful not to scrape too hard, as it could damage the plastic surface.
- Clean the plastic. After removing the glue, clean the plastic surface with warm water and dish soap to remove any residue.
- Rinse and dry. Rinse the plastic surface thoroughly with clean water and dry it with a soft cloth or towel.
Remember, acetone is a powerful solvent and can cause damage to certain types of plastic. When using this method to remove Gorilla Glue from plastic, it’s important to test a small, inconspicuous area of the plastic first. If you notice any discoloration or damage, stop using acetone and try a different removal method.
Method 2 – Using Sandpaper.
Another method to remove Gorilla Glue from plastic is by using sandpaper. This method is more time-consuming and requires more effort than using acetone but is effective nonetheless. Here are the steps to follow:
- Procure sandpaper: First, you need to procure sandpaper. Sandpaper comes in different sizes and types, make sure to choose the one that suits your plastic surface.
- Dampen the affected area: Before sanding the area, dampen it lightly with water. This will help in preventing any damage to the plastic surface while sanding.
- Sand the glue: Take the sandpaper and start sanding the affected area slowly and gently. Do not apply too much pressure as it can scratch the surface. Sand until the glue is completely removed from the plastic surface.
- Clean the surface: Once the glue is removed, clean the surface to remove any residue of the glue and sandpaper, as well. You can use a damp cloth or sponge to clean it.
- Polish the surface: After cleaning the surface, you can polish it with a plastic polish or a wax to restore its shine.
While sandpaper can remove Gorilla Glue from plastic, it may not be suitable for all types of plastic since sanding can cause scratches or damage the surface. Additionally, sandpaper should be used as a last resort if acetone is not available or if the plastic surface is not acetone-friendly.
Conclusion
In conclusion, using Gorilla Glue on plastic is a great way to bond two surfaces together. With its strong adhesive properties, Gorilla Glue can create a durable and long-lasting bond on a variety of plastic surfaces. However, it is important to follow the steps outlined in this ultimate guide carefully to ensure the best results.
One of the key factors to using Gorilla Glue on plastic effectively is preparing the surfaces properly. This includes cleaning and sanding the surfaces to be bonded, as well as ensuring that both surfaces are completely dry before applying the glue.
When applying the Gorilla Glue on plastic, it is important to choose the right amount of glue and apply it evenly to both surfaces. Once the glue is applied, align the surfaces carefully and secure the bond using clamps or weights.
It is also important to take precautions while using Gorilla Glue, as it can be harmful if it comes into contact with skin or eyes. Always wear protective gloves and eye goggles, and work in a well-ventilated area.
If for any reason the Gorilla Glue needs to be removed from the plastic surface, there are methods to do this using acetone or sandpaper.
Overall, with the use of this ultimate guide and careful attention to the steps outlined, anyone can successfully use Gorilla Glue on plastic for a variety of bonding projects.
Frequently Asked Questions
1. Can I use Gorilla Glue on all types of plastic?
No, Gorilla Glue may not work on all types of plastic. It is recommended to test it on a small area first before using it on the entire surface.
2. How long does it take for Gorilla Glue to dry on plastic?
Gorilla Glue takes about 10-20 minutes to dry partially and 24 hours to fully set.
3. What should I do if the glue expands and spills over the surface?
You can use a damp cloth to wipe off any excess glue before it dries. If the glue has already dried, you can use sandpaper or a scraper to remove it.
4. Can I use water to clean the plastic surface before applying Gorilla Glue?
No, it is recommended to clean the surface with acetone or rubbing alcohol instead of water. Water can leave residue and affect the bonding strength.
5. How much Gorilla Glue should I use on plastic?
You should apply a small amount of glue on one surface only. A little goes a long way with Gorilla Glue.
6. Is it necessary to clamp the surfaces while the glue dries?
Clamping the surfaces can improve the bonding strength, but it is not always necessary. If you cannot use clamps, you can use heavy weights to secure the surfaces in place.
7. Can I use Gorilla Glue to fix a crack on a plastic item?
Yes, you can use Gorilla Glue to fix a crack on a plastic item by applying a small amount of glue on the crack and aligning the edges together. However, the bonding strength may vary depending on the type of plastic and the severity of the crack.
8. Can Gorilla Glue be used on both smooth and rough plastic surfaces?
Yes, Gorilla Glue can be used on both smooth and rough plastic surfaces. However, sanding the surface can improve the bonding strength.
9. Is Gorilla Glue waterproof?
Yes, Gorilla Glue is waterproof and can be used for both indoor and outdoor projects.
10. How can I remove Gorilla Glue from my hands?
You can remove Gorilla Glue from your hands by washing them with soap and warm water before the glue dries. If the glue has already dried, you can use acetone or rubbing alcohol to dissolve it.