Introduction
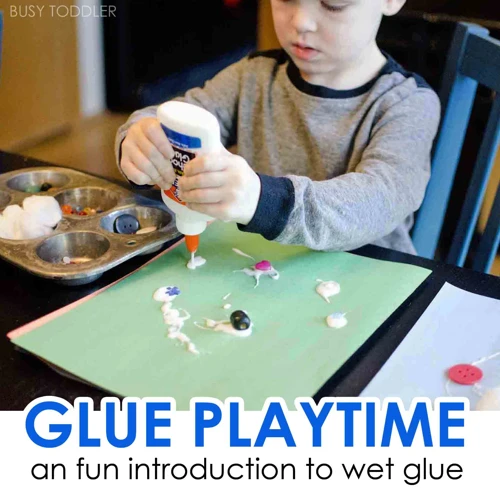
When it comes to woodworking, having a reliable adhesive is essential for producing quality and long-lasting projects. While there are many types of wood glue available on the market, making your own glue can be a cost-effective and rewarding solution. In this article, we’ll walk you through the steps of creating your own wood glue from scratch and the benefits of doing so. We’ll also cover the different types of wood glue available, how to properly use it, and some useful tips and tricks to ensure a successful project. So, grab your equipment and let’s get started!
What Is Wood Glue?
Wood glue is a type of adhesive that is specifically designed for use on wood surfaces. This specialized glue is made up of a mixture of chemicals that can include various types of resins, plastics, and natural ingredients like animal hides and bones. The purpose of wood glue is to create a strong bond between two pieces of wood, whether it’s to repair a broken chair leg or to create a unique wooden art piece.
Wood glue is one of the most versatile and commonly used adhesives in the world, and it’s no surprise why. It’s durable, water-resistant, and can withstand various temperatures, which makes it an ideal adhesive for any wood-based project. Additionally, wood glue provides extra strength and durability that cannot be achieved with traditional nails or screws.
Different types of wood glue exist, and each type comes with its own unique advantages. For example, Polyvinyl Acetate (PVA) glue is a popular choice due to its fast drying time and its ability to fill gaps and pores effectively. Polyurethane glue is another glue type that is known for its extremely strong bond that can withstand pressure and shock. Epoxy glue is a two-part adhesive that combines resin and hardener to create a long-lasting bond that can be sanded and painted when dry.
Knowing the different types of wood glue can help you make informed decisions when working on your projects, and choosing the right type for your needs will make a big difference in the final outcome.
The Benefits of Making Your Own Glue
Making your own wood glue can bring several benefits that are worth considering. First off, it can be more cost-effective than buying commercial products. By purchasing the ingredients in bulk and making your own batches of glue, you can save money in the long run. Secondly, you can have greater control over the strength and properties of the glue, especially when it comes to special projects that require different types of adhesives.
Another advantage of making your own glue is that you can avoid the harsh chemicals and additives that may be present in some commercial products. By using natural ingredients and avoiding toxic additives, you can make a safer and more environmentally-friendly product.
Making your own glue can be a fun and rewarding DIY activity that can give you a sense of pride and accomplishment. You can experiment with different recipes and techniques to find what works best for your needs. Plus, you can customize the color and texture of the glue to match your preferences.
Table:
| Benefits of making your own wood glue: |
|---|
| – Cost-effective |
| – Greater control over strength and properties |
| – Avoiding toxic additives |
| – Safer and more environmentally-friendly |
| – Fun and rewarding DIY activity |
If you want to learn more about different types of wood glue and which one is the strongest, check out this article.
Types of Wood Glue
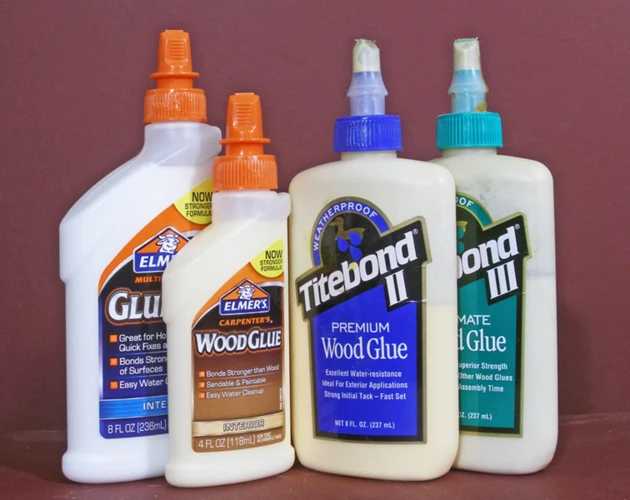
Wood glue comes in many different forms, each with its own unique properties and uses. Choosing the right type of glue for your woodworking project can be confusing, especially for beginners. In this section, we will discuss the various types of wood glue available, including PVA glue, polyurethane glue, and epoxy glue. We will look at the advantages and disadvantages of each type and provide guidance on which one to use for different projects.
PVA Glue
PVA glue, also known as polyvinyl acetate, is one of the most popular types of wood glue. It is a water-based glue that is easy to clean up and dries clear, making it an ideal choice for most woodworking projects. Another benefit of PVA glue is that it is relatively inexpensive and widely available.
Advantages of PVA Glue:
– Dries clear
– Water-soluble, making it easy to clean up with water
– Less toxic than many other types of glue
– Ideal for use on porous surfaces
– Dries relatively quickly, usually within a few hours
– Provides a strong bond
Disadvantages of PVA Glue:
– Not waterproof, so not suitable for outdoor use
– May not bond well with non-porous surfaces
– Can become brittle over time
– Not heat-resistant
To ensure a strong bond when using PVA glue, it is important to prepare the surface properly. The surface should be clean and free of any dust or debris. Apply the glue evenly to both surfaces being bonded and clamp the pieces together firmly until the glue dries. The drying time for PVA glue varies depending on the conditions, but it usually takes several hours to fully cure.
PVA glue is a versatile and cost-effective choice for most woodworking projects. It is easy to use, dries clear, and provides a strong bond. However, if your project requires a waterproof glue or a stronger bond, you may want to consider using a different type of glue such as polyurethane or epoxy.
If you’re interested in learning more about glue drying clear, check out our article What Glue Dries Clear? for more information.
Polyurethane Glue
Polyurethane Glue is another type of wood glue that is highly versatile and waterproof. It adheres well to a wide range of materials including wood, metals, and plastics. Polyurethane glue is also resistant to solvents, heat, and impact, making it an excellent choice for outdoor projects and heavy-duty applications. It expands as it dries, which allows it to fill gaps and irregularities.
To use polyurethane glue, it is important to prepare the surfaces to be glued properly. The surfaces should be clean, dry, and free from any oils or debris. Apply a thin layer of glue to one surface and press the two surfaces together. Make sure to clamp the objects firmly to keep them in place until the glue dries completely.
Unlike PVA glue, polyurethane glue takes longer to dry and requires more time for clamping. It can take up to 24 hours for the glue to dry completely, but it will be fully cured after that time. Remember to use gloves when working with polyurethane glue, as it can be difficult to remove from the skin once it has dried.
Polyurethane glue is a great choice for a variety of projects where durability and waterproof properties are required. However, it is important to note that this type of glue can be more expensive than other types of wood glue, so it may not be ideal for all projects. If you need a more affordable option, consider making your own tylo glue or using PVA glue, which is also a great option for most woodworking projects.
Epoxy Glue
Epoxy glue is a versatile adhesive that is known for its excellent bonding strength and resistance to water and heat. It is a two-part adhesive consisting of a resin and hardener that must be mixed together before application. Epoxy glue is great for bonding different materials like wood, metal, plastic, and ceramic.
Advantages of Epoxy Glue:
-Strong bonding strength
-Resistant to water and heat
-Can be used for bonding different materials
-Can be used for filling gaps and holes
-Quick drying
Epoxy glue is commonly used in woodworking projects where strong and durable adhesive is required. It works well for bonding wood pieces together and can also be used to fill gaps in wood. To use epoxy glue for woodworking, you will need to prepare the surface carefully and follow the manufacturer’s instructions when mixing and applying the glue.
Precautions when using Epoxy Glue:
-Should be used in a well-ventilated area
-Can cause skin irritation if it comes in contact with skin
-Should be handled with care
When mixing epoxy glue, it is important to follow the instructions carefully. The resin and hardener must be mixed in the right proportions to ensure a strong bond. After mixing, the glue should be applied immediately as it will begin to harden quickly. Any excess glue can be wiped away with a cloth or sandpaper after it has dried.
Internal link: If you are looking for information on how long it takes for wood glue to dry, you can check out our article on how long Elmer’s wood glue should dry.
DIY Wood Glue Recipe
Assembling materials for your woodworking project calls for the right adhesive to join the pieces together. Fortunately, creating your own wood glue is possible with everyday household supplies. This DIY project not only saves you money but also allows you to create a custom adhesive suitable for your project. Here’s how to make a strong and effective wood glue in various forms to fulfill your woodworking needs. Follow these simple steps to create your own wood glue that is ideal for securing different types of wood and joints.
Ingredients
Wood glue is a type of adhesive that is specifically designed for use on wood. Making your own wood glue at home is a simple and cost-effective solution that can be done with just a few ingredients. Here are the ingredients needed to make your own wood glue:
- Gelatin: This ingredient is necessary for making the glue thick enough to hold the wood pieces together. You will need approximately 1 tablespoon of gelatin powder for every 1 cup of water.
- Water: The water is used to dissolve the gelatin powder and create a sticky adhesive that will bond the wood pieces together.
- Vinegar: Adding vinegar to your mixture may help to slow the drying process and provide a stronger bond between the wood pieces.
- Flour: Some DIY wood glue recipes may call for a small amount of flour to thicken the mixture. This is an optional ingredient, but it can help to achieve a thicker consistency for a stronger bond.
It’s important to note that each ingredient in this list plays a specific role in creating a wood glue mixture that is strong, flexible, and long-lasting. Mixing these ingredients together according to the recipe will produce a quality adhesive that can be used for various woodworking projects. If you’re ready to learn how to mix these ingredients together, please refer to our step-by-step guide on how to glue mix together.
Equipment
Equipment
To make wood glue at home, you will need a few basic tools and materials. Some of the essential pieces of equipment that you will require can be found around the house, while others may need to be purchased from a hardware store. Here is the equipment that you will need to make your own wood glue:
| Equipment | Description |
|---|---|
| Measuring cups and spoons | You will need measuring cups and spoons to measure out the ingredients accurately. Use a set of measuring spoons for small amounts and liquid measuring cups for larger quantities. |
| Mixing bowl | You will need a mixing bowl to mix up the ingredients, preferably one with a spout for easy pouring. Use a bowl that is large enough to hold the ingredients without spilling over. |
| Stirring utensil | You can use a wooden spoon or a plastic spatula to mix the ingredients together. Avoid using a metal utensil as it may react with the glue. |
| Stove | If you are making hide glue, you will need a heat source such as a stove or a hot plate to heat the ingredients. Make sure the area is well ventilated and keep a fire extinguisher nearby, just in case. |
| Containers | You will need containers to store the glue. Mason jars or plastic containers with lids work well and can be found at a hardware store or online. Make sure the containers are clean before using them. |
Having the right equipment is crucial to making successful and effective wood glue at home. With these basic tools and materials, you’ll be on your way to creating your own wood glue in no time.
If you want to learn more about glues, check out this article on how to glue a book. If you’re interested in spray glue, read our guide on what is the best spray glue.
Step-by-Step Guide
Making your own wood glue can provide a cost-effective and reliable alternative to store-bought options. Follow these steps to make your own DIY wood glue at home.
Step 1: Prepare the Ingredients
Gather the necessary ingredients for your DIY wood glue recipe. You will need water, gelatin, and white vinegar. Mix the gelatin with water and allow it to soak for several minutes while you proceed to the next step.
Step 2: Heat the Mixture
Place the gelatin and water mixture on low heat and stir occasionally until all the gelatin has dissolved. Avoid overheating the mixture, as it could alter the glue’s performance.
Step 3: Add Vinegar
After the gelatin has dissolved, add the white vinegar to the mixture and stir. This addition will help preserve your glue for a more extended period of time, as well as alter the glue’s characteristics.
Step 4: Store and Use
After thoroughly mixing the concoction, transfer it into a container and allow the mixture to cool and solidify. You are now ready to use your DIY wood glue.
Tips and Tricks
- For a stronger bond, consider mixing in sawdust to the glue to provide a more robust adhesive.
- Be sure to use your glue when it is still warm and liquid to allow for maximum adhesion.
- Experiment with the combination of ingredients to adjust the glue’s characteristics to your preference.
Making your own wood glue can save you a considerable amount of money, and provide you with a reliable and customizable adhesive for all your wood projects. Be sure to follow the instructions carefully and store the glue properly to ensure it lasts as long as possible.
Tips and Tricks
When it comes to making your own wood glue, there are a few tips and tricks you can follow to ensure that your glue is as strong and effective as possible. Here are a few things to keep in mind:
- Measure carefully: When you’re making your own glue, it’s important to measure your ingredients carefully. Even slight variations can impact the strength and consistency of your glue. Use a digital scale to get precise measurements.
- Stir thoroughly: After adding your ingredients together, be sure to stir your glue thoroughly. You want to make sure that all the ingredients are well combined and that there are no pockets of unmixed materials.
- Apply to clean surfaces: Before applying your glue, make sure the surfaces you’ll be gluing together are clean and free of dust, dirt, and debris. This will help the glue adhere more effectively.
- Use clamps: Clamping your glued surfaces together can help ensure a strong bond. Use clamps that are strong enough to hold the surfaces in place without slipping.
- Allow time to dry: Give your glue plenty of time to dry before putting any weight or force on the glued surfaces. The drying time will vary depending on the type of glue you’re using and the environmental conditions.
- Experiment with different types: Depending on the project you’re working on, different types of glue may be more effective. For example, polyurethane glue may be better for outdoor projects, while PVA glue may work well for indoor furniture repairs. Don’t be afraid to experiment to find the best glue for your needs.
While making your own wood glue can be a cost-effective and fun alternative to store-bought options, it may not be the right choice for every project. Be sure to evaluate your needs and the requirements of your project before deciding which route to take. If you’re looking for other DIY glue ideas, check out our articles on how to make goo with starch and glue and how to make shampoo slime without glue. And if you’re wondering what glue to use for a cat scratching post, check out our detailed guide on what glue to use for a cat scratching post.
Using Wood Glue
Once you’ve made your own wood glue, it’s time to put it to use! Using wood glue may seem straightforward, but there are actually a few important steps to follow in order to ensure a strong and long-lasting bond. In this section, we’ll cover the key steps for using wood glue, from preparing the surface to clamping and drying. So, grab your homemade glue and let’s get started on creating some beautiful, sturdy wood projects!
Preparing the Surface
Preparing the surface before applying wood glue is crucial to ensuring a strong bond. The surface should be clean and free of any dirt, dust, or debris. The surface should be dry and free of any oil or grease.
Step 1: Begin by sanding the surface to be glued. This will create a rough surface that will allow the glue to adhere more tightly.
Step 2: Next, wipe down the surface with a damp cloth to remove any remaining debris. Be sure to use a clean cloth to avoid adding any extra dirt or debris to the surface.
Step 3: If the surface is particularly dirty, use a cleaning solution to remove any build-up of grime or grease. Be sure to choose a cleaning solution that is safe for use on wood surfaces.
Step 4: Allow the surface to dry completely before applying any glue. This will help to ensure that the glue adheres properly and that the bond is strong.
Step 5: Once the surface is dry, apply the glue according to the instructions provided with the glue. Be sure to apply the glue evenly and to cover the entire surface.
By taking the time to properly prepare the surface before applying wood glue, you can ensure a strong and long-lasting bond. Remember to always follow the manufacturer’s instructions for the best results.
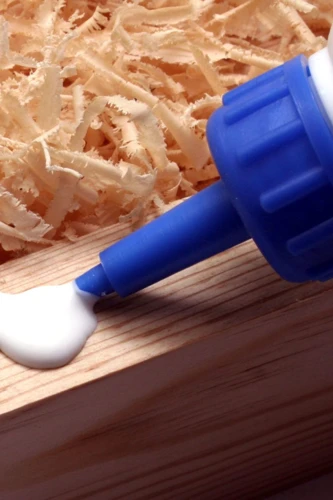
Applying the Glue
Applying wood glue correctly is crucial for achieving a strong hold. Here are the steps to follow when applying wood glue:
| Step 1: | Stir the glue well before applying it. This ensures that the glue is evenly mixed. |
| Step 2: | Apply a thin layer of glue to one of the surfaces using a brush or roller. Use just enough glue to cover the surface with a thin, even coating. Too much glue can cause the pieces to slip when clamped, resulting in a weak bond. |
| Step 3: | Press the two surfaces together firmly, making sure they are aligned properly. Use your hands or a clamp to hold the two pieces together. If using a clamp, tighten it just enough to apply pressure, but not so tight as to squeeze all the glue out. |
| Step 4: | Wipe away any excess glue that squeezes out from the joint immediately with a damp cloth. Any dried glue will prevent stain or finish from penetrating the wood properly. |
| Step 5: | Allow the glue to dry completely before removing the clamps. The drying time will depend on the type of glue used and the humidity and temperature of your working area. Refer to the manufacturer’s label for specific drying times. |
Following these steps will ensure that your wood glue creates a strong and lasting bond.
Clamping and Drying
After applying the wood glue, it is important to clamp the pieces together to ensure a tight bond. This prevents any gaps or air pockets and ensures that the glue sets properly. Here are the steps to follow for clamping and drying:
Step 1: Use a clamp to hold the two pieces of wood together tightly. The pressure of the clamp will help to push out any excess glue that could cause weak spots in your bond.
Step 2: Make sure that the pieces are lined up properly and that the joints are flush. If the pieces are misaligned, it can lead to a weak bond and a less sturdy final product.
Step 3: Wipe away any excess glue that squeezes out from the joint. This will prevent any mess and also ensure that the glue dries evenly.
Step 4: Leave the clamps in place for at least 24 hours. This gives the wood glue enough time to dry and cure properly. If you remove the clamps too soon, the bond may not be strong enough and the pieces could separate.
Step 5: Once the glue has dried, you can remove the clamps. Sand down any rough edges or excess glue residue before moving on to the next step of your project.
Remember that different types of wood glue have different drying times, so make sure to check the instructions on the product that you’re using. Additionally, the drying time can be affected by factors such as temperature and humidity. If you’re working in a particularly humid environment, it may take longer for the glue to dry. Be patient and allow the glue enough time to set properly for the best results.
Conclusion
After following this step-by-step guide, you should feel confident in creating your own wood glue at home. It’s important to note that each type of wood glue has its own unique properties and uses, so it’s important to choose the right one for your specific project.
When using wood glue, always be sure to properly prepare the surface, apply the glue evenly, and clamp the pieces together tightly while it dries. Using wood glue can greatly improve the strength and durability of your woodworking projects, and making your own can save you money and provide a sense of accomplishment.
Remember to always follow safety precautions when working with wood glue and wear appropriate protective gear, such as gloves and safety glasses.
In conclusion, with a few simple ingredients and equipment, you can easily make your own wood glue and take your woodworking projects to the next level. Now go forth and create!
Frequently Asked Questions
1. Is it cheaper to make wood glue at home?
Yes, making wood glue at home is usually cheaper than buying it from the store.
2. How long does it take for wood glue to dry?
It can take anywhere from a few hours to overnight for wood glue to dry completely.
3. Can I use regular glue instead of wood glue?
No, regular glue is not designed for use on wood and will not create a strong or long-lasting bond.
4. Can I stain wood after using wood glue?
Yes, after the wood glue has dried and been sanded, you can stain the wood as usual.
5. What temperature should the glue and wood be when applying wood glue?
The glue and wood should be between 60-80°F (15-27°C) for best results.
6. Can I use wood glue on non-wood surfaces?
No, wood glue is specifically designed for use on wood surfaces and may not adhere properly to other materials.
7. How long can I store homemade wood glue?
Homemade wood glue can be stored in an airtight container for several months.
8. Can I use a hairdryer to speed up the drying process?
Using a hairdryer may cause the wood glue to dry too quickly and compromise the strength of the bond.
9. Can I sand wood before applying wood glue?
Yes, it is recommended to sand the wood before applying wood glue for better adhesive properties.
10. Can I use wood glue for outdoor projects?
It depends on the type of wood glue. Some types of wood glue are water-resistant and can be used for outdoor projects, while others are not recommended for extended exposure to moisture.