Do you want to give your floors a modern and stylish look without breaking the bank on installation costs? Are you searching for an easy-to-follow guide to lay vinyl flooring without the use of glue? If so, you’re in luck, because we’ve got you covered! In this step-by-step guide, we will show you how to install vinyl flooring without glue and give your space an updated and fresh appearance. Vinyl flooring is a practical and affordable option that can replicate the appearance of tile, hardwood, or stone, at a fraction of the cost. Let’s get started on transforming your floors with this hassle-free method.
Advantages of Laying Vinyl Flooring without Glue
Why Vinyl Flooring without Glue is the Way to Go
Vinyl flooring without glue is a popular choice for many homeowners due to its numerous benefits. Not only is it an affordable flooring option, but it also has a hassle-free installation process. In this section, we will discuss the advantages of laying vinyl flooring without glue, including its cost-effectiveness, ease of installation, and easy removal and replacement. Plus, we’ll provide you with all the necessary information you need to make the most of this versatile flooring option. So, let’s dive in!
Cost-Effective
Vinyl flooring is a cost-effective solution for those who want to renovate their home’s flooring on a budget. Unlike traditional flooring options like hardwood that can be quite expensive, vinyl flooring is significantly cheaper. Not only is the material relatively inexpensive, but you can also save money on labor costs because you won’t need to hire a professional to install it. Laying vinyl flooring without glue is an excellent option for those who want to save even more money because you will not have to purchase additional glue or pay someone to apply it.
Moreover, vinyl flooring is very durable and long-lasting. It’s resistant to scratches, scuffs, and spills, making it a popular choice for high-traffic areas like entryways, kitchens, and bathrooms. Due to its durability and longevity, you won’t have to replace your vinyl flooring as often as other types of flooring, which will save you even more money over time.
In addition, vinyl flooring is easy to install, even without using glue. This means you can save money on installation costs by taking on the project yourself. Additionally, if you decide to move to a new home, you can easily remove and take the vinyl flooring with you to your new location. Not only will this save you money on buying new flooring, but it will also reduce waste and help the environment.
Laying vinyl flooring without glue is a cost-effective solution that can provide numerous benefits for homeowners. It’s an ideal option for those who want to save money while still achieving a beautiful and durable flooring solution.
Click here to learn more about other options for installing vinyl flooring.
Ease of Installation
Installing vinyl flooring without glue is a simple and easy process that even beginners can handle without any trouble. It does not require much expertise as there is no need for any messy adhesives or special tools.
- Without the need for glue, you can simply use double-sided tape for adhesive purposes. Thus, making the installation process much easier.
- Unlike glue-down vinyl, laying non-glue vinyl flooring does not create any fumes or harmful gases. You don’t have to worry about any fumes or compromising your indoor air quality.
- With glue-down vinyl, you need to use the correct adhesive and lay the flooring precisely, otherwise, it may not adhere properly or may even become damaged. However, laying non-glue vinyl flooring involves cutting the flooring material to size with a utility knife, aligning and laying it on the subfloor, and trimming the edges with the straight edge without any complications.
The ease of installation is what makes non-glue vinyl flooring a popular choice.
Easy Removal and Replacement
One major advantage of installing vinyl flooring without glue is the ease of removal and replacement. In case of any damage or wear and tear, replacing a vinyl plank or tile can be simple and hassle-free. This can save both time and money, which is especially important for those who want a low-maintenance flooring option.
Unlike traditional glued-down flooring, which can be difficult to remove and can cause damage to the subfloor or the flooring itself during the removal process, vinyl flooring installed with double-sided tape can be removed with ease. This is because the tape used in the installation process is not permanent, allowing the flooring to be easily lifted up when in need of replacement or repair.
To remove a vinyl tile or plank installed with double-sided tape, simply lift up the damaged piece and peel off the tape. Clean the floor surface before installing a new piece of flooring, and use fresh tape to re-install it. This process is much easier and more convenient than removing glued-down flooring, which often requires special tools and techniques to avoid damage to the subfloor.
It’s worth noting that while the removal and replacement process is easy with double-sided tape, it’s important to ensure that the tape used during the installation is of high quality. This will ensure that the flooring stays in place and does not start to peel or lift over time, which can cause tripping hazards or leave unsightly gaps in the floor.
The ease of removal and replacement is a major advantage of installing vinyl flooring without glue. It can save time, money, and effort, and offers a more convenient option for those who want a low-maintenance flooring solution. However, it’s important to use high-quality double-sided tape during the installation process to ensure that the flooring remains in place.
Preparing for the Installation
Preparing your subfloor for installation is the most critical step in laying vinyl flooring without glue. To ensure the longevity and appearance of the vinyl flooring, it is essential to adequately prepare the subfloor. This section will discuss the important preparatory steps that need to be taken before the installation process. It is highly recommended to follow each step accurately to ensure a smooth and safe installation process.
Clean the Floor
Before laying vinyl flooring without glue, it is important to prepare the floor by thoroughly cleaning it. This will ensure that the adhesive tape used in the installation process adheres properly and prevent any contaminants from getting trapped underneath the flooring. Cleaning the floor is a simple process if you have the right tools and materials. Here are some steps to follow when cleaning the floor:
| Step 1: | Remove all furniture and other objects from the area where the vinyl flooring will be installed. |
| Step 2: | Sweep the floor thoroughly to remove any dust, dirt, or debris. |
| Step 3: | Mop the floor with a solution of warm water and a gentle floor cleaner. Avoid using harsh chemicals or abrasives that could damage the floor. |
| Step 4: | Dry the floor completely using a clean, dry mop or towels. Any remaining moisture on the floor could affect the adhesive tape’s performance, leading to an unstable installation. |
| Step 5: | Inspect the floor for any cracks, holes, or other damage and address them accordingly before laying the vinyl flooring. |
It’s essential to note that the condition of the sub-floor will impact the longevity of the vinyl flooring. Make sure that the floor is clean, dry, and free of any damage before proceeding with the installation. If the sub-floor is damaged, refer to our guide on “/how-to-glue-particle-board/.”
Check the Subfloor
Before laying vinyl flooring without glue, it’s important to ensure that the subfloor is clean, dry, and free from any cracks or irregularities. Checking the subfloor will help prevent any damage or issues with the vinyl flooring down the line.
Here are the steps to check the subfloor:
| Step | Action |
|---|---|
| Step 1 | Remove any old flooring: |
| Before checking the subfloor, remove any old flooring such as carpet, tiles, or hardwood. This will allow you to inspect the subfloor properly and ensure there are no underlying issues. | |
| Step 2 | Check for smoothness and levelness: |
| Check to see if the subfloor is smooth and level. This can be done by placing a straight edge or level across the subfloor to see if there are any high or low spots. Any bumps or hollows should be filled with a leveling compound to ensure a smooth surface for laying the vinyl flooring. | |
| Step 3 | Check for moisture: |
| It’s important to check the moisture level in the subfloor to prevent any damage or issues with the vinyl flooring. A moisture meter can be used to test the subfloor’s moisture content. If the level is too high, address the moisture issue before installing the vinyl flooring. | |
| Step 4 | Check for cracks: |
| Inspect the subfloor for any cracks or damage. If there are any significant cracks, they should be filled with a suitable filler or patching compound to ensure a solid surface for laying the vinyl flooring. |
By checking the subfloor, you’ll be able to ensure that your vinyl flooring will be installed on a smooth, level surface that will last for years to come. If you encounter any subfloor issues that need addressing, it’s recommended to do so before starting the installation process to avoid any unexpected problems down the line.
If you need advice on what glue to use for wall panels or how to glue carpet, we’ve got you covered.
Acclimatize the Flooring
Acclimatizing the flooring is a necessary step that should not be skipped before laying vinyl flooring. This step allows the flooring to adjust to the temperature and humidity of the room it will be installed in, to avoid any issues such as warping or buckling. It is important to follow the manufacturer’s instructions for acclimatization, as it varies depending on the type of vinyl flooring being used.
Here are the general steps for acclimatizing vinyl flooring:
- First, leave the vinyl flooring in its packaging, and place it in the room where it will be installed. Ensure the room temperature and humidity are similar to the environment the vinyl flooring will be exposed to in the future to prevent any warping, bulging or shrinkage after the installation.
- Next, allow the flooring to acclimate for at least 24 to 48 hours. During this period, make sure the room is properly ventilated and the flooring boxes are kept flat and stacked evenly to avoid bowing or damaging.
- Be sure to check the manufacturer’s instructions for specific acclimation requirements. This time period could change depending on the type of flooring being used and the climate conditions.
Taking the time to acclimate vinyl flooring can prevent any potential issues and contribute to a successful installation. Skipping this step may seem like it saves time, but it can lead to disastrous consequences and potentially waste more time and money in the long run.
Tools and Materials
When embarking on any home renovation project, having the right tools and materials is essential. This is especially true when it comes to laying vinyl flooring without glue. Making sure you have the proper equipment will not only ensure the job is done correctly but will also save you time and money in the long run. So let’s take a look at the list of tools and materials you will need for this installation process. And, if you’re wondering about the use of glue for other home improvement projects, check out some of our related articles, such as What Glue to Use for Wall Panels or How to Glue Carpet to Stairs, for further guidance.
Vinyl Flooring
Vinyl flooring is a popular flooring choice for many homeowners and it’s perfect for those who want to update their floors without breaking the bank. When installing vinyl flooring without glue, it’s important to choose the right type of vinyl flooring. There are two main types of vinyl flooring – sheet vinyl and vinyl tiles.
Sheet Vinyl: Sheet vinyl comes in large, continuous rolls. This type of vinyl flooring is perfect for large rooms where you want the flooring to have as few seams as possible. Sheet vinyl is very durable and water-resistant, making it an ideal flooring option for bathrooms and kitchens. It’s also easy to clean.
Vinyl Tiles: Vinyl tiles are individual tiles that come in a variety of sizes. They can be installed in a variety of patterns such as brick, herringbone, and diagonal. Vinyl tiles are more forgiving, which makes them a great option for DIY installations. They’re also easy to replace if one tile gets damaged.
No matter which type of vinyl flooring you choose, it’s important to make sure that the surface underneath is clean, smooth, and dry. Any bumps or rough spots in the subfloor can cause the vinyl flooring to bubble or peel up over time.
Pro tip: Before purchasing vinyl flooring, measure the area of your room to determine how much flooring you need. Remember to add an extra 10% to your measurements to account for any mistakes or future replacements.
To make sure you choose the right vinyl flooring for your needs, visit your local hardware store or home improvement store. They can offer suggestions and help you choose the right flooring for your budget and style.
Recommended internal link: If you’re interested in learning about how to glue down cork flooring, check out our article on How to Install Glue Down Cork Flooring.
Double-Sided Tape
Using double-sided tape is one of the easiest and most convenient ways to lay vinyl flooring without glue. The tape provides a secure and stable hold while also making it easy to remove and replace the flooring if needed.
Advantages of Double-Sided Tape
- Unlike traditional glue, double-sided tape doesn’t require any mixing or drying time, making the installation process quicker and more efficient.
- Double-sided tape is also cost-effective as it typically costs less than a regular adhesive.
- It’s also easier to handle as there are no messy applications involved. Simply peel and stick the tape to the subfloor.
- Double-sided tape creates a strong bond that ensures the flooring stays in place without any shifting or movement.
- The tape also allows for a cleaner installation as there is no glue residue left behind which can attract dirt and grime.
Choosing and Using Double-Sided Tape
When choosing double-sided tape for laying vinyl flooring, make sure to select a high-quality product that is strong enough to withstand wear and tear. Also, ensure that the adhesive is compatible with both the subfloor and the vinyl flooring.
To use the tape, start by cleaning and preparing the subfloor as per the instructions in the previous section. Then, cut the tape into strips and apply it to the subfloor. Make sure to leave some space between each strip to allow for expansion.
Next, carefully lay the vinyl flooring on top of the tape, making sure to align it with the centre lines or patterns marked earlier. Using a roller, firmly press the vinyl down onto the tape to create a secure bond.
Finally, trim any excess vinyl using a straight edge and a utility knife, and your vinyl flooring without glue installation is complete!
By using double-sided tape, you can enjoy a cost-effective, easy-to-install, and easy-to-maintain vinyl flooring without the need for messy adhesives. For more information on adhesive options, check out our article on how to glue drywall.
Utility Knife
One of the essential tools you will need for laying vinyl flooring without glue is a utility knife. It’s a versatile cutting tool that you can use to cut the flooring to size, trim off excess, and make precise cuts along edges and corners. It’s best to use a sharp, high-quality utility knife for this task, as a dull blade can make cutting difficult and increase the risk of damaging the flooring.
To use a utility knife for cutting vinyl flooring, start by measuring the piece of flooring you need and marking the cut line with a straight edge or ruler. Then, use the utility knife to score the vinyl along the cut line with a firm, steady pressure. Be sure to use multiple passes if necessary to cut through the material completely. Once you have made the cut, use the utility knife to trim any excess material around the edges.
Remember to always use caution when handling a utility knife, as the blades are sharp and can cause injury if mishandled or used improperly. Always store the knife in a safe place when not in use, and keep it away from children and pets.
In addition to a utility knife, you may also need other tools and materials for laying vinyl flooring without glue. These include vinyl flooring, double-sided tape, a straight edge, and a tape measure. If you need guidance on how to glue other materials, you can find useful information in our other articles like How to Glue Shingles Down or How to Glue Paneling to Walls.
Straight Edge
A straight edge is a crucial tool needed to cut vinyl flooring to the correct size and shape. This tool ensures that the vinyl flooring fits perfectly against the edges of the room’s walls or other obstacles on the floor. Using a straight edge will also ensure that the vinyl flooring lies completely flat against the subfloor, and there are no bubbles or creases in the flooring.
When selecting a straight edge, consider the length of the cut to be made. A longer straight edge might be necessary for larger areas, while a shorter straight edge might suffice for smaller cuts. Additionally, choose a straight edge made of sturdy material, like metal or hard plastic, to ensure that it does not warp or bend during the cutting process.
It is also essential to use a sharp utility knife when cutting the vinyl flooring. A dull blade can cause uneven cuts or tears in the flooring, which can affect the overall appearance and performance of the flooring.
Using a straight edge, along with a sharp utility knife, will ensure precise and accurate cuts when laying vinyl flooring without glue. This results in a professional-looking finish that enhances the room’s overall appearance.
No relevant anchor found for an internal link.
Tape Measure
One of the essential tools that you need for laying vinyl flooring without glue is a tape measure. Taking precise measurements of the floor area ensures that you purchase the correct amount of vinyl flooring to cover the space. It also helps you to know the exact length and width of the vinyl flooring you need to cut for each section of the layout.
When purchasing a tape measure, consider getting one that is at least 25 feet long, as it can adequately measure larger areas. Retractable tape measures are commonly used because they are easy to handle.
Tip: To measure the width of the room, stretch the tape measure from one wall to the opposite wall. Take note of the measurement and repeat the process to determine the length of the room.
After taking measurements, add an extra 10% to the total square footage. This additional material will cater to any errors that may occur during cutting and fitting.
A tape measure is an indispensable tool for the installation of vinyl flooring without glue. Without it, you won’t be able to measure correctly and may waste money on excess materials. So, be sure to get one before starting your vinyl flooring project.
Note that it’s important to check the subfloor first and ensure that it’s level and in good condition before laying the flooring. You can read more about checking the subfloor in the preceding section.
Internal link: If you’re interested in learning more about how to glue carpet, check out our article on how to glue carpet.
Installation Process
Now that you have prepared your floor and gathered all the necessary tools and materials, it’s time for the exciting part – the installation process! This is where you’ll see your vinyl flooring come to life. But before you jump right in, it’s important to know the proper steps to follow to ensure a successful and long-lasting installation. In the following sections, we’ll guide you through each step of the process, from measuring and cutting your flooring to laying it down and trimming the edges. But first, if you’re wondering how long it takes for tile glue to dry, check out our article on how long it takes for different types of tile glue to dry. Now, let’s get started on laying your vinyl flooring without glue!
Measure and Cut the Vinyl Flooring
Before laying vinyl flooring, it is important to measure the floor area where you want to install it. This will help you determine the amount of flooring needed. You can use a tape measure to measure the length and width of the room and multiply these two to get the total square footage. It is important to add an additional 10% of flooring to account for any waste or cuts.
Once you have the correct measurements, it is time to cut the vinyl flooring. This part of the process can be a bit tricky but with the right tools and technique it can be done easily. Here are the steps:
- Gather the Materials: You will need a utility knife, straight edge, measuring tape, and vinyl flooring.
- Measure the Vinyl: Measure and mark the vinyl plank with the correct dimensions based on the size of your floor. Be sure to include any additional length for cuts or trimming. Use a measuring tape to ensure your cuts are accurate.
- Cut the Vinyl: It’s important to score the vinyl plank before cutting it. This can be done by placing the straight edge along the line you want to cut and then using the utility knife to score the vinyl. This will prevent the vinyl from tearing or ripping during cutting. Next, cut along the scored line using the utility knife and straight edge.
- Double Check: After cutting the vinyl plank, double check the measurements to ensure it will fit properly in the designated space.
- Repeat the Process: Repeat this process until all the vinyl planks are cut and ready to be laid.
Remember to take your time with this step, as accurate measurements and cuts will help ensure a smooth and seamless installation process.
Mark Centre Lines and Laying Pattern
To ensure that your vinyl flooring looks professional and is correctly installed, it’s essential to mark the center lines of the room and plan the laying pattern. This step helps distribute the tiles evenly and creates a cohesive look.
Step 1: Find the center of the room by measuring the length and width of the floor and marking the exact middle point. Use a chalk line to snap a line across the center of the room.
Step 2: Divide the width of the room into equal sections based on the width of the tiles. For example, if you have 12-inch tiles and a room that is 10 feet wide, you’ll need to divide 120 inches by 12 to get 10 sections.
Step 3: Using a straight edge and a pencil, mark each section along the center line. These marks will serve as a guide for laying the first row.
Step 4: Repeat the process for the length of the room, marking equal sections along the center line.
Step 5: Lay out a small section of tiles according to your desired pattern, starting from the center of the room. Use the marked lines as a guide for placement.
Step 6: Adjust the tile placement until the pattern looks appealing and balanced. If necessary, adjust the starting point of the tiles to ensure that cut tiles are not in highly visible areas.
Step 7: Make any necessary cuts to fit the tiles around the perimeter of the room. Use a straight edge and a utility knife to make precise cuts.
By taking the time to properly plan the layout of your vinyl flooring, you’ll ensure a stunning finished product. Marking the center lines and creating a laying pattern is an essential step in achieving a professional look.
Apply Double-Sided Tape
Before laying the vinyl flooring, you must apply double-sided tape to secure it in place. Follow these steps to ensure proper application:
| Steps | Instructions |
|---|---|
| Step 1 | Cut the tape to the length of the room’s width. Start at the wall opposite the entrance and work towards the entrance, cutting and laying the tape in sections. |
| Step 2 | Remove the backing of the tape to reveal the adhesive side. |
| Step 3 | Align the tape with the center line and firmly press it down on the floor. |
When applying the tape, avoid leaving gaps or overlaps between the sections and make sure to press down firmly on the tape to ensure a strong bond. Once the double-sided tape is in place, you can proceed to lay the vinyl flooring.
Remember that the vinyl flooring must constantly be pressed onto the double-sided tape as it is being laid, to ensure a secure fit. You can use a flooring roller, a clean towel, or your hands with a soft rubber mallet if necessary.
Applying double-sided tape to lay vinyl flooring without glue is a simple and fast process that ensures a firm bond and a professional finish.
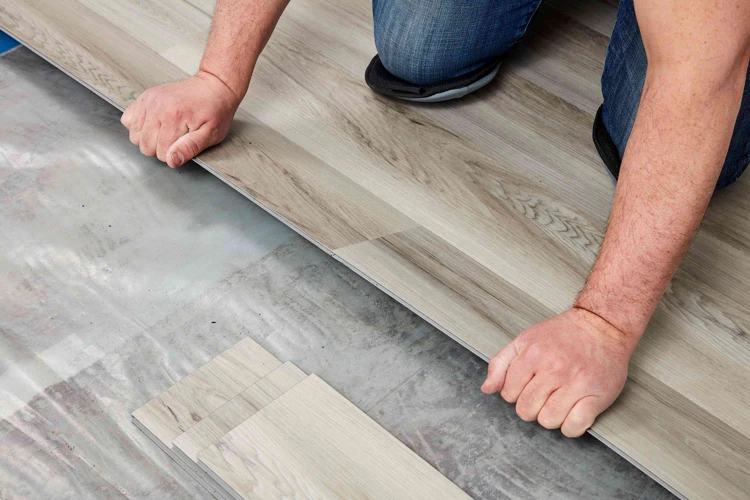
Align and Lay the Flooring
Now that the double-sided tape has been placed, it’s time to align and lay the vinyl flooring. This step requires a bit of patience and attention to detail, but with the right tools and approach, it can be done smoothly.
Step 1: Identify the Starting Point
Before laying the first plank of vinyl flooring, it’s important to identify the starting point. To do this, measure the width of the room and divide it in half. Use a straight edge and a pencil to mark a line down the center of the room. This line will be the reference point for laying the flooring.
Step 2: Lay the First Plank
Take the first plank of vinyl flooring and remove the backing from the double-sided tape. Carefully align the edge of the plank with the center line on the floor and press down firmly. Continue to lay the first row of planks, using the center line as a guide for keeping the planks straight and aligned.
Step 3: Continue Laying Planks
Once the first row of planks has been laid, move on to the next row. Offset the planks in the second row so that the seams do not line up with the seams in the first row. This will create a more natural and appealing look to the flooring.
Step 4: Trim as Needed
As you lay the planks, there will inevitably be areas where trimming is necessary, such as around doorways and other obstacles. Use a tape measure and a utility knife to carefully trim the vinyl flooring, ensuring a snug fit around these obstacles.
To help ensure a smooth installation, consider using an html table to keep track of your measurements, starting points, and the placement of each plank. This can help you stay organized and avoid mistakes as you lay the flooring.
By taking your time and following these steps, you can lay vinyl flooring without glue with ease and confidence.
Trim the Edges
After you have laid down the vinyl flooring, you will need to trim the edges to fit the room perfectly. This step can make a huge difference in the overall appearance of the room, making it look sleek and professional. Follow the steps below to trim the edges:
| Step | Action |
|---|---|
| 1 | Use a straight edge to guide your utility knife as you cut along the edge of the flooring. Be sure to cut at a slight angle so that the flooring fits snugly against the wall. |
| 2 | Trim off excess vinyl using the utility knife. Be careful not to cut too much, as you can always trim more if needed. |
| 3 | Install a baseboard or quarter-round molding along the edge of the flooring to give it a finished look. This will also help to cover up any gaps or rough edges that may be visible. |
It is important to take your time with this step, as mistakes can be costly and difficult to fix. Be sure to measure twice before cutting, and use a sharp utility knife to make clean cuts. After trimming the edges, take a step back and admire your newly installed vinyl flooring. It will look like a professional job, and you will feel proud of the work you have accomplished.
Cleaning and Maintenance
After successfully installing your vinyl flooring without glue, the next step is to maintain its pristine condition for as long as possible. It’s essential to engage in regular cleaning and maintenance to prevent dirt and grime from accumulating and ruining the stylish finish of your flooring. In this section, we’ll highlight the cleaning and maintenance tips and tricks you need to keep your vinyl flooring looking as good as new. Let’s dive in!
Regular Cleaning
Regular cleaning is essential to maintain the appearance and longevity of your vinyl flooring. Using the proper cleaning methods and products can help prolong its life and prevent damage. Here are some tips for regular cleaning:
| Cleaning Method | Instructions |
|---|---|
| Dry Cleaning | Use a soft-bristled broom or vacuum cleaner with a soft brush attachment to remove loose dirt and debris. Make sure to avoid using a vacuum cleaner with a beater bar, as it can scratch the surface of your flooring. |
| Wet Cleaning | Mix a mild detergent with warm water. Use a damp mop or sponge to clean the floor. Rinse with clean water and make sure to dry the surface thoroughly. |
| Stain Removal | Use a mild detergent and warm water to clean the stain immediately. Avoid using abrasive cleaning products or tools, which can damage the surface. Rinse with clean water and dry thoroughly. |
| Prevention | Place a doormat at the entrance of your home to prevent dirt and debris from being tracked inside. Avoid using high heels or shoes with sharp edges, as they can scratch the surface of your flooring. Also, place furniture pads under the legs of heavy furniture to prevent indentations. |
Remember to avoid using harsh chemicals or abrasive tools when cleaning your vinyl flooring. This can damage the surface and shorten its lifespan. Instead, opt for mild cleaning solutions and tools that are safe for use on vinyl flooring. By following these cleaning tips and preventative measures, you can keep your vinyl flooring looking clean and new for years to come.
Routine Maintenance
After laying vinyl flooring without glue, it is important to properly maintain it to ensure its longevity. Routine maintenance of vinyl flooring is relatively easy and straightforward. It involves regular cleaning and occasional refinishing.
Regular cleaning of vinyl flooring involves sweeping, vacuuming, and damp mopping with a mild cleaning solution. It is recommended to clean spills and stains as soon as they occur using a soft cloth or sponge. To avoid any damage to the vinyl flooring, avoid using abrasive materials and harsh chemicals for cleaning.
Occasional refinishing is necessary to restore the protective layer of the vinyl flooring and to maintain its shine. Refinishing involves stripping off the old sealer or polish, cleaning the surface thoroughly, and applying a new coat of sealer or polish. Refinishing can be done every few years or as needed depending on the condition of the flooring.
To keep your vinyl flooring looking new and in good condition, it is also important to follow a few simple guidelines:
| Guideline | Description |
|---|---|
| Use floor mats and rugs | Place mats and rugs at entryways and high traffic areas to prevent dirt, dust, and debris from scratching and dulling the surface of the vinyl flooring. |
| Avoid high heels and heavy furniture | High heels and heavy furniture can damage the vinyl flooring by causing dents, scratches, and permanent marks. Use felt pads under furniture to protect the vinyl flooring. |
| Protect the flooring from direct sunlight | Direct sunlight can cause the vinyl flooring to fade and discolor over time. Use curtains or blinds to block the sunlight or consider using UV-resistant coatings to protect the flooring. |
Following these simple guidelines and performing routine maintenance can help your vinyl flooring without glue last for many years to come.
Conclusion
After following the step-by-step guide on how to lay vinyl flooring without glue, you should now have a beautiful and durable floor that will last for years. By choosing to install vinyl flooring without glue, you have saved yourself time, money, and hassle.
Remember to keep your floor clean and well-maintained to ensure its longevity. Simple regular cleaning with a soft-bristled broom, a damp mop, or a floor cleaning solution will keep your vinyl floor looking new and fresh for years.
Additionally, routine maintenance such as polishing and applying a floor sealant can help protect your floor from scratches, scuffs, and stains, preserving its quality and enhancing its beauty.
Laying vinyl flooring without glue does not have to be difficult. With the right tools and a little know-how, you can achieve a professional-looking finish to your flooring without the need for a professional installer.
Enjoy your newly installed vinyl flooring, knowing that you have saved yourself money, time, and effort by following this simple guide. With the added benefits of cost-effectiveness, ease of installation, and easy removal and replacement, this flooring option is an excellent choice for anyone looking to update their space.
Frequently Asked Questions
1. Can you install vinyl flooring without glue?
Yes, you can install vinyl flooring without glue by using double-sided tape instead.
2. Is laying vinyl flooring without glue cost-effective?
Yes, it is cost-effective as you do not need to purchase glue or other adhesives.
3. Do I need to clean the floor before laying vinyl flooring without glue?
Yes, it is recommended to clean the floor thoroughly to ensure the tape adheres properly.
4. Can I install vinyl flooring without glue on any type of subfloor?
It is important to check the manufacturer’s recommendations, but vinyl flooring without glue can typically be installed on most types of subfloors.
5. How do I acclimatize the vinyl flooring before installation?
You can acclimatize the vinyl flooring by leaving it in the room for at least 24 hours before installation.
6. Can I use regular tape instead of double-sided tape?
No, it is important to use double-sided tape specifically designed for vinyl flooring installation.
7. Do I need special tools to install vinyl flooring without glue?
You will need a utility knife, straight edge, tape measure, and double-sided tape, but no other special tools are necessary.
8. Can I install vinyl flooring without glue in a bathroom or kitchen?
Yes, vinyl flooring without glue is a great option for areas prone to moisture as it can be easily removed and replaced if needed.
9. How do I clean vinyl flooring without glue?
You can clean it with a damp mop or cloth and mild detergent. Avoid using harsh chemicals or abrasive cleaning tools.
10. How often do I need to perform routine maintenance on my vinyl flooring without glue?
You should perform routine maintenance like sweeping or vacuuming as needed and occasionally damp mopping to keep the flooring looking its best.