Introduction
When it comes to working with Schedule 80 PVC pipe, gluing the pipes and fittings together is an essential step for a secure and leak-proof connection. However, if you’re new to working with PVC pipes, it may seem daunting. Don’t worry, in this guide we will walk you through the step-by-step process of gluing Schedule 80 PVC pipe, helping you to understand everything you need to know before you begin. So, let’s get started!
What is Schedule 80 PVC Pipe?
Schedule 80 PVC pipe is a heavy-duty PVC (Polyvinyl Chloride) piping with a thicker wall than Schedule 40 PVC pipe. It is commonly used in industrial and commercial applications such as water management, chemical handling, and irrigation. Compared to Schedule 40 PVC pipe, Schedule 80 can withstand higher pressure levels and is more durable. It is also able to resist erosion, corrosion, and chemicals, making it an ideal choice for harsh environments.
Comparison Table: Schedule 40 vs. Schedule 80 PVC Pipe
| Schedule 40 | Schedule 80 | |
|---|---|---|
| Wall thickness | Medium | Thicker |
| Pressure rating | up to 120 PSI | up to 280 PSI |
| Common applications | Residential water supply, drainage, irrigation | Industrial and commercial water management, chemical handling, irrigation |
| Strengths | Lightweight, easy to install, inexpensive | Durable, high pressure resistance, chemical and erosion resistance |
It is important to note that Schedule 80 PVC pipe requires a different glue compared to Schedule 40 PVC pipe. Using the wrong glue can weaken the joint and lead to leaks or structural failure. It is important to choose the appropriate glue according to the type of PVC pipe being used.
Why Use Glue?
Using glue is an essential step when working with Schedule 80 PVC pipes. Schedule 80 PVC pipes are thicker and designed to withstand higher pressure than other types of PVC pipes. Glue helps to create a permanent bond between the pipe and fittings that ensures they remain leak-free under high pressure.
The type of PVC cement used in gluing Schedule 80 PVC pipes is different from the PVC cement used in other types of PVC pipes. Schedule 80 PVC requires a special type of PVC cement that is formulated specifically for it. This cement can withstand the high pressure that Schedule 80 PVC is designed to handle.
Gluing also makes it easier to install the pipes and fittings compared to other types of joining methods such as welding or soldering. Glued joints are quicker to install and do not require specialized equipment.
It’s important to note that using the wrong type of glue or using it incorrectly can lead to joint failure, leaks, or even a dangerous pressure buildup. Using the wrong type of glue or not following the manufacturer’s guidelines can also void the manufacturer’s warranty.
Below is a table that summarizes the reasons why using glue is important when working with Schedule 80 PVC pipes:
| Reasons to Use Glue for Schedule 80 PVC Pipes |
|---|
| Creates a permanent and leak-free bond between the pipe and fittings. |
| Can withstand high pressure that Schedule 80 PVC pipes are designed to handle. |
| Requires no specialized equipment. |
| Quick and easy to install. |
| Using the wrong type of glue or not following the manufacturer’s guidelines can lead to joint failure, leaks, or even dangerous pressure buildup. |
Using glue is crucial when working with Schedule 80 PVC pipes. It ensures that the pipes remain leak-free and can withstand the high pressure they are designed to handle. However, it’s important to understand the type of glue required and to follow the manufacturer’s guidelines carefully to avoid any potential issues.
What You’ll Need
Gather Your Tools and Materials
Before you begin gluing your Schedule 80 PVC pipe, it’s important to have all the necessary tools and materials on hand. This will ensure a smooth and efficient gluing process, and help you avoid any unnecessary delays or mistakes. Here’s a list of the items you’ll need:
- PVC pipe and fittings
- PVC primer
- PVC cement
- Clean rag or cloth
- Pipe cutter or saw
- Pipe cleaner or emery cloth
- Measuring tape or ruler
- Pencil or marker
Make sure you have each of these items before beginning the gluing process. If you’re unsure about any of the tools or materials, refer to the manufacturer’s instructions or do some further research.
Materials
Materials are important to ensure a successful PVC pipe joining process. Before starting, gather the following materials:
| Materials | Description |
| Schedule 80 PVC pipe and fittings | The main components to be joined. Schedule 80 PVC is ideal for high-pressure applications and has a thicker wall than Schedule 40 PVC. |
| PVC primer | Used to clean and prime the surface of the PVC pipe and fittings. |
| PVC cement | A specialized glue that chemically bonds the PVC pipe and fittings together. Ensure that the PVC cement is compatible with Schedule 80 PVC. |
| Clean cloth | Used to wipe away dirt and debris from the pipe and fittings. |
It’s important to note that using incorrect materials can lead to joint failure or potential safety hazards. Always use materials that are specifically designed for the job at hand. In case you need to glue other types of materials, such as polyethylene, inflatables or pool liner, refer to our other articles like How to Glue Polyethylene and What Kind of Glue to Use on Pool Liner.
Tools
Tools:
- PVC cutter or saw
- Emery cloth or sandpaper
- PVC primer
- Schedule 80 PVC glue
- Paintbrush or dauber (included with glue)
- Rag or paper towel for cleanup
Before starting the gluing process, it’s important to have the right tools on hand. The PVC cutter or saw will be necessary to cut the PVC pipe to the appropriate length. The emery cloth or sandpaper will be used to remove any burrs or rough edges on the cut ends of the pipe.
The PVC primer is a crucial component of the gluing process, as it prepares the PVC surface for the glue to adhere properly. You will also need Schedule 80 PVC glue that is specifically designed for Schedule 80 PVC pipes.
A paintbrush or dauber is typically included with the PVC glue for easy application. Be sure to have a rag or paper towel on hand for cleanup in case you accidentally spill or apply too much glue.
While these tools may seem simple, having them on hand and using them correctly can make all the difference in ensuring a successful and long-lasting PVC pipe connection.
Preparing the Pipe and Fittings
Preparing the PVC pipe and fittings is an essential step in ensuring a secure and long-lasting connection. Not properly preparing the surfaces can lead to weak joints and potential leaks down the line. To avoid any mishaps, let’s dive into the necessary steps you should take before applying the adhesive. Keep in mind that these steps will also be imperative for the proper application of the glue as well. So, let’s get started!
Clean the Pipe and Fittings
To ensure a proper glue bond when connecting Schedule 80 PVC pipe and fittings, it is important to clean both the pipe and fittings thoroughly before priming and gluing. Contaminants such as dirt, grease, and oil can interfere with the glue’s ability to bond properly, so these must be removed before gluing.
To clean the pipe and fittings, follow these steps:
| Step | Instructions |
|---|---|
| 1 | Wipe away any visible dirt or debris from the pipe and fittings using a clean, dry cloth. |
| 2 | Rinse the pipe and fittings with water to remove any remaining dirt or debris. |
| 3 | Using a clean, dry cloth, dry the pipe and fittings thoroughly. |
| 4 | Using a PVC primer, apply a liberal coat to the outside of the pipe and the inside of the fitting. |
Note: It is important to use a clean, lint-free cloth to dry the pipe and fittings to avoid leaving behind any fibers or particles that could contaminate the glue bond.
Once cleaned and primed, you are now ready to move on to applying the glue and connecting the fittings. But before doing so, it is important to make sure you have all the necessary tools and materials on hand.
Priming the Pipe and Fittings
Priming the Pipe and Fittings: Before applying the glue, make sure to prime the pipe and fittings. This step is crucial, as it ensures that the glue will properly bond the pieces together. The primer softens and cleans the PVC surface, giving the glue a better surface to adhere to. It also helps to remove any dirt, oil or debris that could interfere with the glue’s bonding ability.
To prime the pipe and fittings, you’ll need a primer that’s specifically designed for use with PVC. One popular option is Oatey PVC Primer Purple. Apply the primer using a brush that’s appropriate for the size of the pipe you’re working with.
| Materials: | Tools: |
|---|---|
| PVC Primer | Applicator brush |
To prime the pipe and fittings properly, follow these steps:
- Start by cleaning the area where the pipe and fittings will be joined to remove any dirt, debris, or oil.
- Using the applicator brush, apply the primer to the end of the pipe and inside of the fitting.
- Be sure to apply a thin, even coat of primer.
- After applying the primer, let it dry for a few seconds before applying the glue.
Note: When using primer and glue with PVC, it’s essential to follow the manufacturer’s instructions carefully. Failure to do so can result in weak joints that could break or leak.
Properly priming the PVC pipe and fittings will help ensure a strong and permanent bond. Using the correct type of glue and primer is essential for ensuring that the joint is strong enough to withstand pressure and other stresses that could cause it to fail.
Applying the Glue
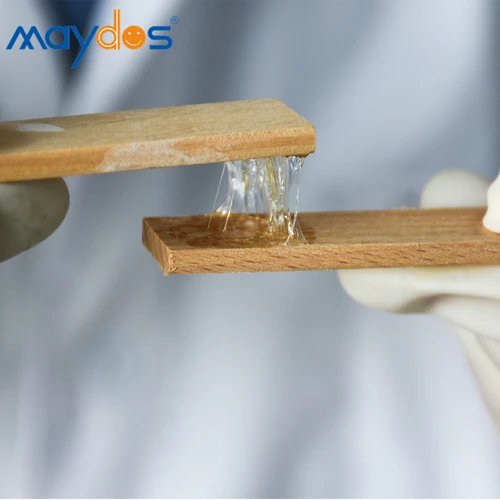
Now that you’ve properly primed your pipe and fittings, it’s time to move on to the next step – applying the glue. PVC cement is specially formulated to fuse together PVC pipe and fittings to create strong, watertight connections. It’s important to closely follow the instructions on the specific brand of cement you are using, as drying times and application methods can vary. If you’re looking for more information about the strength of PVC glue or how to apply it to inflatable items, be sure to check out our articles on “How Much Pressure Can PVC Glue Hold?” and “What Glue to Use on Inflatables?” respectively.
How to Apply the Glue
To properly apply the glue onto the Schedule 80 PVC pipe, follow these step-by-step instructions:
- Shake the glue: Before opening the can of PVC glue, shake it vigorously to properly mix the contents inside. This ensures that the glue is evenly distributed and that the parts of the adhesive that may have settled at the bottom are mixed in properly.
- Use a brush: Dip the brush that comes with the PVC glue in the can. Be sure to load it with an ample amount of glue. Then, start applying the glue to the outside of the pipe. Apply the glue around the circumference of the pipe and make sure that the height of glue on the pipe is consistent.
- Repeat on the fitting: Apply the same process to the inside of the fitting. Use the brush to apply the glue around the fitting’s circumference and make sure that it is evenly spread.
- Insert the pipe: Insert the pipe into the fitting and twist it a quarter of the way to ensure that the glue is spread evenly. Hold the pipe and fitting together for about 30 seconds to prevent the pipe from slipping out of the fitting as the glue settles and starts to dry.
It is important to note that once the glue is applied, it sets very fast. So, it is recommended to prepare all the necessary parts and fittings before application to avoid delays.
Remember to keep the work area well-ventilated to prevent inhalation of the fumes from the glue. Also, ensure that you store the PVC glue in a dry place and always keep the lid tightly sealed to prevent moisture from damaging the glue.
In case you encounter challenges opening the PVC glue container, follow our step-by-step guide on ‘how to open Christy’s PVC glue.‘
Additionally, note that using CPVC glue when it’s wet is not an effective adhesive solution. To learn more about this topic, you can read our article, ‘will CPVC glue work when wet?‘
Finally, if you need to glue PVC sheet to plywood, we have a detailed article on ‘how to glue PVC sheet to plywood.‘
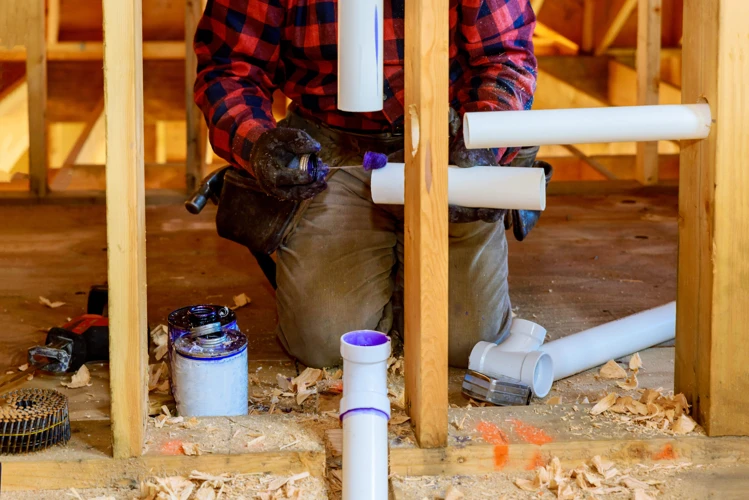
How To Connect the Fittings
Connecting fittings is an essential step in gluing Schedule 80 PVC pipes. Below is a step-by-step guide on how to connect fittings securely to the pipes using glue.
Step 1: Apply PVC glue on the fitting’s inner surface.
Using a brush, apply a liberal amount of PVC glue on the inner surface of the fitting and ensure the adhesive covers the socket where the pipe will be connected.
Step 2: Apply PVC glue on the pipe’s outer surface.
Ensure the outer surface of the pipe is clean and dry. Apply the PVC glue on the pipe’s outer surface using a brush. Spread it uniformly to ensure it covers the entire circumference.
Step 3: Insert the pipe into the fitting.
Insert the pipe into the fitting socket and twist it ¼-turn for even distribution of the glue. Hold the pipe in place for about 10 seconds to allow the glue to set.
Step 4: Wipe off any excess glue.
Using a dry rag or cloth, wipe off any excess glue that might have oozed out of the joint. Ensure you clean the fittings completely and that no glue residue is left behind.
| Step | Description |
|---|---|
| Step 1 | Apply PVC glue on the fitting’s inner surface. |
| Step 2 | Apply PVC glue on the pipe’s outer surface. |
| Step 3 | Insert the pipe into the fitting. |
| Step 4 | Wipe off any excess glue. |
It is important to note that twisting the pipe while inserting it into the fitting helps to distribute the glue evenly. Do not insert the pipe too far into the fitting, as it may cause the joint to fail.
Following these four steps will ensure that your fittings are securely connected to the Schedule 80 PVC pipes. Remember to give the joint enough time to dry before putting any pressure on it.
Drying Time and Final Inspections
As you apply the glue and connect the fittings, you might wonder how long you will have to wait before the pipe is fully secure and ready for use. This is where drying time comes in – a crucial step in attaching Schedule 80 PVC pipe. Additionally, it’s important to thoroughly inspect your work to ensure there are no leaks or issues before turning on your system. In this section, we’ll go over the recommended drying time, as well as the final inspections you should perform before considering your project complete.
How Long to Let it Dry
After applying the glue and connecting the fittings, it’s crucial to allow the joint to dry completely before pressurizing the pipe. The drying time will depend on a few factors, such as temperature, humidity, and the type of cement used.
For Schedule 80 PVC pipe:
- Allow the joint to dry for at least 30 minutes before handling it.
- Wait at least two hours before applying pressure to the pipe.
- For best results, wait 24 hours before running any water or turning on any pumps.
It’s important not to rush the drying time as this can compromise the strength and longevity of the joint. If the joint is not allowed to dry long enough, it may leak or break under pressure.
During the drying time, avoid touching or disturbing the joint as it may cause it to detach or weaken. Keep the area well-ventilated to allow the fumes from the cement to dissipate.
Pro Tip: If you’re working in cold temperatures or high humidity, consider using a slower-drying cement to ensure a strong and secure joint.
Final Inspections
Once the drying time is complete, it’s time to perform a final inspection of the glued joint to ensure a proper and secure connection.
Here are some key things to look for during the inspection process:
- Visual inspection: Examine the joint closely to make sure the glue has been applied evenly and there are no gaps or bubbles between the pipe and fittings.
- Tightness test: Apply pressure on the joint to ensure there is no give or movement. If the joint does move, it could mean that the glue has not adhered properly.
- Leak test: Spray a soapy water solution on the joint and look for any bubbles, which can indicate a leak in the joint.
- Overall strength: While it’s not always necessary to test the joint’s strength, you can do so by placing heavy objects on top of the pipe and fittings to see if they can withstand the weight.
If any issues are found during the inspection process, it’s important to take corrective action immediately to prevent further damage or issues down the line. This may involve cutting out the joint and redoing the gluing process.
Remember, taking the time to perform a thorough inspection of the joint can save you time and money in the long run.
Tips and Tricks
When it comes to working with Schedule 80 PVC pipe and glue, there are some tips and tricks that can make the process easier and safer. Whether you’re a seasoned DIYer or a beginner, these helpful hints can help you achieve a successful outcome for your piping project. So, let’s dive into some of the best advice for working with Schedule 80 PVC pipe and glue.
Working Safely with PVC Cement
As with any construction project, safety is of utmost importance when working with PVC cement. Here are some important safety tips to keep in mind:
- Wear protective gear: PVC cement can be corrosive, so it’s important to wear protective gloves, safety glasses, and a respirator to prevent inhalation of fumes.
- Work in a well-ventilated area: When using PVC cement, it’s important to work in a well-ventilated area to minimize exposure to fumes.
- Avoid contact with skin and eyes: If PVC cement comes into contact with your skin or eyes, rinse the affected area with water immediately and seek medical attention if any symptoms persist.
- Store PVC cement properly: Be sure to store PVC cement in a cool, dry place away from sources of heat and sunlight. Make sure the lid is tightly sealed to prevent spills.
- Don’t mix different types of PVC cement: PVC cement is specific to the type of PVC pipe being used, so using the wrong type of cement can compromise the integrity of the joint. Make sure you’re using the correct type of cement for your project.
- Dispose of PVC cement properly: PVC cement should be disposed of properly, following local regulations.
By following these safety tips and working carefully, you can ensure that your project goes smoothly and without any accidents.
Troubleshooting Common Issues
When working with Schedule 80 PVC pipes, it’s not uncommon to run into issues during the gluing process. Here are some common issues you may encounter and how to troubleshoot them:
- Bonding failure: If the PVC pipes and fittings don’t seem to be bonding properly, you may need to double-check that you’ve followed all the steps correctly. Make sure you’ve properly cleaned and primed the materials, and that you’ve applied the glue according to instructions. Also, make sure you’re using the appropriate glue for your specific materials.
- Leaking: If you notice leaks once the glue has dried, it’s possible that you didn’t apply enough glue or that you didn’t properly seat the pipes and fittings. You can try applying more glue and repositioning the pieces, though keep in mind that this may not always work. It may be necessary to remove the affected pieces and start the gluing process over again.
- Excessive glue: Using too much glue can also be a problem. If you’re finding large amounts of glue on your pipes and fittings, it can be messy and difficult to work with. To avoid this, use a brush to apply the glue in a thin, even layer. Additionally, make sure you’re not over-applying the primer, as this can also lead to excessive glue.
- Inconsistent glue coverage: Another issue you may encounter is inconsistent glue coverage. This can happen if you apply too little glue or if you don’t apply it in a thorough enough manner. Make sure you’re using a brush to apply a thin, even layer of glue to both the pipe and the fitting, and that you’re pressing them together firmly to ensure a tight seal.
Remember, it’s important to troubleshoot any issues as soon as they arise to avoid further problems down the line. By carefully following each step of the gluing process and utilizing these troubleshooting tips, you can ensure a successful, secure, and long-lasting PVC pipe connection.
Conclusion
In conclusion, gluing Schedule 80 PVC pipe can seem intimidating at first, but with the right materials, tools, and techniques, it can be a simple and effective process. Ensuring that the pipe and fittings are clean and primed is crucial for a strong and durable connection. Applying the glue evenly and quickly and connecting the fittings immediately after will help ensure a secure bond.
Remember to always work safely with PVC cement by wearing gloves and working in a well-ventilated area. Troubleshooting common issues such as leaks can be done by identifying the cause and applying additional glue if necessary.
By following this step-by-step guide, you can confidently glue Schedule 80 PVC pipe for your next project. Whether you are a professional plumber or a DIY enthusiast, it is essential to make sure that your PVC pipes are properly connected for a long-lasting and reliable system. Don’t forget to let the glue dry completely before testing the system to ensure optimal results. Happy gluing!
Frequently Asked Questions
Can I use regular PVC glue for Schedule 80 PVC pipes?
No, you need to use a special, extra-strength cement designed specifically for Schedule 80 PVC pipes. Regular PVC glue is not strong enough to hold Schedule 80 PVC pipes together.
What is the difference between Schedule 40 and Schedule 80 PVC pipe?
Schedule 80 PVC pipes are thicker and stronger than Schedule 40 PVC pipes. Schedule 80 PVC pipes can handle higher pressures and are more suitable for industrial and commercial applications than Schedule 40 PVC pipes.
Do I need to sand the pipe and fittings before gluing them together?
No, sanding is not necessary if the pipe and fittings are clean and dry. However, you can sand the ends of the pipe and fittings lightly if you want to ensure a better bond.
How much glue do I need to apply?
You should apply enough glue to cover the entire surface of the PVC pipe and fitting. You don’t want to apply too much, but you also don’t want to apply too little. A thin, even layer is recommended.
How long do I need to wait for the glue to dry?
The drying time for Schedule 80 PVC cement can vary depending on the temperature and humidity. Generally, it takes about 15-30 minutes for the glue to set, and 2-3 hours for it to cure completely.
Can I use an adhesive instead of glue?
No, you should not use an adhesive as a substitute for PVC cement. Adhesives are not strong enough to hold PVC pipes together and can cause leaks.
What should I do if the fittings don’t fit properly?
If the fittings don’t fit properly, you may need to trim or sand the ends of the pipe to ensure a proper fit. Make sure to test-fit the pipe and fittings before applying the glue.
Can I use a primer that is different from the glue?
No, you should always use a primer that is recommended by the manufacturer of the glue you are using. Using a different primer can affect the strength of the bond.
How long will the glued joint last?
The glued joint should last for many years, but the actual lifespan depends on various factors such as the environment, temperature, and pressure. Regular maintenance can prolong the life of the joint.
What safety precautions should I take when working with PVC cement?
You should always wear protective gloves and safety glasses when working with PVC cement. Make sure to work in a well-ventilated area and avoid inhaling the fumes. Keep the cement away from open flames and heat sources.