Creating a personalized wall art piece is an engaging and rewarding process, particularly when it involves showcasing your cherished memories. This DIY photo canvas tutorial is designed to guide you through the process of transforming your photographs into beautiful canvas artwork. From gathering materials to the final touches of mounting your masterpiece, this tutorial will ensure that your photo to canvas DIY project is a success.
Gathering Your Materials
Before starting your homemade photo canvas, it’s important to have all the necessary materials on hand. You will need:
- A canvas in your desired size
- High-quality photo prints
- The best glue for canvas
- A paintbrush or foam brush
- A sealer or varnish
- Mounting hardware
With these items ready, you’re all set to embark on your canvas photo craft ideas and create a unique piece of art.
Preparing the Canvas and Photos
Before you can start gluing photos to canvas, both the canvas and the photos must be properly prepared. Begin by ensuring the canvas is clean and free of any dust or oils. If necessary, gently wipe it with a damp cloth and let it dry. For the photos, choose high-resolution prints and trim any excess paper to fit the canvas size appropriately. This step is crucial for a seamless fit and professional finish.
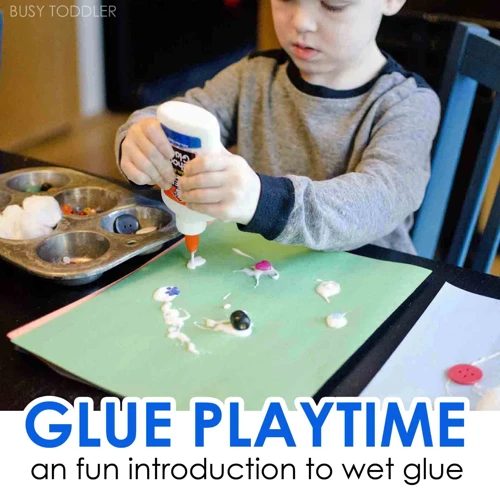
Choosing the Best Glue for Canvas
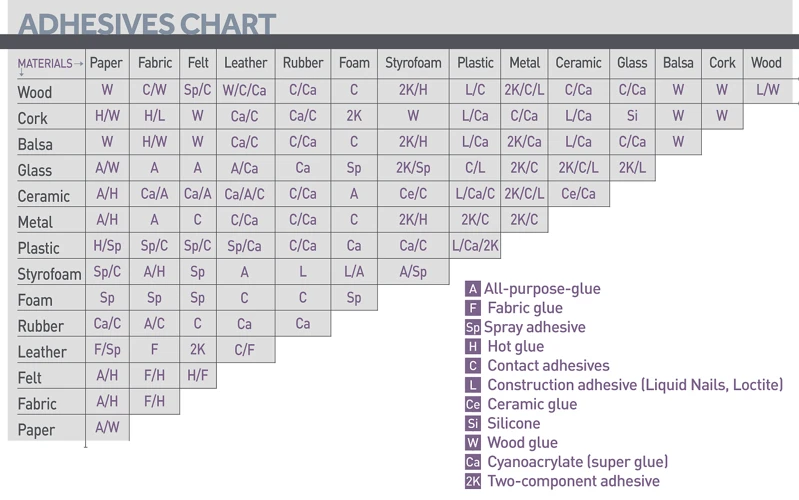
The adhesive you select can make or break your project. When searching for the best glue for canvas, consider factors like drying time, finish, and durability. A pH-neutral PVA glue, a spray adhesive, or a gel medium are all popular choices among crafters. Each has its own set of advantages, and your decision will depend on your specific needs and the look you want to achieve.
Gluing Photos to Canvas
The moment has arrived to begin gluing photos to canvas. Apply a thin, even layer of your chosen adhesive directly to the canvas surface. Carefully place your photo on top and smooth it out, starting from the center and working towards the edges to eliminate any air bubbles. Allow it to dry according to the glue manufacturer’s instructions. Patience is key during this step to ensure the best adhesion.
Sealing and Protecting Your Photo Canvas
Once your photo is securely attached to the canvas and the glue has dried, it’s time to protect your creation. A clear acrylic sealer or varnish can be applied to the entire surface, providing a protective coat that will prevent fading and damage. This sealing step not only preserves your photo canvas but can also enhance the colors and give your artwork a professional finish.
Mounting and Displaying Your Homemade Photo Canvas
How to mount photos on canvas is the final puzzle piece in the photo canvas tutorial. To display your artwork, attach mounting hardware to the back of the canvas frame. Depending on the size and weight of your canvas, you may use sawtooth hangers, D-rings, or wire. Once installed, your DIY photo canvas is ready to be showcased. Hang it on a wall and enjoy the personal touch it adds to your space.
Canvas Photo Craft Ideas and Tips
Embarking on a canvas photo project opens the door to endless creative possibilities. Whether you’re creating a gallery wall or a standalone piece, these ideas and tips will help you elevate your DIY photo canvas.
Exploring Different Canvas Photo Project Styles
Canvas photo projects can range from single, large-scale prints to intricately arranged photo collages. Consider mixing black and white photos with color prints for a striking contrast. Experiment with filters or digital effects on your photos before printing them for an artistic flair. The style you choose can dramatically affect the ambiance of a room, so let your creativity flow.
Adhesive Options for Canvas Photos: Pros and Cons
When selecting an adhesive for canvas photos, you’ll find that each type has its advantages and drawbacks. For instance, PVA glue is affordable and dries clear but may not be as strong as a gel medium, which offers a more robust bond but at a higher cost. Spray adhesives provide a quick and even coat but require a well-ventilated area. Consider these factors alongside your project needs when making your choice.
Adding Personal Touches to Your Photo to Canvas DIY
To infuse your canvas with even more personality, add embellishments or textures to the finished piece. Stencils, stamps, or hand-painted details can transform your photo to canvas DIY into a mixed media artwork. Additionally, incorporating meaningful quotes or dates with paint or permanent marker can further personalize your piece and make it truly one of a kind.
Troubleshooting Common Issues
Even with careful planning and execution, you may encounter some challenges while working on your DIY photo canvas. Let’s explore common issues and how to resolve them.
Dealing with Air Bubbles and Wrinkles
If air bubbles or wrinkles appear after gluing your photo, don’t panic. Gently press them out towards the edges while the glue is still wet. If they persist after drying, carefully lift the edge of the photo and apply additional glue. Using a roller or a flat tool can help achieve a smooth, bubble-free surface.
Ensuring Longevity: Preventing Peeling and Fading
To prevent your photo from peeling or fading over time, make sure to use a high-quality adhesive and apply a UV-resistant sealer. Displaying your canvas away from direct sunlight and in a stable environment will also help maintain its condition for years to come.
Conclusion

The journey of creating a DIY photo canvas is as fulfilling as the end result. This comprehensive guide has provided you with the knowledge and techniques to bring your canvas photo craft ideas to life.
Final Thoughts on Your Photo Canvas Tutorial
With this photo canvas tutorial at your fingertips, you’re well-equipped to tackle your next DIY project with confidence. Remember that patience and attention to detail are essential components of a successful outcome.
Are you looking to create a personalized piece of art by gluing photos onto different surfaces? Whether you’re working on canvas, glass, paper, or wood, we’ve got you covered with step-by-step guides. For those of you interested in adhering images to canvases, stay tuned for our upcoming article on how to glue photos to canvas. In the meantime, you can explore our tutorials on how to glue photos to glass, perfect for creating unique home decor items. If you’re working with paper projects, check out our guide on how to glue photos to paper, which is great for scrapbooking enthusiasts. And for a rustic touch to your photo displays, our instructions on how to glue photos to wood will help you achieve that charming wooden aesthetic. Each guide is tailored to help you achieve the best results with your photo projects, so you can create beautiful, lasting memories.
Inspiration for Your Next DIY Project
Now that you’ve mastered how to glue photos to canvas, consider exploring other DIY projects. Perhaps a custom photo book, a handcrafted picture frame, or even a scrapbook page will be your next craft adventure. Whatever you choose, the skills you’ve honed here will serve you well in all your creative endeavors.