Have you accidentally snapped your beloved headphones in half? Or has the joint between the earpiece and the headband finally given out after years of use? Whatever the reason may be, a broken pair of headphones can be frustrating and debilitating. But don’t despair just yet! With the right materials and some careful application, you can easily glue your headphones back together in no time. Read on to learn how to revive your favorite headphones with a step-by-step guide and expert tips for preventing future damage.
Materials You’ll Need
Before you can begin repairing your broken headphones, you’ll need to gather some materials. These tools will help you successfully glue your headphones back together. It’s important to choose the right adhesive for the job, and there are a few different options to consider. You may already have some of these materials at home. Otherwise, head to your nearest hardware or craft store to pick up what you need. Here are the materials you’ll need to glue your headphones back together: Epoxy, hot glue gun, super glue, and craft glue. If you’re unsure which type of glue is best for your headphones, take a look at our guide on how to glue bottle caps to a picture frame to learn about different types of glue and their uses.
Epoxy
Using Epoxy is one of the most effective ways to glue headphones back together. This two-part adhesive is known for its strength and durability. It consists of a resin and a hardener that are mixed together to create a strong bond. Epoxy works well on a variety of materials, including plastic and metal.
To use epoxy on your headphones, you will need to mix the resin and hardener together according to the manufacturer’s instructions. Be sure to work quickly, as epoxy can dry fast. Apply the mixture to the broken area of your headphones and hold it in place until the epoxy sets.
| Pros | Cons |
|---|---|
| Strong and durable bond | Can be messy to work with |
| Works well on a variety of materials | Requires mixing and careful application |
| Resistant to water and heat | Can be difficult to remove if applied incorrectly |
| Can be sanded and painted over once dry | May not work well on certain types of plastic |
It’s important to note that epoxy can be messy to work with and can be difficult to remove if applied incorrectly. When using epoxy, be sure to work in a well-ventilated area and wear gloves to protect your skin. If you have never used epoxy before, it may be helpful to practice on a small object before attempting to repair your headphones.
If you’re looking to use an alternative to epoxy, there are other types of glue that can be effective for gluing headphones back together. Some of these include a hot glue gun, super glue, and craft glue. Each of these types of glue has their own pros and cons, so be sure to choose the one that works best for your specific needs.
Hot Glue Gun
When it comes to gluing headphones back together, a hot glue gun can be a useful tool to have on hand. Hot glue guns are a popular choice for DIY projects, and they work by heating up a solid glue stick until it turns into a liquid. Once the glue has melted, it can be applied to the surface of the headphones and will quickly harden as it cools, creating a strong bond.
Before using a hot glue gun to fix your headphones, it is important to ensure that you have all the necessary materials. You will need a hot glue gun and glue sticks. Additionally, you will want to make sure that you have a proper workspace set up, with plenty of room to maneuver the headphones and glue gun.
To begin, plug the glue gun in and allow it to heat up. Once it is heated, insert a glue stick into the gun and push it down until it is properly seated. Squeeze the trigger on the gun to begin dispensing the hot glue. Use caution when applying the glue, as it can be very hot.
Here are some tips for using a hot glue gun to fix headphones:
- Apply the glue in small amounts, working carefully to avoid getting glue on any sensitive electronic components such as wires or speakers.
- Hold the headphones together firmly for several minutes after applying the glue to allow it to set.
- Be sure to let the headphones dry completely before using them again.
While hot glue guns can be a great option for fixing headphones, it is important to note that they may not always be the best choice. If your headphones have suffered more extensive damage or have electrical issues, it may be best to seek the help of a professional. It’s always a good idea to take steps to prevent damage to your headphones in the first place, such as storing them properly and choosing headphones with durable features.
If you’re interested in other cool hot glue gun projects, check out our guide on how to make icicles with hot glue.
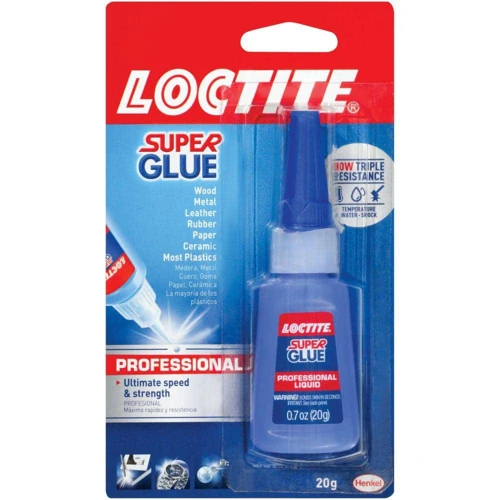
Super Glue
Super glue is a popular adhesive that has a fast-drying formula. It is a great option for repairing headphones as it forms a strong bond quickly. However, it is important to note that super glue can be messy and difficult to remove if it gets on your skin. Here are some important things to keep in mind when using super glue for your headphones:
- Use a small amount of super glue: Using too much glue can cause it to overflow and get into the headphone driver, which can cause damage to the headphones.
- Apply the glue in small dots: Small dots of glue will ensure that you have better control over the adhesive and will also prevent it from seeping into unwanted areas.
- Hold the glued parts tightly for at least a minute: Super glue dries quickly, but holding the glued parts tightly for at least a minute will ensure that the bond is strong.
- Use acetone or nail polish remover to remove excess glue: If you happen to get super glue on your skin, use acetone or nail polish remover to remove it. Do not attempt to pull it off, as this can damage your skin.
- Be careful while using super glue: As super glue dries quickly, it can be tricky to use. Take extra care while handling super glue and ensure that you are using it in a well-ventilated area.
Super glue is a great option for repairing headphones, but it should be used with caution. If you are unsure about using super glue or if your headphones require more extensive repairs, it is recommended to consult with a professional.
Craft Glue
Craft glue is a type of adhesive that is commonly used for arts and crafts projects, but it can also be used for gluing headphones back together. One of the benefits of craft glue is that it dries clear, making it less noticeable than other types of glue.
When using craft glue to fix headphones, it is important to:
- Make sure the glue is non-toxic and safe to use with electronics.
- Use a small brush or toothpick to apply the glue precisely to the broken parts.
- Hold the parts together securely until the glue has dried completely.
- Remember that craft glue may not be strong enough for heavy-duty use, so it may not be a permanent solution.
If you are using craft glue to fix your headphones, it is important to follow the same steps as you would with other types of glue. Make sure to clean and prepare the broken parts beforehand, and use the appropriate amount of glue. Craft glue may not be the most suitable option for repairing headphones with major damage, so it’s important to assess the extent of the damage before proceeding.
Craft glue can be a useful adhesive for repairing headphones if the damage is minor. However, if you are unsure about which type of glue to use or how to repair your headphones, it may be best to seek professional help. Additionally, you can find other creative uses for craft glue, such as using it to glue cardboard or tucking clothing.
Step-by-Step Guide to Gluing Headphones
Preparing to glue your headphones back together is a fairly simple process that anyone can do with a few basic materials. To get started, gather the necessary materials and find a comfortable and well-lit workspace. The steps in this guide to fix your broken headphones involve applying glue to the broken parts of the headphones and securing them together until the glue dries. Following these steps will result in a successful repair and have your headphones functioning again in no time. Not sure what type of glue to use? Check out our article on how hot a glue gun gets for an overview of popular types of glue to get started.
Step 1: Clean and Prepare
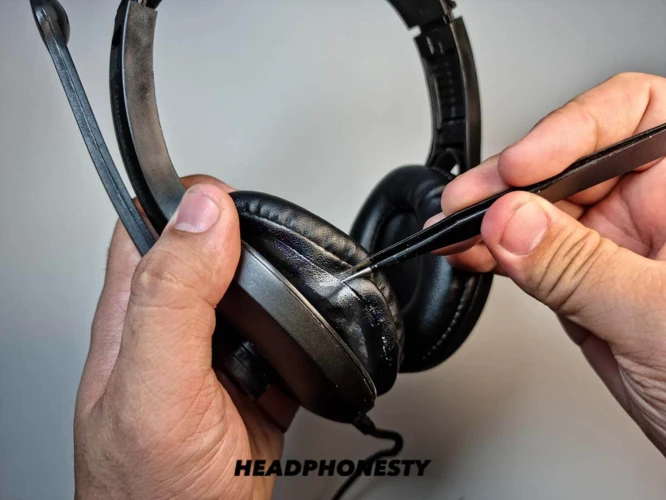
Before you start gluing your broken headphones, Step 1: Clean and Prepare the damaged area. This is essential to ensure proper adhesion between the glue and the surface. First, use a soft cloth or cotton swab dipped in rubbing alcohol to clean the area around the break. This will remove any dirt, oil, or debris that could interfere with the bonding process. Be gentle, and avoid using too much pressure on delicate wires or small parts.
Next, inspect the damage closely and identify any loose or protruding wires. Use a pair of tweezers to gently push them back into place, making sure that they are in the correct orientation. Be careful not to damage or break any wires during this process.
If any wires are completely broken, you may need to strip off a small section of insulation to reveal fresh metal wire. Use wire strippers or a small knife to carefully remove about 1/4 inch of insulation from each wire end. Be sure not to cut the metal wire itself.
Once the area is clean and wires are properly aligned, you can begin gluing. Depending on the type of glue you are using, you may need to apply it directly to the broken parts or to a small piece of material that will serve as a bridge between the two ends. Refer to the instructions for your specific adhesive for best results.
Note: If you are unsure about how to proceed with any of these steps or don’t feel comfortable using glue yourself, it may be best to consult a professional. They have the necessary tools and experience to fix your headphones properly. If you want to learn more about gluing other items, such as bottle caps or cardboard, you can check out our articles on how to glue bottle caps to a picture frame, how to glue cardboard.
Step 2: Apply Glue
Step 2: Apply Glue
Now that you’ve cleaned and prepared your headphones, it’s time to start gluing them back together. Before you begin, ensure that you have all the necessary tools and materials.
Materials:
- Epoxy
- Hot Glue Gun
- Super Glue
- Craft Glue
Choose the glue that best suits your needs. If you need a strong bond, epoxy or super glue may be the best option. If you want a more flexible bond, craft glue may be the way to go.
To apply the glue, take the headphones and carefully apply a thin layer of glue to the broken parts. Do not use too much glue, as this can cause the headphones to become bulky and uncomfortable to wear.
Note: When applying hot glue, be careful not to burn yourself. If you are new to using a hot glue gun, practice on an old piece of cardboard before moving on to your headphones.
Once the glue is applied, carefully press the broken parts together. Apply pressure for at least 30 seconds to ensure that the glue is properly set.
Tip: If you are having trouble keeping the broken parts together, you can use clamp or rubber bands to hold them in place while the glue sets.
Repeat this process for any other broken parts of the headphones.
Note: Do not use the headphones until the glue has set completely. This can take anywhere from a few hours to overnight depending on the type of glue you used.
Now that you’ve successfully glued your headphones back together, you can enjoy your favorite music once again. Remember to take care when storing and traveling with your headphones to prevent further damage.
If you’re interested in learning more about using glue for various DIY projects, check out our article on How to Make a Pipe out of a Glue Stick.
Step 3: Hold and Secure
Once you have applied the glue onto the damaged part of the headphones, it’s time to hold and secure it to ensure that it dries properly. Gently press the pieces together to make sure the glue sticks, and then use a small clamp or clip to hold them in place. If you don’t have a clamp or clip, you can improvise by using rubber bands or tape to hold the pieces together.
Make sure not to move or adjust the headphones during the drying process to avoid any complications. Leave the headphones to dry overnight or for the recommended time on the glue instructions for best results. It’s essential to keep in mind that rushing the drying process may cause the glue to weaken or not bond correctly.
Pro tip: If you accidentally get glue on your hands during the process, don’t worry. You can easily remove it by using warm water and soap to wash it off.
In case the headphones have any loose parts, hold them in place for a few seconds and wait for the glue to dry. You can use a glue gun or other types of sealants to keep the loose parts in place. Remember, depending on the type of glue that you use, the drying process may vary.
Note: During the drying process, avoid placing the headphones in direct sunlight or in areas with high humidity. Doing so may impact the glue’s bonding strength, and the repair may not last as long as you anticipated.
Now that you have successfully held and secured the glued parts in place, it’s time to test your headphones. If everything works correctly, you have successfully repaired your headphones! If not, consider reevaluating and repeating the steps or seeking professional assistance.
Internal link: If you need help with other DIY projects, check out this article on how to make hot glue.
When to Call a Professional
It is important to know when it is time to call in a professional to fix your headphones. While gluing your headphones back together can be a quick and easy fix in some cases, certain issues may require a more skilled touch. Here are a few situations in which you should consider seeking professional help to restore your headphones to working order.
Wires in Distress
When handling headphone wires, it is important to keep an eye out for any distress or damage. If the wires appear to be frayed or loose, it is best to seek professional help rather than trying to fix them yourself. Attempting to glue headphones with damaged wires can result in further damage and even electrical hazards.
Here are some signs that indicate your headphone wires are in distress:
- Visible fraying or tearing of the wires
- Loose, disconnected or visibly damaged wire connections
- Audio cutting in and out
- Distorted or low-quality sound
If you notice any of these signs, it’s important not to take any chances. Rather than attempting to repair your headphones, contact a professional for assistance. Additionally, always be sure to purchase high-quality headphones from reputable brands. This can help prevent damage and ensure that your headphones last longer.
If you feel confident in your DIY skills and want to try and fix your headphone wires yourself, be sure to do so with caution and only if the damage is minor. Use guides such as “How to Glue Foam Core” and “How to Use Hot Glue and E6000 Together” to help you get started with hands-on repairs. However, it’s always better to be safe than sorry, so err on the side of caution and seek professional help when necessary.
Dealing with Electrical Issues
One of the more challenging issues that can arise with headphones is electrical damage. This could be anything from a short circuit to a damaged wire. Dealing with electrical issues is more complex than just gluing the headphones back together.
Short Circuit
A short circuit occurs when the electricity flows along an unintended path. This can cause the battery to overheat and potentially catch fire. If you suspect a short circuit within your headphones, stop using them immediately. Do not attempt to repair this on your own. Instead, bring them to a professional technician.
Exposed Wires
Exposed wires can be dangerous, especially if they come into contact with your skin. If your headphones have exposed wires, you should either bring them to a professional technician or replace them entirely. However, if you decide to repair them yourself, start by carefully examining the damaged wire and identifying where it is in need of repair. Then follow the previously stated steps to properly glue the headphones back together.
Loose Connections
Sometimes headphones will stop working because of a loose connection. This can happen if the wires inside the headphones break or become disconnected. If this is an issue, you can try a simple fix before calling a professional. First, check any visible connections for looseness and make sure they are tightly secured. If this doesn’t work, you may need to re-solder the connections.
Knowing how to deal with electrical issues with headphones is crucial for keeping you and your loved ones safe. Remember to always take the necessary precautions, especially when dealing with electricity. If you are unsure of how to repair electrical damage, it’s best to bring your headphones to a professional technician. And don’t forget to practice good habits to prevent damage in the future, such as proper storage and careful handling when traveling.
| Type of Electrical Issue | Actions to Take |
|---|---|
| Short Circuit | Stop using them immediately. Do not attempt to repair this on your own. Instead, bring them to a professional technician. |
| Exposed Wires | Bring them to a professional technician or replace them entirely. If you decide to repair them yourself, carefully examine the damaged wire and follow the previously stated steps to properly glue the headphones back together. |
| Loose Connections | Check visible connections for looseness and make sure they are tightly secured. If this doesn’t work, you may need to re-solder the connections. |
If you decide to repair your headphones yourself, make sure to use the appropriate safety gear and adhere to safe electrical practices. For more information on working with glue in electrical applications, check out our article on melting glue sticks. And if you’re curious about how to use glue to secure wires, read up on tucking with glue.
Tips for Preventing Damage
As frustrating as it is to have to glue your headphones back together, it’s even more frustrating to have to do it repeatedly due to preventable damage. Taking preventative measures can help ensure your headphones last longer and reduce the need for repairs. Here are some helpful tips to prevent damage and prolong the life of your headphones.
Store Properly
Properly storing your headphones can significantly increase their lifespan, saving you the hassle of having to glue them back together. Here are some tips on how to store your headphones properly:
| Tip | Description |
|---|---|
| Keep them in a case | Investing in a protective case is one of the best ways to store your headphones. It will keep them safe from impact, dust, and other damaging elements that can cause wear and tear. |
| Hang them up | For over-ear headphones, hanging them up on a hook or stand can be a great way to keep them organized and avoid getting tangled. Be sure to choose a safe and secure location to hang them. |
| Wrap them carefully | If you don’t have a case or a place to hang your headphones, you can wrap them carefully using a twist tie or a Velcro strap. This will help avoid tangling and keep them organized. |
| Avoid extreme temperatures | High temperatures can damage the plastic and rubber components of your headphones, while low temperatures can cause the glue to weaken or break. Try to store your headphones in a cool and dry place. |
By following these simple tips, you can avoid unnecessary damage to your headphones and ultimately extend their lifespan. Remember, prevention is always better than cure, so take the time to properly store your headphones to avoid having to glue them back together later on.
Travel with Care
When it comes to headphones, traveling can be one of the riskiest times for damaging them. Here are some tips to travel with care and avoid damaging your headphones:
| Tip | Description |
|---|---|
| Pack Properly | Make sure your headphones are securely stored in a protective case before you pack them in your luggage. This will prevent them from getting knocked around and potentially crushed. |
| Avoid Overstuffing | Avoid packing your headphones in an overstuffed bag or suitcase. When items are crammed together, the pressure can damage delicate parts of your headphones, such as the ear cups or headband. |
| Carry-On Your Headphones | Whenever possible, carry your headphones with you onto the plane instead of packing them in checked luggage. This will give you greater control over how they are handled during the journey. |
| Use a Travel Adapter | If you are traveling overseas or to a country with different electrical outlets, make sure to bring a travel adapter with you. This will prevent voltage damage to your headphones. |
| Avoid Extreme Temperatures | Keep your headphones at a moderate temperature during travel. Avoid leaving them in direct sunlight or in extreme cold as it can cause damage to the battery and other components. |
By following these travel tips, you can ensure your headphones remain intact and in good condition during your journey.
Choose Headphones with Durable Features
When shopping for headphones, it’s important to consider the durability of the product to avoid having to constantly repair or replace them. Look for headphones that have sturdy construction and durable materials, especially for the headband and connector points where the wires connect to the earpieces. Here are some other options to consider:
| Sweat-resistant | For those who like to exercise with their headphones, look for models that are sweat-resistant to prevent damage from moisture. |
|---|---|
| Foldable | Foldable headphones are perfect for those who travel frequently or are always on the go, as they take up less space and are less likely to break in transit. |
| Replaceable parts | Some models have replaceable ear cushions or cords, which can be helpful if a part becomes damaged or worn out over time. |
| Wireless | Wireless headphones eliminate the risk of damage to cords, making them a great option for those who are active or frequently on the move. |
| Noise-cancelling | Noise-cancelling headphones can help prevent damage from high volume levels or outside noise, as they allow the user to listen at lower volumes. |
Remember, investing in a durable pair of headphones can save you time and money in the long run. It’s important to consider your lifestyle and how you’ll be using the headphones before making a purchase to ensure you’re getting a product that will last.
Conclusion
In conclusion, repairing your headphones back to their former glory is a simple task that can be done with a few basic materials and some patience. By following the step-by-step guide provided in this article, you’ll be able to fix your broken headphones and save money on buying a new pair.
Remember to choose the right type of glue for your headphones. Epoxy and super glue are strong adhesives that provide a permanent fix, while craft glue and hot glue are better for temporary repairs.
It’s also important to properly clean and prepare the area before applying glue, and to hold and secure the headphones until the glue dries completely.
If you’re not confident in your repair skills or your headphones have more serious issues, it’s best to take them to a professional. This is especially important if you notice any electrical issues or damaged wires.
To prevent damage to your headphones in the future, store them properly and travel with care. Consider purchasing headphones with durable features such as reinforced cords or foldable designs.
Overall, repairing your broken headphones is a simple and rewarding task. With a little effort, you can extend the life of your headphones and enjoy your favorite music for years to come.
Frequently Asked Questions
Can I use any type of glue to fix my headphones?
No, not all types of glue are suitable for fixing headphones. It is recommended to use epoxy, hot glue gun, super glue or craft glue.
Is it easy to glue headphones back together?
Gluing headphones back together can be an easy process if you take the necessary steps and use the right materials.
Can I fix any type of headphone?
Although it is possible to fix most types of headphones, some may require professional assistance if the damage is severe or it involves electrical problems.
What is the best material to use for gluing headphones?
Epoxy is a strong and durable adhesive that is ideal for gluing headphones back together.
How do I know when to call a professional for headphone repairs?
You should call a professional for headphone repairs when dealing with electrical issues or wires in distress that may require specialized tools or knowledge to fix properly.
Can I prevent damage to my headphones?
Yes, you can prevent damage to your headphones by storing them properly, traveling with care, and choosing headphones with durable features.
What are the most common causes of headphone damage?
The most common causes of headphone damage include improper storage, rough handling during travel, and wear and tear over time.
How long should I wait for the glue to dry before using my headphones again?
You should wait at least 24 hours for the glue to dry completely before using your headphones again.
Is it safe to use headphones that have been glued back together?
Yes, it is safe to use headphones that have been glued back together as long as the adhesive used is safe and non-toxic, and the repair has been done properly.
Can I reuse broken parts of my headphones or should I replace them?
It is best to replace broken parts of your headphones as reusing them may compromise the quality of sound and comfort of use.