Introduction
Starting an interior painting project can be an exciting endeavor, but often overlooked is the importance of sanding. Many people believe that simply applying paint over old or rough surfaces will yield satisfactory results. However, without proper sanding, the final finish will suffer. In this article, we’ll discuss the benefits of sanding, the different types of sandpaper to use, and step-by-step instructions for sanding interior walls, ceilings, wood trim, and doors. With these tips, you’ll be able to achieve a professional finish that will make your home look brand new.
What is Sanding and Why is it Important
Sanding is a process of smoothing out surfaces by using abrasive materials such as sandpaper, steel wool or sanding sponges. It is one of the most critical steps when it comes to interior painting. Before you start the actual painting, sanding helps in preparing the surface by creating a smooth and even surface for the paint to adhere properly.
The importance of sanding cannot be overemphasized as it ensures that the walls, ceilings, or woodwork are free from bumps, rough areas, or old paint drips that could affect the final look of the painted surface. Sanding also helps in removing any old finish, dirt or debris that might have accumulated on the surface, which could reduce the paint’s adhesion.
If the surface isn’t sanded correctly, the paint’s finish could look uneven, bumpy, and unprofessional. The paint might also peel, crack, or bubble, which could lead to costly repairs down the line. Sanding helps to produce a clean uniform surface that not only looks good but also increases the life of the painted surface.
In addition to preparing the surface for painting, sanding also helps in creating a uniform surface for even paint coverage. It gets rid of any high spots on the wall or ceiling, which could cause the paint to build up, creating an uneven surface.
To achieve a smooth surface for painting, it is essential to sand the surface carefully and thoroughly while following the necessary steps. Proper preparation through sanding leads to a professional-looking finish that enhances the quality of the paint job.
Benefits of Sanding
Sanding may seem like a tedious and time-consuming task, but it offers a wide range of benefits that are essential for achieving a professional finish. Here are some of the most important benefits of sanding before painting:
| Benefits of Sanding |
|---|
| Removes Imperfections: Sanding helps to smooth out any rough or uneven surfaces on the walls, ceilings, and trim, creating a clean and even base for the paint to adhere to. |
| Improves Adhesion: Roughing up the surface through sanding allows the primer and paint to better adhere to the surface, creating a more durable and long-lasting finish. |
| Helps Hide Repairs: Sanding helps to blend in any repairs or patches on the walls or trim, creating a seamless finished look. |
| Provides a Smooth and Professional Finish: Sanding before painting creates a smooth surface that looks professional and polished, adding value to your home. |
| Increases Paint Coverage: Sanding helps to open up the pores of the surface, allowing the paint to better penetrate and cover the surface, which means less paint is needed for complete coverage. |
Additionally, sanding is an important step in the paint preparation process. Without proper preparation, paint may not adhere correctly and could peel, crack or chip. Sanding also ensures that any imperfections, such as scratches or dents, are eliminated before painting. It is especially important to sand surfaces that have been patched or filled with spackling compound, which can create a raised surface that needs to be leveled out through sanding. Sanding can also remove any residue from previous coatings, such as wallpaper paste, helping to create a fresh, clean working surface. It is important not to skip sanding before painting.
How to Prepare for Sanding
Before starting the sanding process, it’s important to prepare the area to ensure a smooth and successful finish. Here are a few steps to follow when preparing for sanding:
| Step 1: | Remove any wallpaper, loose paint, or debris from the surface. If there are any holes or cracks in the surface, fill them in with spackle or putty and allow it to dry completely. For more information on filling walls, check out our previous article. |
| Step 2: | Wash the surface with soap and water to remove any dirt or grease. For surfaces that are particularly grimy, use a mixture of water and trisodium phosphate (TSP) to clean the surface. Rinse the surface with clean water and allow it to dry completely. This step is important because sanding a dirty surface will only push more dirt and debris into the surface, making it difficult to paint. |
| Step 3: | Remove any hardware, such as outlet covers or light switch covers, from the surface. This will make it easier to sand around these areas and give a more professional finish. |
| Step 4: | Protect any areas that won’t be sanded or painted. Use painter’s tape or plastic sheeting to cover areas such as baseboards, floors, and furniture. This will prevent any accidental damage from the sanding process. For more information on protecting surfaces during painting and prep, check out our previous article. |
By following these steps, you can ensure that the surface is clean, smooth, and ready for sanding. This will result in a more professional finish and a longer-lasting paint job.
Types of Sandpaper to Use
When it comes to sanding, using the right type of sandpaper can make a significant difference in achieving a smooth and even surface. However, with so many different types of sandpaper available, it can be overwhelming to select the right one for your project. Understanding the different types of sandpaper and their recommended uses is crucial for achieving the best results. In this section, we will discuss the various types of sandpaper grits and provide guidance on which sandpaper to use for different surfaces.
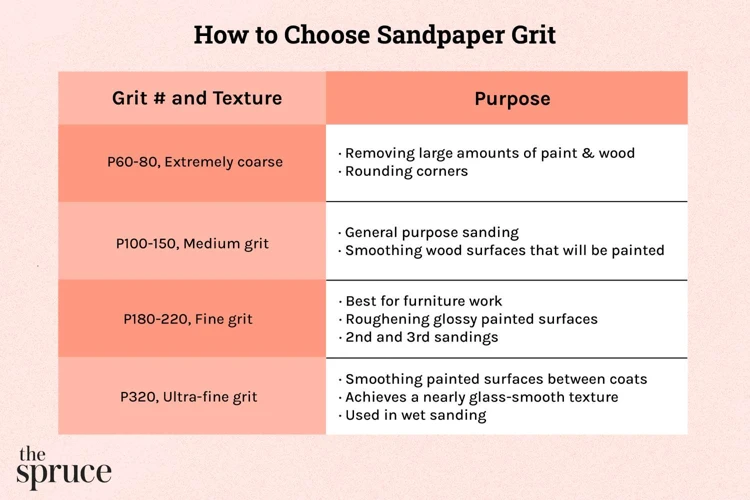
Types of Sandpaper Grits
When it comes to sanding, using the right sandpaper grit can make all the difference in achieving a smooth and even surface. Sandpapers are made of various materials and come in a range of grit sizes, which determine the coarseness or fineness of the abrasive particles on the sandpaper. Here are the common types of sandpaper grits you’ll need to know:
- Coarse grits: Coarse grit sandpaper is typically labeled between 40-60 grit and is more suitable for heavy-duty sanding tasks that involve removing rough surfaces or layers of paint, varnish, or rust. Coarse sandpaper is also appropriate for shaping or smoothing rough wood planks or joints.
- Medium grits: Medium grits ranges between 80-120 grit and designed to smooth surfaces that are rough to the touch, such as bare wood, painted or varnished surfaces, and drywall. This grit is ideal for removing minor scratches, blemishes, and imperfections, without being too abrasive.
- Fine grits: Fine grits, range between 150-180 grit, is used for light sanding tasks that involves removing minor surface imperfections, smoothing out wood grain and preparing surfaces for finish coatings. Fine sandpaper is also useful for sanding painted surfaces prior to adding another coat of paint.
- Extra-fine grits: Extra-fine grit sandpapers, such as 220-grit, are the finest sandpapers you can find. They are recommended for the final sanding between coats of paint or clear coat to ensure a ultra-smooth surface finish. They are also useful on delicate materials like plastics or soft woods requiring a very gentle touch.
It’s essential to match the sandpaper grit to the surface you’re working on to achieve the best results. Using coarser sandpaper than necessary can unnecessarily remove a lot of material and may leave behind unsightly scratches and swirl marks. On the other hand, using fine grit sandpaper on a rough surface will take too long and will not produce an even or level finish.
Which Sandpaper Grit to Use for Different Surfaces
When it comes to choosing the right sandpaper grit for different surfaces, it’s important to consider the type of material, the condition of the surface, and the level of fine-tuning required. Here’s a table with some general guidelines to help you select the right sandpaper grit:
| Surface Type | Recommended Grit |
|---|---|
| Fresh Drywall | 100-120 grit sandpaper |
| Previously Painted Walls | 120-150 grit sandpaper |
| Raw Wood | 60-80 grit sandpaper |
| Previously Painted Wood | 150-180 grit sandpaper |
| Metal | 220-400 grit sandpaper |
| Plastic | 220-400 grit sandpaper |
Keep in mind that these are general guidelines and may vary depending on the specific circumstances. If a surface is in particularly rough condition, you may need to start with a lower grit sandpaper and work your way up to a finer grit. Conversely, if a surface is already relatively smooth, you may be able to start with a higher grit sandpaper right away. Additionally, some surfaces may require specialized sandpaper (such as wet sandpaper for auto body work) that is not included in this table.
Always use caution and appropriate safety equipment (such as respirator masks) when sanding any surface to minimize hazards like dust inhalation.
How to Sand Interior Walls and Ceilings
When it comes to interior painting, sanding is an essential step that shouldn’t be skipped. A smooth, even surface is key to achieving a flawless finish. But sanding walls and ceilings can be a challenging task, especially if you’re a beginner. You may wonder how to prepare the surface, what type of sandpaper to use, and what technique to apply. In this section, we’ll guide you through the process of sanding interior walls and ceilings step-by-step, so that you can achieve a professional-looking result that will last for years to come.
Preparing the Surface for Sanding
One of the key steps of preparing for sanding is to ensure that the surface is clean and free from any debris. This helps to achieve a smooth and even finish. Here are some steps for preparing the surface for sanding:
Step 1: Remove any furniture or fixtures that may be in the way. Cover the floor and remaining fixtures with a drop cloth to protect them from any dust and debris.
Step 2: Inspect the surface for any cracks or holes. Fill them with spackle and let it dry completely. Sand the spackled area until it is smooth and even with the surrounding area.
Step 3: Clean the surface with soap and water. Make sure to remove any dirt, grease, or grime. Rinse with clean water and let it dry completely.
Step 4: Sand the surface with a coarse-grit sandpaper. This helps to remove any bumps or roughness. Be careful not to apply too much pressure, as it may damage the surface.
Step 5: Switch to a finer-grit sandpaper to achieve a smooth finish. Move the sandpaper in a circular motion or back and forth motion across the surface.
Step 6: Wipe the surface with a damp cloth to remove any dust and debris before painting.
By following these steps, you can ensure that the surface is clean and smooth, creating a perfect canvas for your painting project.
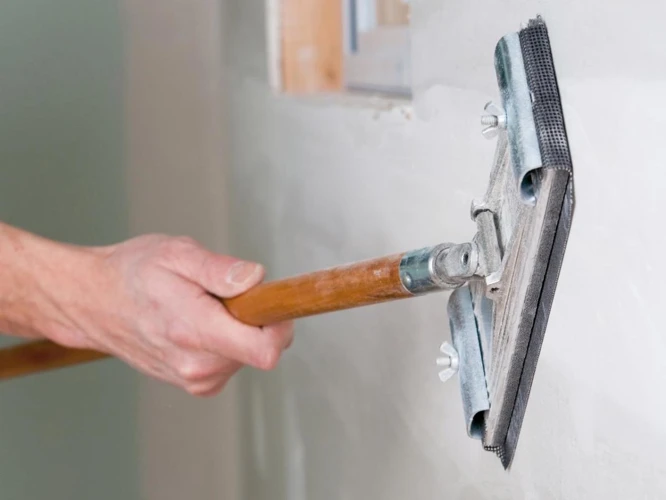
Sanding Techniques for Walls and Ceilings
Sandpaper is an essential tool for preparing interior walls and ceilings for painting. To achieve a professional finish, it is important to use the correct sanding techniques. Here are some recommended sanding techniques for walls and ceilings:
- Start with coarse sandpaper: When sanding walls and ceilings, start with coarse sandpaper with a low grit, such as 60 or 100. This will help remove any bumps or rough patches on the surface.
- Sand in a circular motion: To avoid creating uneven areas, sand in a circular motion. Don’t apply too much pressure, as this can cause damage to the surface.
- Use a sanding pole: To reach high points on ceilings or walls, use a sanding pole. This will help you avoid standing on a ladder and will allow you to comfortably reach those high areas.
- Change direction: Once you have sanded in a circular motion, change direction and sand horizontally or vertically. This will help ensure an even finish.
- Switch to finer grit sandpaper: After you have completed the first round of sanding with coarse sandpaper, switch to a finer grit, such as 220. This will help remove any remaining rough patches and create a smooth surface for painting.
By following these sanding techniques, you will ensure that your walls and ceilings are properly prepared for painting. Remember to take your time, use the right sandpaper grit, and avoid applying too much pressure to avoid any damage or unevenness.
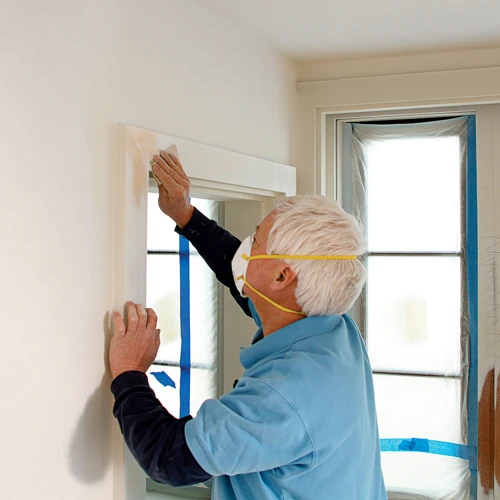
How to Sand Wood Trim and Doors

When it comes to painting interior spaces, sanding is a crucial step that should not be overlooked. However, sanding wood trim and doors can present its own set of challenges. It requires a delicate touch to achieve a smooth surface without damaging the wood. In this section, we will discuss the best practices for preparing and sanding wood trim and doors to ensure a professional finish. Let’s dive in and explore the intricacies of this important aspect of the painting process.
Preparing the Surface for Sanding
Before beginning the sanding process, it is essential to properly prepare the surface to ensure the best possible outcome. The following steps will help you prepare the surface for sanding:
| 1. Clean the surface: | Before sanding, remove any dirt, debris, or dust from the surface using a soft-bristle brush or a clean cloth. Any leftover debris can damage the sandpaper or create scratches on the surface. |
| 2. Repair any damages: | Inspect the surface for any damage, including cracks or holes. If you find any, repair them with spackle or wood filler and allow to dry completely according to the manufacturer’s instructions. |
| 3. Remove any hardware: | If you are working on wood trims or doors, remove any hardware such as handles, knobs, or hinges, to avoid sanding them by accident. |
| 4. Protect the surrounding area: | Cover the surrounding area, including floors, furniture or any other objects with a plastic drop cloth or sheet to avoid getting dust and debris all over them. |
By properly preparing your surface, you can ensure that your sanding process is efficient and effective in creating a smooth finished product. Don’t skip this crucial step to achieve a professional look to your interior paint job.
Sanding Techniques for Wood Trim and Doors
To achieve a smooth and perfect finish on wood trim and doors, proper sanding techniques should be applied. Here are some steps to follow:
- Step 1: Choose the right sandpaper grit. For raw wood trim, start with a coarse grit sandpaper such as 80 or 100. For finished wood trim, start with a finer grit such as 120, 150 or 180.
- Step 2: Remove any hardware or attachments. If there are any hinges or handles attached to the door or trim, remove them before sanding. This is to avoid scraping them and causing damage.
- Step 3: Prepare the surface. Use a damp cloth to wipe the surface of the wood trim or door. This will remove any surface dust and dirt that may be present. Make sure the surface is completely dry before sanding.
- Step 4: Sand along the grain. Use long, even strokes and sand in the direction of the grain on the wood. This will help to avoid damaging the surface. Be careful around corners and edges, as it is easy to over-sand and create an uneven finish.
- Step 5: Use the right pressure. Apply even, gentle pressure as you move the sandpaper over the surface of the wood trim or door. Too much pressure can cause unwanted scratches or uneven sanding.
- Step 6: Use multiple grits for a smooth finish. After sanding with the coarse grit, move on to a finer grit sandpaper such as 220 or 240. This will help to smooth out any rough areas left by the coarser grit sandpaper.
- Step 7: Wipe down the surface. After sanding with the finer grit, wipe down the surface of the wood trim or door with a clean, dry cloth. This will remove any remaining dust or debris and ensure a smooth finish for painting.
By following these sanding techniques for wood trim and doors, you can achieve a professional finish that is ready for painting. Remember to take your time and use the right sandpaper grit for the job at hand.
Clean Up After Sanding
After completing the sanding process, it is crucial to conduct proper clean up before moving forward with interior painting. Failure to do so can lead to paint adhering poorly and an unprofessional finish. Taking your time to clean the surfaces will ensure a smooth and even paint job that will last for years to come. In this section, we will discuss the steps necessary to effectively clean up dust and debris left behind after sanding. So, let’s roll up our sleeves and get started on making our surface ready for painting!
Removing Dust and Debris
After sanding, it’s important to remove all dust and debris from the surface before painting. Here are some steps to follow for a proper clean up:
- Use a vacuum cleaner: A vacuum cleaner with a brush attachment is ideal for removing dust and debris. Make sure to go over the entire surface area to ensure all the dust is removed.
- Wipe with a tack cloth: A tack cloth is a sticky cloth that picks up any remaining dust particles. Wipe the surface with the tack cloth to ensure all dust is removed.
- Check for debris: Look closely at the surface and check for any debris, such as small bits of sandpaper or wood chips. Remove any remaining debris with a small brush or cloth.
- Seal any remaining pores: Some surfaces, such as wood, may have small pores that can trap dust and debris. Use a sealer or primer to seal these pores and ensure a smooth finish.
Properly removing all dust and debris is essential to achieving a professional finish. Taking the time to do this step correctly will prevent any imperfections in the final paint job.
Preparing the Surface for Painting
Before painting, it’s important to properly prepare the surface to achieve a smooth and long-lasting finish. Here are some steps you should follow to prepare the surface for painting:
- Inspect the surface: Before starting the painting process, make sure the surface is free from any major damages or defects. If there are any holes, cracks or dents, fill them with spackle or putty and allow it to dry completely.
- Sand the surface: Once the spackle or putty is completely dry, sand the surface to make it smooth and even. Use a fine-grit sandpaper (220 grit or higher) for this process. Sanding the surface also helps to rough up any glossy or shiny areas, which will help the paint to adhere better.
- Clean the surface: Once the sanding is complete, it’s important to clean the surface thoroughly. Use a soft brush or vacuum cleaner to remove any dust or debris that may have accumulated on the surface. Be sure to clean every corner and crevice carefully, as even a small amount of dust or debris can cause issues during the painting process.
- Final inspection: After cleaning, re-inspect the surface to make sure it’s completely clean and dust-free. If you notice any areas that need additional sanding or cleaning, take care of it at this time.
Remember, proper preparation is key to achieving a smooth and long-lasting paint finish. So be sure to follow these steps before beginning any interior painting project.
Conclusion
As we come to the end of our article, it’s important to reflect on the essential role of sanding in achieving a professional and high-quality interior paint job. From preparing the surface to choosing the right sandpaper grit to mastering the sanding techniques, each step is crucial in creating the perfect canvas for your paint. The clean-up process after sanding is also important to ensure a smooth and dust-free surface. By following these steps and incorporating our sanding tips, you can achieve a flawless finish that will impress all who see it. Don’t underestimate the significance of sanding, as it truly sets the stage for a successful interior painting project.
Sanding Tips for a Professional Finish
Achieving a professional finish when sanding surfaces for interior painting requires attention to detail and careful execution. Here are some tips to help you get started:
- Choose the right sandpaper grit: Using the right sandpaper grit is crucial to the success of your project. A fine grit sandpaper (220-grit or higher) is ideal for a smooth finish on surfaces that are already in good condition. On the other hand, a coarser grit sandpaper (80-grit or lower) is better for removing old paint, rough spots, and scratches.
- Use a sanding block: A sanding block helps to ensure that the pressure is evenly distributed across the surface. This will help to prevent damage to the surface and make it easier to achieve a smooth finish.
- Sand in a circular motion: Sand the surface in a circular motion to avoid creating visible sanding marks. This will also help to prevent scratching the surface.
- Check your progress often: Sanding a surface is a gradual process, and it can be difficult to determine how much progress you’ve made just by looking at it. To make sure you’re on the right track and not removing too much material, stop sanding periodically and run your hand over the surface to feel for any uneven spots or roughness.
- Don’t skimp on sanding time: It’s important to take the time to sand the surface thoroughly, especially if there are any imperfections or rough spots. Rushing through the sanding process can lead to an uneven finish and make it harder to achieve a professional result.
- Clean up thoroughly: After sanding, it’s important to clean up any dust and debris to ensure that the surface is ready for painting. Use a vacuum or damp cloth to remove any remaining dust or debris, and allow the surface to dry completely before continuing with the painting process.
- Protect yourself: Sanding can create a lot of dust, which can be harmful if inhaled. Wear a dust mask and eye protection to protect yourself from airborne particles.
By following these sanding tips, you can help ensure that your surfaces are properly prepared for painting and achieve a professional-looking finish.
Importance of Sanding for Interior Painting
Proper sanding is critical for achieving a smooth, professional-looking finish on interior walls, ceilings, wood trim, and doors. Neglecting to sand surfaces before painting can result in a variety of unpleasant outcomes such as rough patches and bumps, peeling and cracking paint, uneven coverage, and an overall unrefined appearance. In other words, skipping this crucial preparation step could ultimately defeat the purpose of the paint job.
Why is sanding so important for interior painting?
Sanding is the process of removing surface imperfections and creating a smooth, even surface for painting. On walls and ceilings, sanding eliminates unsightly bumps and ridges, ensuring the paint adheres evenly and has a consistent look. For wood trim and doors, sanding is especially important as it removes any loose, splintered or chipping paint, ensuring the new coat will adhere properly and last longer.
What are the benefits of sanding before painting?
Sandpaper removes any roughness, old paint, debris or impurities that could cause issues during painting. It also provides an even texture that reduces the risk of brush or roller strokes creating unsightly patterns or uneven color coverage. Proper sanding also helps create an ideal environment for new paint to adhere, ensuring it lasts longer and looks better.
What are the consequences of skipping sanding?
Skipping sanding, while tempting to save time, could result in a painting disaster, particularly on wood surfaces. If you apply new paint directly to an old, peeling surface, the old paint will continue to peel and pull away, taking the new paint with it. Bumps and rough spots will also be amplified and highlighted by the new paint, creating an unprofessional and unsightly look. Skipping sanding could ultimately result in having to redo the entire project, causing frustration and extra expenses.
By ensuring thorough sanding before painting, you’ll create a smooth, even surface that allows paint to adhere better and last longer. Taking the time to do it right the first time can save time, hassle, and expenses down the road.
Frequently Asked Questions
What is the purpose of sanding before painting?
Sanding helps to smooth out any rough areas or imperfections on the surface, making it easier for the paint to adhere and resulting in a more even and professional-looking finish.
What materials can be sanded before painting?
Most interior surfaces can be sanded before painting, including walls, ceilings, wood trim, and doors.
Do I need to sand all surfaces before painting?
Not necessarily. Surfaces that are already smooth and even may not require sanding. However, if there are any rough or uneven areas, sanding may be necessary to achieve a professional finish.
What type of sandpaper should I use?
The type of sandpaper you use will depend on the surface you are sanding and the desired level of smoothness. Generally, a medium-grit sandpaper (such as 120-grit) is a good choice for most surfaces.
What safety precautions should I take when sanding?
It is important to wear a dust mask and safety goggles to protect your lungs and eyes from airborne dust particles. Additionally, ensure that the work area is well-ventilated.
How do I know when I’ve sanded enough?
You can test the smoothness of the surface by running your hand over it. If it feels smooth and even, you may have sanded enough. Additionally, the surface should be free of any visible scratches or rough areas.
Can I use a sanding machine instead of sandpaper?
Yes, a sanding machine (such as a palm sander or orbital sander) can be used to speed up the sanding process. However, it is important to use the proper technique and avoid over-sanding or creating grooves in the surface.
How do I clean up after sanding?
Use a vacuum or tack cloth to remove any dust or debris from the surface. It is important to ensure that the surface is completely clean and free of dust before painting.
Can I skip sanding if I’m using a primer?
While using a primer can help the paint adhere better to the surface, it is still recommended to sand beforehand to ensure a smooth and even surface.
How long does sanding take?
The amount of time it takes to sand a surface will depend on the size and condition of the area being sanded. Small areas may only take a few minutes, while larger areas may take several hours.