Woodworking projects have always captured the imagination of people – the thought of creating something unique and beautiful from scratch is enticing. But, knowing the right take on each task is critical. One of the vital aspects of woodworking is selecting the right adhesive and fastening agent for your project. And, the option that often comes up is woodworking glue and screws. But, why use wood glue and screws for your woodworking projects? In this article, we’ll discuss the benefits of using both together. We’ll look at the different types of wood glues and screws that are available and how to use them to create a more robust and durable outcome. Follow us as we guide you step-by-step on why you should consider wood glue and screws in your next woodworking project.
The Benefits of Using Wood Glue and Screws Together
Combining wood glue and screws is a tried and tested method of joining wood pieces together in woodworking projects. Wood glue and screws may seem like an odd pairing, but the two materials complement each other perfectly. The use of both materials together offers numerous advantages over using just one. In this section, we will explore the benefits of using wood glue and screws together and how they can significantly improve the quality of your woodworking project. So let’s dive in and see why this combination is a go-to for many woodworkers.
1. Improved Holding Power
Improved Holding Power is one of the key benefits of using wood glue and screws together in woodworking projects. This means that when you use glue and screws together, you create a joint that is much stronger than if you were to use either one on its own.
Wood glue is perfect for holding pieces of wood together, but its holding power can be compromised over time due to factors such as moisture and temperature changes. Meanwhile, screws can provide strong holding power, but they can also loosen over time and may not be strong enough to hold wood pieces together on their own.
When you combine the use of wood glue and screws, you can create a joint that is more sturdy and secure, ensuring that your woodworking projects last longer.
Here is a table that highlights the benefits of using wood glue and screws together:
| Using Wood Glue only | Using Screws only | Using Wood Glue and Screws Together |
| Provides good holding power initially | Provides strong holding power initially | Provides improved holding power compared to using either one on its own |
| May weaken over time due to changes in moisture and temperature | May loosen over time, compromising the hold | Creates a joint that is more sturdy and secure, ensuring that woodworking projects last longer |
Internal link: If you want to learn how to make a paper car without glue, check out our article on how to make a paper car without glue.
2. Better Joint Strength
Using wood glue and screws together can result in better joint strength, which is a crucial factor to consider when working on woodworking projects. By complementing each other, the glue and screws create a firm and long-lasting joinery that can withstand regular wear and tear. The following are some of the reasons why combining wood glue and screws can give better joint strength:
- Glue fills gaps: While screws pull two pieces of wood together, it doesn’t necessarily mean there aren’t any gaps between them. Wood glue helps to fill these gaps and creates a seamless bond, making the joint stronger and more secure.
- Glue absorbs shock: One of the major advantages of using wood glue is that it can absorb shock and prevent the joint from cracking. This is especially helpful for furniture or other pieces that are frequently moved or exposed to pressure.
- Screws provide reinforcement: While wood glue creates an adhesive bond between two pieces of wood, screws provide reinforcement to prevent the joint from separating. They act like clamps, holding the pieces together, and distribute the pressure evenly along the joint line.
Combining wood glue and screws in woodworking projects can result in a strong and long-lasting joint. However, it’s important to keep in mind that using the right type of glue and screws is critical and can vary depending on the project. If you want to learn more about different ways to stick wood together, read our article “How to Stick Wood Together Without Glue”.
3. Enhanced Durability
Using wood glue and screws together in a woodworking project can lead to enhanced durability of the final product. This is because the combination of the two creates a strong bond that can withstand various external factors such as pressure, weight, and weather conditions.
Wood glue penetrates wood fibers and creates a bond that is often stronger than the wood itself. When combined with screws, it creates a powerful hold that increases the overall durability of a joint.
Screws also play a major role in increasing the durability of a woodworking project. They create mechanical strength that keeps two pieces of wood together. When glued, the screw acts as a clamp, providing extra support to the joint as the glue dries. Additionally, screws can be adjusted or replaced if necessary, unlike nails which can damage the wood fibers when removed.
Combining wood glue and screws in woodworking projects can increase the lifespan of the final product, making it more durable and long-lasting. However, it’s important to choose the right type of glue and screws for each project to ensure maximum durability.
Not using the right adhesive or screw for a particular type of wood or environment can lead to joint failure and decrease the overall durability of the project. For instance, using inappropriate glue or screw for outdoor furniture can cause moisture to seep in and encourage decay and rot. It’s essential to take into account the specific requirements of each project and adapt accordingly.
Edible glue with corn syrup is a great alternative to regular glue when working with children or when the final product may come in contact with food. In contrast, freezing glue can have a detrimental effect on its quality, so it’s essential to store it at room temperature.
Table: Comparison of Screw Types for Woodworking Projects
| Type | Size | Usage |
|---|---|---|
| Wood Screws | 4-16 gauge | For joining two wooden pieces together |
| Drywall Screws | 6-10 gauge | For attaching drywall sheets to wooden frames |
| Deck Screws | 8-10 gauge | For outdoor projects or attaching decking boards |
| Lag Screws | 1/4 inch to 1 inch | For heavy-duty joining and attaching wooden parts to walls or floors |
Combining wood glue and screws can enhance the durability of any woodworking project when used appropriately. Choosing the right type of glue and screws for each project and keeping the workspace clean and organized are also crucial factors in ensuring a long-lasting and sturdy final product.
Types of Wood Glues and Screws
Exploring the different kinds of wood glues and screws that are available can help you make informed decisions about the materials you use for your woodworking projects. Each type of glue and screw has unique benefits and drawbacks, so it’s vital to understand the differences before choosing the safest and most reliable ones. In the next section, we’ll dive deeper into the specific types of glues and screws that are commonly used in woodworking projects.
1. Wood Glue
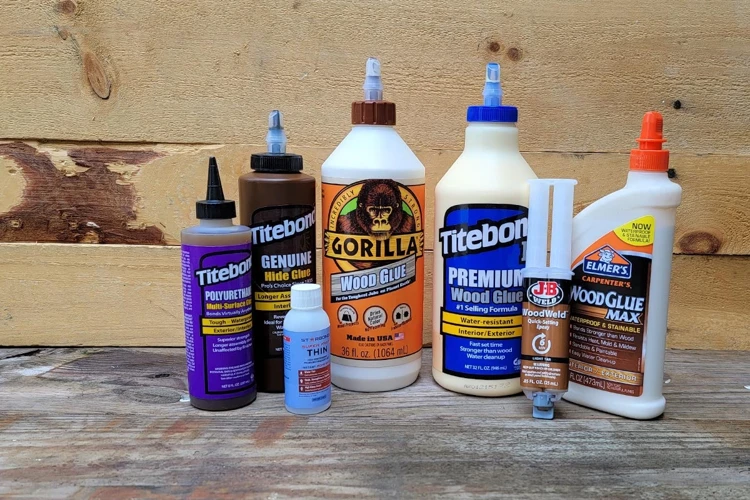
When it comes to woodworking projects, wood glue is an essential component that helps to create a strong and durable bond between wood pieces. There are different types of wood glue available on the market, each with its own unique features and benefits. Choosing the right glue for your project can make a significant difference in the final outcome. Let’s take a closer look at some of the most popular types of wood glue.
| Type of Wood Glue | Description | Benefits |
|---|---|---|
| PVA (Polyvinyl Acetate) Glue | Also known as white glue or school glue, PVA glue is water-based and easy to clean up. It dries clear and is suitable for a wide range of woodworking projects. | – Easy to use and clean up – Dries clear – Versatile – Inexpensive – Non-toxic |
| Polyurethane Glue | Also known as Gorilla glue, polyurethane glue is a waterproof adhesive that expands as it dries, filling any gaps in the joint. It can be challenging to work with and requires moisture to cure properly. | – Waterproof – Fills gaps in joints – Dries hard and durable – Can be sanded and painted over |
| Cyanoacrylate Glue | Also known as superglue, cyanoacrylate glue dries quickly and creates a strong bond between two surfaces. It is best used for small projects and repairs and can be challenging to remove once cured. | – Dries quickly – Creates a strong bond – Suitable for small projects and repairs – Can be used on a variety of materials |
| Epoxy Glue | Epoxy glue consists of two parts – a resin and a hardener – which must be mixed together before use. It dries hard and is suitable for bonding wood, metal, and other materials together. | – Strong and durable – Suitable for a variety of materials – Can be used to fill gaps and cracks in joints – Waterproof |
Choosing the right type of wood glue for your project depends on several factors, such as the type of wood being used, the size of the project, and the amount of time and effort required. It’s always recommended to read the manufacturer’s instructions before using any glue to ensure the best results.
Pro tip: When using wood glue for your project, make sure to clamp the pieces together for at least a few hours to allow the glue to dry properly and create a strong bond.
Internal link: If you’re interested in learning more about how to use glue for other types of projects, such as cake decorating, check out our article on how to glue fondant.
2. Screws
When it comes to woodworking projects, screws are an indispensable component for creating strong and long-lasting joints. They are available in a wide variety of sizes, lengths, and materials, making it easy to find the right ones for any project. Generally, screws are made of either steel, brass, or stainless steel, each with its own set of benefits and drawbacks.
Steel screws are the most common type and are affordable. They are strong and durable, but they can rust over time and are not recommended for outdoor use or humid environments.
Brass screws are corrosion-resistant and have a decorative appearance. They are often used in furniture making or other projects where the hardware is visible, but they are not as strong as steel screws and may not be suitable for heavy-duty applications.
Stainless steel screws are the most expensive but also the most durable and corrosion-resistant option. They are often used in outdoor projects or in areas with high humidity levels where other screws may rust.
In addition to different materials, screws also come in different head styles, such as flathead, pan head, and round head, each with their own advantages. Flathead screws sit flush with the surface of the wood, making them ideal for situations where a smooth surface is important, while pan head screws are slightly rounded and provide a larger surface area for driving the screw. Round head screws are the most common type and offer excellent holding power and ease of use.
Screws are an important component of any woodworking project and choosing the right type of screw can make a big difference in the overall strength and durability of the finished product.
How to Use Wood Glue and Screws Together in Woodworking Projects

As mentioned earlier, the combination of wood glue and screws provides a reliable and sturdy joint that is ideal for woodworking projects. However, a proper technique needs to be followed for optimal results. In this section, we will discuss how to effectively use wood glue and screws together for your projects. These techniques will help you achieve the best possible hold and produce long-lasting results. So, let’s dive right into the steps that you need to follow.
1. Choose the Right Type of Glue and Screws
Choosing the right type of glue and screws is crucial to ensure the strength and durability of your woodworking project. When it comes to selecting the right glue, you can choose between PVA glue, polyurethane glue, epoxy glue, hide glue, and cyanoacrylate glue. PVA glue, also known as the yellow glue, is great for general purpose woodworking projects and it is easy to clean up. Polyurethane glue, also known as Gorilla glue, is water-resistant and suitable for outdoor projects. Epoxy glue is known for its strong and permanent bond, and it is ideal for joining two different types of wood together. Hide glue is a natural glue that offers excellent holding strength and is easy to reverse. Finally, cyanoacrylate glue, also known as super glue, is fast-drying and best suited for small woodworking projects.
Now, when it comes to selecting screws, you have options like wood screws, deck screws, drywall screws, and sheet metal screws. It is important to choose screws that are designed for woodworking and have sufficient length and width to ensure a secure bond. Wood screws are specifically designed for woodworking projects and have a large diameter that helps in providing a solid grip. Deck screws are suitable for outdoor projects as they are coated to protect against corrosion. Drywall screws have a tapered shape and are ideal for woodworking projects that require sinking of the screw head below the wood surface. Sheet metal screws are not designed for woodworking projects as they are meant for attaching thin sheets of metal to other materials.
It is recommended to choose the right glue and screws based on your woodworking project requirements. For example, if you are building outdoor furniture, it is best to go for polyurethane glue and deck screws as they are water-resistant and can prevent corrosion. Similarly, if you are building a wooden toy, choosing PVA glue and wood screws will suffice. Remember to choose the right glue and screws combination that ensures a long-lasting and sturdy bond for your woodworking project.
2. Apply the Glue Properly
Proper application of wood glue is essential for a strong and lasting bond. First, make sure to choose the right type of glue based on the project you are working on and the type of wood you are using. There are different types of wood glue available in the market, including PVA, epoxy, polyurethane, hide glue, and cyanoacrylate glue, among others.
Once you have the right type of wood glue, apply a sufficient amount of glue to both surfaces that will be joined together. Use a brush, a roller, or your finger to spread the glue evenly. Be careful not to apply too much glue because excess glue can cause wood to warp, and the excess glue will have to be wiped away, which can create a mess.
Next, ensure that the surfaces being joined are free from dirt, dust, and other debris. Use a clean cloth or rag to wipe the surfaces to be joined before applying the glue. Dust and debris can prevent the glue from penetrating the wood and weaken the bond. They can also create voids in the finished product, which can affect the appearance of the project.
After applying glue to both surfaces, clamp the pieces together using a quality clamp. This step ensures that the wood pieces are held tightly together while the glue dries, creating a strong bond. Allow sufficient drying time for the glue according to the manufacturer’s directions.
Finally, wipe off any excess glue that may have seeped out from the joint using a cloth or rag. Remember that excess glue, when dried, can be difficult to remove, which can impact the appearance of your project.
Here is an HTML table that summarizes the steps to properly apply wood glue:
| Step | Description |
|---|---|
| Step 1 | Choose the right type of glue |
| Step 2 | Apply an even layer of glue to both surfaces |
| Step 3 | Ensure surfaces are clean |
| Step 4 | Clamp the pieces tightly together |
| Step 5 | Allow to dry according to manufacturer’s directions |
| Step 6 | Wipe off excess glue |
Properly applying wood glue is essential for a strong and lasting bond. Following these steps will help you achieve the best results in your woodworking projects.
3. Pre-Drill Holes for Screws
Pre-drilling holes for screws is an important step when using wood glue and screws together in woodworking projects. Pre-drilling helps prevent the wood from splitting when the screw is inserted and also ensures that the screw is properly aligned and securely fastened.
To pre-drill holes for screws, you will need a drill and a drill bit that is slightly smaller in diameter than the screw. The depth of the hole should also be slightly shorter than the length of the screw. The optimal size of the drill bit will depend on the thickness of the wood and the size of the screw.
It is recommended that you use a drill bit that is roughly 2/3 the diameter of the screw. For example, if you are using a 1/2 inch screw, you should use a 1/4 inch drill bit.
When pre-drilling holes for screws, it’s important to:
| Step | Description |
|---|---|
| 1. Mark the spot | Use a pencil to mark the spot where you want to insert the screw. This will help ensure that the hole is properly aligned. |
| 2. Set the drill bit | Attach the appropriate size drill bit to your drill. Make sure it is securely in place. |
| 3. Drill the hole | Hold the drill perpendicular to the wood and slowly make a hole at the marked spot. Be careful not to drill too deeply. |
| 4. Remove debris | Use a brush or a piece of cloth to remove any debris or sawdust from the hole. |
By pre-drilling the holes for screws, you can ensure that the screw will be properly aligned and fastened, which will help to improve the strength and durability of the joint. Additionally, pre-drilling can help to prevent the wood from splitting, which is especially important when working with thinner or softer wood.
Always remember to adjust the size and depth of the drill bit based on the size of the screw being used, and to be careful not to drill too deeply and damage the wood.
4. Screw the Pieces Together
After pre-drilling the holes, it’s time to screw the pieces together. The screws create a strong bond that will keep the pieces from pulling apart, especially when combined with wood glue. The screws should be long enough to go through both pieces of wood and come out the other side without protruding.
One way to ensure that screws are placed in the right spot is to use a countersink bit, which creates a depression that the screw head can sit in. This ensures that the screw will be flush with the surface of the wood. It also allows you to fill in the depression with wood filler later on for a seamless finish.
When using screws, it’s important to keep in mind that they may split the wood if not used properly. To avoid this, choose a screw that is the correct length for the wood thickness and pre-drill the holes. The pre-drilled holes will allow the screws to go in smoothly without splitting the wood. It’s also important to use the right type of screw for the job. For example, a flat-head screw is ideal for countersinking, while a round-head screw is often used for construction projects.
It’s important to apply the screws tightly, but not too tight that it damages the wood. Over-tightening can cause the wood to split, which can weaken the bond between the two pieces. Once the screws are tightened, wipe off any excess glue with a damp cloth. After that, let the glue dry completely before sanding or staining.
To summarize, screwing the pieces together is a crucial step in creating a strong bond between two pieces of wood. Choosing the right screws and pre-drilling the holes will ensure that the screws go in smoothly without splitting the wood. It’s important to avoid over-tightening the screws and wipe off excess glue with a damp cloth. By carefully following these steps, your woodworking project will have a strong, secure joint that will last for years to come.
5. Clamp the Pieces Together
When using wood glue and screws in woodworking projects, clamping the pieces together is an important step to ensure a strong and sturdy joint. Clamps are used to hold the pieces of wood together while the glue dries and the screws are properly set.
1. Choose the Right Clamps: When choosing clamps, it is important to choose ones that are large enough for the project and have enough clamping pressure to hold the pieces together tightly. There are different types of clamps available such as bar clamps, pipe clamps, and c-clamps. Choose the one that best suits your project needs.
2. Positioning the Clamps: Positioning the clamps in the right way is important to ensure that the pieces of wood are held tightly together. Before applying the clamps, make sure that the wood pieces are properly aligned and flush with each other. Apply the clamps with even pressure along the length of the joint.
3. Check Alignment: Before tightening the clamps, check the alignment of the wood pieces and make sure that they are flush with each other. Once you are sure they are aligned, tighten the clamps until the glue starts to squeeze out of the joint.
4. Leave to Dry: Leave the clamps in place until the glue has fully dried. The amount of time required for the glue to dry depends on the type of glue being used. Check the manufacturer’s recommendations for drying times.
By clamping the pieces of wood together, the pressure is evenly distributed, and the glue has a better chance of bonding the wood together. This results in a stronger joint, making the woodworking project more durable and long-lasting.
Super glue can also be used for woodworking projects, but it is not recommended as it does not hold as strong as wood glue and does not allow for any movement of the joint. When using super glue, clamping may not be necessary as it sets quickly, but it is still recommended to clamp it to ensure a proper bond.
Clamping the pieces together is an essential step when using wood glue and screws in woodworking projects. By choosing the right clamps, positioning them properly, and leaving them to dry, you can ensure a strong and durable joint that will last for years to come.
Tips for Using Wood Glue and Screws Together
After learning about the benefits of using wood glue and screws together, it’s important to know some tips on how to use them effectively. These tips will help ensure that your woodworking projects are successful and long-lasting. Here are some useful tips for using wood glue and screws together in woodworking projects.
1. Choose the Right Glue and Screws for Different Projects
When it comes to woodworking projects, choosing the right type of glue and screws is crucial. Using the wrong type of glue and screws may result in weak joints that can easily break or come apart. For instance, if you’re working on a project that involves exterior use or exposure to water, then you should opt for a water-resistant or waterproof type of glue and screws. It’s essential to read the labels and specifications before purchasing.
Different types of wood glues are suitable for different purposes; some dry clear, while others have a yellow or brown tint. If you’re looking for a glue that dries quickly, then a cyanoacrylate-based glue may be your best bet. Conversely, if you need a glue that allows you more work time, a polyurethane-based glue may be the way to go. Choosing the right size and length of screws can significantly affect the holding power of joints.
When it comes to choosing the right glue and screws, it’s also important to consider the material you’re working with. For softwoods and thinner pieces of wood, a thin and fast-setting glue like cyanoacrylate will work best. On the other hand, for hardwoods, a thicker and more viscous glue will be needed to minimize penetration and maximize bonding.
In conclusion, making the right choices for your glue and screw needs can seem overwhelming, but the choice lies in understanding the project’s requirements and materials used. Reading the specifications provided by the manufacturers is essential in making informed purchases. It’s best to start with small projects and work yourself up to bigger and more complicated ones as you gain experience with different types of glue and screws.
2. Keep Glue and Screws Handy
It’s vital to have your glue and screws within easy reach when working on a woodworking project. Having them easily accessible will save you time and effort. Ensure that you have sufficient quantities of both glue and screws so that you don’t run out halfway through your project. You can create a checklist of the materials you need before starting your project so that you don’t forget anything.
Storing the glue and screws properly is also essential to ensure their longevity. Consider keeping them in a cool, dry place that is free of moisture. Humidity can cause the glue to lose its effectiveness, reducing its adhesive strength. Similarly, keeping your fasteners dry can prevent rust and corrosion.
When keeping glue on hand, it’s also important to check the expiration date. Using expired glue can reduce its bonding strength, which ultimately affects the durability of your project. Additionally, expired glue may become lumpy or separated, making it challenging to apply.
Having glue and screws handy not only saves you time but can also help you ensure that the project’s quality is not compromised. You can also reduce the chances of misplacing them by keeping them in a dedicated toolbox, which will also help you stay organized.
Keep your glue and screws within reach to save time and ensure the quality of your woodworking project. Store them in a dry and cool place, check the expiration dates of the glue, and keep them together in a dedicated toolbox.
3. Keep the Workspace Clean
Keeping the workspace clean is essential when using wood glue and screws in woodworking projects. Sawdust and debris can contaminate the bond and prevent the glue from adhering properly, compromising the joint strength and durability.
Here are some tips for keeping your workspace clean:
- Clear the Area: Before you start your project, clear the workspace of any debris, sawdust, or other materials that might get in the way. This will help you stay organized and prevent any clutter from getting in your way.
- Use a Vacuum: A shop vac or dust collection system can also help to keep your workspace clean by removing sawdust from the area before it has a chance to settle on your project.
- Wipe the Surface: Before applying the glue, use a clean, dry cloth to wipe down the surface of the wood to remove any remaining dust or debris.
- Keep Glue Containers Closed: When not in use, keep your glue containers closed and stored off the ground to prevent dust and debris from falling into them.
- Dispose of Waste Properly: After completing your project, make sure to dispose of any leftover glue, screws, or other materials properly. This will help to keep your workspace clean and organized, and it will also prevent any potential safety hazards.
By keeping your workspace clean and organized, you’ll be able to achieve better results when using wood glue and screws in your woodworking projects, ensuring that your joints are strong and durable for years to come.
If you want to learn more about using glue in different DIY projects, check out this tutorial on how to glue envelope liners.
4. Clamp the Pieces Together with Care
When it comes to clamping the pieces together while using wood glue and screws, it’s important to proceed with care to ensure the pieces are properly adhered and secured. Below are some tips to help with clamping:
- Choose the right type of clamp: Depending on the size and shape of the project, there are different types of clamps that can be used. C-clamps, bar clamps, and pipe clamps are all popular options in woodworking and can be found at hardware stores or online.
- Apply even pressure: When using clamps, it’s important to apply even pressure to the pieces being joined together. This will help ensure that there are no gaps in the joint and that the pieces adhere properly.
- Don’t over-tighten: While it’s important to apply enough pressure to properly join the pieces, it’s possible to over-tighten clamps and cause damage. Be sure to tighten the clamps gradually and check the joint periodically to make sure it’s holding.
- Use protection: When using clamps, it’s possible for them to leave marks or indentations on the wood. To prevent this, place a piece of scrap wood or felt between the clamp and the project.
By following these tips for clamping your wood glue and screw joints properly, you can ensure that your woodworking projects will come out strong and durable. Don’t underestimate the importance of using clamps and applying even pressure to ensure a secure hold.
Note: If you’re interested in other types of glues for different projects, you can check What Kind of Glue for Pool Cue Tips? or if you’re looking for alternative slime-making options How to Make Clear Slime Without Glue.
Conclusion
In conclusion, using wood glue and screws together in woodworking projects can greatly enhance the holding power and joint strength of the finished piece, as well as increase its overall durability. By choosing the right type of glue and screws for your project and properly applying them, you can ensure a secure and long-lasting bond. It’s important to keep your workspace clean and to clamp the pieces together carefully during the gluing and screwing process. And don’t forget to keep your glue and screws handy for future projects. Whether you’re a beginner or an experienced woodworker, incorporating these techniques into your projects can make all the difference. So next time you’re working on a woodworking project, consider using wood glue and screws together for a stronger, more durable finished product.
Frequently Asked Questions
1. What is the best type of wood glue to use for woodworking projects?
The best type of wood glue to use for woodworking projects is usually PVA (polyvinyl acetate) glue, which provides a strong, durable bond and is easy to use.
2. Can you use wood glue and screws on different types of wood?
Yes, wood glue and screws can be used on different types of wood, but it’s important to choose the right type of glue and screws for the project and the type of wood being used.
3. How long does it take for wood glue to dry before screwing the pieces together?
The drying time for wood glue varies depending on the type of glue, but it’s typically recommended to wait at least one hour before screwing the pieces together to ensure a strong bond.
4. Do you need to use clamps when using wood glue and screws together?
Yes, using clamps is recommended when using wood glue and screws together to ensure a tight, secure bond between the pieces being joined.
5. Can you remove screws from wood that has been glued together?
Yes, it’s possible to remove screws from wood that has been glued together, but it may be difficult and could damage the wood in the process.
6. Are there different types of screws to use for different types of wood?
Yes, different types of screws are recommended for different types of wood and projects, such as self-tapping screws for hardwoods and exterior screws for outdoor projects.
7. How much wood glue and how many screws do you need for a project?
The amount of wood glue and number of screws needed for a project varies depending on the size and complexity of the project, but it’s always best to have extra on hand to ensure a strong, secure bond.
8. Can you use wood glue and screws to repair broken furniture?
Yes, wood glue and screws can be used to repair broken furniture, but it’s important to choose the right type of glue and screws for the specific repair needed.
9. Should you sand the wood before applying glue and screws?
Yes, sanding the wood before applying glue and screws is recommended to ensure a smooth surface and better bond between the pieces being joined.
10. Is it okay to use wood glue and screws on painted or finished wood?
Yes, wood glue and screws can be used on painted or finished wood, but it’s important to sand down the finish before applying the glue to ensure a strong bond.